
User Manual
Page 7
... the shutter speed and aperture displays from turning off ? Can I restore Custom Setting defaults? How do I get more information on a different D700 camera? How do I save menu settings for daylight savings time? Key phrase Help Using the menus My Menu Recent settings See page 31 26 364 368 v Can I change the self-timer delay? How...
... the shutter speed and aperture displays from turning off ? Can I restore Custom Setting defaults? How do I get more information on a different D700 camera? How do I save menu settings for daylight savings time? Key phrase Help Using the menus My Menu Recent settings See page 31 26 364 368 v Can I change the self-timer delay? How...
User Manual
Page 9
... bracketing 131, 315 Can I reduce "red-eye"? Flash photography, flash 185 How can I create multiple copies of a photo White balance using different white balance settings? Flash sync speed 305 Can I record multiple shots as a single photograph? mode, red-eye reduction 188 How can I pick the standard exposure level? Vignette ... (aperture-priority auto) 119 Can I vary exposure or flash level Exposure and flash automatically over a series of photographs? vii Long time-exposures (A) 124 Can I set both foreground and background in focus?
... bracketing 131, 315 Can I reduce "red-eye"? Flash photography, flash 185 How can I create multiple copies of a photo White balance using different white balance settings? Flash sync speed 305 Can I record multiple shots as a single photograph? mode, red-eye reduction 188 How can I pick the standard exposure level? Vignette ... (aperture-priority auto) 119 Can I vary exposure or flash level Exposure and flash automatically over a series of photographs? vii Long time-exposures (A) 124 Can I set both foreground and background in focus?

User Manual
Page 11
...? Print set (DPOF) See page 255 257 238 243 244 247 253 Optional Accessories Question Key phrase What optional flash units (Speedlights) can I print the date on TV? Television playback Can I print photos without a computer? Printing via USB Can I use the camera to create... of NEF (RAW) photographs? Compatible lenses What AC adapters, battery packs, remote cords, and viewfinder Other accessories accessories are available for my camera? Can I use ? Other accessories See page 377 370 385 390 388 ix What memory cards can I copy photos to my computer?...
...? Print set (DPOF) See page 255 257 238 243 244 247 253 Optional Accessories Question Key phrase What optional flash units (Speedlights) can I print the date on TV? Television playback Can I print photos without a computer? Printing via USB Can I use the camera to create... of NEF (RAW) photographs? Compatible lenses What AC adapters, battery packs, remote cords, and viewfinder Other accessories accessories are available for my camera? Can I use ? Other accessories See page 377 370 385 390 388 ix What memory cards can I copy photos to my computer?...

User Manual
Page 14
... 184 Using the Built-in Flash 185 Flash Modes 188 Flash Compensation 190 FV Lock 192 Other Shooting Options 195 Two-Button Reset: Restoring Default Settings 196 Multiple Exposure 198 Interval Timer Photography 203 Non-CPU Lenses 210 Using a GPS Unit 213 xii
... 184 Using the Built-in Flash 185 Flash Modes 188 Flash Compensation 190 FV Lock 192 Other Shooting Options 195 Two-Button Reset: Restoring Default Settings 196 Multiple Exposure 198 Interval Timer Photography 203 Non-CPU Lenses 210 Using a GPS Unit 213 xii

User Manual
Page 15
... 260 Delete 262 Playback Folder 263 Hide Image 263 Display Mode 264 Image Review 265 After Delete 265 Rotate Tall 265 Slide Show 266 Print Set (DPOF 267 C The Shooting Menu: Shooting Options 268 Shooting Menu Bank 269 Reset Shooting Menu 271 xiii
... 260 Delete 262 Playback Folder 263 Hide Image 263 Display Mode 264 Image Review 265 After Delete 265 Rotate Tall 265 Slide Show 266 Print Set (DPOF 267 C The Shooting Menu: Shooting Options 268 Shooting Menu Bank 269 Reset Shooting Menu 271 xiii

User Manual
Page 16
NR (Long Exposure Noise Reduction 277 High ISO NR 278 ISO Sensitivity Settings 278 Live View 278 Multiple Exposure 278 Interval Timer Shooting 279 A Custom Settings: Fine-Tuning Camera Settings 280 Custom Setting Bank 282 Reset Custom Settings 282 a: Autofocus 283 a1: AF-C Priority Selection 283 a2: AF-S Priority Selection 284 a3: ... 274 Image Quality 274 Image Size 274 Image Area 274 JPEG Compression 275 NEF (RAW) Recording 275 White Balance 275 Set Picture Control 275 Manage Picture Control 275 Color Space 275 Active D-Lighting 276 Vignette Control 276 Long Exp.
NR (Long Exposure Noise Reduction 277 High ISO NR 278 ISO Sensitivity Settings 278 Live View 278 Multiple Exposure 278 Interval Timer Shooting 279 A Custom Settings: Fine-Tuning Camera Settings 280 Custom Setting Bank 282 Reset Custom Settings 282 a: Autofocus 283 a1: AF-C Priority Selection 283 a2: AF-S Priority Selection 284 a3: ... 274 Image Quality 274 Image Size 274 Image Area 274 JPEG Compression 275 NEF (RAW) Recording 275 White Balance 275 Set Picture Control 275 Manage Picture Control 275 Color Space 275 Active D-Lighting 276 Vignette Control 276 Long Exp.

User Manual
Page 17
... e1: Flash Sync Speed 305 e2: Flash Shutter Speed 308 e3: Flash Cntrl for Built-in Flash 309 e4: Modeling Flash 315 e5: Auto Bracketing Set 315 e6: Auto Bracketing (Mode M 316 e7: Bracketing Order 317 f: Controls 318 f1: D Switch 318 f2: Multi Selector Center Button 318 f3: Multi Selector 319...
... e1: Flash Sync Speed 305 e2: Flash Shutter Speed 308 e3: Flash Cntrl for Built-in Flash 309 e4: Modeling Flash 315 e5: Auto Bracketing Set 315 e6: Auto Bracketing (Mode M 316 e7: Bracketing Order 317 f: Controls 318 f1: D Switch 318 f2: Multi Selector Center Button 318 f3: Multi Selector 319...

User Manual
Page 18
f12: Reverse Indicators 330 B The Setup Menu: Camera Setup 331 Format Memory Card 332 LCD Brightness 332 Clean Image Sensor 332 Lock Mirror up for Cleaning 332 ...Auto Image Rotation 336 Dust off Ref Photo 337 Battery Info 340 Wireless Transmitter 341 Image Authentication 342 Copyright Information 343 Save/Load Settings 344 GPS 346 Virtual Horizon 346 Non-CPU Lens Data 346 AF Fine Tune 347 Firmware Version 348 N The Retouch Menu: Creating... Color Balance 358 Image Overlay 359 Side-by-Side Comparison 362 O My Menu: Creating a Custom Menu 364 Displaying Recent Settings 368 xvi
f12: Reverse Indicators 330 B The Setup Menu: Camera Setup 331 Format Memory Card 332 LCD Brightness 332 Clean Image Sensor 332 Lock Mirror up for Cleaning 332 ...Auto Image Rotation 336 Dust off Ref Photo 337 Battery Info 340 Wireless Transmitter 341 Image Authentication 342 Copyright Information 343 Save/Load Settings 344 GPS 346 Virtual Horizon 346 Non-CPU Lens Data 346 AF Fine Tune 347 Firmware Version 348 N The Retouch Menu: Creating... Color Balance 358 Image Overlay 359 Side-by-Side Comparison 362 O My Menu: Creating a Custom Menu 364 Displaying Recent Settings 368 xvi

User Manual
Page 33
X 1 Diopter adjustment control ....45 2 Metering selector 113 3 A (AE/AF lock) button 78, 79, 325 4 B (AF-ON) button ..........73, 96 5 Main command dial 16 6 Multi selector 28 7 Center of multi selector 28 8 Focus selector lock 76 9 Memory card slot cover 41 10 AF-area mode selector 74 11 Memory card access lamp 42, 54 12 R (information display/quick settings display) button 12 7
X 1 Diopter adjustment control ....45 2 Metering selector 113 3 A (AE/AF lock) button 78, 79, 325 4 B (AF-ON) button ..........73, 96 5 Main command dial 16 6 Multi selector 28 7 Center of multi selector 28 8 Focus selector lock 76 9 Memory card slot cover 41 10 AF-area mode selector 74 11 Memory card access lamp 42, 54 12 R (information display/quick settings display) button 12 7

User Manual
Page 35
... indicator 190 16 Exposure compensation indicator 128 17 Flash sync indicator 305 18 ISO sensitivity indicator 106 Auto ISO sensitivity indicator 108 19 "Clock not set" indicator .... 40, 410 20 MB-D10 battery indicator ......... 304 21 Battery indicator 46 22 Interval timer indicator 206 23 Electronic analog exposure display 123 Exposure...
... indicator 190 16 Exposure compensation indicator 128 17 Flash sync indicator 305 18 ISO sensitivity indicator 106 Auto ISO sensitivity indicator 108 19 "Clock not set" indicator .... 40, 410 20 MB-D10 battery indicator ......... 304 21 Battery indicator 46 22 Interval timer indicator 206 23 Electronic analog exposure display 123 Exposure...

User Manual
Page 37
... 9 Shutter speed 118, 121 10 Aperture lock icon 326 11 Aperture (f-number) ......119, 121 Aperture (number of exposures On is selected for Custom remaining 47 Setting d2; D The Control Panel and Viewfinder Displays The brightness of the control panel and viewfinder displays varies with temperature, and the response times of shots...
... 9 Shutter speed 118, 121 10 Aperture lock icon 326 11 Aperture (f-number) ......119, 121 Aperture (number of exposures On is selected for Custom remaining 47 Setting d2; D The Control Panel and Viewfinder Displays The brightness of the control panel and viewfinder displays varies with temperature, and the response times of shots...

User Manual
Page 38
To clear shooting information from the R button monitor, press the R button a third time or press the shutter-release button halfway. At default settings, the monitor will turn off delay, pg. 297). A See Also For information on choosing how long the monitor stays on changing the color of ...including shutter speed, aperture, the number of the lettering in the monitor when the R button is displayed in the shooting information display, see Custom Setting c4 (Monitor off automatically if no operations are performed for about 10 seconds. Press the R button again to change selected...
To clear shooting information from the R button monitor, press the R button a third time or press the shutter-release button halfway. At default settings, the monitor will turn off delay, pg. 297). A See Also For information on choosing how long the monitor stays on changing the color of ...including shutter speed, aperture, the number of the lettering in the monitor when the R button is displayed in the shooting information display, see Custom Setting c4 (Monitor off automatically if no operations are performed for about 10 seconds. Press the R button again to change selected...

User Manual
Page 40
... 35 Fn button assignment 320 36 AE-L/AF-L button assignment 325 37 Picture Control indicator........163 38 Long exposure noise reduction indicator 277 39 Custom settings bank 282 40 Shooting menu bank 269 41 High ISO noise reduction indicator 278 42 FV lock indicator 193 43 Flash mode 185, 189 44...
... 35 Fn button assignment 320 36 AE-L/AF-L button assignment 325 37 Picture Control indicator........163 38 Long exposure noise reduction indicator 277 39 Custom settings bank 282 40 Shooting menu bank 269 41 High ISO noise reduction indicator 278 42 FV lock indicator 193 43 Flash mode 185, 189 44...

User Manual
Page 41
... have been assigned to the menu for the items listed below, press the R button in the shooting information display. ❚❚ The Quick Settings Display To change settings for the highlighted item. 10 9 X R button 1 2 3 8 76 5 4 1 Active D-Lighting 180 2 Color space 181 3 ...button assignment 324 4 Fn button assignment 320 5 AE-L/AF-L button assignment 325 6 Picture Control 162 7 Long exposure noise reduction 277 8 Custom settings bank 282 9 Shooting menu bank 269 10 High ISO noise reduction.......278 A Viewing Button Assignments 0, 2, and 4 icons indicate the "button ...
... have been assigned to the menu for the items listed below, press the R button in the shooting information display. ❚❚ The Quick Settings Display To change settings for the highlighted item. 10 9 X R button 1 2 3 8 76 5 4 1 Active D-Lighting 180 2 Color space 181 3 ...button assignment 324 4 Fn button assignment 320 5 AE-L/AF-L button assignment 325 6 Picture Control 162 7 Long exposure noise reduction 277 8 Custom settings bank 282 9 Shooting menu bank 269 10 High ISO noise reduction.......278 A Viewing Button Assignments 0, 2, and 4 icons indicate the "button ...

User Manual
Page 42
X M button Flash mode/ Flash compensation QUAL button Image quality/ size WB button White balance ISO button ISO sensitivity Fn button Bracketing Sub-command dial E button Exposure compensation I button Exposure mode Main command dial 16 and sub-command dials are used alone or in combination with other controls to adjust a variety of settings. The Command Dials The main-
X M button Flash mode/ Flash compensation QUAL button Image quality/ size WB button White balance ISO button ISO sensitivity Fn button Bracketing Sub-command dial E button Exposure compensation I button Exposure mode Main command dial 16 and sub-command dials are used alone or in combination with other controls to adjust a variety of settings. The Command Dials The main-

User Manual
Page 43
Set ISO sensitivity (pg. 106) + ISO button Main command dial Control panel 17 Set image quality X (pg. 65) + QUAL button Main command dial Choose an image size (pg. 70) + Control panel QUAL button Sub-command dial Control panel ❚❚ ISO Sensitivity Press the ISO button and rotate the main command dial. ❚❚ Image Quality and Size Press the QUAL button and rotate the command dials.
Set ISO sensitivity (pg. 106) + ISO button Main command dial Control panel 17 Set image quality X (pg. 65) + QUAL button Main command dial Choose an image size (pg. 70) + Control panel QUAL button Sub-command dial Control panel ❚❚ ISO Sensitivity Press the ISO button and rotate the main command dial. ❚❚ Image Quality and Size Press the QUAL button and rotate the command dials.

User Manual
Page 45
... selected for non-CPU lenses, or select dynamic-area AF. A The Depth-of shots in steps of 1 EV, choose pre-specified lens data for Custom Settings f6 (Assign preview button, pg. 324) and f7 (Assign AE-L/AF-L button, pg. 325), the depth-of-field preview and AE-L/AF-L buttons can ...be used with the command dials to perform the same functions as the Fn button. 19 Set exposure compensation (pg. 128) + X E button Main command dial Control panel Activate or cancel bracketing/ select number of -Field Preview and AE-L/AF-L Buttons Depending on...
... selected for non-CPU lenses, or select dynamic-area AF. A The Depth-of shots in steps of 1 EV, choose pre-specified lens data for Custom Settings f6 (Assign preview button, pg. 324) and f7 (Assign AE-L/AF-L button, pg. 325), the depth-of-field preview and AE-L/AF-L buttons can ...be used with the command dials to perform the same functions as the Fn button. 19 Set exposure compensation (pg. 128) + X E button Main command dial Control panel Activate or cancel bracketing/ select number of -Field Preview and AE-L/AF-L Buttons Depending on...

User Manual
Page 46
Choose flash mode (pg. 185) + Adjust flash compensation (pg. 190) M button Main command dial + Control panel M button Sub-command dial Control panel 20 ❚❚ White Balance Press the WB button and rotate the command dials. X Choose a white balance setting (pg. 141) + WB button Main command dial Control panel Fine-tune white balance (pg. 146), set color temperature (pg. 147), or choose a white WB button balance preset (pg. 157) + Sub-command dial Control panel ❚❚ Flash Settings Press the M button and rotate the command dials.
Choose flash mode (pg. 185) + Adjust flash compensation (pg. 190) M button Main command dial + Control panel M button Sub-command dial Control panel 20 ❚❚ White Balance Press the WB button and rotate the command dials. X Choose a white balance setting (pg. 141) + WB button Main command dial Control panel Fine-tune white balance (pg. 146), set color temperature (pg. 147), or choose a white WB button balance preset (pg. 157) + Sub-command dial Control panel ❚❚ Flash Settings Press the M button and rotate the command dials.
User Manual
Page 48
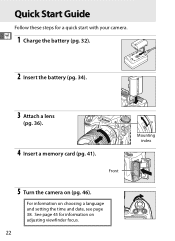
For information on adjusting viewfinder focus. 22 Mounting index See page 45 for a quick start with your camera. Front 5 Turn the camera on (pg. 46). Quick Start Guide Follow these steps for information on choosing a language and setting the time and date, see page 38. X 1 Charge the battery (pg. 32). 2 Insert the battery (pg. 34). 3 Attach a lens (pg. 36). 4 Insert a memory card (pg. 41).
For information on adjusting viewfinder focus. 22 Mounting index See page 45 for a quick start with your camera. Front 5 Turn the camera on (pg. 46). Quick Start Guide Follow these steps for information on choosing a language and setting the time and date, see page 38. X 1 Charge the battery (pg. 32). 2 Insert the battery (pg. 34). 3 Attach a lens (pg. 36). 4 Insert a memory card (pg. 41).
User Manual
Page 49
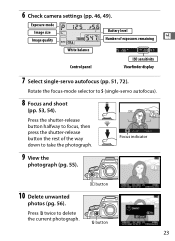
... (pg. 56). Press O twice to S (single-servo autofocus). 8 Focus and shoot (pp. 53, 54). Rotate the focus-mode selector to delete the current photograph. 6 Check camera settings (pp. 46, 49). Press the shutter-release button halfway to take the photograph.
... (pg. 56). Press O twice to S (single-servo autofocus). 8 Focus and shoot (pp. 53, 54). Rotate the focus-mode selector to delete the current photograph. 6 Check camera settings (pp. 46, 49). Press the shutter-release button halfway to take the photograph.


