
F6 Instruction Manual
Page 2
...Focus Mode, AF Area Mode and Focus Area 24-25 6. Holding the Camera and Focusing 28-29 8. Loading Film and Setting Film Advance Mode 22-23 5. Rewinding the Film 32-33 Setting Language and Date/Time 34-36 Detailed Operation 37-86 Lens Compatibility 36-42 CPU Nikkor 38...Using a non-AI lenses 41-42 Film ...43-47 Aligning frame counter and number of frame on the film/ Confirming film advance status 43 Setting and confirming film speed 44 Selecting film advance mode 45 Film rewinding with button operation 46 Rewinding film using the film rewind crank 47 Autofocus ...48-59 ...
...Focus Mode, AF Area Mode and Focus Area 24-25 6. Holding the Camera and Focusing 28-29 8. Loading Film and Setting Film Advance Mode 22-23 5. Rewinding the Film 32-33 Setting Language and Date/Time 34-36 Detailed Operation 37-86 Lens Compatibility 36-42 CPU Nikkor 38...Using a non-AI lenses 41-42 Film ...43-47 Aligning frame counter and number of frame on the film/ Confirming film advance status 43 Setting and confirming film speed 44 Selecting film advance mode 45 Film rewinding with button operation 46 Rewinding film using the film rewind crank 47 Autofocus ...48-59 ...
F6 Instruction Manual
Page 3
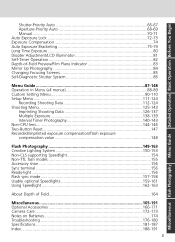
... Exposure Compensation 74 Auto Exposure Bracketing 75-79 Long Time Exposure 80 Diopter Adjustment/LCD Illuminator 81 Self-Timer Operation 82 Depth-of-Field Preview/Film Plane Indicator 83 Mirror Up Photography 84 Changing Focusing Screens 85 Self-Diagnostic Shutter System 86 Menu Guide 87-148 Operation in Menu (all menus...
... Exposure Compensation 74 Auto Exposure Bracketing 75-79 Long Time Exposure 80 Diopter Adjustment/LCD Illuminator 81 Self-Timer Operation 82 Depth-of-Field Preview/Film Plane Indicator 83 Mirror Up Photography 84 Changing Focusing Screens 85 Self-Diagnostic Shutter System 86 Menu Guide 87-148 Operation in Menu (all menus...
F6 Instruction Manual
Page 7
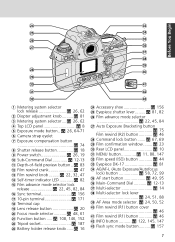
... 9 Power switch x 26, 19 !p Sub-Command Dial x 12-13 !q Depth-of-field preview button ..x 83 !w Film rewind crank x 47 !e Film rewind knob .........x 22, 32, 47 !r Self-timer indicator LED x 82 !t Film advance mode selector lock release x 22, 45, 82, 84 !y Sync terminal x 156 !u 10-pin terminal x 171... 12-13 #u Multi-selector x 14 #i Multi-selector lock lever x 24, 51, 88 #o AF Area mode selector .x 24, 50, 52 $p Film rewind (R1) button cover x 46 $q Film rewind (R1) button x 46 $w INFO button ...........x 122, 145, 147 $e Flash sync mode button..........x 157 7 Before You Begin
... 9 Power switch x 26, 19 !p Sub-Command Dial x 12-13 !q Depth-of-field preview button ..x 83 !w Film rewind crank x 47 !e Film rewind knob .........x 22, 32, 47 !r Self-timer indicator LED x 82 !t Film advance mode selector lock release x 22, 45, 82, 84 !y Sync terminal x 156 !u 10-pin terminal x 171... 12-13 #u Multi-selector x 14 #i Multi-selector lock lever x 24, 51, 88 #o AF Area mode selector .x 24, 50, 52 $p Film rewind (R1) button cover x 46 $q Film rewind (R1) button x 46 $w INFO button ...........x 122, 145, 147 $e Flash sync mode button..........x 157 7 Before You Begin

F6 Instruction Manual
Page 10
It can be changed to detailed or large display by selecting "Detailed" or "Large" in Custom Setting "d7: Rear panel info" (x 103). 1 2 3 1 ISO x 44 2 Film speed x 44 3 DX x 23 4 4 EV steps in Auto Exposure Bracketing 5 7 x 75 8 5 Auto Exposure Bracketing x 75 6 9 6 Flash sync mode x 157 10 7 Auto Exposure Bracketing status ......x 75 8 ...
It can be changed to detailed or large display by selecting "Detailed" or "Large" in Custom Setting "d7: Rear panel info" (x 103). 1 2 3 1 ISO x 44 2 Film speed x 44 3 DX x 23 4 4 EV steps in Auto Exposure Bracketing 5 7 x 75 8 5 Auto Exposure Bracketing x 75 6 9 6 Flash sync mode x 157 10 7 Auto Exposure Bracketing status ......x 75 8 ...
F6 Instruction Manual
Page 12
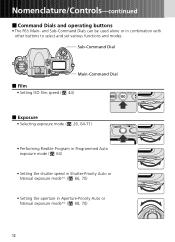
Sub-Command Dial Main-Command Dial • Film • Setting ISO film speed (x 44) • Exposure • Selecting exposure mode (x 26, 64-71) • Performing Flexible Program in Programmed Auto exposure mode (x 64) • Setting the shutter ... used alone or in Aperture-Priority Auto or Manual exposure mode*1 (x 68, 70) 12 Nomenclature/Controls-continued • Command Dials and operating buttons • The F6's Main-
Sub-Command Dial Main-Command Dial • Film • Setting ISO film speed (x 44) • Exposure • Selecting exposure mode (x 26, 64-71) • Performing Flexible Program in Programmed Auto exposure mode (x 64) • Setting the shutter ... used alone or in Aperture-Priority Auto or Manual exposure mode*1 (x 68, 70) 12 Nomenclature/Controls-continued • Command Dials and operating buttons • The F6's Main-
F6 Instruction Manual
Page 14
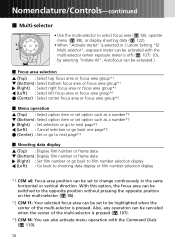
... or go to next page*3 • Shooting data display P (Top) : Display film number or frame data { (Bottom) : Display film number or frame data > (Right) : Set film number or go back to film number selection display < (Left) : Go back to shooting data display or film number selection display *1 CSM a6: Focus area position can be set...
... or go to next page*3 • Shooting data display P (Top) : Display film number or frame data { (Bottom) : Display film number or frame data > (Right) : Set film number or go back to film number selection display < (Left) : Go back to shooting data display or film number selection display *1 CSM a6: Focus area position can be set...

F6 Instruction Manual
Page 15
Basic Operation Basic Operation Shooting modes/functions explained in this section are as follows: Lens attached Film speed Film advance mode Focus mode AF area mode Exposure metering Exposure mode Custom Setting G/D-type AF Nikkor x 20 s x 23 S (Single frame) x 22 S (Single Servo AF) x 24 g (Single Area AF) x 24 " (3D Color Matrix Metering) x 26 ¡ (Programmed Auto) x 26 Initial (default) settings x 90 15
Basic Operation Basic Operation Shooting modes/functions explained in this section are as follows: Lens attached Film speed Film advance mode Focus mode AF area mode Exposure metering Exposure mode Custom Setting G/D-type AF Nikkor x 20 s x 23 S (Single frame) x 22 S (Single Servo AF) x 24 g (Single Area AF) x 24 " (3D Color Matrix Metering) x 26 ¡ (Programmed Auto) x 26 Initial (default) settings x 90 15

F6 Instruction Manual
Page 17
... (date and time) (x 112) or imprinted (day/hour/minute, date and time) (x 126) correctly and interval timer (x 140) cannot be used ). For number of film rolls that you take spare batteries with a built-in the rear LCD panel (the display returns to normal when any of children's reach. When camera... has been reset When power is not supplied for the first time and power is turned on Batteries", x 174.) Backup battery The F6 is supplying power to supply the F6's built-in approximately 48 hours when 3 V lithium or the optional Multi Power Battery Pack MB-40 (x 166) is equipped with you...
... (date and time) (x 112) or imprinted (day/hour/minute, date and time) (x 126) correctly and interval timer (x 140) cannot be used ). For number of film rolls that you take spare batteries with a built-in the rear LCD panel (the display returns to normal when any of children's reach. When camera... has been reset When power is not supplied for the first time and power is turned on Batteries", x 174.) Backup battery The F6 is supplying power to supply the F6's built-in approximately 48 hours when 3 V lithium or the optional Multi Power Battery Pack MB-40 (x 166) is equipped with you...

F6 Instruction Manual
Page 18
... Battery power can be checked in the top LCD panel and viewfinder. 1 Turn the power switch on ), lightly press the shutter release button. • "F6 Nikon" is displayed in the viewfinder turn off ) - Exposure mode: ¡ (Programmed Auto) - Exposure compensation: 00 (no setting - Auto Exposure Bracketing: ...18 2. Data imprint: no operation is possible to change the duration before automatic meter switch-off ). if the power switch is turned on . Film speed: s - If any other indication appears, see table on the next page. • When the power switch is turned on, exposure ...
... Battery power can be checked in the top LCD panel and viewfinder. 1 Turn the power switch on ), lightly press the shutter release button. • "F6 Nikon" is displayed in the viewfinder turn off ) - Exposure mode: ¡ (Programmed Auto) - Exposure compensation: 00 (no setting - Auto Exposure Bracketing: ...18 2. Data imprint: no operation is possible to change the duration before automatic meter switch-off ). if the power switch is turned on . Film speed: s - If any other indication appears, see table on the next page. • When the power switch is turned on, exposure ...
F6 Instruction Manual
Page 22
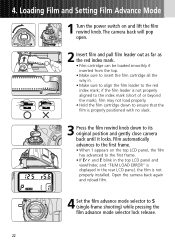
...the red index mark; if the film leader is not properly aligned to the index mark (short of or beyond the mark), film may not load properly. • Hold the film cartridge down to ensure that the film is not properly installed. 4. Loading Film and Setting Film Advance Mode 1 Turn the power ...switch on the top LCD panel, the film has advanced to the first frame. •...
...the red index mark; if the film leader is not properly aligned to the index mark (short of or beyond the mark), film may not load properly. • Hold the film cartridge down to ensure that the film is not properly installed. 4. Loading Film and Setting Film Advance Mode 1 Turn the power ...switch on the top LCD panel, the film has advanced to the first frame. •...

F6 Instruction Manual
Page 23
... rear LCD panel, and the shutter locks. For details on film advance mode, see page 45. ISO (film speed) DX mark You can be set film speed manually (x 44). When a non-DXcoded film is set to advance the film automatically to s and DX-coded film is available for the first time, remove the shutter curtain's protective...
... rear LCD panel, and the shutter locks. For details on film advance mode, see page 45. ISO (film speed) DX mark You can be set film speed manually (x 44). When a non-DXcoded film is set to advance the film automatically to s and DX-coded film is available for the first time, remove the shutter curtain's protective...

F6 Instruction Manual
Page 27
... speed and aperture are set manually. Shutter speed and aperture control how much light reaches the film. Basic Operation Metering Systems Since brightness and film sensitivity determine the proper combination of shutter speed and aperture for correct exposure, measuring subject brightness is... detected in the central area of the viewfinder. With Spot Metering (x 63), sensitivity is detected using a slower speed. The F6 provides three...
... speed and aperture are set manually. Shutter speed and aperture control how much light reaches the film. Basic Operation Metering Systems Since brightness and film sensitivity determine the proper combination of shutter speed and aperture for correct exposure, measuring subject brightness is... detected in the central area of the viewfinder. With Spot Metering (x 63), sensitivity is detected using a slower speed. The F6 provides three...
F6 Instruction Manual
Page 29
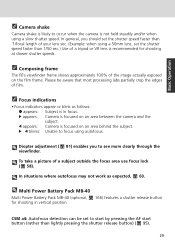
...an area between the camera and the subject. > appears: Camera is recommended for shooting in focus. < appears: Camera is focused on the film frame. Please be set to occur when the camera is in vertical position. In situations where autofocus may not work as follows: / appears... speed faster than 1/50 sec.) Use of a subject outside the focus area use focus lock (x 58). Composing frame The F6's viewfinder frame shows approximately 100% of film. blinks: Unable to see more clearly through the viewfinder. Diopter adjustment (x 81) enables you should set the shutter speed faster...
...an area between the camera and the subject. > appears: Camera is recommended for shooting in focus. < appears: Camera is focused on the film frame. Please be set to occur when the camera is in vertical position. In situations where autofocus may not work as follows: / appears... speed faster than 1/50 sec.) Use of a subject outside the focus area use focus lock (x 58). Composing frame The F6's viewfinder frame shows approximately 100% of film. blinks: Unable to see more clearly through the viewfinder. Diopter adjustment (x 81) enables you should set the shutter speed faster...

F6 Instruction Manual
Page 30
... panel or viewfinder, see page 65. 2 Confirm that focus indicator / appears and slowly depress the shutter release button. • After the shutter is released, the film automatically advances to the next frame and the next shot can be taken. 30 8.
... panel or viewfinder, see page 65. 2 Confirm that focus indicator / appears and slowly depress the shutter release button. • After the shutter is released, the film automatically advances to the next frame and the next shot can be taken. 30 8.

F6 Instruction Manual
Page 31
... button (x 49) is continuously pressed, the camera will automatically switch to track a subject (even a subject that began moving subject based on the film.) The shooting data is also recorded in the camera's built-in the viewfinder. • In Continuous Servo AF, the camera continues to Focus Tracking... settings in the frame, between the frames or before the first frame on recording data, see page 126. Imprinting/recording shooting data With the F6, date, shutter speed, aperture and lens focal length can be imprinted in steps of exposure. • In Single Servo AF, Focus Tracking...
... button (x 49) is continuously pressed, the camera will automatically switch to track a subject (even a subject that began moving subject based on the film.) The shooting data is also recorded in the camera's built-in the viewfinder. • In Continuous Servo AF, the camera continues to Focus Tracking... settings in the frame, between the frames or before the first frame on recording data, see page 126. Imprinting/recording shooting data With the F6, date, shutter speed, aperture and lens focal length can be imprinted in steps of exposure. • In Single Servo AF, Focus Tracking...
F6 Instruction Manual
Page 32
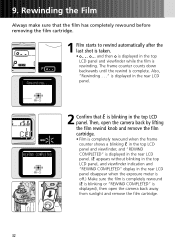
...8226; o--, o-, and then o is displayed in the top LCD panel and viewfinder while the film is displayed), then open the camera back by lifting the film rewind knob and remove the film cartridge. • Film is completely rewound when the frame counter shows a blinking E in the top LCD panel and viewfinder... counter counts down backwards until the rewind is blinking in the rear LCD panel disappear when the exposure meter is off.) Make sure the film is completely rewound (E is blinking or "REWIND COMPLETED" is rewinding. Also, "Rewinding . . ." 9. Then, open the camera back away from ...
...8226; o--, o-, and then o is displayed in the top LCD panel and viewfinder while the film is displayed), then open the camera back by lifting the film rewind knob and remove the film cartridge. • Film is completely rewound when the frame counter shows a blinking E in the top LCD panel and viewfinder... counter counts down backwards until the rewind is blinking in the rear LCD panel disappear when the exposure meter is off.) Make sure the film is completely rewound (E is blinking or "REWIND COMPLETED" is rewinding. Also, "Rewinding . . ." 9. Then, open the camera back away from ...
F6 Instruction Manual
Page 33
... is down before rewinding film. CSM d2: The F6 can be discarded in the process of a roll (execute film rewind by pressing the film rewind buttons) (x 101). Pictures taken on this camera. To rewind film manually using the film rewind crank, x 47. CSM d3: Film leader can be changed to not automatically begin film rewind when it is...
... is down before rewinding film. CSM d2: The F6 can be discarded in the process of a roll (execute film rewind by pressing the film rewind buttons) (x 101). Pictures taken on this camera. To rewind film manually using the film rewind crank, x 47. CSM d3: Film leader can be changed to not automatically begin film rewind when it is...

F6 Instruction Manual
Page 37
Detailed Operation Detailed Operation This section features detailed descriptions of all camera functions-including lens, film, focus, exposure and other functions. 37
Detailed Operation Detailed Operation This section features detailed descriptions of all camera functions-including lens, film, focus, exposure and other functions. 37

F6 Instruction Manual
Page 43
...the camera back is closed. (Release the shutter when "Press rel button" is opened. 1 Turn the power switch on and lift the film rewind knob. Insert film after rotating the camera sprocket with your finger until it stops rotating. • You can rotate the sprocket in either direction. • ...The frame counter and the number of frame on the film may not align precisely with the projections on the film in Custom Setting "d1: Film loading", x 101.) • Note that the usable number of frames decreases as you keep depressing the ...
...the camera back is closed. (Release the shutter when "Press rel button" is opened. 1 Turn the power switch on and lift the film rewind knob. Insert film after rotating the camera sprocket with your finger until it stops rotating. • You can rotate the sprocket in either direction. • ...The frame counter and the number of frame on the film may not align precisely with the projections on the film in Custom Setting "d1: Film loading", x 101.) • Note that the usable number of frames decreases as you keep depressing the ...

F6 Instruction Manual
Page 44
... appear when the power switch is turned on the camera is advanced to the first frame) (x 102). 44 CSM d6: When film speed is set to s and non-DX-coded film is loaded, Err blinks in the top LCD panel and viewfinder and "DX ERR" is displayed in the rear LCD panel... displayed in the rear LCD panel (in normal and detailed display). (Press the ISO button to confirm film speed in 1/3 steps. • When film speed is set to s and DX-coded film is installed, film speed is set automatically between ISO 66400 in the large display.) Manually set on and camera back is closed...
... appear when the power switch is turned on the camera is advanced to the first frame) (x 102). 44 CSM d6: When film speed is set to s and non-DX-coded film is loaded, Err blinks in the top LCD panel and viewfinder and "DX ERR" is displayed in the rear LCD panel... displayed in the rear LCD panel (in normal and detailed display). (Press the ISO button to confirm film speed in 1/3 steps. • When film speed is set to s and DX-coded film is installed, film speed is set automatically between ISO 66400 in the large display.) Manually set on and camera back is closed...


