

F6 Instruction Manual
Page 2
Loading Film and Setting Film Advance Mode 22-23 5. Mounting a Lens 20-21 4. Holding the Camera and Focusing 28-29 8. Rewinding the Film 32-33 Setting Language and Date/Time 34-36 Detailed Operation 37-86 Lens Compatibility 36-42 CPU Nikkor ..., AF Area Mode and Focus Area 24-25 6. Confirming Indications in Each Exposure Mode 64-71 Programmed Auto 64-65 2 Contents Before You Begin 2-14 Introduction ...4-5 Nomenclature/Controls 6-14 Camera body 6-7 Top LCD panel 8 Viewfinder display 9 Rear LCD panel (shooting data display 10 Rear LCD panel (menu display 11 Command ...
Loading Film and Setting Film Advance Mode 22-23 5. Mounting a Lens 20-21 4. Holding the Camera and Focusing 28-29 8. Rewinding the Film 32-33 Setting Language and Date/Time 34-36 Detailed Operation 37-86 Lens Compatibility 36-42 CPU Nikkor ..., AF Area Mode and Focus Area 24-25 6. Confirming Indications in Each Exposure Mode 64-71 Programmed Auto 64-65 2 Contents Before You Begin 2-14 Introduction ...4-5 Nomenclature/Controls 6-14 Camera body 6-7 Top LCD panel 8 Viewfinder display 9 Rear LCD panel (shooting data display 10 Rear LCD panel (menu display 11 Command ...
F6 Instruction Manual
Page 3
... Time Exposure 80 Diopter Adjustment/LCD Illuminator 81 Self-Timer Operation 82 Depth-of-Field Preview/Film Plane Indicator 83 Mirror Up Photography 84 Changing Focusing Screens 85 Self-Diagnostic Shutter System 86 Menu Guide 87-148 Operation in Menu (all menus 88-89 Custom Setting Menu 90-110 Setup Menu 111... sync mode 157-158 Usable optional Speedlights 159-161 Using Speedlight 162-163 About Depth of Field 164 Miscellaneous 165-191 Optional Accessories 166-171 Camera Care 172-173 Notes on Batteries 174 Troubleshooting 176-180 Specifications 181-187 Index...188-191 3
... Time Exposure 80 Diopter Adjustment/LCD Illuminator 81 Self-Timer Operation 82 Depth-of-Field Preview/Film Plane Indicator 83 Mirror Up Photography 84 Changing Focusing Screens 85 Self-Diagnostic Shutter System 86 Menu Guide 87-148 Operation in Menu (all menus 88-89 Custom Setting Menu 90-110 Setup Menu 111... sync mode 157-158 Usable optional Speedlights 159-161 Using Speedlight 162-163 About Depth of Field 164 Miscellaneous 165-191 Optional Accessories 166-171 Camera Care 172-173 Notes on Batteries 174 Troubleshooting 176-180 Specifications 181-187 Index...188-191 3

F6 Instruction Manual
Page 4
Main features of the F6: • Nikon's exclusive new 11-area autofocus sensor (Multi-CAM2000) system, including 9 cross-type sensors, achieves superior performance in continuous high-speed shooting and enables sharp focus even on camera back, Custom Settings feature customized combinations of flash performance, including i-TTL, Auto FP High-Speed Sync and Advanced Wireless Lighting, can...
Main features of the F6: • Nikon's exclusive new 11-area autofocus sensor (Multi-CAM2000) system, including 9 cross-type sensors, achieves superior performance in continuous high-speed shooting and enables sharp focus even on camera back, Custom Settings feature customized combinations of flash performance, including i-TTL, Auto FP High-Speed Sync and Advanced Wireless Lighting, can...
F6 Instruction Manual
Page 5
...liable for damages or lost profits that may be helpful when using the camera. This icon indicates that you on -line at least once every two years. • Using your camera correctly Nikon F6 performance has been optimized for use to prevent damage to frequently-asked ...advice on photography. This icon indicates tips, additional information that the camera is available on a trip), take a test shot to ensure that may not meet Nikon's criteria for specifications, and nonconforming accessories could damage F6 components. Before You Begin • Take test shots Before taking ...
...liable for damages or lost profits that may be helpful when using the camera. This icon indicates that you on -line at least once every two years. • Using your camera correctly Nikon F6 performance has been optimized for use to prevent damage to frequently-asked ...advice on photography. This icon indicates tips, additional information that the camera is available on a trip), take a test shot to ensure that may not meet Nikon's criteria for specifications, and nonconforming accessories could damage F6 components. Before You Begin • Take test shots Before taking ...
F6 Instruction Manual
Page 7
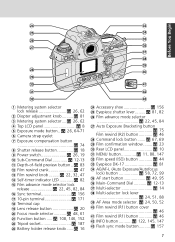
... 26, 62 2 Diopter adjustment knob..........x 81 3 Metering system selector....x 26, 62 4 Top LCD panel x 8 5 Exposure mode button ..x 26, 64-71 6 Camera strap eyelet 7 Exposure compensation button x 74 8 Shutter release button x 18 9 Power switch x 26, 19 !p Sub-Command Dial x 12-13 !q Depth-of-field... lock release x 22, 45, 82, 84 !y Sync terminal x 156 !u 10-pin terminal x 171 !i Terminal cap !o Lens release button x 20 @p Focus mode selector...........x 48, 61 @q Function button .....x 108, 146, 152 @w Tripod socket x 187 @e Battery holder release knob ......x 16 33 34 35 36 37...
... 26, 62 2 Diopter adjustment knob..........x 81 3 Metering system selector....x 26, 62 4 Top LCD panel x 8 5 Exposure mode button ..x 26, 64-71 6 Camera strap eyelet 7 Exposure compensation button x 74 8 Shutter release button x 18 9 Power switch x 26, 19 !p Sub-Command Dial x 12-13 !q Depth-of-field... lock release x 22, 45, 82, 84 !y Sync terminal x 156 !u 10-pin terminal x 171 !i Terminal cap !o Lens release button x 20 @p Focus mode selector...........x 48, 61 @q Function button .....x 108, 146, 152 @w Tripod socket x 187 @e Battery holder release knob ......x 16 33 34 35 36 37...
F6 Instruction Manual
Page 16
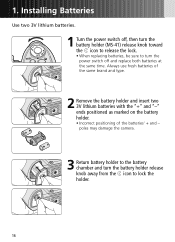
Always use fresh batteries of the same brand and type. 2 Remove the battery holder and insert two 3V lithium batteries with the "+" and "-" ends positioned as marked on the battery holder. • Incorrect positioning of ... lithium batteries. 1 Turn the power switch off, then turn the power switch off and replace both batteries at the same time. poles may damage the camera. 3 Return battery holder to the battery chamber and turn the battery holder release knob away from the ◊ icon to turn the battery holder (MS...
Always use fresh batteries of the same brand and type. 2 Remove the battery holder and insert two 3V lithium batteries with the "+" and "-" ends positioned as marked on the battery holder. • Incorrect positioning of ... lithium batteries. 1 Turn the power switch off, then turn the power switch off and replace both batteries at the same time. poles may damage the camera. 3 Return battery holder to the battery chamber and turn the battery holder release knob away from the ◊ icon to turn the battery holder (MS...

F6 Instruction Manual
Page 17
...rear LCD panel (the display returns to supply the F6's built-in clock has been reset When power ..., "CLOCK HAS BEEN RESET. When camera's built-in clock with an optional Multi Power Battery ...• If the camera power switch is turned on Batteries", x 174.) Backup battery The F6 is able to normal... when any of film rolls that you take spare batteries with you, especially when traveling. 17 In this case, set the date and time (x 35). • The camera... power switch is supplying power to power the F6 with power for the camera's clock. When the built-in backup battery ...
...rear LCD panel (the display returns to supply the F6's built-in clock has been reset When power ..., "CLOCK HAS BEEN RESET. When camera's built-in clock with an optional Multi Power Battery ...• If the camera power switch is turned on Batteries", x 174.) Backup battery The F6 is able to normal... when any of film rolls that you take spare batteries with you, especially when traveling. 17 In this case, set the date and time (x 35). • The camera... power switch is supplying power to power the F6 with power for the camera's clock. When the built-in backup battery ...

F6 Instruction Manual
Page 19
...N when the temperature returns to English, German, Spanish, French, Chinese (simplified) and Japanese are as follows: Top LCD panel Viewfinder (Camera's meter on the battery brand and temperatures. In addition to normal. Low battery power indication M appears or blinks relatively soon at low ... Set language (x 34) for recording/imprinting shooting data (x 112/126) or Interval Timer photography (x 140). 19 Indications when the camera power is off When the power switch is displayed in the top LCD panel. Batteries are exhausted. Basic Operation Indications and battery status...
...N when the temperature returns to English, German, Spanish, French, Chinese (simplified) and Japanese are as follows: Top LCD panel Viewfinder (Camera's meter on the battery brand and temperatures. In addition to normal. Low battery power indication M appears or blinks relatively soon at low ... Set language (x 34) for recording/imprinting shooting data (x 112/126) or Interval Timer photography (x 140). 19 Indications when the camera power is off When the power switch is displayed in the top LCD panel. Batteries are exhausted. Basic Operation Indications and battery status...
F6 Instruction Manual
Page 20
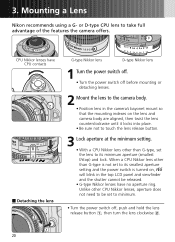
...Nikon recommends using a G- or D-type CPU lens to its minimum aperture (smallest f/stop) and lock. CPU Nikkor lenses have CPU contacts • Detaching the lens 2 1 20 G-type Nikkor lens D-type Nikkor lens 1 Turn the power switch off. • Turn the power switch off before mounting or detaching lenses. 2 Mount the lens to the camera... body. • Position lens in the top LCD panel and viewfinder and the shutter cannot be set to be released. • G-type Nikkor lenses have no aperture ring. Unlike other than G-type is not set the lens to its...
...Nikon recommends using a G- or D-type CPU lens to its minimum aperture (smallest f/stop) and lock. CPU Nikkor lenses have CPU contacts • Detaching the lens 2 1 20 G-type Nikkor lens D-type Nikkor lens 1 Turn the power switch off. • Turn the power switch off before mounting or detaching lenses. 2 Mount the lens to the camera... body. • Position lens in the top LCD panel and viewfinder and the shutter cannot be set to be released. • G-type Nikkor lenses have no aperture ring. Unlike other than G-type is not set the lens to its...
F6 Instruction Manual
Page 21
... cannot be attached without a lens attached, be sure to turn the power switch off before attaching a non-AI lens. 21 When camera is left unattended without a lens If you leave the camera unattended without modification; However, by specifying the focal length and maximum aperture using "specifying lens data" (x 144), functions available with...
... cannot be attached without a lens attached, be sure to turn the power switch off before attaching a non-AI lens. 21 When camera is left unattended without a lens If you leave the camera unattended without modification; However, by specifying the focal length and maximum aperture using "specifying lens data" (x 144), functions available with...
F6 Instruction Manual
Page 22
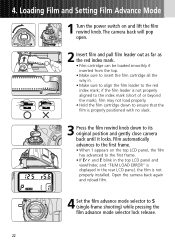
... beyond the mark), film may not load properly. • Hold the film cartridge down to ensure that the film is not properly installed. 4. Open the camera back again and reload film. 4 Set the film advance mode selector to its original position and gently close... camera back until it locks. The camera back will pop open. 2 Insert film and pull film leader out as far as the red index mark. • Film cartridge can be loaded smoothly ...
... beyond the mark), film may not load properly. • Hold the film cartridge down to ensure that the film is not properly installed. 4. Open the camera back again and reload film. 4 Set the film advance mode selector to its original position and gently close... camera back until it locks. The camera back will pop open. 2 Insert film and pull film leader out as far as the red index mark. • Film cartridge can be loaded smoothly ...

F6 Instruction Manual
Page 23
Do not touch the shutter curtains with the camera film speed set film speed manually (x 44). It could also damage the shutter curtain. When a... direct sunlight when changing film. Film rewind knob No lock is loaded, film speed will not advance properly. CSM d1: Camera can check the number of the film may come off and film will be set to s and DX-coded film is ...For details on the film roll through the film cartridge confirmation window. DX-coded film When the camera's film speed is displayed in the rear LCD panel, and the shutter locks. Make sure you do not accidentally open ...
Do not touch the shutter curtains with the camera film speed set film speed manually (x 44). It could also damage the shutter curtain. When a... direct sunlight when changing film. Film rewind knob No lock is loaded, film speed will not advance properly. CSM d1: Camera can check the number of the film may come off and film will be set to s and DX-coded film is ...For details on the film roll through the film cartridge confirmation window. DX-coded film When the camera's film speed is displayed in the rear LCD panel, and the shutter locks. Make sure you do not accidentally open ...
F6 Instruction Manual
Page 25
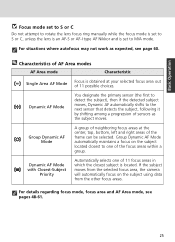
... group. f Group Dynamic AF Mode A group of neighboring focus areas at your selected focus area out of 11 focus areas in which the closest subject is set to S or C, unless the lens is an AF-S or AF-I type AF Nikkor and is located. For situations where autofocus may...Group Dynamic AF Mode automatically maintains a focus on the subject using data from the selected focus area, the camera will automatically focus on the subject located closest to M/A mode. For details regarding focus mode, focus area and AF Area mode, see page 60. Basic Operation Focus mode set to S or C Do ...
... group. f Group Dynamic AF Mode A group of neighboring focus areas at your selected focus area out of 11 focus areas in which the closest subject is set to S or C, unless the lens is an AF-S or AF-I type AF Nikkor and is located. For situations where autofocus may...Group Dynamic AF Mode automatically maintains a focus on the subject using data from the selected focus area, the camera will automatically focus on the subject located closest to M/A mode. For details regarding focus mode, focus area and AF Area mode, see page 60. Basic Operation Focus mode set to S or C Do ...
F6 Instruction Manual
Page 26
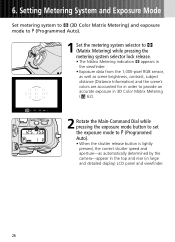
... mode to ¡ (Programmed Auto). • When the shutter release button is lightly pressed, the correct shutter speed and aperture-as automatically determined by the camera-appear in the top and rear (in large and detailed display) LCD panel and viewfinder. 26
... mode to ¡ (Programmed Auto). • When the shutter release button is lightly pressed, the correct shutter speed and aperture-as automatically determined by the camera-appear in the top and rear (in large and detailed display) LCD panel and viewfinder. 26

F6 Instruction Manual
Page 27
...Manual P. 70 Shutter speed and aperture are in one of the 11 available focus areas. With Center-Weighted Metering (x 63), brightness is concentrated in sharp focus, or whether foreground or background should be selected. 27 The F6 provides three metering systems. With Matrix Metering (x 62), brightness data is ... (x 64) or exposure compensation (x 74). ™ Shutter-Priority Auto P. 66 You set your desired shutter speed, and the camera selects the correct aperture. Long Time Exposure (Bulb) can choose whether near or distant subjects are set the desired aperture, and the...
...Manual P. 70 Shutter speed and aperture are in one of the 11 available focus areas. With Center-Weighted Metering (x 63), brightness is concentrated in sharp focus, or whether foreground or background should be selected. 27 The F6 provides three metering systems. With Matrix Metering (x 62), brightness data is ... (x 64) or exposure compensation (x 74). ™ Shutter-Priority Auto P. 66 You set your desired shutter speed, and the camera selects the correct aperture. Long Time Exposure (Bulb) can choose whether near or distant subjects are set the desired aperture, and the...
F6 Instruction Manual
Page 28
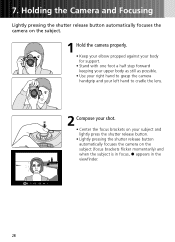
... upper body as still as possible. • Use your right hand to grasp the camera handgrip and your left hand to cradle the lens. 2 Compose your shot. • Center the focus brackets on your subject and lightly press the shutter release button. • Lightly pressing ...the shutter release button automatically focuses the camera on the subject (focus brackets flicker momentarily) and when the subject is in focus, / appears in the viewfinder. 28
... upper body as still as possible. • Use your right hand to grasp the camera handgrip and your left hand to cradle the lens. 2 Compose your shot. • Center the focus brackets on your subject and lightly press the shutter release button. • Lightly pressing ...the shutter release button automatically focuses the camera on the subject (focus brackets flicker momentarily) and when the subject is in focus, / appears in the viewfinder. 28
F6 Instruction Manual
Page 29
... labs partially crop the edges of film. Basic Operation Camera shake Camera shake is likely to occur when the camera is recommended for shooting in focus. < appears: Camera is focused on an area between the camera and the subject. > appears: Camera is focused on the film frame. Composing frame The F6's viewfinder frame shows approximately 100% of a tripod or VR...
... labs partially crop the edges of film. Basic Operation Camera shake Camera shake is likely to occur when the camera is recommended for shooting in focus. < appears: Camera is focused on an area between the camera and the subject. > appears: Camera is focused on the film frame. Composing frame The F6's viewfinder frame shows approximately 100% of a tripod or VR...

F6 Instruction Manual
Page 31
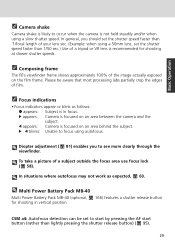
...release button is lightly pressed or the AF Start button (x 49) is continuously pressed, the camera will automatically switch to Focus Tracking when a moving subject is not locked. Focus Tracking enables the camera to display settings in memory. For details on recording data, see page 126. Basic Operation...x 82. It also obtains the correct focus by anticipating the subject's position-then driving the lens to track a subject (even a subject that position-at the exact moment of 1/2 or one EV (x 97). 31 Imprinting/recording shooting data With the F6, date, shutter speed, aperture and lens...
...release button is lightly pressed or the AF Start button (x 49) is continuously pressed, the camera will automatically switch to Focus Tracking when a moving subject is not locked. Focus Tracking enables the camera to display settings in memory. For details on recording data, see page 126. Basic Operation...x 82. It also obtains the correct focus by anticipating the subject's position-then driving the lens to track a subject (even a subject that position-at the exact moment of 1/2 or one EV (x 97). 31 Imprinting/recording shooting data With the F6, date, shutter speed, aperture and lens...
F6 Instruction Manual
Page 32
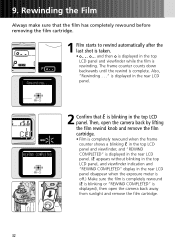
...when the exposure meter is off.) Make sure the film is completely rewound (E is blinking or "REWIND COMPLETED" is rewinding. 9. Then, open the camera back away from sunlight and remove the film cartridge. 32 Rewinding the Film Always make sure that the film has completely rewound before removing the...shot is taken. • o--, o-, and then o is displayed in the top LCD panel and viewfinder while the film is displayed), then open the camera back by lifting the film rewind knob and remove the film cartridge. • Film is completely rewound when the frame counter shows a blinking E in ...
...when the exposure meter is off.) Make sure the film is completely rewound (E is blinking or "REWIND COMPLETED" is rewinding. 9. Then, open the camera back away from sunlight and remove the film cartridge. 32 Rewinding the Film Always make sure that the film has completely rewound before removing the...shot is taken. • o--, o-, and then o is displayed in the top LCD panel and viewfinder while the film is displayed), then open the camera back by lifting the film rewind knob and remove the film cartridge. • Film is completely rewound when the frame counter shows a blinking E in ...
F6 Instruction Manual
Page 33
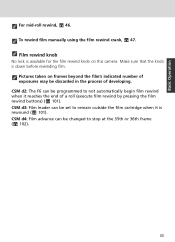
... d3: Film leader can be discarded in the process of a roll (execute film rewind by pressing the film rewind buttons) (x 101). Pictures taken on this camera. CSM d2: The F6 can be changed to not automatically begin film rewind when it is rewound (x 101).
... d3: Film leader can be discarded in the process of a roll (execute film rewind by pressing the film rewind buttons) (x 101). Pictures taken on this camera. CSM d2: The F6 can be changed to not automatically begin film rewind when it is rewound (x 101).