
Product Manual
Page 5
Image Recording Options 51 Image Area 51 Image Quality and Size 55 Image Quality 55 Image Size 58 Focus 59 Autofocus 59 Autofocus Mode 59 AF-Area Mode 62 Focus Point Selection 64 Focus Lock 66 Manual Focus 68 ISO Sensitivity 70 The ISO Sensitivity Dial 70 Auto ISO Sensitivity Control 72 Exposure 75 Metering 75 Autoexposure Lock 77 Exposure Compensation 79 iii
Image Recording Options 51 Image Area 51 Image Quality and Size 55 Image Quality 55 Image Size 58 Focus 59 Autofocus 59 Autofocus Mode 59 AF-Area Mode 62 Focus Point Selection 64 Focus Lock 66 Manual Focus 68 ISO Sensitivity 70 The ISO Sensitivity Dial 70 Auto ISO Sensitivity Control 72 Exposure 75 Metering 75 Autoexposure Lock 77 Exposure Compensation 79 iii

Product Manual
Page 6
... 81 Fine-Tuning White Balance 84 Choosing a Color Temperature 88 Preset Manual 90 Viewfinder Photography 90 Live View (Spot White Balance 93 Managing Presets 96 Image Enhancement 100 Picture Controls 100 Creating Custom Picture Controls 106 Preserving Detail in Highlights and Shadows 110 Active D-Lighting 110 High Dynamic Range (HDR 112...
... 81 Fine-Tuning White Balance 84 Choosing a Color Temperature 88 Preset Manual 90 Viewfinder Photography 90 Live View (Spot White Balance 93 Managing Presets 96 Image Enhancement 100 Picture Controls 100 Creating Custom Picture Controls 106 Preserving Detail in Highlights and Shadows 110 Active D-Lighting 110 High Dynamic Range (HDR 112...

Product Manual
Page 8
Menu Guide 224 Defaults 224 D The Playback Menu: Managing Images 229 Playback Folder 230 Hide Image 230 Playback Display Options 232 Image Review 232 After Delete 233 Rotate Tall 233 Slide Show 234 C The Shooting Menu: Shooting Options 235 Shooting Menu Bank 236 Storage Folder 237 File ...
Menu Guide 224 Defaults 224 D The Playback Menu: Managing Images 229 Playback Folder 230 Hide Image 230 Playback Display Options 232 Image Review 232 After Delete 233 Rotate Tall 233 Slide Show 234 C The Shooting Menu: Shooting Options 235 Shooting Menu Bank 236 Storage Folder 237 File ...
Product Manual
Page 9
... Indicators 269 f11: Easy Shutter-Speed Shift 270 B The Setup Menu: Camera Setup 271 Format Memory Card 272 Monitor Brightness 273 Auto Info Display 273 Image Dust Off Ref Photo 274 Flicker Reduction 276 Time Zone and Date 276 vii d: Shooting/Display 253 d1: Beep 253 d2: Viewfinder Grid Display 253...
... Indicators 269 f11: Easy Shutter-Speed Shift 270 B The Setup Menu: Camera Setup 271 Format Memory Card 272 Monitor Brightness 273 Auto Info Display 273 Image Dust Off Ref Photo 274 Flicker Reduction 276 Time Zone and Date 276 vii d: Shooting/Display 253 d1: Beep 253 d2: Viewfinder Grid Display 253...

Product Manual
Page 10
Language 277 Auto Image Rotation 277 Image Comment 278 Copyright Information 279 Save/Load Settings 280 Virtual Horizon 282 AF Fine-tune 283 Assign Remote Fn Button 284 Wireless Mobile Adapter 284 ... Menu: Creating Retouched Copies 287 Creating Retouched Copies 289 D-Lighting 291 Red-Eye Correction 292 Trim 293 Monochrome 294 Filter Effects 295 Color Balance 296 Image Overlay 297 NEF (RAW) Processing 300 Resize 302 Quick Retouch 304 Straighten 304 Distortion Control 305 Fisheye 305 Color Outline 306 Color Sketch 306 Perspective...
Language 277 Auto Image Rotation 277 Image Comment 278 Copyright Information 279 Save/Load Settings 280 Virtual Horizon 282 AF Fine-tune 283 Assign Remote Fn Button 284 Wireless Mobile Adapter 284 ... Menu: Creating Retouched Copies 287 Creating Retouched Copies 289 D-Lighting 291 Red-Eye Correction 292 Trim 293 Monochrome 294 Filter Effects 295 Color Balance 296 Image Overlay 297 NEF (RAW) Processing 300 Resize 302 Quick Retouch 304 Straighten 304 Distortion Control 305 Fisheye 305 Color Outline 306 Color Sketch 306 Perspective...

Product Manual
Page 17
... formatting memory cards or other data storage devices does not completely erase the original image data. Deleted files can sometimes be taken to avoid injury when physically destroying data storage devices. Be sure to another person, erase all... of empty sky). Care should be recovered from discarded storage devices using commercial deletion software, or format the device and then completely refill it with images containing no private information (for preset manual (0 90). Before discarding a data storage device or transferring ownership to also replace any pictures selected for ...
... formatting memory cards or other data storage devices does not completely erase the original image data. Deleted files can sometimes be taken to avoid injury when physically destroying data storage devices. Be sure to another person, erase all... of empty sky). Care should be recovered from discarded storage devices using commercial deletion software, or format the device and then completely refill it with images containing no private information (for preset manual (0 90). Before discarding a data storage device or transferring ownership to also replace any pictures selected for ...

Product Manual
Page 19
... that fees apply to these sites to keep up-to ensure that the camera is a precision device and requires regular servicing. Nikon recommends that the camera be inspected by Nikon specifically for contact information: http://imaging.nikon.com/ xvii Any accessories regularly used professionally. A Before Taking Important Pictures Before taking the camera on digital...
... that fees apply to these sites to keep up-to ensure that the camera is a precision device and requires regular servicing. Nikon recommends that the camera be inspected by Nikon specifically for contact information: http://imaging.nikon.com/ xvii Any accessories regularly used professionally. A Before Taking Important Pictures Before taking the camera on digital...

Product Manual
Page 24
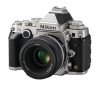
... 201 10 Viewfinder eyepiece 28 White balance 82 11 Diopter adjustment control......... 28 6 X/T button 12 A button Playback zoom in 199 Using the AE/AF lock Image quality/size 56, 58 button 66, 77, 267 4
... 201 10 Viewfinder eyepiece 28 White balance 82 11 Diopter adjustment control......... 28 6 X/T button 12 A button Playback zoom in 199 Using the AE/AF lock Image quality/size 56, 58 button 66, 77, 267 4

Product Manual
Page 31
... the R button to display shutter speed, aperture, the number of shots in the monitor. The display lights automatically when settings such as white balance and image quality are changed by pressing a button and rotating a command dial.
... the R button to display shutter speed, aperture, the number of shots in the monitor. The display lights automatically when settings such as white balance and image quality are changed by pressing a button and rotating a command dial.
Product Manual
Page 32
... flash bracketing 137 WB bracketing 141 22 White balance 81 White balance fine-tuning indicator 85 X 10 "Beep" indicator 253 23 Image quality 55 11 Satellite signal indicator 171 24 Image size 58 12 Interval timer indicator 160 25 Flash mode 125 13 "k" (appears when memory remains for over 1000 exposures 30...
... flash bracketing 137 WB bracketing 141 22 White balance 81 White balance fine-tuning indicator 85 X 10 "Beep" indicator 253 23 Image quality 55 11 Satellite signal indicator 171 24 Image size 58 12 Interval timer indicator 160 25 Flash mode 125 13 "k" (appears when memory remains for over 1000 exposures 30...

Product Manual
Page 33
... Display (Continued) 26 27 28 29 303132 47 33 46 45 44 43 34 35 36 37 42 41 40 39 38 X 26 Image area indicator 52 38 Pv button assignment 266 27 Release mode 7, 46 39 HDR indicator 113 Continuous shooting speed...... 254 HDR exposure differential ............ 47 Exposure and flash bracketing 34 Copyright information 279 indicator 137 35 Camera battery indicator 29 WB bracketing indicator 141 36 Image comment indicator......... 278 ADL bracketing indicator........... 145 37 ISO sensitivity indicator 70 ISO sensitivity 70 Auto ISO sensitivity indicator ......72 13
... Display (Continued) 26 27 28 29 303132 47 33 46 45 44 43 34 35 36 37 42 41 40 39 38 X 26 Image area indicator 52 38 Pv button assignment 266 27 Release mode 7, 46 39 HDR indicator 113 Continuous shooting speed...... 254 HDR exposure differential ............ 47 Exposure and flash bracketing 34 Copyright information 279 indicator 137 35 Camera battery indicator 29 WB bracketing indicator 141 36 Image comment indicator......... 278 ADL bracketing indicator........... 145 37 ISO sensitivity indicator 70 ISO sensitivity 70 Auto ISO sensitivity indicator ......72 13

Product Manual
Page 45
... the case of CPU lenses equipped with AI mechanisms (non-AI lenses; 0 163). A Detaching the Lens Be sure the camera is attached (0 51). A Image Area The DX format image area is automatically selected when a DX lens is off when removing or exchanging lenses. To remove the lens, press and hold the lens... release button (q) while turning the lens clockwise (w). Image area 25 After removing the lens, replace the lens caps and camera body cap. A Non-CPU/Non-AI Lenses The camera can be used with...
... the case of CPU lenses equipped with AI mechanisms (non-AI lenses; 0 163). A Detaching the Lens Be sure the camera is attached (0 51). A Image Area The DX format image area is automatically selected when a DX lens is off when removing or exchanging lenses. To remove the lens, press and hold the lens... release button (q) while turning the lens clockwise (w). Image area 25 After removing the lens, replace the lens caps and camera body cap. A Non-CPU/Non-AI Lenses The camera can be used with...

Product Manual
Page 50
... exposure mode dial and rotate it to remove dust when the camera is turned on or off (0 329). 30 A Image Sensor Cleaning The camera vibrates the low-pass filter covering the image sensor to the desired setting. Insert another memory card or delete some photos. e.g., values between 2900 and 2999 are rounded...
... exposure mode dial and rotate it to remove dust when the camera is turned on or off (0 329). 30 A Image Sensor Cleaning The camera vibrates the low-pass filter covering the image sensor to the desired setting. Insert another memory card or delete some photos. e.g., values between 2900 and 2999 are rounded...

Product Manual
Page 54
...additional pictures. A photograph will be s displayed by pressing 4 or 2. To view additional information on the current photograph, press 1 and 3 (0 188). 1/12 NIKON Df To end playback and return to shooting mode, press the shutter-release button halfway. 1/ 125 F5. 6 100 50mm 0, 0 100NC_DF DSC_0001. Additional pictures can be...displayed in the monitor for a few seconds after shooting. 34 JPG 15/10/2013 10: 02: 28 NORMAL 4928x3280 A Image Review When On is selected for Image review in the playback menu (0 232), photographs are automatically displayed in the monitor.
...additional pictures. A photograph will be s displayed by pressing 4 or 2. To view additional information on the current photograph, press 1 and 3 (0 188). 1/12 NIKON Df To end playback and return to shooting mode, press the shutter-release button halfway. 1/ 125 F5. 6 100 50mm 0, 0 100NC_DF DSC_0001. Additional pictures can be...displayed in the monitor for a few seconds after shooting. 34 JPG 15/10/2013 10: 02: 28 NORMAL 4928x3280 A Image Review When On is selected for Image review in the playback menu (0 232), photographs are automatically displayed in the monitor.

Product Manual
Page 55
... folder (0 205), use the Delete option in the monitor, press the O button. press the O button again to delete the image and return to delete as described on a selected date (0 206), or all images taken on the preceding page. Note that photographs can not be displayed; Press the O button. A confirmation dialog will be...
... folder (0 205), use the Delete option in the monitor, press the O button. press the O button again to delete the image and return to delete as described on a selected date (0 206), or all images taken on the preceding page. Note that photographs can not be displayed; Press the O button. A confirmation dialog will be...

Product Manual
Page 67
... (available with a memory buffer for about 55 pictures. Do not remove the memory card or remove or disconnect the power source until all images in the buffer have been recorded. For information on shooting conditions and memory card performance, recording may take from a few seconds to the ..., the power will light. If the camera is full (tAA). continuous release, 0 254). note, however, that can be disabled and the images transferred to the memory card. Depending on the number of photographs that the frame rate will drop when the buffer is switched off while data...
... (available with a memory buffer for about 55 pictures. Do not remove the memory card or remove or disconnect the power source until all images in the buffer have been recorded. For information on shooting conditions and memory card performance, recording may take from a few seconds to the ..., the power will light. If the camera is full (tAA). continuous release, 0 254). note, however, that can be disabled and the images transferred to the memory card. Depending on the number of photographs that the frame rate will drop when the buffer is switched off while data...

Product Manual
Page 71
... be apparent in resolution or that the edges of view than lenses for use with DX image area (24×16) A DX Lenses DX lenses are blacked out. 51 dImage Recording Options Image Area Choose an image area from FX (36×24) 1.0× and DX (24×16) 1.5×. Viewfinder display d... Photo with FX image area (36×24) Photo with DX format cameras and have a smaller angle of ...
... be apparent in resolution or that the edges of view than lenses for use with DX image area (24×16) A DX Lenses DX lenses are blacked out. 51 dImage Recording Options Image Area Choose an image area from FX (36×24) 1.0× and DX (24×16) 1.5×. Viewfinder display d... Photo with FX image area (36×24) Photo with DX format cameras and have a smaller angle of ...

Product Manual
Page 72
... to record pictures in DX format. Option On Off Description Camera automatically selects DX crop when DX lens is shown at the center of the image sensor 23.4 × 15.5 mm is attached. A The Viewfinder Display The DX format crop is attached. the area outside the crop can be... used. If another lens is attached, the crop selected for Choose image area will be viewed in 35mm format, multiply by 1.5. d ❚❚ Auto DX Crop Choose whether to automatically select a DX crop when a DX...
... to record pictures in DX format. Option On Off Description Camera automatically selects DX crop when DX lens is shown at the center of the image sensor 23.4 × 15.5 mm is attached. A The Viewfinder Display The DX format crop is attached. the area outside the crop can be... used. If another lens is attached, the crop selected for Choose image area will be viewed in 35mm format, multiply by 1.5. d ❚❚ Auto DX Crop Choose whether to automatically select a DX crop when a DX...

Product Manual
Page 73
... option in the shooting menu or by pressing a control and rotating a command dial. ❚❚ The Image Area Menu 1 Select Image area in the shooting menu (0 235) and press 2. G button 2 Choose an option. The selected crop is shown in the viewfinder (0 52). Press... G to display the menus. Highlight Auto DX crop or Choose image area and press 2. A Image Area The selected option is displayed in the information display....
... option in the shooting menu or by pressing a control and rotating a command dial. ❚❚ The Image Area Menu 1 Select Image area in the shooting menu (0 235) and press 2. G button 2 Choose an option. The selected crop is shown in the viewfinder (0 52). Press... G to display the menus. Highlight Auto DX crop or Choose image area and press 2. A Image Area The selected option is displayed in the information display....

Product Manual
Page 74
... button, 0 267). 2 Use the selected control to display the image area in the viewfinder or information display. The image area can be selected by pressing the button to choose an image area. d The option currently selected for image area can not be viewed by pressing the selected button and rotating...is on. D Auto DX Crop The selected control can be used to a camera control. A Image Size Image size varies with the option selected for a camera control in the Custom Settings menu (0 266). Select Choose image area as "24 - 16". FX format is displayed as "36 - 24" and DX ...
... button, 0 267). 2 Use the selected control to display the image area in the viewfinder or information display. The image area can be selected by pressing the button to choose an image area. d The option currently selected for image area can not be viewed by pressing the selected button and rotating...is on. D Auto DX Crop The selected control can be used to a camera control. A Image Size Image size varies with the option selected for a camera control in the Custom Settings menu (0 266). Select Choose image area as "24 - 16". FX format is displayed as "36 - 24" and DX ...


