
Instruction Booklet
Page 2
... hour. NOTE: This product only plays Nintendo GameCube Game Discs that may have any of the following symptoms: Convulsions Altered vision Eye or muscle twitching Involuntary movements Loss of awareness Disorientation • To reduce the likelihood of electric shock from lighting. • Use only the AC Adapter that comes with this system, stop and...
... hour. NOTE: This product only plays Nintendo GameCube Game Discs that may have any of the following symptoms: Convulsions Altered vision Eye or muscle twitching Involuntary movements Loss of awareness Disorientation • To reduce the likelihood of electric shock from lighting. • Use only the AC Adapter that comes with this system, stop and...
Instruction Booklet
Page 3
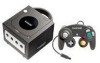
...for service. CONTENTS Section 1 Section 2 Section 3 Section 4 Section 5 Section 6 Section 7 Section 8 Components Nintendo GameCube 2-4 AC Adapter 5 Stereo Audio/Video Cable 5 Controller 6 System Setup Connecting the AC Adapter & Controller 7 Connecting to a Stereo TV/VCR using a Stereo AV Cable 8 Connecting to a Stereo TV/VCR using a... Service Information 26 Video Game Rating Information 27 1 Always look for this number when calling for purchasing the Nintendo GameCube™. You may need to refer to a TV without the Official Nintendo Seal. Nintendo does not license the...
...for service. CONTENTS Section 1 Section 2 Section 3 Section 4 Section 5 Section 6 Section 7 Section 8 Components Nintendo GameCube 2-4 AC Adapter 5 Stereo Audio/Video Cable 5 Controller 6 System Setup Connecting the AC Adapter & Controller 7 Connecting to a Stereo TV/VCR using a Stereo AV Cable 8 Connecting to a Stereo TV/VCR using a... Service Information 26 Video Game Rating Information 27 1 Always look for this number when calling for purchasing the Nintendo GameCube™. You may need to refer to a TV without the Official Nintendo Seal. Nintendo does not license the...

Instruction Booklet
Page 4
... power is on Open Button Opens disc cover FRONT VIEW Controller Sockets For connection of Nintendo GameCube controllers and accessories 12 34 Disc Release Button Press to release Game Disc BACK VIEW DC Input Connector (DC 12V IN) Connects the DC Jack of the AC Adapter Memory Card Slots (SLOT A and SLOT B) SLOT A SLOT B For connection...
... power is on Open Button Opens disc cover FRONT VIEW Controller Sockets For connection of Nintendo GameCube controllers and accessories 12 34 Disc Release Button Press to release Game Disc BACK VIEW DC Input Connector (DC 12V IN) Connects the DC Jack of the AC Adapter Memory Card Slots (SLOT A and SLOT B) SLOT A SLOT B For connection...
Instruction Booklet
Page 6
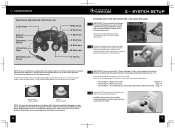
... the AC Adapter and Controller IMPORTANT: Please review the Hardware 1 Precautions/Maintenance section of the separate Precautions Booklet included with this product before connecting the Nintendo GameCube to wide slot and insert fully into the Controller 2 Socket on the back of the console. Control Stick neutral position C Stick neutral position NOTE: On specially designed games, the Game Boy®...
... the AC Adapter and Controller IMPORTANT: Please review the Hardware 1 Precautions/Maintenance section of the separate Precautions Booklet included with this product before connecting the Nintendo GameCube to wide slot and insert fully into the Controller 2 Socket on the back of the console. Control Stick neutral position C Stick neutral position NOTE: On specially designed games, the Game Boy®...
Instruction Booklet
Page 9
...turned on your TV or VCR. 1 Usually this product before using Nintendo GameCube Discs. 5 Place the Game Disc, printed side up, into the console and the wall outlet. (Illustration 2) 3 4 Press the Open Button to the Nintendo GameCube. Locate the input select for the component that the Stereo AV ... between the different inputs on for the first time, the Nintendo GameCube logo screen, shown below . If channel 3 has an active television station, change both switches to channel 4. 3 Make sure that both the controller and AC Adapter are : input, select, input select, line, line in...
...turned on your TV or VCR. 1 Usually this product before using Nintendo GameCube Discs. 5 Place the Game Disc, printed side up, into the console and the wall outlet. (Illustration 2) 3 4 Press the Open Button to the Nintendo GameCube. Locate the input select for the component that the Stereo AV ... between the different inputs on for the first time, the Nintendo GameCube logo screen, shown below . If channel 3 has an active television station, change both switches to channel 4. 3 Make sure that both the controller and AC Adapter are : input, select, input select, line, line in...

Instruction Booklet
Page 10
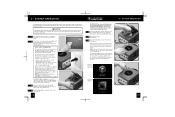
...: To prevent your Nintendo GameCube, disconnect the AC Adapter from center towards the edges; Control Stick • Select menu screen • Highlight menu item • Change menu setting Game Play Screen Displays information about the Game Disc currently loaded into the Nintendo GameCube, set the date and time, see information about the Game Disc loaded into the console. See page...
...: To prevent your Nintendo GameCube, disconnect the AC Adapter from center towards the edges; Control Stick • Select menu screen • Highlight menu item • Change menu setting Game Play Screen Displays information about the Game Disc currently loaded into the Nintendo GameCube, set the date and time, see information about the Game Disc loaded into the console. See page...

Instruction Booklet
Page 13
...Adapter is clean and in good condition. If the Main Menu appears the disc may be dirty or damaged. • Check that the Game Disc will only work on TV screen. This system will work with a soft cloth from your version of the console. • Make sure that the power switches on Nintendo GameCube...ask for confirmation for use this booklet to the TV (see page 9). • The progressive scan feature is only available on Nintendo Gamecube Model No. Use the 3 Control Stick to select "ERASE" and press the A 2 Button. After selecting "Memory Card Screen" from the Main 1 Menu, if...
...Adapter is clean and in good condition. If the Main Menu appears the disc may be dirty or damaged. • Check that the Game Disc will only work on TV screen. This system will work with a soft cloth from your version of the console. • Make sure that the power switches on Nintendo GameCube...ask for confirmation for use this booklet to the TV (see page 9). • The progressive scan feature is only available on Nintendo Gamecube Model No. Use the 3 Control Stick to select "ERASE" and press the A 2 Button. After selecting "Memory Card Screen" from the Main 1 Menu, if...

Instruction Booklet
Page 14
...disconnect the AC Adapter plug from the wall outlet, wait 2 minutes and plug it back into the outlet. Turn the console power ON. • Remove all game sounds. If the Power Indicator Light now comes on your particular setup. (Review page 12 on Nintendo GameCube Model No.... connection, make sure to get all controllers and accessories from the Nintendo GameCube and repeat the above procedure. Use a "Y" Adapter to use only a licensed Nintendo RF Switch and Modulator (look for the Official Nintendo Seal). • Make sure the power of the Nintendo GameCube is turned OFF. • If using...
...disconnect the AC Adapter plug from the wall outlet, wait 2 minutes and plug it back into the outlet. Turn the console power ON. • Remove all game sounds. If the Power Indicator Light now comes on your particular setup. (Review page 12 on Nintendo GameCube Model No.... connection, make sure to get all controllers and accessories from the Nintendo GameCube and repeat the above procedure. Use a "Y" Adapter to use only a licensed Nintendo RF Switch and Modulator (look for the Official Nintendo Seal). • Make sure the power of the Nintendo GameCube is turned OFF. • If using...

