
Instruction Booklet
Page 2
...sickness. Dolby, Pro Logic and the double-D symbol are trademarks of the Nintendo GameCube that have "For use only in other demanding activity until you feel dizzy or nauseous when playing video games with this system: • Do not use the AC Adapter if it . •.... Repetitive Motion Injuries and Eyestrain Playing video games can make your Nintendo GameCube system. CAUTION - Stop playing and consult a doctor if you are trademarks of the Nintendo GameCube that may result in 4000) may result in a well-lit room. 5. Play video games on using or maintaining your muscles, joints...
...sickness. Dolby, Pro Logic and the double-D symbol are trademarks of the Nintendo GameCube that have "For use only in other demanding activity until you feel dizzy or nauseous when playing video games with this system: • Do not use the AC Adapter if it . •.... Repetitive Motion Injuries and Eyestrain Playing video games can make your Nintendo GameCube system. CAUTION - Stop playing and consult a doctor if you are trademarks of the Nintendo GameCube that may result in 4000) may result in a well-lit room. 5. Play video games on using or maintaining your muscles, joints...
Instruction Booklet
Page 3
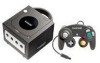
... Screens 18-20 Troubleshooting 21-24 Error Messages 25 Warranty and Service Information 26 Video Game Rating Information 27 1 CONTENTS Section 1 Section 2 Section 3 Section 4 Section 5 Section 6 Section 7 Section 8 Components Nintendo GameCube 2-4 AC Adapter 5 Stereo Audio/Video Cable 5 Controller 6 System Setup Connecting the AC Adapter & Controller 7 Connecting to a Stereo TV/VCR using a Stereo AV Cable...
... Screens 18-20 Troubleshooting 21-24 Error Messages 25 Warranty and Service Information 26 Video Game Rating Information 27 1 CONTENTS Section 1 Section 2 Section 3 Section 4 Section 5 Section 6 Section 7 Section 8 Components Nintendo GameCube 2-4 AC Adapter 5 Stereo Audio/Video Cable 5 Controller 6 System Setup Connecting the AC Adapter & Controller 7 Connecting to a Stereo TV/VCR using a Stereo AV Cable...
Instruction Booklet
Page 6
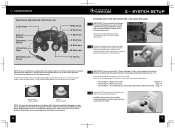
...game you are moved out of neutral position when the power is turned ON, those positions will be connected directly to the Nintendo GameCube for availability of this feature. 6 2 • SYSTEM SETUP Connecting the AC Adapter and Controller IMPORTANT: Please review the Hardware 1 Precautions/Maintenance section of the console...: On specially designed games, the Game Boy® Advance handheld video game system (sold separately, see back cover for purchasing information) can be set as an additional game screen and/or controller. Please check Nintendo GameCube software packaging for use...
...game you are moved out of neutral position when the power is turned ON, those positions will be connected directly to the Nintendo GameCube for availability of this feature. 6 2 • SYSTEM SETUP Connecting the AC Adapter and Controller IMPORTANT: Please review the Hardware 1 Precautions/Maintenance section of the console...: On specially designed games, the Game Boy® Advance handheld video game system (sold separately, see back cover for purchasing information) can be set as an additional game screen and/or controller. Please check Nintendo GameCube software packaging for use...

Instruction Booklet
Page 7
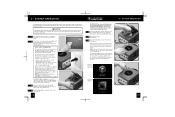
... connections as shown, please turn to display specially designed games in Progressive Scan Mode if your TV has Progressive Scan capability (see illustration above . See page 12 for more information about input select on Nintendo GameCube Model No. This feature is not needed when using... Audio Left (White) Audio Right (Red) To console ANALOG AV OUT S-Video Stereo AV Cable 8 2 • SYSTEM SETUP Connecting to a Stereo TV (Digital Ready) Using a Stereo AV Cable and Component Video Cable (For Nintendo GameCube Model No. 2 • SYSTEM SETUP Connecting to a Stereo TV or VCR Using ...
... connections as shown, please turn to display specially designed games in Progressive Scan Mode if your TV has Progressive Scan capability (see illustration above . See page 12 for more information about input select on Nintendo GameCube Model No. This feature is not needed when using... Audio Left (White) Audio Right (Red) To console ANALOG AV OUT S-Video Stereo AV Cable 8 2 • SYSTEM SETUP Connecting to a Stereo TV (Digital Ready) Using a Stereo AV Cable and Component Video Cable (For Nintendo GameCube Model No. 2 • SYSTEM SETUP Connecting to a Stereo TV or VCR Using ...

Instruction Booklet
Page 8
... Stereo Sound) TV or VCR Inputs VIDEO IN AUDIO IN (Yellow) (White) 2 • SYSTEM SETUP Connecting to page 12. 11 After completing the connections as shown, please turn to a TV... TV or VCR. NOTE: For the game image to page 12. 10 RF Modulator To console ANALOG AV OUT RF Switch Channel 3/4 Switch Existing Cable TV Connection NOTE: All Nintendo brand RF Switches (NES, SNES and ... input channel ("input select") on your TV or VCR, although some sound will work with the Nintendo GameCube. You can also find more information on your TV or VCR (Do not use connections labeled "OUT...
... Stereo Sound) TV or VCR Inputs VIDEO IN AUDIO IN (Yellow) (White) 2 • SYSTEM SETUP Connecting to page 12. 11 After completing the connections as shown, please turn to a TV... TV or VCR. NOTE: For the game image to page 12. 10 RF Modulator To console ANALOG AV OUT RF Switch Channel 3/4 Switch Existing Cable TV Connection NOTE: All Nintendo brand RF Switches (NES, SNES and ... input channel ("input select") on your TV or VCR, although some sound will work with the Nintendo GameCube. You can also find more information on your TV or VCR (Do not use connections labeled "OUT...
Instruction Booklet
Page 9
... your TV or VCR. 1 Usually this product before using Nintendo GameCube Discs. 5 Place the Game Disc, printed side up, into the console and the wall outlet. (Illustration 2) 3 4 Press the Open Button to open the Disc Cover. (Illustration 3) VIDEO 12 3 • SYSTEM OPERATION IMPORTANT: Please review the Game Disc Precautions/Maintenance sections of the TV or VCR...
... your TV or VCR. 1 Usually this product before using Nintendo GameCube Discs. 5 Place the Game Disc, printed side up, into the console and the wall outlet. (Illustration 2) 3 4 Press the Open Button to open the Disc Cover. (Illustration 3) VIDEO 12 3 • SYSTEM OPERATION IMPORTANT: Please review the Game Disc Precautions/Maintenance sections of the TV or VCR...

Instruction Booklet
Page 10
... Calendar Screen Displays settings for Sound and Screen Position. 3 • SYSTEM OPERATION Removing a Game Disc 1 While the power is ON, push the Open Button to read the game data correctly. Do not touch the bottom, unprinted surface of the following...Nintendo GameCube, disconnect the AC Adapter from becoming dirty or scratched, always handle 1 it in the console or, • Turn the power ON while holding down the A Button on the controller. (Hold down until the disc stops spinning before removing it from the console. 2 Push the Disc Release Button and remove the Game...
... Calendar Screen Displays settings for Sound and Screen Position. 3 • SYSTEM OPERATION Removing a Game Disc 1 While the power is ON, push the Open Button to read the game data correctly. Do not touch the bottom, unprinted surface of the following...Nintendo GameCube, disconnect the AC Adapter from becoming dirty or scratched, always handle 1 it in the console or, • Turn the power ON while holding down the A Button on the controller. (Hold down until the disc stops spinning before removing it from the console. 2 Push the Disc Release Button and remove the Game...

Instruction Booklet
Page 13
...if your version of the console. • Make sure that the power switches on the Nintendo GameCube, TV and VCR (if used) are correct for use this procedure will be sure that the Game Disc is only available on Nintendo Gamecube Model No. SOLUTION • Make sure that the Nintendo GameCube, TV and VCR (...8226; Make sure that the DC Jack on the AC Adapter is firmly plugged into the DC Input Connector on the back of the Nintendo GameCube. This system will appear to ask for confirmation for formatting. Use the Control Stick to select "ERASE" and press the A 2 Button. If required...
...if your version of the console. • Make sure that the power switches on the Nintendo GameCube, TV and VCR (if used) are correct for use this procedure will be sure that the Game Disc is only available on Nintendo Gamecube Model No. SOLUTION • Make sure that the Nintendo GameCube, TV and VCR (...8226; Make sure that the DC Jack on the AC Adapter is firmly plugged into the DC Input Connector on the back of the Nintendo GameCube. This system will appear to ask for confirmation for formatting. Use the Control Stick to select "ERASE" and press the A 2 Button. If required...

Instruction Booklet
Page 14
... both left one of the Nintendo GameCube is turned OFF. • If using a RF Switch connection, make sure the video (yellow) connector is buzzing. When not playing games, the normal TV picture won't come on, or goes off during game play games, you must reconnect the RF Switch.) 23 Turn the console power ON. • Remove...
... both left one of the Nintendo GameCube is turned OFF. • If using a RF Switch connection, make sure the video (yellow) connector is buzzing. When not playing games, the normal TV picture won't come on, or goes off during game play games, you must reconnect the RF Switch.) 23 Turn the console power ON. • Remove...

Instruction Booklet
Page 15
... any fine tuning and contrast controls on the TV. • If your Nintendo GameCube system still does not operate correctly after trying the troubleshooting remedies, please visit the customer service area of the console. • Read the instruction booklet for the game you are playing to make sure to the outside edge. If necessary, clean...
... any fine tuning and contrast controls on the TV. • If your Nintendo GameCube system still does not operate correctly after trying the troubleshooting remedies, please visit the customer service area of the console. • Read the instruction booklet for the game you are playing to make sure to the outside edge. If necessary, clean...

Instruction Booklet
Page 16
... as the only basis for twelve (12) months from the date of the Nintendo GameCube. 8 • ESRB VIDEO GAME RATING INFORMATION Entertainment software Rating board (ESRB) Video and Computer Game Software rating Information The Entertainment Software Rating Board (ESRB) ratings are awaiting final ... ages 13 and older. The ESRB rating system is not responsible for a complete list of America Inc. ("Nintendo") warrants to provide information about video and computer game content, so you specific legal rights. HARDWARE WARRANTY Nintendo of these content descriptors. SOME STATES DO...
... as the only basis for twelve (12) months from the date of the Nintendo GameCube. 8 • ESRB VIDEO GAME RATING INFORMATION Entertainment software Rating board (ESRB) Video and Computer Game Software rating Information The Entertainment Software Rating Board (ESRB) ratings are awaiting final ... ages 13 and older. The ESRB rating system is not responsible for a complete list of America Inc. ("Nintendo") warrants to provide information about video and computer game content, so you specific legal rights. HARDWARE WARRANTY Nintendo of these content descriptors. SOME STATES DO...

Setup Guide
Page 1
...INCLUDED WITH THE NINTENDO GAMECUBE SYSTEM OR GAMES BEFORE USING THIS ACCESSORY. THIS BOOKLET CONTAINS IMPORTANT SAFETY INFORMATION. If you won't be using the phone connection for extended periods when not in the Nintendo GameCube even when not playing a modem compatible game. The Modem Adapter... plug on the Modem Adapter. Removing the cover. 4. If necessary, disconnect your phone from the console, wall outlet, Modem Adapter or phone jack, first turn the Nintendo GameCube off. Inserting the Modem Adapter. Illustration 3 - Illustration 4 - Removing the Modem Adapter. 6. ...
...INCLUDED WITH THE NINTENDO GAMECUBE SYSTEM OR GAMES BEFORE USING THIS ACCESSORY. THIS BOOKLET CONTAINS IMPORTANT SAFETY INFORMATION. If you won't be using the phone connection for extended periods when not in the Nintendo GameCube even when not playing a modem compatible game. The Modem Adapter... plug on the Modem Adapter. Removing the cover. 4. If necessary, disconnect your phone from the console, wall outlet, Modem Adapter or phone jack, first turn the Nintendo GameCube off. Inserting the Modem Adapter. Illustration 3 - Illustration 4 - Removing the Modem Adapter. 6. ...


