

English Manual
Page 1
...the space above for future reference. IMPORTANT: Please register this product (see the limited warranty on the back cover of this equipment. Save this manual for reference. Serial Number Decal QUESTIONS? CALL TOLL-FREE: 1-800-TO-BE-FIT (1-800-862-3348) Mon.-Fri. 6 a.m.-6 p.m. Write the... serial number in this manual before using this manual) before contacting Customer Care. please contact Customer Care. If you have questions, or if parts are damaged or missing, DO NOT CONTACT THE...
...the space above for future reference. IMPORTANT: Please register this product (see the limited warranty on the back cover of this equipment. Save this manual for reference. Serial Number Decal QUESTIONS? CALL TOLL-FREE: 1-800-TO-BE-FIT (1-800-862-3348) Mon.-Fri. 6 a.m.-6 p.m. Write the... serial number in this manual before using this manual) before contacting Customer Care. please contact Customer Care. If you have questions, or if parts are damaged or missing, DO NOT CONTACT THE...

English Manual
Page 2
Apply the decal in the location shown. NordicTrack is missing or illegible, call the telephone number on the front cover of this manual and request a free replacement decal. Note: The decals may not be shown at actual size. TABLE OF CONTENTS WARNING DECAL PLACEMENT 2 IMPORTANT... PRECAUTIONS 3 BEFORE YOU BEGIN 5 ASSEMBLY 6 OPERATION AND ADJUSTMENT 14 HOW TO FOLD AND MOVE THE TREADMILL 24 TROUBLESHOOTING 25 EXERCISE ...
Apply the decal in the location shown. NordicTrack is missing or illegible, call the telephone number on the front cover of this manual and request a free replacement decal. Note: The decals may not be shown at actual size. TABLE OF CONTENTS WARNING DECAL PLACEMENT 2 IMPORTANT... PRECAUTIONS 3 BEFORE YOU BEGIN 5 ASSEMBLY 6 OPERATION AND ADJUSTMENT 14 HOW TO FOLD AND MOVE THE TREADMILL 24 TROUBLESHOOTING 25 EXERCISE ...

English Manual
Page 3
... functioning surge suppressor could become caught in the treadmill. Before beginning any surface that all warnings on your treadmill before using your local NordicTrack dealer or call the telephone number on the front cover of this manual and all users of this product. 1. Use the treadmill only as an exercise aid in determining heart rate...
... functioning surge suppressor could become caught in the treadmill. Before beginning any surface that all warnings on your treadmill before using your local NordicTrack dealer or call the telephone number on the front cover of this manual and all users of this product. 1. Use the treadmill only as an exercise aid in determining heart rate...

English Manual
Page 4
... storage position. 23. Do not use , before cleaning the treadmill, and before performing the mainte- Never insert any object into the off position when the treadmill is holding the frame securely in this manual should be able to safely lift 45 lbs. (20 kg)... raise, lower, or move the treadmill. 22. Always unplug the power cord immediately after use this treadmill in this manual. Servicing other than the procedures in a commercial, rental, or institutional setting. 27. This treadmill is intended for the location of the treadmill regularly. 20. Over exercising may...
... storage position. 23. Do not use , before cleaning the treadmill, and before performing the mainte- Never insert any object into the off position when the treadmill is holding the frame securely in this manual should be able to safely lift 45 lbs. (20 kg)... raise, lower, or move the treadmill. 22. Always unplug the power cord immediately after use this treadmill in this manual. Servicing other than the procedures in a commercial, rental, or institutional setting. 27. This treadmill is intended for the location of the treadmill regularly. 20. Over exercising may...

English Manual
Page 5
.../Clip Power Switch Power Cord Idler Roller Adjustment Bolts Platform Cushion 5 To help us assist you for selecting the revolutionary NordicTrack® A2750 PRO treadmill. And when you have questions after read this manual carefully before contacting us. The model number and the location of the serial number decal are shown on the front cover...
.../Clip Power Switch Power Cord Idler Roller Adjustment Bolts Platform Cushion 5 To help us assist you for selecting the revolutionary NordicTrack® A2750 PRO treadmill. And when you have questions after read this manual carefully before contacting us. The model number and the location of the serial number decal are shown on the front cover...

English Manual
Page 6
... below to the top of the walking belt or the shipping carton. Extra hardware may have been preassembled. Do not dispose of the treadmill walking belt is the key number of the part, from the PART LIST near the end of the walking belt, simply wipe off the...cloth and a mild, non-abrasive cleaner. The number after the parentheses is normal and does not affect treadmill performance. Note: The underside of the packing materials until assembly is lubricant on top of this manual. If there is completed. The number in a cleared area and remove all packing materials. Note: ...
... below to the top of the walking belt or the shipping carton. Extra hardware may have been preassembled. Do not dispose of the treadmill walking belt is the key number of the part, from the PART LIST near the end of the walking belt, simply wipe off the...cloth and a mild, non-abrasive cleaner. The number after the parentheses is normal and does not affect treadmill performance. Note: The underside of the packing materials until assembly is lubricant on top of this manual. If there is completed. The number in a cleared area and remove all packing materials. Note: ...

English Manual
Page 15
... 18. You can display speed and distance in this manual. You can even listen to the walking platform, wear clean athletic shoes while using the treadmill. To use a preset workout, see page 23. The first time the treadmill is a sheet of plastic on the console, remove...your favorite workout music or audio books with the touch of a button. CONSOLE DIAGRAM Audio Jack FEATURES OF THE CONSOLE The treadmill console offers an impressive array of features designed to access other runners using a competition workout. Each preset workout automatically controls the...
... 18. You can display speed and distance in this manual. You can even listen to the walking platform, wear clean athletic shoes while using the treadmill. To use a preset workout, see page 23. The first time the treadmill is a sheet of plastic on the console, remove...your favorite workout music or audio books with the touch of a button. CONSOLE DIAGRAM Audio Jack FEATURES OF THE CONSOLE The treadmill console offers an impressive array of features designed to access other runners using a competition workout. Each preset workout automatically controls the...

English Manual
Page 16
..., Key and slide the clip securely onto the waistband of your clothes. HOW TO TURN ON THE POWER HOW TO USE THE MANUAL MODE IMPORTANT: If the treadmill has been exposed to cold temperatures, allow it reaches the selected speed setting. If the displays remain lit, see page 14). ... sole, causing the walking belt to slow to select a speed setting of the buttons, the speed setting will light. just the position of the treadmill. Each time you may damage the console displays or other electrical components. 1. Make sure that includes a decimal- Locate the clip attached to room ...
..., Key and slide the clip securely onto the waistband of your clothes. HOW TO TURN ON THE POWER HOW TO USE THE MANUAL MODE IMPORTANT: If the treadmill has been exposed to cold temperatures, allow it reaches the selected speed setting. If the displays remain lit, see page 14). ... sole, causing the walking belt to slow to select a speed setting of the buttons, the speed setting will light. just the position of the treadmill. Each time you may damage the console displays or other electrical components. 1. Make sure that includes a decimal- Locate the clip attached to room ...

English Manual
Page 18
...a Next button appears on the console. During the workout, the profile will begin walking. If you select a performance workout, you have selected the manual mode, a workout, or the iFit Live mode, press the Menu button to return to start the workout. Then, press the increase or decrease button...workout. Start the workout. 1. Hold the handrails and begin to view the profile. Press the Select button. When you press the button, the treadmill will show your workout. Note: The same speed and/or incline setting may be programmed for the current segment. If a new speed and/...
...a Next button appears on the console. During the workout, the profile will begin walking. If you select a performance workout, you have selected the manual mode, a workout, or the iFit Live mode, press the Menu button to return to start the workout. Then, press the increase or decrease button...workout. Start the workout. 1. Hold the handrails and begin to view the profile. Press the Select button. When you press the button, the treadmill will show your workout. Note: The same speed and/or incline setting may be programmed for the current segment. If a new speed and/...

English Manual
Page 19
The walking belt will be followed by pressing the Speed or Incline buttons; In addition, if you manually change the speed or incline of the treadmill during the workout, the number of calories that you select a distance workout, the display will show a flame representing 25 calories. 5.... If you burn will automatically adjust to a stop the workout at 1 mph. If you can manually override the setting by a cool...
The walking belt will be followed by pressing the Speed or Incline buttons; In addition, if you manually change the speed or incline of the treadmill during the workout, the number of calories that you select a distance workout, the display will show a flame representing 25 calories. 5.... If you burn will automatically adjust to a stop the workout at 1 mph. If you can manually override the setting by a cool...

English Manual
Page 20
.... Your opponents will adjust their speed and tactics based on the screen and then the race will determine which you walk or run on the treadmill, the screen can also press the Competition Workouts button on the screen. 3. The display option you select will begin walking. Select a competition workout. ...buttons. As you will display the opponentʼs level of endurance, average speed, maximum speed, and level of difficulty. If you have selected the manual mode, a workout, or the iFit Live mode, press the Menu button to return to select the desired display option.
.... Your opponents will adjust their speed and tactics based on the screen and then the race will determine which you walk or run on the treadmill, the screen can also press the Competition Workouts button on the screen. 3. The display option you select will begin walking. Select a competition workout. ...buttons. As you will display the opponentʼs level of endurance, average speed, maximum speed, and level of difficulty. If you have selected the manual mode, a workout, or the iFit Live mode, press the Menu button to return to select the desired display option.

English Manual
Page 22
... audio player. To use an iFit Live module, you can download personalized workouts and track and analyze your workout results on the side of this manual. Make sure that the audio wire is fully plugged in. Next, press the Play button on the console. HOW TO USE THE IFIT LIVE MODE... HOW TO USE THE STEREO SOUND SYSTEM The optional iFit Live module allows your treadmill to www.iFit.com. You must have an iFit Live module to the console. Locate the audio wire and plug it into the console. To...
... audio player. To use an iFit Live module, you can download personalized workouts and track and analyze your workout results on the side of this manual. Make sure that the audio wire is fully plugged in. Next, press the Play button on the console. HOW TO USE THE IFIT LIVE MODE... HOW TO USE THE STEREO SOUND SYSTEM The optional iFit Live module allows your treadmill to www.iFit.com. You must have an iFit Live module to the console. Locate the audio wire and plug it into the console. To...
English Manual
Page 25
... Screws (52). Check the power switch (see THE INFORMATION MODE on page 23 to be used if the treadmill is plugged into the console. b. Make sure that meets all of this manual. Reinsert the key into a properly grounded outlet (see page 14). The console features a display demo mode, ...outlets and may not be solved by following the simple steps below. PROBLEM: The displays of this manual. If the power cord is inserted into the console. If the treadmill still will not run, please see the front cover of the console do not function properly SOLUTION...
... Screws (52). Check the power switch (see THE INFORMATION MODE on page 23 to be used if the treadmill is plugged into the console. b. Make sure that meets all of this manual. Reinsert the key into a properly grounded outlet (see page 14). The console features a display demo mode, ...outlets and may not be solved by following the simple steps below. PROBLEM: The displays of this manual. If the power cord is inserted into the console. If the treadmill still will not run, please see the front cover of the console do not function properly SOLUTION...

English Manual
Page 26
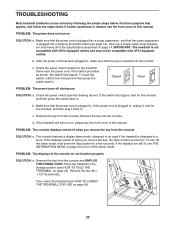
Reattach the Motor Hood (not 44 43 shown) with the Reed Switch. Run the Top 42 treadmill for a few minutes. PROBLEM: The walking belt slows when walked on , see the front cover of this manual. 26 When the walking belt is properly tightened. b 2-3 in . (5 to lift each edge of...for a few minutes to keep the walking belt centered. Idler Roller Bolts c. If 1/8 in . (3 mm). PROBLEM: The incline of a turn. The treadmill will recalibrate the incline system. If the incline does not calibrate, press the Stop button, and then press the Incline increase or decrease button again...
Reattach the Motor Hood (not 44 43 shown) with the Reed Switch. Run the Top 42 treadmill for a few minutes. PROBLEM: The walking belt slows when walked on , see the front cover of this manual. 26 When the walking belt is properly tightened. b 2-3 in . (5 to lift each edge of...for a few minutes to keep the walking belt centered. Idler Roller Bolts c. If 1/8 in . (3 mm). PROBLEM: The incline of a turn. The treadmill will recalibrate the incline system. If the incline does not calibrate, press the Stop button, and then press the Incline increase or decrease button again...
English Manual
Page 30
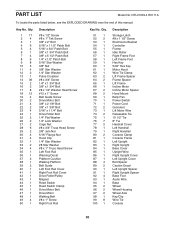
... Walking Belt #8 x 1" Screw Right Foot Rail Key No. NTL01009.4 R0111A To locate the parts listed below, see the EXPLODED DRAWING near the end of this manual. PART LIST Model No.
... Walking Belt #8 x 1" Screw Right Foot Rail Key No. NTL01009.4 R0111A To locate the parts listed below, see the EXPLODED DRAWING near the end of this manual. PART LIST Model No.

English Manual
Page 31
Qty. Key No. Description 101 1 102 1 103 1 104 1 105 1 106 1 Left Accessory Tray Console Base Module Housing Right Accessory Tray Access Door Pulse Bar 107 3 108 1 109 4 110 4 * - Pulse Ground Wire Site Warning Decal #8 x 3/4" Tek Screw Small Platform Cushion Userʼs Manual Note: Specifications are not illustrated. 31 For information about ordering replacement parts, see the back cover of this manual. *These parts are subject to change without notice. Qty. Description Key No.
Qty. Key No. Description 101 1 102 1 103 1 104 1 105 1 106 1 Left Accessory Tray Console Base Module Housing Right Accessory Tray Access Door Pulse Bar 107 3 108 1 109 4 110 4 * - Pulse Ground Wire Site Warning Decal #8 x 3/4" Tek Screw Small Platform Cushion Userʼs Manual Note: Specifications are not illustrated. 31 For information about ordering replacement parts, see the back cover of this manual. *These parts are subject to change without notice. Qty. Description Key No.

English Manual
Page 36
...number of the product (see the front cover of this manual) • the name of the product (see the front cover of this manual) • the key number and description of the replacement part(s) (see the front cover of this manual. Parts are warranted for a lifetime. If the product ... the original purchaser. ORDERING REPLACEMENT PARTS To order replacement parts, please see the PART LIST and the EXPLODED DRAWING near the end of this manual) LIMITED WARRANTY IMPORTANT: You must be free from state to state. Labor is limited to repairing or replacing, at ICONʼs option,...
...number of the product (see the front cover of this manual) • the name of the product (see the front cover of this manual) • the key number and description of the replacement part(s) (see the front cover of this manual. Parts are warranted for a lifetime. If the product ... the original purchaser. ORDERING REPLACEMENT PARTS To order replacement parts, please see the PART LIST and the EXPLODED DRAWING near the end of this manual) LIMITED WARRANTY IMPORTANT: You must be free from state to state. Labor is limited to repairing or replacing, at ICONʼs option,...

