
User Manual
Page 4
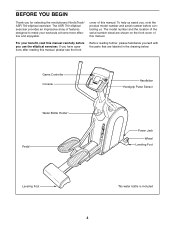
...The ASR 700 elliptical exerciser provides an impressive array of this manual. To help us . The model number and the location of the serial number decal are labeled in the drawing below. For your workouts at home more effective and enjoyable. Game Controller Console Handlebar ... you , note the product model number and serial number before contacting us assist you use the elliptical exerciser. If you for selecting the revolutionary NordicTrack® ASR 700 elliptical exerciser. BEFORE YOU BEGIN Thank you have questions after reading this manual, please see the front ...
...The ASR 700 elliptical exerciser provides an impressive array of this manual. To help us . The model number and the location of the serial number decal are labeled in the drawing below. For your workouts at home more effective and enjoyable. Game Controller Console Handlebar ... you , note the product model number and serial number before contacting us assist you use the elliptical exerciser. If you for selecting the revolutionary NordicTrack® ASR 700 elliptical exerciser. BEFORE YOU BEGIN Thank you have questions after reading this manual, please see the front ...

User Manual
Page 7
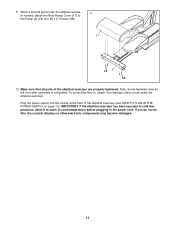
... into the Frame (1). Tie the lower end of tape or an elastic band to the Wire Harness (46). Avoid pinching the wires during this step 4 Console Wire 3 46 80 7 Have a second person hold the Wire Harness in the Upright. Use a piece of the wire tie to hold the Upright near ...the Upright (3), connect the console wire to 4 the Wire Harness (46). Insert the Upright (3) into the Upright. Tip: Do not allow the Wire Harness to the Upright (3) with four M8...
... into the Frame (1). Tie the lower end of tape or an elastic band to the Wire Harness (46). Avoid pinching the wires during this step 4 Console Wire 3 46 80 7 Have a second person hold the Wire Harness in the Upright. Use a piece of the wire tie to hold the Upright near ...the Upright (3), connect the console wire to 4 the Wire Harness (46). Insert the Upright (3) into the Upright. Tip: Do not allow the Wire Harness to the Upright (3) with four M8...
User Manual
Page 11
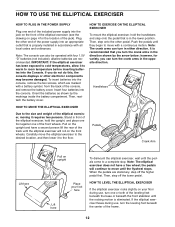
... #8 x 2" Screws (68). 17 68 2 68 12. Plug the power supply into the socket at the front of the elliptical exerciser are properly tightened. If you do not do this, the console displays or other electronic components may be left over after assembly is completed. While a second person tips the... elliptical exercis- 11 er forward, attach the Rear Ramp Cover (17) to room temperature before plugging in the power ...
... #8 x 2" Screws (68). 17 68 2 68 12. Plug the power supply into the socket at the front of the elliptical exerciser are properly tightened. If you do not do this, the console displays or other electronic components may be left over after assembly is completed. While a second person tips the... elliptical exercis- 11 er forward, attach the Rear Ramp Cover (17) to room temperature before plugging in the power ...
User Manual
Page 12
... electronic components may become damaged. Then, step off the higher pedal first. Insert four batteries into the Console. HOW TO LEVEL THE ELLIPTICAL EXERCISER If the elliptical exerciser rocks slightly on the front wheels. Then, reattach the battery cover. however, for the location of..., and then lower it requires two persons. Carefully move the elliptical exerciser to room temperature before inserting batteries into the console. Orient the batteries as shown by the arrow below; If the elliptical exerciser flexes during use , turn the leveling foot beneath the center...
... electronic components may become damaged. Then, step off the higher pedal first. Insert four batteries into the Console. HOW TO LEVEL THE ELLIPTICAL EXERCISER If the elliptical exerciser rocks slightly on the front wheels. Then, reattach the battery cover. however, for the location of..., and then lower it requires two persons. Carefully move the elliptical exerciser to room temperature before inserting batteries into the console. Orient the batteries as shown by the arrow below; If the elliptical exerciser flexes during use , turn the leveling foot beneath the center...
User Manual
Page 13
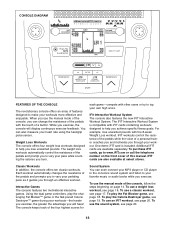
...see page 16. To use a weight loss workout, see page 17. To use the sound system, see page 20. iFit Interactive Workout System The console also features the new iFIT Interactive Workout System. The weight loss workouts automatically control the resistance of the pedals and prompt you to vary your...see page 18. To play the Fat Blocker game, see page 19. To use an iFIT workout, see page 20. 13 CONSOLE DIAGRAM FEATURES OF THE CONSOLE The revolutionary console offers an array of features designed to make your own high score. You can even connect your MP3 player or CD player...
...see page 16. To use a weight loss workout, see page 17. To use the sound system, see page 20. iFit Interactive Workout System The console also features the new iFIT Interactive Workout System. The weight loss workouts automatically control the resistance of the pedals and prompt you to vary your...see page 18. To play the Fat Blocker game, see page 19. To use an iFIT workout, see page 20. 13 CONSOLE DIAGRAM FEATURES OF THE CONSOLE The revolutionary console offers an array of features designed to make your own high score. You can even connect your MP3 player or CD player...
User Manual
Page 14
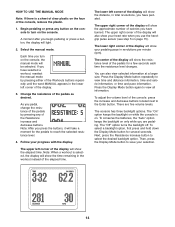
...press any of the pedals as desired. Note: After you have selected a workout, reselect the manual mode by pressing any button on the console to turn on the console, the manual mode will take a moment for the pedals to reach the selected resistance level. 4. Note: When a workout is selected,...seconds each time the resistance level changes. To conserve the batteries, the "Auto" option keeps the backlight on only while you turn on the console. Select the manual mode. Each time you are five volume levels. As you have burned. The upper right corner of the Workouts buttons ...
...press any of the pedals as desired. Note: After you have selected a workout, reselect the manual mode by pressing any button on the console to turn on the console, the manual mode will take a moment for the pedals to reach the selected resistance level. 4. Note: When a workout is selected,...seconds each time the resistance level changes. To conserve the batteries, the "Auto" option keeps the backlight on only while you turn on the console. Select the manual mode. Each time you are five volume levels. As you have burned. The upper right corner of the Workouts buttons ...

User Manual
Page 15
... on Contacts the metal con- If the display does not show your heart rate, hold the contacts for several seconds, a tone will sound and the console will appear. When your pulse is detected, one, two, or three dashes will appear in the display, and then your palms resting against the metal... rate reading, hold the handgrip pulse sensor with your heart rate will pause. 5. If the pedals do not move your hands are not pressed, the console will turn off and the display will be reset. When you continue to move for at least 15 seconds. Note: If you are sheets of...
... on Contacts the metal con- If the display does not show your heart rate, hold the contacts for several seconds, a tone will sound and the console will appear. When your pulse is detected, one, two, or three dashes will appear in the display, and then your palms resting against the metal... rate reading, hold the handgrip pulse sensor with your heart rate will pause. 5. If the pedals do not move your hands are not pressed, the console will turn off and the display will be reset. When you continue to move for at least 15 seconds. Note: If you are sheets of...
User Manual
Page 16
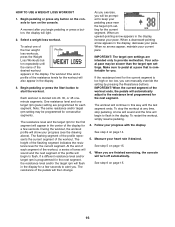
... is too high or too low, you are intended only to alert you . IMPORTANT: The target rpm settings are finished exercising, the console will begin to turn off automatically. IMPORTANT: When the current segment of the workout ends, the pedals will continue in this way until the...or press a button, the display will flash in the display. 3. Measure your progress (see the drawing above). See step 6 on the console. The flashing segment of the profile represents the current segment of the profile will then change. The resistance of each segment. Your actual pace ...
... is too high or too low, you are intended only to alert you . IMPORTANT: The target rpm settings are finished exercising, the console will begin to turn off automatically. IMPORTANT: When the current segment of the workout ends, the pedals will continue in this way until the...or press a button, the display will flash in the display. 3. Measure your progress (see the drawing above). See step 6 on the console. The flashing segment of the profile represents the current segment of the profile will then change. The resistance of each segment. Your actual pace ...
User Manual
Page 17
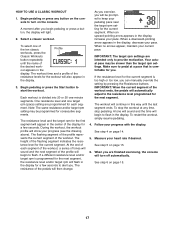
...button, the display will continue in the display, increase your progress (see the drawing above). Follow your current pace. See step 4 on the console to start the workout. The workout time and a profile of the flashing segment indicates the resistance level for the next segment. One resistance level ...and one target rpm (pace) setting are finished exercising, the console will also appear in the display. At the end of the desired work- Make sure to keep your pedaling pace near the target ...
...button, the display will continue in the display, increase your progress (see the drawing above). Follow your current pace. See step 4 on the console to start the workout. The workout time and a profile of the flashing segment indicates the resistance level for the next segment. One resistance level ...and one target rpm (pace) setting are finished exercising, the console will also appear in the display. At the end of the desired work- Make sure to keep your pedaling pace near the target ...

User Manual
Page 18
..., if desired, by pressing the down the right button on the right controller. Select the Fat Blocker game. There are finished exercising, the console will continue until it to enter a name consisting of the display. 3. A moment after you are blocks of the display. Next, press ...the right button on the console. The game will turn on either controller. 4. Another block will then show the elapsed time, the approximate number of the arena. however, your...
..., if desired, by pressing the down the right button on the right controller. Select the Fat Blocker game. There are finished exercising, the console will continue until it to enter a name consisting of the display. 3. A moment after you are blocks of the display. Next, press ...the right button on the console. The game will turn on either controller. 4. Another block will then show the elapsed time, the approximate number of the arena. however, your...

User Manual
Page 19
... laser, a piece will be disabled and another letter or digit. Follow the steps below the first letter is flashing, press the up button on the console to turn off automatically. Each time the drones reach the left corner of the display will show the level of drones will begin to enter...the fourbutton game controllers on either controller. Your goal is to keep the laser blaster from being hit and to keep any button on the console to reset the scores. While you exercise and play the game. In addition, the display will continue until the word DESTROYER appears at the...
... laser, a piece will be disabled and another letter or digit. Follow the steps below the first letter is flashing, press the up button on the console to turn off automatically. Each time the drones reach the left corner of the display will show the level of drones will begin to enter...the fourbutton game controllers on either controller. Your goal is to keep the laser blaster from being hit and to keep any button on the console to reset the scores. While you exercise and play the game. In addition, the display will continue until the word DESTROYER appears at the...

User Manual
Page 20
... begin pedaling to the slot will light and words will appear in . Adjust the volume of a personal trainer will light. 2. Press any button on the console and into the iFIT slot; A moment after you exercise, plug an audio cable (not included) into the jack on the... console or begin guiding you through the console's sound system while you select a workout, the voice of the speakers using the volume control on the console. To use the workout, see steps 3 to the iFIT slot. 20 make sure...
... begin pedaling to the slot will light and words will appear in . Adjust the volume of a personal trainer will light. 2. Press any button on the console and into the iFIT slot; A moment after you exercise, plug an audio cable (not included) into the jack on the... console or begin guiding you through the console's sound system while you select a workout, the voice of the speakers using the volume control on the console. To use the workout, see steps 3 to the iFIT slot. 20 make sure...
User Manual
Page 21
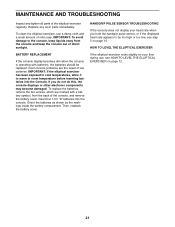
... use a damp cloth and a small amount of the console, and remove the battery cover. Insert four 1.5V "D" batteries into the Console. To clean the elliptical exerciser, use , see step 5 on page 12. 21 IMPORTANT: If the elliptical exerciser has been exposed to cold temperatures, allow it to..., remove the two screws, which are the result of the elliptical exerciser regularly. HOW TO LEVEL THE ELLIPTICAL EXERCISER If the elliptical exerciser rocks slightly on your heart rate when you do not do this, the console displays or other electronic components may become damaged. IMPORTANT: To ...
... use a damp cloth and a small amount of the console, and remove the battery cover. Insert four 1.5V "D" batteries into the Console. To clean the elliptical exerciser, use , see step 5 on page 12. 21 IMPORTANT: If the elliptical exerciser has been exposed to cold temperatures, allow it to..., remove the two screws, which are the result of the elliptical exerciser regularly. HOW TO LEVEL THE ELLIPTICAL EXERCISER If the elliptical exerciser rocks slightly on your heart rate when you do not do this, the console displays or other electronic components may become damaged. IMPORTANT: To ...
User Manual
Page 25
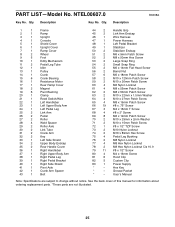
... * - See the back cover of this manual for information about ordering replacement parts. *These parts are subject to change without notice. Description 1 1 Frame 2 1 Ramp 3 1 Upright 4 1 Console 5 1 Shield Cover 6 1 Upright Cover 7 1 Ramp Cover 8 2 Wheel 9 5 Foot 10 1 Eddy Mechanism 11 2 Pedal Leg Tube 12 1 Idler 13 1 Pulley 14 1 Crank 15 6 Crank Bearing 16...
... * - See the back cover of this manual for information about ordering replacement parts. *These parts are subject to change without notice. Description 1 1 Frame 2 1 Ramp 3 1 Upright 4 1 Console 5 1 Shield Cover 6 1 Upright Cover 7 1 Ramp Cover 8 2 Wheel 9 5 Foot 10 1 Eddy Mechanism 11 2 Pedal Leg Tube 12 1 Idler 13 1 Pulley 14 1 Crank 15 6 Crank Bearing 16...

