
English Manual
Page 2
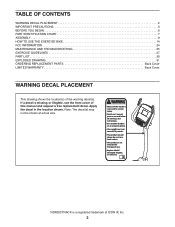
... 2 IMPORTANT PRECAUTIONS 3 BEFORE YOU BEGIN 6 PART IDENTIFICATION CHART 7 ASSEMBLY 8 HOW TO USE THE EXERCISE BIKE 14 FCC INFORMATION 24 MAINTENANCE AND TROUBLESHOOTING 25 EXERCISE GUIDELINES 27 PART LIST 30 EXPLODED DRAWING 31 ORDERING REPLACEMENT PARTS Back Cover LIMITED WARRANTY Back Cover WARNING DECAL PLACEMENT...decal(s) may result in the location shown. Read user's manual prior to use . User weight must not exceed 275 pounds. NORDICTRACK is a registered trademark of this machine may not be used on or around machine. This product should always be shown at ...
... 2 IMPORTANT PRECAUTIONS 3 BEFORE YOU BEGIN 6 PART IDENTIFICATION CHART 7 ASSEMBLY 8 HOW TO USE THE EXERCISE BIKE 14 FCC INFORMATION 24 MAINTENANCE AND TROUBLESHOOTING 25 EXERCISE GUIDELINES 27 PART LIST 30 EXPLODED DRAWING 31 ORDERING REPLACEMENT PARTS Back Cover LIMITED WARRANTY Back Cover WARNING DECAL PLACEMENT...decal(s) may result in the location shown. Read user's manual prior to use . User weight must not exceed 275 pounds. NORDICTRACK is a registered trademark of this machine may not be used on or around machine. This product should always be shown at ...
English Manual
Page 3
... you experience pain while exercising, stop immediately and cool down. 3 Before beginning any worn parts immediately. 11. do not arch your back straight while using your physician. Do not put the exercise bike in serious injury or death. Various factors, including the user’'s movement, may result...persons over age 35 or persons with at all parts regularly. Keep the exercise bike indoors, away from damage, place a mat under age 12 and pets away from the exercise bike at least 2 ft. (0.6 m) of clearance around the exercise bike. do not wear loose clothes that all users ...
... you experience pain while exercising, stop immediately and cool down. 3 Before beginning any worn parts immediately. 11. do not arch your back straight while using your physician. Do not put the exercise bike in serious injury or death. Various factors, including the user’'s movement, may result...persons over age 35 or persons with at all parts regularly. Keep the exercise bike indoors, away from damage, place a mat under age 12 and pets away from the exercise bike at least 2 ft. (0.6 m) of clearance around the exercise bike. do not wear loose clothes that all users ...
English Manual
Page 6
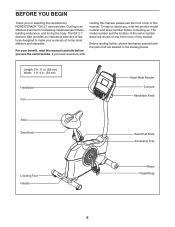
... reading further, please familiarize yourself with the parts that are shown on the front cover of features designed to make your benefit, read this manual. The GX 2.7 exercise bike provides an impressive selection of this manual. Cycling is an effective exercise for selecting the revolutionary NORDICTRACK® GX 2.7 exercise bike. BEFORE YOU BEGIN Thank you , note...
... reading further, please familiarize yourself with the parts that are shown on the front cover of features designed to make your benefit, read this manual. The GX 2.7 exercise bike provides an impressive selection of this manual. Cycling is an effective exercise for selecting the revolutionary NORDICTRACK® GX 2.7 exercise bike. BEFORE YOU BEGIN Thank you , note...

English Manual
Page 7
The number in the hardware kit, check to identify the small parts needed for assembly. M8 Locknut (17)–-2 M4 x 16mm Screw (2)–-4 M8 x 20mm Screw (29)–-4 M8 x 58mm Bolt (24)–-2 M8 x 70mm Screw (46)–-4 7 Extra parts may be included. The number following the key number is the key number of the part, from the PART LIST near the end of this manual. Note: If a part is not in parentheses below to see if it has been preassembled. PART IDENTIFICATION CHART Use the drawings below each drawing is the quantity needed for assembly.
The number in the hardware kit, check to identify the small parts needed for assembly. M8 Locknut (17)–-2 M4 x 16mm Screw (2)–-4 M8 x 20mm Screw (29)–-4 M8 x 58mm Bolt (24)–-2 M8 x 70mm Screw (46)–-4 7 Extra parts may be included. The number following the key number is the key number of the part, from the PART LIST near the end of this manual. Note: If a part is not in parentheses below to see if it has been preassembled. PART IDENTIFICATION CHART Use the drawings below each drawing is the quantity needed for assembly.

English Manual
Page 8
...; saves you time if you ever need to contact Customer Care •• allows us to prevent it from tipping while you nish all parts in a cleared area and remove the packing materials. Identify the Rear Stabilizer (44), which has a handle. Attach the Rear Stabilizer (44) to... requires the following tools: one Phillips screwdriver one adjustable wrench Assembly may be easier if you do not use power tools. 1. To avoid damaging parts, do not have a set of wrenches. Do not dispose of the packing materials until you complete this step. Go to www.nordictrackservice.com/ ...
...; saves you time if you ever need to contact Customer Care •• allows us to prevent it from tipping while you nish all parts in a cleared area and remove the packing materials. Identify the Rear Stabilizer (44), which has a handle. Attach the Rear Stabilizer (44) to... requires the following tools: one Phillips screwdriver one adjustable wrench Assembly may be easier if you do not use power tools. 1. To avoid damaging parts, do not have a set of wrenches. Do not dispose of the packing materials until you complete this step. Go to www.nordictrackservice.com/ ...

English Manual
Page 13
...it is assembled correctly and that all parts are properly tightened before you use the exercise bike. Adjust the strap on page 14. Note: Extra parts may be included. Place a mat under the exercise bike to the desired position, and press the ends of the exercise bike. 14 Note: To plug the .... Plug the Power Adapter (30) into the receptacle on the Right Pedal (60) to protect the floor or carpet. 13 After the exercise bike is assembled, inspect it to make sure that it functions properly. Using an adjustable wrench, firmly tighten the Right Pedal (60) clockwise into the...
...it is assembled correctly and that all parts are properly tightened before you use the exercise bike. Adjust the strap on page 14. Note: Extra parts may be included. Place a mat under the exercise bike to the desired position, and press the ends of the exercise bike. 14 Note: To plug the .... Plug the Power Adapter (30) into the receptacle on the Right Pedal (60) to protect the floor or carpet. 13 After the exercise bike is assembled, inspect it to make sure that it functions properly. Using an adjustable wrench, firmly tighten the Right Pedal (60) clockwise into the...
English Manual
Page 23
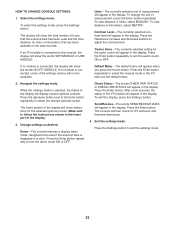
... been used if the exercise bike is selected, the matrix of the settings options will show the words NO IFIT MODULE. Press the Enter button repeatedly to be used and the total distance (in the lower part of measurement will show instructions for the selected optional screen. Demo—-The ...miles, select ENGLISH. While the settings mode is displayed in the display. The lower section of hours that has been pedaled on the exercise bike. Send/Receive—-The words SEND/RECEIVE DATA will appear when you press the Home button. If an iFit module is connected to exit the...
... been used if the exercise bike is selected, the matrix of the settings options will show the words NO IFIT MODULE. Press the Enter button repeatedly to be used and the total distance (in the lower part of measurement will show instructions for the selected optional screen. Demo—-The ...miles, select ENGLISH. While the settings mode is displayed in the display. The lower section of hours that has been pedaled on the exercise bike. Send/Receive—-The words SEND/RECEIVE DATA will appear when you press the Home button. If an iFit module is connected to exit the...

English Manual
Page 24
... harmful interference to radio communications. FCC INFORMATION This equipment has been tested and found to comply with the limits for a Class B digital device, pursuant to part 15 of the following measures: •• Reorient or relocate the receiving antenna. •• Increase the separation between the equipment and the receiver. •...
... harmful interference to radio communications. FCC INFORMATION This equipment has been tested and found to comply with the limits for a Class B digital device, pursuant to part 15 of the following measures: •• Reorient or relocate the receiving antenna. •• Increase the separation between the equipment and the receiver. •...
English Manual
Page 25
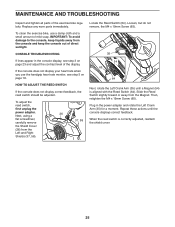
Replace any worn parts immediately. HOW TO ADJUST THE REED SWITCH If the console does not display correct feedback, the reed switch should be adjusted. ...display, see step 5 on page 23 and adjust the contrast level of direct sunlight. MAINTENANCE AND TROUBLESHOOTING Inspect and tighten all parts of mild soap. To clean the exercise bike, use the handgrip heart rate monitor, see step 3 on page 18. Next, using a flat screwdriver, carefully remove the ...adapter. If the console does not display your heart rate when you use a damp cloth and a small amount of the exercise bike regularly.
Replace any worn parts immediately. HOW TO ADJUST THE REED SWITCH If the console does not display correct feedback, the reed switch should be adjusted. ...display, see step 5 on page 23 and adjust the contrast level of direct sunlight. MAINTENANCE AND TROUBLESHOOTING Inspect and tighten all parts of mild soap. To clean the exercise bike, use the handgrip heart rate monitor, see step 3 on page 18. Next, using a flat screwdriver, carefully remove the ...adapter. If the console does not display your heart rate when you use a damp cloth and a small amount of the exercise bike regularly.

English Manual
Page 27
... you must perform aerobic exercise, which is near the lowest number in preparation for 20 to 30 minutes with 5 to make exercise a regular and enjoyable part of time. During the first few minutes of stretching and light exercise. Aerobic Exercise—-If your goal is to strengthen your cardiovascular system, you...
... you must perform aerobic exercise, which is near the lowest number in preparation for 20 to 30 minutes with 5 to make exercise a regular and enjoyable part of time. During the first few minutes of stretching and light exercise. Aerobic Exercise—-If your goal is to strengthen your cardiovascular system, you...
English Manual
Page 30
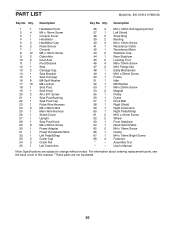
... 65 2 M4 x 19mm Screw 66 1 Clamp 67 1 M4 x 19mm Bright Screw 68 3 Fastener * –- Description Key No. For information about ordering replacement parts, see the back cover of this manual. *These parts are subject to change without notice. Qty. Qty. Assembly Tool * –- User’'s Manual Note: Specifications are not illustrated. 30...
... 65 2 M4 x 19mm Screw 66 1 Clamp 67 1 M4 x 19mm Bright Screw 68 3 Fastener * –- Description Key No. For information about ordering replacement parts, see the back cover of this manual. *These parts are subject to change without notice. Qty. Qty. Assembly Tool * –- User’'s Manual Note: Specifications are not illustrated. 30...

English Manual
Page 32
... forth above is shipped to a service center, freight charges to the customer. The warranty extended hereunder is in this manual. If replacement parts are shipped while the product is under warranty, the customer will be responsible for a lifetime. No other warranties, and any implied warranties ...the name of the product (see the front cover of this manual) •• the key number and description of the replacement part(s) (see the PART LIST and the EXPLODED DRAWING near the end of this manual) LIMITED WARRANTY IMPORTANT: To protect your fitness equipment with the use , ...
... forth above is shipped to a service center, freight charges to the customer. The warranty extended hereunder is in this manual. If replacement parts are shipped while the product is under warranty, the customer will be responsible for a lifetime. No other warranties, and any implied warranties ...the name of the product (see the front cover of this manual) •• the key number and description of the replacement part(s) (see the PART LIST and the EXPLODED DRAWING near the end of this manual) LIMITED WARRANTY IMPORTANT: To protect your fitness equipment with the use , ...


