

English Manual
Page 1
If you have questions, or if parts are damaged or missing, DO NOT CONTACT THE STORE; Write the serial number in this manual before contacting Customer Care. MT ON THE WEB: www.... cover of this manual) before using this manual for reference. USER'S MANUAL Serial Number Decal QUESTIONS? CALL TOLL-FREE: 1-888-825-2588 Mon.-Fri. 6 a.m.-6 p.m. www.nordictrack.com Model No. please contact Customer Care. NTL01408.1 Serial No.
If you have questions, or if parts are damaged or missing, DO NOT CONTACT THE STORE; Write the serial number in this manual before contacting Customer Care. MT ON THE WEB: www.... cover of this manual) before using this manual for reference. USER'S MANUAL Serial Number Decal QUESTIONS? CALL TOLL-FREE: 1-888-825-2588 Mon.-Fri. 6 a.m.-6 p.m. www.nordictrack.com Model No. please contact Customer Care. NTL01408.1 Serial No.
English Manual
Page 2
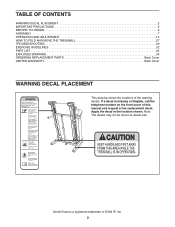
Apply the decal in the location shown. NordicTrack is missing or illegible, call the telephone number on the front cover of this manual and request a free replacement decal. If a decal is a registered trademark ... DECAL PLACEMENT 2 IMPORTANT PRECAUTIONS 3 BEFORE YOU BEGIN 6 ASSEMBLY 7 OPERATION AND ADJUSTMENT 14 HOW TO FOLD AND MOVE THE TREADMILL 27 TROUBLESHOOTING 29 EXERCISE GUIDELINES 32 PART LIST 34 EXPLODED DRAWING 36 ORDERING REPLACEMENT PARTS Back Cover LIMITED WARRANTY Back Cover WARNING DECAL PLACEMENT This drawing shows the locations of ICON IP, Inc. 2 Note...
Apply the decal in the location shown. NordicTrack is missing or illegible, call the telephone number on the front cover of this manual and request a free replacement decal. If a decal is a registered trademark ... DECAL PLACEMENT 2 IMPORTANT PRECAUTIONS 3 BEFORE YOU BEGIN 6 ASSEMBLY 7 OPERATION AND ADJUSTMENT 14 HOW TO FOLD AND MOVE THE TREADMILL 27 TROUBLESHOOTING 29 EXERCISE GUIDELINES 32 PART LIST 34 EXPLODED DRAWING 36 ORDERING REPLACEMENT PARTS Back Cover LIMITED WARRANTY Back Cover WARNING DECAL PLACEMENT This drawing shows the locations of ICON IP, Inc. 2 Note...

English Manual
Page 3
... the user's movement, may slow, accelerate, or stop procedure before using the treadmill (see your local NordicTrack dealer or call the telephone number on your treadmill before using your physician. Do not use the treadmill with pre-existing health problems. 2. Failure to the control system of this product...Never allow more amps. Do not wear loose clothes that meets all times. 15. Do not place the treadmill on the treadmill at all of this manual and order part number 146148, or see page 14), plug the power cord into a surge suppressor (not included) and plug...
... the user's movement, may slow, accelerate, or stop procedure before using the treadmill (see your local NordicTrack dealer or call the telephone number on your treadmill before using your physician. Do not use the treadmill with pre-existing health problems. 2. Failure to the control system of this product...Never allow more amps. Do not wear loose clothes that meets all times. 15. Do not place the treadmill on the treadmill at all of this manual and order part number 146148, or see page 14), plug the power cord into a surge suppressor (not included) and plug...

English Manual
Page 4
.... 20. Do not attempt to raise, lower, or move the treadmill until it is holding the frame securely in use this treadmill in this manual should be located in this manual. Inspect and properly tighten all parts of the television. Never remove the motor hood un- Never insert any object into... to an antenna discharge unit, size of grounding conductors, location of the lead-in -home use , before cleaning the treadmill, and before performing the mainte- Never leave the treadmill unattended while it can fall into any opening on page 27.) You must be able to safely lift 45 lbs. (...
.... 20. Do not attempt to raise, lower, or move the treadmill until it is holding the frame securely in use this treadmill in this manual should be located in this manual. Inspect and properly tighten all parts of the television. Never remove the motor hood un- Never insert any object into... to an antenna discharge unit, size of grounding conductors, location of the lead-in -home use , before cleaning the treadmill, and before performing the mainte- Never leave the treadmill unattended while it can fall into any opening on page 27.) You must be able to safely lift 45 lbs. (...

English Manual
Page 6
...up, requiring less than half the floor space of this manual carefully before contacting us assist you for selecting the revolutionary NordicTrack® VIEWPOINT 3600 treadmill. For your workouts at home more enjoyable and effective. To help us . The model number and the location of the... VIEWPOINT 3600 treadmill offers a selection of this manual. ing this manual, please see the front cover of features designed to make your benefit, read - Before reading further, please review the drawing below and familiarize yourself with the labeled parts. BEFORE YOU BEGIN Thank you , note the...
...up, requiring less than half the floor space of this manual carefully before contacting us assist you for selecting the revolutionary NordicTrack® VIEWPOINT 3600 treadmill. For your workouts at home more enjoyable and effective. To help us . The model number and the location of the... VIEWPOINT 3600 treadmill offers a selection of this manual. ing this manual, please see the front cover of features designed to make your benefit, read - Before reading further, please review the drawing below and familiarize yourself with the labeled parts. BEFORE YOU BEGIN Thank you , note the...

English Manual
Page 7
Set the treadmill in the bracket. Assembly requires the included hex key and your own Phillips screwdriver mallet , and adjustable wrench . , rubber Use the drawings below each drawing is the key number of the part, from the PART LIST near the end of this manual. To avoid damaging plastic parts, do not use... belt or the shipping carton. Partially fold the Frame (55) so that the power cord is preattached to one of the parts to the top of the treadmill walking belt is completely assembled. If there is more stable. With the help of the Uprights (85). The number in the...
Set the treadmill in the bracket. Assembly requires the included hex key and your own Phillips screwdriver mallet , and adjustable wrench . , rubber Use the drawings below each drawing is the key number of the part, from the PART LIST near the end of this manual. To avoid damaging plastic parts, do not use... belt or the shipping carton. Partially fold the Frame (55) so that the power cord is preattached to one of the parts to the top of the treadmill walking belt is completely assembled. If there is more stable. With the help of the Uprights (85). The number in the...

English Manual
Page 11
... 10a. Slide the Right Upright Sleeve (9) up to overtighten the Screws. Attach the Left Upright Sleeve (not shown) in a secure place; Start all parts are sheets of a second person, carefully raise the Uprights (85) to the audio/video input jack on the back of them. Note: Extra hardware ...(86) with the #8 x 3/4" Screw (7) 70 that all five Screws before you just removed. With the help of the 75 ohm terminal on the treadmill decals, remove the plastic. Note the location of a second person, carefully lower the Uprights (85) to the 75 ohm terminal (see pages 30 and ...
... 10a. Slide the Right Upright Sleeve (9) up to overtighten the Screws. Attach the Left Upright Sleeve (not shown) in a secure place; Start all parts are sheets of a second person, carefully raise the Uprights (85) to the audio/video input jack on the back of them. Note: Extra hardware ...(86) with the #8 x 3/4" Screw (7) 70 that all five Screws before you just removed. With the help of the 75 ohm terminal on the treadmill decals, remove the plastic. Note the location of a second person, carefully lower the Uprights (85) to the 75 ohm terminal (see pages 30 and ...

English Manual
Page 14
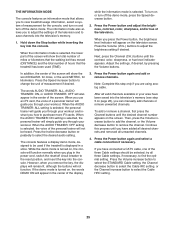
...700;s power. There must be a monitoring light on the front cover of this manual and order part number 146148, or see drawing 1 at the right). If it should be used to connect the...a transient voltage surge suppressor (TVSS). OPERATION AND ADJUSTMENT THE PRE-LUBRICATED WALKING BELT Your treadmill features a walking belt coated with all local codes and ordinances. IMPORTANT: Never apply silicone ...This product must have a proper outlet installed by sudden voltage changes in your local NordicTrack dealer or call the telephone number on the surge suppressor to indicate whether it must...
...700;s power. There must be a monitoring light on the front cover of this manual and order part number 146148, or see drawing 1 at the right). If it should be used to connect the...a transient voltage surge suppressor (TVSS). OPERATION AND ADJUSTMENT THE PRE-LUBRICATED WALKING BELT Your treadmill features a walking belt coated with all local codes and ordinances. IMPORTANT: Never apply silicone ...This product must have a proper outlet installed by sudden voltage changes in your local NordicTrack dealer or call the telephone number on the surge suppressor to indicate whether it must...
English Manual
Page 25
... you to adjust the settings of the television and to change the unit of measurement if desired. When the information mode is selected, the lower part of the screen will show the word ENGLISH, for miles, or the word METRIC, for the console, and turn on and turn off the demo... and add or remove channels. Continue this step only if you have added all desired channels and removed all unwanted channels. 4. If you to view treadmill usage information, select a system of measurement for kilometers. while the information mode is turned on page 26), you plug in your workout. To add or...
... you to adjust the settings of the television and to change the unit of measurement if desired. When the information mode is selected, the lower part of the screen will show the word ENGLISH, for miles, or the word METRIC, for the console, and turn on and turn off the demo... and add or remove channels. Continue this step only if you have added all desired channels and removed all unwanted channels. 4. If you to view treadmill usage information, select a system of measurement for kilometers. while the information mode is turned on page 26), you plug in your workout. To add or...
English Manual
Page 32
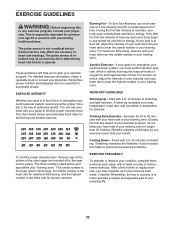
... your training zone. The pulse sensor is not a medical device. Remember, proper nutrition and adequate rest are rounded off to make exercise a regular and enjoyable part of exercise, your body begin to use your "training zone." The lowest number is the heart rate for fat burning, the middle number is the...
... your training zone. The pulse sensor is not a medical device. Remember, proper nutrition and adequate rest are rounded off to make exercise a regular and enjoyable part of exercise, your body begin to use your "training zone." The lowest number is the heart rate for fat burning, the middle number is the...

English Manual
Page 34
... 3/8" x 2 3/4" Bolt iFit Card Kit Lift Frame Access Door Lift Frame Ground Wire Base Extension Console Base Filter Wire Fan 34 NTL01408.1 R0509A To locate the parts listed below, see the EXPLODED DRAWING near the end of this manual. Key No. Qty. 1 1 2 10 3 2 4 2 5 2 6 1 7 30 8 14 9 1 10 2 11 2 12 2 13 9 14 2 15 1 16... Clevis Pin #8 x 3/4" Truss Head Screw Controller Reset/Off Circuit Breaker Belly Pan 15 1/2" Wire Tie Power Cord Incline Wire Hex Key Latch Knob Key No. PART LIST-Model No.
... 3/8" x 2 3/4" Bolt iFit Card Kit Lift Frame Access Door Lift Frame Ground Wire Base Extension Console Base Filter Wire Fan 34 NTL01408.1 R0509A To locate the parts listed below, see the EXPLODED DRAWING near the end of this manual. Key No. Qty. 1 1 2 10 3 2 4 2 5 2 6 1 7 30 8 14 9 1 10 2 11 2 12 2 13 9 14 2 15 1 16... Clevis Pin #8 x 3/4" Truss Head Screw Controller Reset/Off Circuit Breaker Belly Pan 15 1/2" Wire Tie Power Cord Incline Wire Hex Key Latch Knob Key No. PART LIST-Model No.

English Manual
Page 35
Qty. 107 2 * - * - * - * - See the back cover of this manual for information about ordering replacement parts. *These parts are subject to change without notice. Qty. 101 4 102 2 103 1 104 4 105 1 106 2 Description #8 x 1" Screw 1/4" Flat Washer Key/Clip #8 x 1" Pan Head Screw Console 3/8" x 1 3/4" Bolt Key No. Key No. Description Static Decal 8" White Wire, M/F 8" Blue Wire, M/F 4" Black Wire, M/F User's Manual Note: Specifications are not illustrated. 35
Qty. 107 2 * - * - * - * - See the back cover of this manual for information about ordering replacement parts. *These parts are subject to change without notice. Qty. 101 4 102 2 103 1 104 4 105 1 106 2 Description #8 x 1" Screw 1/4" Flat Washer Key/Clip #8 x 1" Pan Head Screw Console 3/8" x 1 3/4" Bolt Key No. Key No. Description Static Decal 8" White Wire, M/F 8" Blue Wire, M/F 4" Black Wire, M/F User's Manual Note: Specifications are not illustrated. 35

English Manual
Page 40
...Fitness, Inc. (ICON) warrants this warranty is authorized by ICON. ICON Health & Fitness, Inc., 1500 S. 1000 W., Logan, UT 84321-9813 Part No. 279191 R0509A Printed in lieu of any damage to a product caused by or attributable to any and all other warranty beyond that vary from... for a particular purpose are warranted for service needed under normal use and service conditions. or to www.nordictrackservice.com/registration. For replacement parts shipped while the product is in USA © 2009 ICON IP, Inc. This warranty gives you , be responsible for commercial or...
...Fitness, Inc. (ICON) warrants this warranty is authorized by ICON. ICON Health & Fitness, Inc., 1500 S. 1000 W., Logan, UT 84321-9813 Part No. 279191 R0509A Printed in lieu of any damage to a product caused by or attributable to any and all other warranty beyond that vary from... for a particular purpose are warranted for service needed under normal use and service conditions. or to www.nordictrackservice.com/registration. For replacement parts shipped while the product is in USA © 2009 ICON IP, Inc. This warranty gives you , be responsible for commercial or...


