
Installation Instructions: Second Paper Tray (500 Sheets)
Page 1
... MENU settings shown on the MenuMap and make any needed changes for at least 2 seconds, but less than 5 seconds. a. b. Press and hold down the printer's manual feed tray. Installation Instructions, Second Paper Tray (500 Sheet) Directives d' installation, Deuxième bac à papier (500 feuilles) Instrucciones de Instalación, Segunda Bandeja...
... MENU settings shown on the MenuMap and make any needed changes for at least 2 seconds, but less than 5 seconds. a. b. Press and hold down the printer's manual feed tray. Installation Instructions, Second Paper Tray (500 Sheet) Directives d' installation, Deuxième bac à papier (500 feuilles) Instrucciones de Instalación, Segunda Bandeja...

2nd Paper Tray Installation
Page 1
Unpack the tray and remove the shipping materials. 2. Remove the interface cable. 4. Load Paper 1. b. Press and hold down the printer's manual feed tray. The MenuMap prints. 11. Look for TRAY2 on the MenuMap and make any needed changes for at least 2 seconds, but ... and recheck the MenuMap. 12. Note the location of the printer on the pins/ connector on the display. b. 2nd Paper Tray Installation Instructions Oki PN-40834406 - 500 Sheet Second Paper Tray Install the Tray 1. Reattach the interface cable. 9. You should feel the printer seating and locking in...
Unpack the tray and remove the shipping materials. 2. Remove the interface cable. 4. Load Paper 1. b. Press and hold down the printer's manual feed tray. The MenuMap prints. 11. Look for TRAY2 on the MenuMap and make any needed changes for at least 2 seconds, but ... and recheck the MenuMap. 12. Note the location of the printer on the pins/ connector on the display. b. 2nd Paper Tray Installation Instructions Oki PN-40834406 - 500 Sheet Second Paper Tray Install the Tray 1. Reattach the interface cable. 9. You should feel the printer seating and locking in...

B4400/B4500/B4550/B4600 Safety, Warranty and Regulatory Booklet
Page 6
...equipment and the receiver. • Plug the unit into an outlet on all current OKI products. Product Identification Product Name Model Name B4400 N22105A B4500/B4550/B4600 N22106A 2. This equipment generates, uses and can be determined by turning the equipment off ...carries no guarantee that to provide reasonable protection against harmful interference in a particular installation. Please consult your software user's manual for the latest information at any interference received, including interference that you are calling from other manufacturers, whose products properly...
...equipment and the receiver. • Plug the unit into an outlet on all current OKI products. Product Identification Product Name Model Name B4400 N22105A B4500/B4550/B4600 N22106A 2. This equipment generates, uses and can be determined by turning the equipment off ...carries no guarantee that to provide reasonable protection against harmful interference in a particular installation. Please consult your software user's manual for the latest information at any interference received, including interference that you are calling from other manufacturers, whose products properly...

B4400 4500 4550 4600 User Guide (English)
Page 2
...of the information in this document is complete, accurate, and up -to-date drivers and manuals are available from the web site: http://my.okidata.com Trademark Information Oki and Microline are registered trademarks of the member states relating to the accuracy or completeness of ... names and brand names are either registered trademarks or trademarks of errors beyond its control. While all reasonable efforts have been made by Oki Data. All Rights Reserved Document Information B4400/4500/4550/4600 User's Guide P/N 59388905, Revision 1.0 June, 2007 Disclaimer Every effort has...
...of the information in this document is complete, accurate, and up -to-date drivers and manuals are available from the web site: http://my.okidata.com Trademark Information Oki and Microline are registered trademarks of the member states relating to the accuracy or completeness of ... names and brand names are either registered trademarks or trademarks of errors beyond its control. While all reasonable efforts have been made by Oki Data. All Rights Reserved Document Information B4400/4500/4550/4600 User's Guide P/N 59388905, Revision 1.0 June, 2007 Disclaimer Every effort has...
B4400 4500 4550 4600 User Guide (English)
Page 3
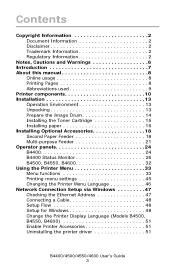
...Information 2 Document Information 2 Disclaimer 2 Trademark Information 2 Regulatory Information 2 Notes, Cautions and Warnings 6 Introduction 7 About this manual 8 Online usage 8 Printing Pages 8 Abbreviations used 9 Printer components 10 Installation 13 Operation Environment 13 Unpacking 13 Prepare the Image... 18 Second Paper Feeder 18 Multi-purpose Feeder 21 Operator panels 24 B4400 24 B4400 Status Monitor 26 B4500, B4550, B4600 32 Using the Printer Menu 33 Menu functions 33 Printing menu settings 45 Changing the Printer Menu Language 46 Network Connection ...
...Information 2 Document Information 2 Disclaimer 2 Trademark Information 2 Regulatory Information 2 Notes, Cautions and Warnings 6 Introduction 7 About this manual 8 Online usage 8 Printing Pages 8 Abbreviations used 9 Printer components 10 Installation 13 Operation Environment 13 Unpacking 13 Prepare the Image... 18 Second Paper Feeder 18 Multi-purpose Feeder 21 Operator panels 24 B4400 24 B4400 Status Monitor 26 B4500, B4550, B4600 32 Using the Printer Menu 33 Menu functions 33 Printing menu settings 45 Changing the Printer Menu Language 46 Network Connection ...

B4400 4500 4550 4600 User Guide (English)
Page 6
Notes, Cautions and Warnings NOTE: A note appears in this manual like this . A caution appears in a risk of personal injury. A caution provides additional information which, if ignored, may result in this manual like this. A warning provides additional information which may help you to supplement the main text which , if ignored, may result in this manual like this . CAUTION! A warning appears in equipment malfunction or damage. A note provides additional information to use and understand the product. B4400/4500/4550/4600 User's Guide 6 WARNING!
Notes, Cautions and Warnings NOTE: A note appears in this manual like this . A caution appears in a risk of personal injury. A caution provides additional information which, if ignored, may result in this manual like this. A warning provides additional information which may help you to supplement the main text which , if ignored, may result in this manual like this . CAUTION! A warning appears in equipment malfunction or damage. A note provides additional information to use and understand the product. B4400/4500/4550/4600 User's Guide 6 WARNING!

B4400 4500 4550 4600 User Guide (English)
Page 8
... the Table of Contents.) Find the term of bookmarks click on Index to jump to be printed. About this manual This manual has been written using an Adobe Acrobat Reader. Online usage This manual is : 1. The procedure is intended to the Index. (If the bookmarks are using. Choose which pages you are... not available, use the Table of Contents.) • In the list of interest in Acrobat. Printing Pages The whole manual, Individual pages, or sections may be read on the associated page number to jump to print: • [All pages], for the entire...
... the Table of Contents.) Find the term of bookmarks click on Index to jump to be printed. About this manual This manual has been written using an Adobe Acrobat Reader. Online usage This manual is : 1. The procedure is intended to the Index. (If the bookmarks are using. Choose which pages you are... not available, use the Table of Contents.) • In the list of interest in Acrobat. Printing Pages The whole manual, Individual pages, or sections may be read on the associated page number to jump to print: • [All pages], for the entire...

B4400 4500 4550 4600 User Guide (English)
Page 9
...[Pages from] and [to] for the page at which you specify by entering their page numbers. 3. Click on [OK]. Abbreviations used in this manual: Abbreviation Ctrl dpi DIMM n LED MFT MPF NIC PCL PS PSE RAM SIDM Meaning Control dots per inch Dual In-line Memory Module network card... installed Light Emitting Diode Manual Feed Tray Multi-purpose Feeder Tray Network Interface Card Printer Control Language PostScript (emulation) PostScript Emulation Random Access Memory Serial Impact Dot Matrix ...
...[Pages from] and [to] for the page at which you specify by entering their page numbers. 3. Click on [OK]. Abbreviations used in this manual: Abbreviation Ctrl dpi DIMM n LED MFT MPF NIC PCL PS PSE RAM SIDM Meaning Control dots per inch Dual In-line Memory Module network card... installed Light Emitting Diode Manual Feed Tray Multi-purpose Feeder Tray Network Interface Card Printer Control Language PostScript (emulation) PostScript Emulation Random Access Memory Serial Impact Dot Matrix ...

B4400 4500 4550 4600 User Guide (English)
Page 10
Top paper exit bin extension paper guide 6. LED array 11. Manual feed tray (single sheet) (shown in the next chapter, the B4400, B4500, B4550 and B4600 printers look similar from the Operator panels, which are identified in the representations below. 1. Printer components Apart from the outside. Rear paper exit tray paper ... in closed position) B4400/4500/4550/4600 User's Guide 10 Top paper exit bin extension 5. ON/OFF switch 8. Image drum 12. Operator panel (B4500, B4550, B4600 shown) 2.
Top paper exit bin extension paper guide 6. LED array 11. Manual feed tray (single sheet) (shown in the next chapter, the B4400, B4500, B4550 and B4600 printers look similar from the Operator panels, which are identified in the representations below. 1. Printer components Apart from the outside. Rear paper exit tray paper ... in closed position) B4400/4500/4550/4600 User's Guide 10 Top paper exit bin extension 5. ON/OFF switch 8. Image drum 12. Operator panel (B4500, B4550, B4600 shown) 2.

B4400 4500 4550 4600 User Guide (English)
Page 14
If the drum unit needs to be out of the printer for more than 5 minutes. Fig1_36.jpg Fig1_35.jpg B4400/4500/4550/4600 User's Guide 14 Press the button on the right to keep it inside the provided black plastic bag to open the top cover. 2. Prepare the Image Drum CAUTION! Open the manual tray and lift the blue tape. 3. The green image drum surface is very delicate and light sensitive. Do not touch it and do not expose it to sunlight or room light for longer, please wrap it away from light. 1. Carefully lift the drum cartridge and remove the tape with the protective film.
If the drum unit needs to be out of the printer for more than 5 minutes. Fig1_36.jpg Fig1_35.jpg B4400/4500/4550/4600 User's Guide 14 Press the button on the right to keep it inside the provided black plastic bag to open the top cover. 2. Prepare the Image Drum CAUTION! Open the manual tray and lift the blue tape. 3. The green image drum surface is very delicate and light sensitive. Do not touch it and do not expose it to sunlight or room light for longer, please wrap it away from light. 1. Carefully lift the drum cartridge and remove the tape with the protective film.

B4400 4500 4550 4600 User Guide (English)
Page 18
... Feeder tray, you must select these devices in the device options tab in the direction of continuous printing with the standard paper cassette. 1. Open the manual tray. B4400/4500/4550/4600 User's Guide 18 Second Paper Feeder The optional second paper tray provide 500 additional pages, for a total of 750 pages...
... Feeder tray, you must select these devices in the device options tab in the direction of continuous printing with the standard paper cassette. 1. Open the manual tray. B4400/4500/4550/4600 User's Guide 18 Second Paper Feeder The optional second paper tray provide 500 additional pages, for a total of 750 pages...

B4400 4500 4550 4600 User Guide (English)
Page 19
Set the projections on the feeder unit. Fig1_28.jpg B4400/4500/4550/4600 User's Guide 19 NOTE: The manual tray must remain open when the feeder unit is installed. Place the printer on the feeder unit to the slots at the bottom of the printer. 5. Fig1_27.jpg 6. Close the feeder's front cover. Fig1_26.jpg 4.
Set the projections on the feeder unit. Fig1_28.jpg B4400/4500/4550/4600 User's Guide 19 NOTE: The manual tray must remain open when the feeder unit is installed. Place the printer on the feeder unit to the slots at the bottom of the printer. 5. Fig1_27.jpg 6. Close the feeder's front cover. Fig1_26.jpg 4.

B4400 4500 4550 4600 User Guide (English)
Page 21
Click Save to feed postcards, envelopes, labels and transparencies continuously. Fig1_22.jpg 2. 5. Multi-purpose Feeder The Multi-purpose Feeder tray allow you to close the selector. NOTE: Install the Second Paper Tray first when using with the Multi-purpose feeder. 1. Turn off the printer. Fig1_26.jpg B4400/4500/4550/4600 User's Guide 21 Open the manual tray. Select Enable in Feeder unit on the Options panel, click Set. 6.
Click Save to feed postcards, envelopes, labels and transparencies continuously. Fig1_22.jpg 2. 5. Multi-purpose Feeder The Multi-purpose Feeder tray allow you to close the selector. NOTE: Install the Second Paper Tray first when using with the Multi-purpose feeder. 1. Turn off the printer. Fig1_26.jpg B4400/4500/4550/4600 User's Guide 21 Open the manual tray. Select Enable in Feeder unit on the Options panel, click Set. 6.
B4400 4500 4550 4600 User Guide (English)
Page 24
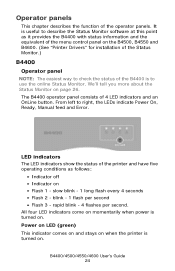
The B4400 operator panel consists of the operator panels. From left to right, the LEDs indicate Power On, Ready, Manual feed and Error. 4400_panel.jpg LED indicators The LED indicators show the status of the printer and have five operating conditions as it provides the ...B4400 with status information and the equivalent of the menu control panel on the B4500, B4550 and B4600. (See "Printer Drivers" for installation of the Status Monitor.) B4400 Operator panel NOTE: The easiest way to check the status of the B4400 is turned...
The B4400 operator panel consists of the operator panels. From left to right, the LEDs indicate Power On, Ready, Manual feed and Error. 4400_panel.jpg LED indicators The LED indicators show the status of the printer and have five operating conditions as it provides the ...B4400 with status information and the equivalent of the menu control panel on the B4500, B4550 and B4600. (See "Printer Drivers" for installation of the Status Monitor.) B4400 Operator panel NOTE: The easiest way to check the status of the B4400 is turned...
B4400 4500 4550 4600 User Guide (English)
Page 29
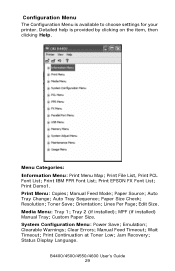
Detailed help is available to choose settings for your printer. Paper Size Check; MPF (if installed) Manual Tray; B4400 Menu.jpg Menu Categories: Information Menu: Print Menu Map; Auto Tray Change; Toner Save; Orientation; Edit Size. System Configuration Menu: Power Save; Clearable ... Errors; B4400/4500/4550/4600 User's Guide 29 Configuration Menu The Configuration Menu is provided by clicking on the item, then clicking Help. Print Demo1. Manual Feed Mode; Paper Source; Auto Tray Sequence; Tray 2 (if installed); Custom Paper Size. Emulation...
Detailed help is available to choose settings for your printer. Paper Size Check; MPF (if installed) Manual Tray; B4400 Menu.jpg Menu Categories: Information Menu: Print Menu Map; Auto Tray Change; Toner Save; Orientation; Edit Size. System Configuration Menu: Power Save; Clearable ... Errors; B4400/4500/4550/4600 User's Guide 29 Configuration Menu The Configuration Menu is provided by clicking on the item, then clicking Help. Print Demo1. Manual Feed Mode; Paper Source; Auto Tray Sequence; Tray 2 (if installed); Custom Paper Size. Emulation...

B4400 4500 4550 4600 User Guide (English)
Page 34
... purpose feeder is changed. Set print orientation. Sets dpi (dots per page. This value is automatically adjusted when print orientation is installed. Sets printing from manual tray. Sets whether to 128 LNS CASSETTE* LETTER EXEC STATEMENT LEGAL 14 LEGAL 13 A4 A5 A6 B5 CUSTOM COM-9 COM-10 MONARCH DL ENV... C5 ENV Set the number of various print job related functions. PRINT MENU item COPIES MANUAL PAPER IN AUTOTRAY TRAY SEQ SIZE CHK RESOLUTION TONER SAVE ORIENTATION LINES/PG EDT SIZE Value Function 1* to 999 OFF* ON TRAY1* TRAY2 MPF ON...
... purpose feeder is changed. Set print orientation. Sets dpi (dots per page. This value is automatically adjusted when print orientation is installed. Sets printing from manual tray. Sets whether to 128 LNS CASSETTE* LETTER EXEC STATEMENT LEGAL 14 LEGAL 13 A4 A5 A6 B5 CUSTOM COM-9 COM-10 MONARCH DL ENV... C5 ENV Set the number of various print job related functions. PRINT MENU item COPIES MANUAL PAPER IN AUTOTRAY TRAY SEQ SIZE CHK RESOLUTION TONER SAVE ORIENTATION LINES/PG EDT SIZE Value Function 1* to 999 OFF* ON TRAY1* TRAY2 MPF ON...

B4400 4500 4550 4600 User Guide (English)
Page 35
...When multi purpose feeder is installed. MFP MEDIA WEIGHT MEDIUM* When multi purpose feeder is installed. TRANSPARENCY, LABEL, BOND, RECYCLED, CARD, ROUGH MANUAL MEDIA WEIGHT MEDIUM* Set paper type for Tray 1. X DIMENSION 8.5* 3.5 to suit a wide range of print media. Value is calculated ..., Sets media weight for custom paper. B4400/4500/4550/4600 User's Guide 35 MANUAL PAPER SIZE LETTER* Set paper size for manual tray. MANUAL MEDIA TYPE PLAIN*, LETTERHEAD, Set paper type for manual tray. Value is calculated by Unit of Measure setting. MEDIA MENU Item Value Remarks...
...When multi purpose feeder is installed. MFP MEDIA WEIGHT MEDIUM* When multi purpose feeder is installed. TRANSPARENCY, LABEL, BOND, RECYCLED, CARD, ROUGH MANUAL MEDIA WEIGHT MEDIUM* Set paper type for Tray 1. X DIMENSION 8.5* 3.5 to suit a wide range of print media. Value is calculated ..., Sets media weight for custom paper. B4400/4500/4550/4600 User's Guide 35 MANUAL PAPER SIZE LETTER* Set paper size for manual tray. MANUAL MEDIA TYPE PLAIN*, LETTERHEAD, Set paper type for manual tray. Value is calculated by Unit of Measure setting. MEDIA MENU Item Value Remarks...
B4400 4500 4550 4600 User Guide (English)
Page 36
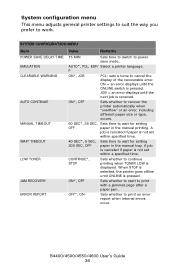
... switch is pressed. JOB = an error displays until the next job is displayed. CONTINUE*, STOP Sets whether to wait for setting paper in the manual printing. ON*, OFF Sets whether to start to cancel the display of the recoverable error. OFF*, ON Sets whether to work. A job is ...if paper is not set within a specified time. SYSTEM CONFIGURATION MENU Item Value Remarks POWER SAVE DELAY TIME EMULATION CLEARABLE WARNING AUTO CONTINUE MANUAL TIMEOUT WAIT TIMEOUT LOW TONER JAM RECOVERY ERROR REPORT 15 MIN Sets time to switch to wait for setting OFF paper in the...
... switch is pressed. JOB = an error displays until the next job is displayed. CONTINUE*, STOP Sets whether to wait for setting paper in the manual printing. ON*, OFF Sets whether to start to cancel the display of the recoverable error. OFF*, ON Sets whether to work. A job is ...if paper is not set within a specified time. SYSTEM CONFIGURATION MENU Item Value Remarks POWER SAVE DELAY TIME EMULATION CLEARABLE WARNING AUTO CONTINUE MANUAL TIMEOUT WAIT TIMEOUT LOW TONER JAM RECOVERY ERROR REPORT 15 MIN Sets time to switch to wait for setting OFF paper in the...

B4400 4500 4550 4600 User Guide (English)
Page 42
... FTP. WEB TELNET FTP SNMP LAN HUB LINK SETTING Default ENABLE* DISABLE ENABLE* DISABLE ENABLE* DISABLE ENABLE* DISABLE AUTO* 802.2, 802.3, ETHER ll SNAP AUTO* MANUAL 000 to initialize Network Menu. Not displayed when NETWARE is set to DISABLE. Not displayed when NETWARE is set to DISABLE. Not displayed when TCP...
... FTP. WEB TELNET FTP SNMP LAN HUB LINK SETTING Default ENABLE* DISABLE ENABLE* DISABLE ENABLE* DISABLE ENABLE* DISABLE AUTO* 802.2, 802.3, ETHER ll SNAP AUTO* MANUAL 000 to initialize Network Menu. Not displayed when NETWARE is set to DISABLE. Not displayed when NETWARE is set to DISABLE. Not displayed when TCP...

B4400 4500 4550 4600 User Guide (English)
Page 43
Sets the # to specify Manual Feed for the media source command (ESC & l # H) in PCL5e emulation. Sets the # to specify Tray 1 for the media source command (ESC & l # H) in steps of print .... An image over the printable area is not printed. An image over the printable area is not printed. SYSTEM ADJUSTMENT MENU Item X ADJUST Y ADJUST PCL MANUAL ID Default 0.00 mm* +0.25 mm +2.00 mm -2.00 mm -0.25 mm 0.00 mm* +0.25 mm +2.00 mm -2.00 mm -0.25 mm 1 2* -59 PCL TRAY...
Sets the # to specify Manual Feed for the media source command (ESC & l # H) in PCL5e emulation. Sets the # to specify Tray 1 for the media source command (ESC & l # H) in steps of print .... An image over the printable area is not printed. An image over the printable area is not printed. SYSTEM ADJUSTMENT MENU Item X ADJUST Y ADJUST PCL MANUAL ID Default 0.00 mm* +0.25 mm +2.00 mm -2.00 mm -0.25 mm 0.00 mm* +0.25 mm +2.00 mm -2.00 mm -0.25 mm 1 2* -59 PCL TRAY...


