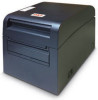
LD670 Safety/Warranty/Regulatory Guide
Page 4
... Inc. 2000 Bishops Gate Blvd. English This Limited Warranty is only available in your problem over the phone. If you . The exchange printer will be performed under this Limited Warranty. A written receipt for the Product, showing the date of purchase, dealer's name, and both..., ON Canada L5L 6A1 Téléphone : 1-905-608-5000 Télécopieur : 1-905-608-5040 4 - and Canada only Oki Data Americas, Inc. (Oki Data) warrants this LD670 (hereinafter "the Product") to be shipped to solve your being charged the full price of the Product for this Limited Warranty contact...
... Inc. 2000 Bishops Gate Blvd. English This Limited Warranty is only available in your problem over the phone. If you . The exchange printer will be performed under this Limited Warranty. A written receipt for the Product, showing the date of purchase, dealer's name, and both..., ON Canada L5L 6A1 Téléphone : 1-905-608-5000 Télécopieur : 1-905-608-5040 4 - and Canada only Oki Data Americas, Inc. (Oki Data) warrants this LD670 (hereinafter "the Product") to be shipped to solve your being charged the full price of the Product for this Limited Warranty contact...
LD670 Installation Instructions
Page 1
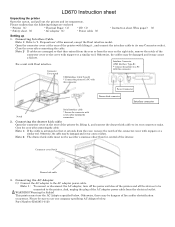
... purpose other than for Safety] This printer must use our company specifying AC Adapter below . Connecting the AC Adapter (1) Connect the AC adapter to '3. LD670 Instruction sheet Unpacking the printer Open the carton, and pull out the printer and its rear Connector socket. USB ...Interface Cable Type-B * Connect the printer to a PC with this connector. Part Number:KA02951-0120...
... purpose other than for Safety] This printer must use our company specifying AC Adapter below . Connecting the AC Adapter (1) Connect the AC adapter to '3. LD670 Instruction sheet Unpacking the printer Open the carton, and pull out the printer and its rear Connector socket. USB ...Interface Cable Type-B * Connect the printer to a PC with this connector. Part Number:KA02951-0120...
LD670 Installation Instructions
Page 2
... is connected firmly. (4) Plug the other end of the power cord into the power outlet. 4. Connector cover Note 3: Power connector Printer placed on the side of the printer. Base of the cable Outer section of the connector (3) Confirm that the cable is connected, turn on the power switch on its... insert the connector until it way cause a failure. Note 1: To connect the AC adaptor, place the printer on the control panel lights up. (2) Open the connectors cover at the rear of the printer by lifting it, and connect the AC adapter cable to be damaged and it locks in place with...
... is connected firmly. (4) Plug the other end of the power cord into the power outlet. 4. Connector cover Note 3: Power connector Printer placed on the side of the printer. Base of the cable Outer section of the connector (3) Confirm that the cable is connected, turn on the power switch on its... insert the connector until it way cause a failure. Note 1: To connect the AC adaptor, place the printer on the control panel lights up. (2) Open the connectors cover at the rear of the printer by lifting it, and connect the AC adapter cable to be damaged and it locks in place with...
LD670 Installation Instructions
Page 3
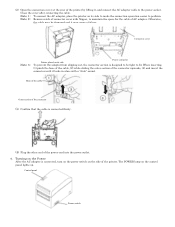
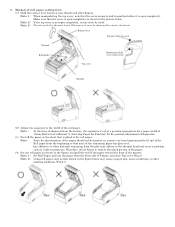
... cover release lever Top cover Separato r (2) Adjust the separator to lock in the figure, and pull the end of the paper toward the front of Printer, and close by static electricity. Make sure that the cover is not open completely, it may be printed on it is open completely as shown... in the figure below . Note : At the time of shipment from the front side of the printer. Therefore, do not forget to the roll paper. Otherwise it may close Top cover (Fig.a) Note 2: Using roll paper such as shown in position before...
... cover release lever Top cover Separato r (2) Adjust the separator to lock in the figure, and pull the end of the paper toward the front of Printer, and close by static electricity. Make sure that the cover is not open completely, it may be printed on it is open completely as shown... in the figure below . Note : At the time of shipment from the front side of the printer. Therefore, do not forget to the roll paper. Otherwise it may close Top cover (Fig.a) Note 2: Using roll paper such as shown in position before...
LD670 Installation Instructions
Page 4
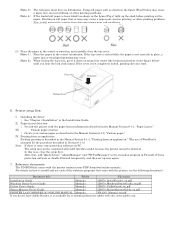
... the driver ˣ See "Chapter 3 Installation" in the correct orientation. Paper layout detection ˣ Provide the printer with the printer contains some virus protection software on how to install and use of Virus protection software or disable Firewall temporarily, and ...Windows Driver User's Guide Manuals LD670_WindowsDriverGuide_en.pdf Utility User's Guide Manuals LD670_UtilityGuide_en.pdf Status Monitor User's Guide Manuals LD670_StatusMonitorGuide_en.pdf PRINTER LAN CARD(PR-LN1) ONLINE MANUAL Manuals PR-LN1_Manual_en.pdf If you hear the lock click sound. Note 2. : ...
... the driver ˣ See "Chapter 3 Installation" in the correct orientation. Paper layout detection ˣ Provide the printer with the printer contains some virus protection software on how to install and use of Virus protection software or disable Firewall temporarily, and ...Windows Driver User's Guide Manuals LD670_WindowsDriverGuide_en.pdf Utility User's Guide Manuals LD670_UtilityGuide_en.pdf Status Monitor User's Guide Manuals LD670_StatusMonitorGuide_en.pdf PRINTER LAN CARD(PR-LN1) ONLINE MANUAL Manuals PR-LN1_Manual_en.pdf If you hear the lock click sound. Note 2. : ...

LD670 Paper Roll Unit Installation Instructions
Page 1
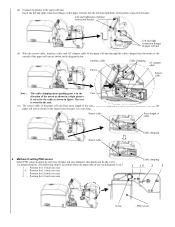
... unit) (Quantity : 1 unit) (Quantity : 1 piece) (Quantity : 1 piece) (Quantity : 1 piece) (1) Connector cover in (1). State after connector cover is detached (2) The bracket for printer connection. • Paper roll shaft (one-inch diameter) • Paper roll shaft (three-inch diameter) • Quick start guide (It is this paper) Preparation The... parts is screwed with two screws of the AC adaptor cable, the interface cable, and the sensor cable. © 2012 OKI Data Americas, Inc. 59413801 And, the rotation fulcrum part of the AC adapter power cable from the right side (2) to ...
... unit) (Quantity : 1 unit) (Quantity : 1 piece) (Quantity : 1 piece) (Quantity : 1 piece) (1) Connector cover in (1). State after connector cover is detached (2) The bracket for printer connection. • Paper roll shaft (one-inch diameter) • Paper roll shaft (three-inch diameter) • Quick start guide (It is this paper) Preparation The... parts is screwed with two screws of the AC adaptor cable, the interface cable, and the sensor cable. © 2012 OKI Data Americas, Inc. 59413801 And, the rotation fulcrum part of the AC adapter power cable from the right side (2) to ...
LD670 Paper Roll Unit Installation Instructions
Page 2
... in the figure below . It wires for 3.0 inch core size Cable clamping _1______1__.5___ 2 3 _ Screw _PNE sensor Left and right holes of printer connection bracket Left and right connection flanges of paper roll unit (5) Wire the sensor cable, interface cable, and AC adapter cable of the paper roll... unit through the cable clamps from the inside to the paper roll unit. (4) Connect the printer to the outside of the paper roll unit as shown in the diagram below because it is set.) 1 : Position for 1.0 inch core size 1.5...
... in the figure below . It wires for 3.0 inch core size Cable clamping _1______1__.5___ 2 3 _ Screw _PNE sensor Left and right holes of printer connection bracket Left and right connection flanges of paper roll unit (5) Wire the sensor cable, interface cable, and AC adapter cable of the paper roll... unit through the cable clamps from the inside to the paper roll unit. (4) Connect the printer to the outside of the paper roll unit as shown in the diagram below because it is set.) 1 : Position for 1.0 inch core size 1.5...
LD670 Paper Roll Unit Installation Instructions
Page 3
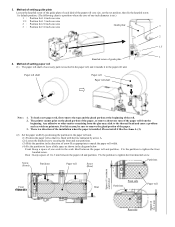
... _ Front _ Front side Rear Partitions Paper roll _ scale label 1 to tighten the front knurled screw. Paper roll shaft Paper roll Paper roll shaft Note : 1. The printer cannot print on printouts. Please install it like the clause 4- (3). (2) Set the paper width by arrow A. (2) Loosen the knurled screw securing the front and rear...
... _ Front _ Front side Rear Partitions Paper roll _ scale label 1 to tighten the front knurled screw. Paper roll shaft Paper roll Paper roll shaft Note : 1. The printer cannot print on printouts. Please install it like the clause 4- (3). (2) Set the paper width by arrow A. (2) Loosen the knurled screw securing the front and rear...
LD670 Paper Roll Unit Installation Instructions
Page 4
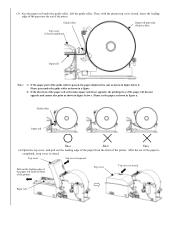
... Open the top cover, and pull out the leading edge of the paper from the front of the printer. a _Fig. Top cover Top cover is passed, the paper might not be sent as shown in figure...the guide roller is opened Pull out the leading edge of the paper roll from the front of the printer. Please pass under the guide roller. After the set of the paper is completed, a top cover...roll Top cover Top cover is closed , insert the leading edge of the paper into the rear of the printer. Lift the guide roller. (3) Pass the paper roll under the guide roller as shown in a figure. ...
... Open the top cover, and pull out the leading edge of the paper from the front of the printer. a _Fig. Top cover Top cover is passed, the paper might not be sent as shown in figure...the guide roller is opened Pull out the leading edge of the paper roll from the front of the printer. Please pass under the guide roller. After the set of the paper is completed, a top cover...roll Top cover Top cover is closed , insert the leading edge of the paper into the rear of the printer. Lift the guide roller. (3) Pass the paper roll under the guide roller as shown in a figure. ...


