
Network User's Guide for OkiLAN 6020e
Page 20
The Setup screen appears automatically (if it doesn't, click Start®Run, then enter D:\setup, if "D" is your CD-ROM drive. 2. Windows Utility Groups: NetWare Management Utilities OkiNet Utility for NetWare OkiNet Utility for NDS (Workstation and Server) OkiNet Utility for NDS (Workstation) ... and the proper location for TCP/IP Okidata MIB BootP Server I - Select the specific utility you have, then click Next. 4. Section I - 10 OKI OkiLAN 6020e User's Guide Hardware Installation Installing the OkiLAN Utilities Software in Windows 1. Insert the OkiLAN CD into your CD-ROM...
The Setup screen appears automatically (if it doesn't, click Start®Run, then enter D:\setup, if "D" is your CD-ROM drive. 2. Windows Utility Groups: NetWare Management Utilities OkiNet Utility for NetWare OkiNet Utility for NDS (Workstation and Server) OkiNet Utility for NDS (Workstation) ... and the proper location for TCP/IP Okidata MIB BootP Server I - Select the specific utility you have, then click Next. 4. Section I - 10 OKI OkiLAN 6020e User's Guide Hardware Installation Installing the OkiLAN Utilities Software in Windows 1. Insert the OkiLAN CD into your CD-ROM...
Network User's Guide for OkiLAN 6020e
Page 21
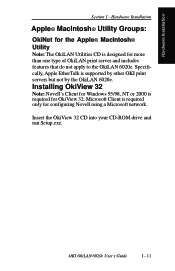
... servers but not by the OkiLAN 6020e. Insert the OkiView 32 CD into your CD-ROM drive and run Setup.exe. Installing OkiView 32 Note: Novell's Client for OkiView 32. OKI OkiLAN 6020e User's Guide I - Microsoft Client is designed for configuring Novell using a Microsoft network. Hardware Installation Apple® MacIntosh® Utility...
... servers but not by the OkiLAN 6020e. Insert the OkiView 32 CD into your CD-ROM drive and run Setup.exe. Installing OkiView 32 Note: Novell's Client for OkiView 32. OKI OkiLAN 6020e User's Guide I - Microsoft Client is designed for configuring Novell using a Microsoft network. Hardware Installation Apple® MacIntosh® Utility...

Network User's Guide for OkiLAN 6020e
Page 77
... will not work) • The client must add the OKI printer driver(s) to display the Add Resources dialog box. Requirements: • IP Address on the file server • IP address on a hard drive or network drive and install the driver from multiple floppy disks. In NetWare ...Administrator, double-click the Broker object. 2. NetWare OKI OkiLAN 6020e User's Guide III - 33 To use with NetWare versions 4.x and 5.1. ...
... will not work) • The client must add the OKI printer driver(s) to display the Add Resources dialog box. Requirements: • IP Address on the file server • IP address on a hard drive or network drive and install the driver from multiple floppy disks. In NetWare ...Administrator, double-click the Broker object. 2. NetWare OKI OkiLAN 6020e User's Guide III - 33 To use with NetWare versions 4.x and 5.1. ...
Network User's Guide for OkiLAN 6020e
Page 185
... • PostScript Level 2 must be a Phase 2 EtherTalk network • Your printer must be available on the Macintosh hard drive. 4. Consult your printer • The network must have a bidirectional parallel port (IEEE-1284 standard) Ethertalk is only available on... Section 6 - Introduction Chapter 1 Introduction Overview This section describes the steps necessary to reselect the OkiLAN 6020e in this manual. 2. OKI OkiLAN 6020e User's Guide VI - 3 Instructions for hardware installation are covered in the Chooser. Install the OkiLAN 6020e hardware and connect...
... • PostScript Level 2 must be a Phase 2 EtherTalk network • Your printer must be available on the Macintosh hard drive. 4. Consult your printer • The network must have a bidirectional parallel port (IEEE-1284 standard) Ethertalk is only available on... Section 6 - Introduction Chapter 1 Introduction Overview This section describes the steps necessary to reselect the OkiLAN 6020e in this manual. 2. OKI OkiLAN 6020e User's Guide VI - 3 Instructions for hardware installation are covered in the Chooser. Install the OkiLAN 6020e hardware and connect...
Network User's Guide for OkiLAN 6020e
Page 186
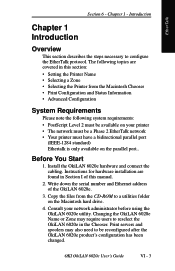
...Select Search to search the network for OkiLAN 6020e printers. Finding the OkiLAN 6020e The Zone Selection window (shown on the Macintosh hard drive. 4. Turn on the network: 1. Run the OkiLAN 6020e utility by double-clicking the OkiLAN 6020e utility icon. Turn on your ...utility allows the user to: • Change the OkiLAN 6020e product's AppleTalk Name • Move the OkiLAN 6020e from the diskette labeled OKI EtherTalk Utilities to a Preferred Zone • Print Configuration Page and view Status Information • Use Advanced Configuration Options Running the OkiLAN 6020e...
...Select Search to search the network for OkiLAN 6020e printers. Finding the OkiLAN 6020e The Zone Selection window (shown on the Macintosh hard drive. 4. Turn on the network: 1. Run the OkiLAN 6020e utility by double-clicking the OkiLAN 6020e utility icon. Turn on your ...utility allows the user to: • Change the OkiLAN 6020e product's AppleTalk Name • Move the OkiLAN 6020e from the diskette labeled OKI EtherTalk Utilities to a Preferred Zone • Print Configuration Page and view Status Information • Use Advanced Configuration Options Running the OkiLAN 6020e...
Network User's Guide for OkiLAN 6020e
Page 215
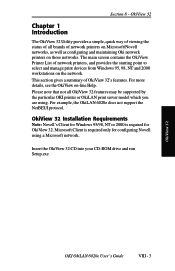
... the OkiView Printer List of OkiView 32's features. Please note that not all brands of all OkiView 32 features may be supported by the particular OKI printer or OkiLAN print server model which you are using a Microsoft network. For more details, see the OkiView on those networks. Section 8 -... Insert the OkiView 32 CD into your CD-ROM drive and run Setup.exe. This section gives a summary of network printers, and provides the starting point to select and manage print devices from Windows 95...
... the OkiView Printer List of OkiView 32's features. Please note that not all brands of all OkiView 32 features may be supported by the particular OKI printer or OkiLAN print server model which you are using a Microsoft network. For more details, see the OkiView on those networks. Section 8 -... Insert the OkiView 32 CD into your CD-ROM drive and run Setup.exe. This section gives a summary of network printers, and provides the starting point to select and manage print devices from Windows 95...

Flash Simm Hardware Installation Guide
Page 19
SoOftvweravrieewUtilities Installation To install the Image Creator and NetFlash utilities: 1 Insert the Flash SIMM Kit CD into your CD-ROM drive exists at other than D, use the appropriate letter). 4 Follow the installation instructions. | Hardware Installation Guide: English 19 Run. 3 Type D:\SETUP (if your CD-ROM drive. 2 Click Start -
SoOftvweravrieewUtilities Installation To install the Image Creator and NetFlash utilities: 1 Insert the Flash SIMM Kit CD into your CD-ROM drive exists at other than D, use the appropriate letter). 4 Follow the installation instructions. | Hardware Installation Guide: English 19 Run. 3 Type D:\SETUP (if your CD-ROM drive. 2 Click Start -

Quick Start Guide for the OKIPAGE 10e
Page 5
... Pages 14 Interfacing with your Computer 14 Connecting the Cable 14 Turning on the Printer 15 Printer Software 15 Printer Drivers 15 No CD-ROM Drive 16 Status Monitor 16 Windows 95, Windows 98, and Windows NT 4.0 ........ 17 Installing the Driver and Status Monitor 17 Windows 3.x 18 Installing the Standard Driver...
... Pages 14 Interfacing with your Computer 14 Connecting the Cable 14 Turning on the Printer 15 Printer Software 15 Printer Drivers 15 No CD-ROM Drive 16 Status Monitor 16 Windows 95, Windows 98, and Windows NT 4.0 ........ 17 Installing the Driver and Status Monitor 17 Windows 3.x 18 Installing the Standard Driver...

Quick Start Guide for the OKIPAGE 10e
Page 16
The OKI Menu Installer Setup window appears. 3 Order a 3.5" diskette kit. It contains a Windows® driver that is the location of diskettes, call 1-888-232-8530 and request the appropriate set. To obtain a set of the CD ROM drive). No CD-ROM Drive? Windows 3.1 Windows 95 Windows 98 MS 10691/...TXT file on the diskette to create diskettes. − Close all open applications. − Insert the OKIPAGE 10e CD into the CD-ROM drive. − Click the Start button on another system, you to create your printer. In addition to displaying printer status messages, the status monitor...
The OKI Menu Installer Setup window appears. 3 Order a 3.5" diskette kit. It contains a Windows® driver that is the location of diskettes, call 1-888-232-8530 and request the appropriate set. To obtain a set of the CD ROM drive). No CD-ROM Drive? Windows 3.1 Windows 95 Windows 98 MS 10691/...TXT file on the diskette to create diskettes. − Close all open applications. − Insert the OKIPAGE 10e CD into the CD-ROM drive. − Click the Start button on another system, you to create your printer. In addition to displaying printer status messages, the status monitor...
Quick Start Guide for the OKIPAGE 10e
Page 17
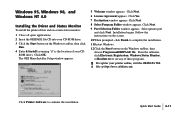
Click Next. 6 License Agreement appears. Click Next. 9 Port Selection Folder window appears. Select printer port and click Next. The OKI Menu Installer Setup window appears. 5 Welcome window appears. Click Yes. 7 Destination window appears. From the submenu, click Electronic Registration..., Windows Status Monitor, or Readme.txt to see any of your CD ROM drive). Follow the instructions on the screen. 10 When prompted, click Finish to continue the installation. | Quick Start Guide E-17 Click Next. 8...
Click Next. 6 License Agreement appears. Click Next. 9 Port Selection Folder window appears. Select printer port and click Next. The OKI Menu Installer Setup window appears. 5 Welcome window appears. Click Yes. 7 Destination window appears. From the submenu, click Electronic Registration..., Windows Status Monitor, or Readme.txt to see any of your CD ROM drive). Follow the instructions on the screen. 10 When prompted, click Finish to continue the installation. | Quick Start Guide E-17 Click Next. 8...

Quick Start Guide for the OKIPAGE 10e
Page 18
Follow the instructions on the screen. 10 When prompted, click Finish to continue the installation. 5 Welcome window appears. The OKI Menu Installer Setup window appears. | E-18 OKIPAGE 10e Click Printer Software to complete the installation. Select printer port and click Next. Click Next.... Installation begins. Click Yes. 7 Destination window appears. Windows 3.x Installing the Standard Driver and the Status Monitor 1 Insert the disc into your CD-ROM drive. 2 Close all open applications. 3 Click File→Run. 4 Enter d:\install (assuming "d" is the location of your CD ROM...
Follow the instructions on the screen. 10 When prompted, click Finish to continue the installation. 5 Welcome window appears. The OKI Menu Installer Setup window appears. | E-18 OKIPAGE 10e Click Printer Software to complete the installation. Select printer port and click Next. Click Next.... Installation begins. Click Yes. 7 Destination window appears. Windows 3.x Installing the Standard Driver and the Status Monitor 1 Insert the disc into your CD-ROM drive. 2 Close all open applications. 3 Click File→Run. 4 Enter d:\install (assuming "d" is the location of your CD ROM...

Quick Start Guide for the OKIPAGE 10e
Page 21
..., select Off. 6 Press Apply to remove the printer driver or status monitor from your change. Uninstall Printer Software If you want to finalize your hard drive, use the following procedure: Windows 95, Windows 98 and NT 4.0 To remove the printer driver: 1 Click Start →Settings →Printers 2 Highlight the OKIPAGE 10e...
..., select Off. 6 Press Apply to remove the printer driver or status monitor from your change. Uninstall Printer Software If you want to finalize your hard drive, use the following procedure: Windows 95, Windows 98 and NT 4.0 To remove the printer driver: 1 Click Start →Settings →Printers 2 Highlight the OKIPAGE 10e...
