
User Manual
Page 5
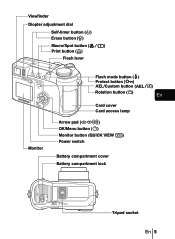
Viewfinder Diopter adjustment dial Self-timer button (Y) Erase button (S) Macro/Spot button (() Print button (
Viewfinder Diopter adjustment dial Self-timer button (Y) Erase button (S) Macro/Spot button (() Print button (

User Manual
Page 6
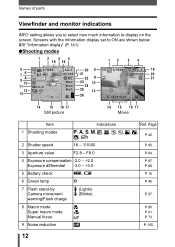
... mode F2.8 F2.8 SQ11600 1200 Still picture Movie En Item Indications 1 Shooting modes P, A, S, M, N, o, m, J, L, K, I, s 2 Shutter speed 16 - 1/1000 3 Aperture value F2.8 - F8.0 4 Exposure compensation -2.0 - +2.0 Exposure differential -3.0 - +3.0 5 Battery check e, f 6 Green lamp 7 Flash stand-by Camera movement warning/Flash charge # (Lights) # (Blinks) 8 Macro mode & Super macro mode % Manual focus MF 9 Noise reduction O 10 Flash...
... mode F2.8 F2.8 SQ11600 1200 Still picture Movie En Item Indications 1 Shooting modes P, A, S, M, N, o, m, J, L, K, I, s 2 Shutter speed 16 - 1/1000 3 Aperture value F2.8 - F8.0 4 Exposure compensation -2.0 - +2.0 Exposure differential -3.0 - +3.0 5 Battery check e, f 6 Green lamp 7 Flash stand-by Camera movement warning/Flash charge # (Lights) # (Blinks) 8 Macro mode & Super macro mode % Manual focus MF 9 Noise reduction O 10 Flash...
User Manual
Page 8
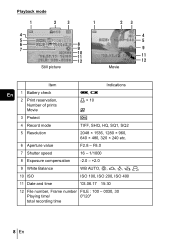
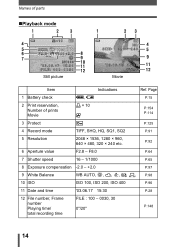
Playback mode SQ1 1600 1200 Still picture Movie Item Indications En 1 Battery check 2 Print reservation, Number of prints Movie e, f < × 10 n 3 Protect 9 4 Record mode TIFF, SHQ, HQ, SQ1, SQ2 5 Resolution 2048 × 1536, 1280 × 960, 640 &#...
Playback mode SQ1 1600 1200 Still picture Movie Item Indications En 1 Battery check 2 Print reservation, Number of prints Movie e, f < × 10 n 3 Protect 9 4 Record mode TIFF, SHQ, HQ, SQ1, SQ2 5 Resolution 2048 × 1536, 1280 × 960, 640 &#...

User Manual
Page 9
... changes as follows when the camera is turned on the card. The indication is low, the battery check indication changes as shown below depending on the left to the status on the shooting status. Battery check indication F2.8 SQ11600 1200 Memory gauge a Shoot b Shoot c Shoot d Before shooting ... is in use. Memory gauge The memory gauge lights up when you take the next shot. No indication Remaining power level: exhausted Replace with new batteries. e Lights (green) (Goes off ) One picture taken (Lit) More than two taken (Lit) Wait En No more pictures can be taken ...
... changes as follows when the camera is turned on the card. The indication is low, the battery check indication changes as shown below depending on the left to the status on the shooting status. Battery check indication F2.8 SQ11600 1200 Memory gauge a Shoot b Shoot c Shoot d Before shooting ... is in use. Memory gauge The memory gauge lights up when you take the next shot. No indication Remaining power level: exhausted Replace with new batteries. e Lights (green) (Goes off ) One picture taken (Lit) More than two taken (Lit) Wait En No more pictures can be taken ...

User Manual
Page 10
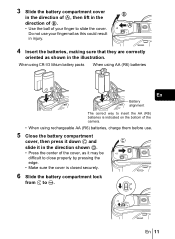
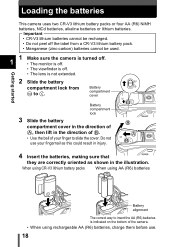
... lock 10 En A 4 Attach the strap to the desired length. J LOADING THE BATTERIES 1 Make sure the camera is turned off. • The monitor is off. • The viewfinder is off. • The lens is fastened securely. J ATTACHING THE ...STRAP AND LENS CAP 1 Pass the lens cap string through the En stopper (A) and make sure it is not extended. 2 Slide the battery compartment lock from = to ). Pull the strap through the hole in the lens cap. 2 Fasten the strap to the strap strap eyelet eyelet as shown...
... lock 10 En A 4 Attach the strap to the desired length. J LOADING THE BATTERIES 1 Make sure the camera is turned off. • The monitor is off. • The viewfinder is off. • The lens is fastened securely. J ATTACHING THE ...STRAP AND LENS CAP 1 Pass the lens cap string through the En stopper (A) and make sure it is not extended. 2 Slide the battery compartment lock from = to ). Pull the strap through the hole in the lens cap. 2 Fasten the strap to the strap strap eyelet eyelet as shown...
User Manual
Page 11
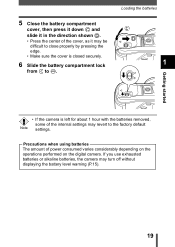
... by pressing the edge. • Make sure the cover is indicated on the bottom of the camera. • When using rechargeable AA (R6) batteries, charge them before use your fingernail as this could result in the direction of B. • Use the ball of the cover, as shown in ...the direction shown D. • Press the center of your finger to slide the cover. En 11 3 Slide the battery compartment cover in the direction of A, then lift in injury. Do not use . 5 Close the battery compartment cover, then press it down C and slide it may be difficult to =. B A 4 Insert the...
... by pressing the edge. • Make sure the cover is indicated on the bottom of the camera. • When using rechargeable AA (R6) batteries, charge them before use your fingernail as this could result in the direction of B. • Use the ball of the cover, as shown in ...the direction shown D. • Press the center of your finger to slide the cover. En 11 3 Slide the battery compartment cover in the direction of A, then lift in injury. Do not use . 5 Close the battery compartment cover, then press it down C and slide it may be difficult to =. B A 4 Insert the...

User Manual
Page 14
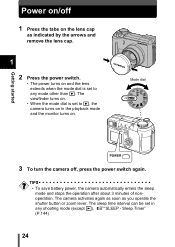
... mode dial to P and press the power switch to exit the menu. 8 To turn the camera off , press the power switch again. • To save battery power, the camera automatically enters the sleep mode and stops the operation after about 3 minutes of non- 3 To turn the camera off , press the power...
... mode dial to P and press the power switch to exit the menu. 8 To turn the camera off , press the power switch again. • To save battery power, the camera automatically enters the sleep mode and stops the operation after about 3 minutes of non- 3 To turn the camera off , press the power...

User Manual
Page 15
.../Month/Day), M-D-Y (Month/Day/Year), D-M-Y (Day/Month/Year). En • For a more accurate setting, press e when the time signal hits 00 seconds. is left without batteries for approximately 1 hour. 6 Press ac to select one of the following steps show the procedure used when the date and time settings are set to...
.../Month/Day), M-D-Y (Month/Day/Year), D-M-Y (Day/Month/Year). En • For a more accurate setting, press e when the time signal hits 00 seconds. is left without batteries for approximately 1 hour. 6 Press ac to select one of the following steps show the procedure used when the date and time settings are set to...
User Manual
Page 42
...°F) (storage) Humidity : 30% to 90% (operation)/10% to 90% (storage) Power supply En Dimensions : 2 CR-V3 lithium battery packs, or 4 AA (R6) alkaline batteries, lithium batteries, NiMH batteries or NiCd batteries. AC adapter (optional) Manganese (zinc-carbon) batteries cannot be used. : 107.5 mm (W) × 66 mm (H) × 68.5 mm (D) (4.2" × 2.6" × 2.7") (excluding protrusions) Weight : 295...
...°F) (storage) Humidity : 30% to 90% (operation)/10% to 90% (storage) Power supply En Dimensions : 2 CR-V3 lithium battery packs, or 4 AA (R6) alkaline batteries, lithium batteries, NiMH batteries or NiCd batteries. AC adapter (optional) Manganese (zinc-carbon) batteries cannot be used. : 107.5 mm (W) × 66 mm (H) × 68.5 mm (D) (4.2" × 2.6" × 2.7") (excluding protrusions) Weight : 295...
Reference Manual
Page 5
... parts 10 Camera 10 Viewfinder and monitor indications 12 How to use this manual 16 1 Getting started 17 Attaching the strap 17 Loading the batteries 18 Selecting optional batteries or an AC adapter 20 Inserting a card 22 Card basics 22 Removing the card 23 Power on/off 24 Startup/Shutdown screen 25...
... parts 10 Camera 10 Viewfinder and monitor indications 12 How to use this manual 16 1 Getting started 17 Attaching the strap 17 Loading the batteries 18 Selecting optional batteries or an AC adapter 20 Inserting a card 22 Card basics 22 Removing the card 23 Power on/off 24 Startup/Shutdown screen 25...
Reference Manual
Page 12
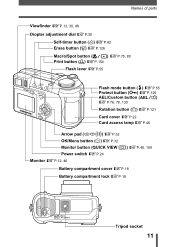
Names of parts Viewfinder gP.12, 30, 46 Diopter adjustment dial gP.30 Self-timer button (Y) gP.82 Erase button (S) gP.126 Macro/Spot button (() gP.75, 80 Print button (
Names of parts Viewfinder gP.12, 30, 46 Diopter adjustment dial gP.30 Self-timer button (Y) gP.82 Erase button (S) gP.126 Macro/Spot button (() gP.75, 80 Print button (
Reference Manual
Page 13
F8.0 P.64 4 Exposure compensation -2.0 - +2.0 P.97 Exposure differential -3.0 - +3.0 P.66 5 Battery check e, f P.15 6 Green lamp | P.46 7 Flash stand-by # (Lights) Camera movement # (Blinks) P.57 warning/Flash charge 8 Macro mode & Super macro mode % Manual focus MF 9 Noise ...
F8.0 P.64 4 Exposure compensation -2.0 - +2.0 P.97 Exposure differential -3.0 - +3.0 P.66 5 Battery check e, f P.15 6 Green lamp | P.46 7 Flash stand-by # (Lights) Camera movement # (Blinks) P.57 warning/Flash charge 8 Macro mode & Super macro mode % Manual focus MF 9 Noise ...
Reference Manual
Page 15
... number Playing time/ total recording time FILE : 100 - 0030, 30 0"/20" Ref. Names of parts zPlayback mode SQ1 1600 1200 Still picture Movie Item Indications 1 Battery check e, f 2 Print reservation, Number of prints Movie < × 10 n 3 Protect 9 4 Record mode TIFF, SHQ, HQ, SQ1, SQ2 5 Resolution 2048 × 1536, 1280 × 960, 640...
... number Playing time/ total recording time FILE : 100 - 0030, 30 0"/20" Ref. Names of parts zPlayback mode SQ1 1600 1200 Still picture Movie Item Indications 1 Battery check e, f 2 Print reservation, Number of prints Movie < × 10 n 3 Protect 9 4 Record mode TIFF, SHQ, HQ, SQ1, SQ2 5 Resolution 2048 × 1536, 1280 × 960, 640...
Reference Manual
Page 16
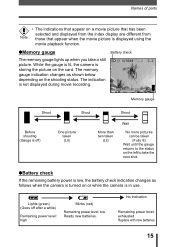
... display are different from Note those that appear when the movie picture is not displayed during movie recording. zBattery check If the remaining battery power is low, the battery check indication changes as shown below depending on the left to take a still picture. e Lights (green) (Goes off ) b ... or while the camera is off after a while) Remaining power level: high f Blinks (red) Remaining power level: low Ready new batteries. zMemory gauge Battery check The memory gauge lights up when you take the next shot. No indication Remaining power level: exhausted Replace with new...
... display are different from Note those that appear when the movie picture is not displayed during movie recording. zBattery check If the remaining battery power is low, the battery check indication changes as shown below depending on the left to take a still picture. e Lights (green) (Goes off ) b ... or while the camera is off after a while) Remaining power level: high f Blinks (red) Remaining power level: low Ready new batteries. zMemory gauge Battery check The memory gauge lights up when you take the next shot. No indication Remaining power level: exhausted Replace with new...
Reference Manual
Page 19
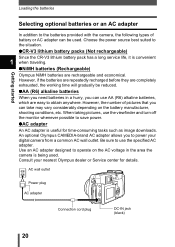
... correctly oriented as this could result in the illustration. Loading the batteries This camera uses two CR-V3 lithium battery packs or four AA (R6) NiMH batteries, NiCd batteries, alkaline batteries or lithium batteries. When using CR-V3 lithium battery packs When using rechargeable AA (R6) batteries, charge them before use your finger to insert the AA (R6...
... correctly oriented as this could result in the illustration. Loading the batteries This camera uses two CR-V3 lithium battery packs or four AA (R6) NiMH batteries, NiCd batteries, alkaline batteries or lithium batteries. When using CR-V3 lithium battery packs When using rechargeable AA (R6) batteries, charge them before use your finger to insert the AA (R6...
Reference Manual
Page 20
... amount of the internal settings may revert to =. If you use exhausted batteries or alkaline batteries, the camera may turn off without displaying the battery level warning (P.15). 19 Getting started 5 Close the battery compartment cover, then press it down C and slide it in the direction shown D. • Press the center of the..., as it may be difficult to close properly by pressing the edge. • Make sure the cover is left for about 1 hour with the batteries removed, some of power consumed varies considerably depending on the operations performed on the digital camera. Loading the...
... amount of the internal settings may revert to =. If you use exhausted batteries or alkaline batteries, the camera may turn off without displaying the battery level warning (P.15). 19 Getting started 5 Close the battery compartment cover, then press it down C and slide it in the direction shown D. • Press the center of the..., as it may be difficult to close properly by pressing the edge. • Make sure the cover is left for about 1 hour with the batteries removed, some of power consumed varies considerably depending on the operations performed on the digital camera. Loading the...
Reference Manual
Page 21
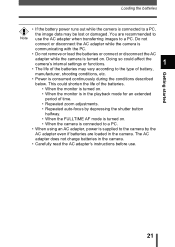
... an AC adapter designed to operate on the battery manufacturer, shooting conditions, etc. zNiMH batteries (Rechargeable) Olympus NiMH batteries are easy to obtain anywhere. However, the number of battery or AC adapter can be reduced. An optional Olympus CAMEDIA-brand AC adapter allows you can take ...sure to save power. Getting started Loading the batteries Selecting optional batteries or an AC adapter In addition to the batteries provided with the camera, the following types of pictures that you to power your nearest Olympus dealer or Service center for time-consuming tasks ...
... an AC adapter designed to operate on the battery manufacturer, shooting conditions, etc. zNiMH batteries (Rechargeable) Olympus NiMH batteries are easy to obtain anywhere. However, the number of battery or AC adapter can be reduced. An optional Olympus CAMEDIA-brand AC adapter allows you can take ...sure to save power. Getting started Loading the batteries Selecting optional batteries or an AC adapter In addition to the batteries provided with the camera, the following types of pictures that you to power your nearest Olympus dealer or Service center for time-consuming tasks ...
Reference Manual
Page 22
... is in the playback mode for an extended period of time. • Repeated zoom adjustments. • Repeated auto-focus by the AC adapter even if batteries are recommended to a PC. • When using an AC adapter, power is turned on . • When the camera is connected to Note use . ...damaged. Do not connect or disconnect the AC adapter while the camera is communicating with the PC. • Do not remove or load the batteries or connect or disconnect the AC adapter while the camera is supplied to the camera by depressing the shutter button halfway. • When the ...
... is in the playback mode for an extended period of time. • Repeated zoom adjustments. • Repeated auto-focus by the AC adapter even if batteries are recommended to a PC. • When using an AC adapter, power is turned on . • When the camera is connected to Note use . ...damaged. Do not connect or disconnect the AC adapter while the camera is communicating with the PC. • Do not remove or load the batteries or connect or disconnect the AC adapter while the camera is supplied to the camera by depressing the shutter button halfway. • When the ...
Reference Manual
Page 24
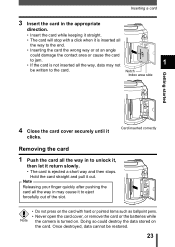
...; The card will stop with hard or pointed items such as ballpoint pens. • Never open the card cover, or remove the card or the batteries while Note the camera is turned on the card.
...; The card will stop with hard or pointed items such as ballpoint pens. • Never open the card cover, or remove the card or the batteries while Note the camera is turned on the card.
Reference Manual
Page 25
TIPS • To save battery power, the camera automatically enters the sleep mode and stops the operation after about 3 minutes of nonoperation. The sleep time interval can be set to q, ...
TIPS • To save battery power, the camera automatically enters the sleep mode and stops the operation after about 3 minutes of nonoperation. The sleep time interval can be set to q, ...


