
User Manual
Page 5
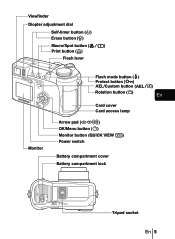
Viewfinder Diopter adjustment dial Self-timer button (Y) Erase button (S) Macro/Spot button (() Print button (
Viewfinder Diopter adjustment dial Self-timer button (Y) Erase button (S) Macro/Spot button (() Print button (

User Manual
Page 10
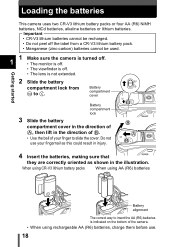
... sure the camera is turned off. • The monitor is off. • The viewfinder is off. • The lens is fastened securely. Battery compartment cover Battery compartment lock 10 En Pull the strap through the hole in the lens cap. 2 Fasten the strap to the strap strap eyelet eyelet as shown ... way. J ATTACHING THE STRAP AND LENS CAP 1 Pass the lens cap string through the En stopper (A) and make sure it is not extended. 2 Slide the battery compartment lock from = to ).
... sure the camera is turned off. • The monitor is off. • The viewfinder is off. • The lens is fastened securely. Battery compartment cover Battery compartment lock 10 En Pull the strap through the hole in the lens cap. 2 Fasten the strap to the strap strap eyelet eyelet as shown ... way. J ATTACHING THE STRAP AND LENS CAP 1 Pass the lens cap string through the En stopper (A) and make sure it is not extended. 2 Slide the battery compartment lock from = to ).
User Manual
Page 11
...your fingernail as shown in injury. Do not use . 5 Close the battery compartment cover, then press it down C and slide it may be difficult to close properly by pressing the edge. • Make sure the cover is indicated on the bottom of the camera. • When using ...AA (R6) batteries En Battery alignment The correct way to =. C D 6 Slide the battery compartment lock from ) to insert the AA (R6) batteries is closed securely. B A 4 Insert the batteries, making sure that they are ...
...your fingernail as shown in injury. Do not use . 5 Close the battery compartment cover, then press it down C and slide it may be difficult to close properly by pressing the edge. • Make sure the cover is indicated on the bottom of the camera. • When using ...AA (R6) batteries En Battery alignment The correct way to =. C D 6 Slide the battery compartment lock from ) to insert the AA (R6) batteries is closed securely. B A 4 Insert the batteries, making sure that they are ...
Reference Manual
Page 12
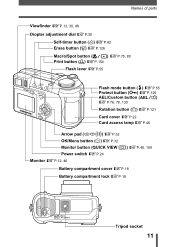
Names of parts Viewfinder gP.12, 30, 46 Diopter adjustment dial gP.30 Self-timer button (Y) gP.82 Erase button (S) gP.126 Macro/Spot button (() gP.75, 80 Print button (
Names of parts Viewfinder gP.12, 30, 46 Diopter adjustment dial gP.30 Self-timer button (Y) gP.82 Erase button (S) gP.126 Macro/Spot button (() gP.75, 80 Print button (
Reference Manual
Page 19
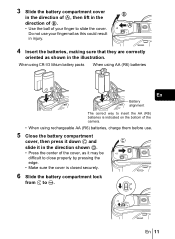
... off. • The viewfinder is off. • The lens is indicated on the bottom of your fingernail as shown in injury. Battery compartment cover Getting started Battery compartment lock 3 Slide the battery compartment cover in the direction of A, then lift in the direction of B. • Use the ball of the camera. • When using AA...
... off. • The viewfinder is off. • The lens is indicated on the bottom of your fingernail as shown in injury. Battery compartment cover Getting started Battery compartment lock 3 Slide the battery compartment cover in the direction of A, then lift in the direction of B. • Use the ball of the camera. • When using AA...
Reference Manual
Page 20
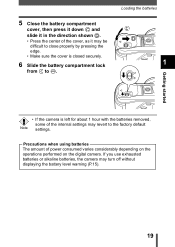
...it in the direction shown D. • Press the center of the cover, as it may be difficult to close properly by pressing the edge. • Make sure the cover is left for about 1 hour with the batteries removed, some of power consumed varies considerably depending on the operations performed... on the digital camera. Precautions when using batteries The amount of the internal settings may turn off without...
...it in the direction shown D. • Press the center of the cover, as it may be difficult to close properly by pressing the edge. • Make sure the cover is left for about 1 hour with the batteries removed, some of power consumed varies considerably depending on the operations performed... on the digital camera. Precautions when using batteries The amount of the internal settings may turn off without...
Reference Manual
Page 24
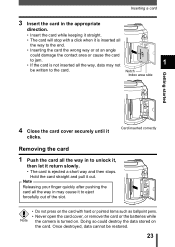
... it straight. • The card will stop with hard or pointed items such as ballpoint pens. • Never open the card cover, or remove the card or the batteries while Note the camera is turned on the card. Card inserted correctly Removing the card 1 Push the card all the way in... may not 1 be restored. 23 Once destroyed, data cannot be written to the card. Notch Index area side Getting started 4 Close the card cover securely until...
... it straight. • The card will stop with hard or pointed items such as ballpoint pens. • Never open the card cover, or remove the card or the batteries while Note the camera is turned on the card. Card inserted correctly Removing the card 1 Push the card all the way in... may not 1 be restored. 23 Once destroyed, data cannot be written to the card. Notch Index area side Getting started 4 Close the card cover securely until...
Reference Manual
Page 49
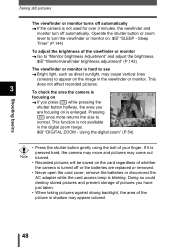
.... Using the digital zoom" (P.54) • Press the shutter button gently using the ball of whether the camera is turned off or the batteries are focusing on F2.8 Shooting basics → If you press f while pressing the shutter button halfway, the area you have just taken. •...normal. Doing so could destroy stored pictures and prevent storage of pictures you are replaced or removed. • Never open the card cover, remove the batteries or disconnect the AC adapter while the card access lamp is not available in shadow may come out Note blurred. • Recorded pictures...
.... Using the digital zoom" (P.54) • Press the shutter button gently using the ball of whether the camera is turned off or the batteries are focusing on F2.8 Shooting basics → If you press f while pressing the shutter button halfway, the area you have just taken. •...normal. Doing so could destroy stored pictures and prevent storage of pictures you are replaced or removed. • Never open the card cover, remove the batteries or disconnect the AC adapter while the card access lamp is not available in shadow may come out Note blurred. • Recorded pictures...

Reference Manual
Page 141
Note • Open the card cover. • Remove the battery. • Connect or disconnect the AC adapter. 8 Useful functions 140 CARD SETUP - FORMAt CAUtION ERASING%ALL YES NO SELECt GO BUSY Never do the following during formatting, as they may cause the card to select YES, then press e. • The BUSY bar is displayed and the card is formatted. Formatting Cards 2 Press a to malfunction.
Note • Open the card cover. • Remove the battery. • Connect or disconnect the AC adapter. 8 Useful functions 140 CARD SETUP - FORMAt CAUtION ERASING%ALL YES NO SELECt GO BUSY Never do the following during formatting, as they may cause the card to select YES, then press e. • The BUSY bar is displayed and the card is formatted. Formatting Cards 2 Press a to malfunction.
Reference Manual
Page 190
... 83 E Editing movies 116 ENLARGE SIZE 95 Erasing pictures 126 Error codes 163 ESP metering 75 Exposure compensation F . . . . .97 Exposure differential 66 B Batteries 18 Battery check 15 Battery compartment cover . . 11, 18 Battery compartment lock . . . 11, 18 Beep sound 8 145 BKT 84 BLACK & WHITE 90 BLACK BOARD 90 C Camera movement warning . . . . 57 Card 22 F FILE...
... 83 E Editing movies 116 ENLARGE SIZE 95 Erasing pictures 126 Error codes 163 ESP metering 75 Exposure compensation F . . . . .97 Exposure differential 66 B Batteries 18 Battery check 15 Battery compartment cover . . 11, 18 Battery compartment lock . . . 11, 18 Beep sound 8 145 BKT 84 BLACK & WHITE 90 BLACK BOARD 90 C Camera movement warning . . . . 57 Card 22 F FILE...
Reference Manual
Page 213
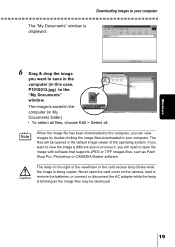
The lamp on the camera, load or remove the batteries, or connect or disconnect the AC adapter while the lamp is blinking as Paint Shop Pro, Photoshop or CAMEDIA Master software. When the image file ... computer, you want to view the image a different size or process it, you will be destroyed. 19 The files will need to open the card cover on the right of the operating system. The image is saved in the computer (in this case, P1010012.jpg) to the "My Documents" window. Windows...
The lamp on the camera, load or remove the batteries, or connect or disconnect the AC adapter while the lamp is blinking as Paint Shop Pro, Photoshop or CAMEDIA Master software. When the image file ... computer, you want to view the image a different size or process it, you will be destroyed. 19 The files will need to open the card cover on the right of the operating system. The image is saved in the computer (in this case, P1010012.jpg) to the "My Documents" window. Windows...

Reference Manual
Page 222
... your computer The "Hard Disk" window is blinking as Paint Shop Pro, Photoshop or CAMEDIA Master software. The files will need to open the card cover on the right of the operating system. The image is being copied. If you want to save in the computer (in the "Hard Disk" folder.... When the image file has been copied to the "Hard Disk" window. The lamp on the camera, load or remove the batteries, or connect or disconnect the AC adapter while the lamp is displayed. 5 Drag & drop the image you want to view the image a different size or...
... your computer The "Hard Disk" window is blinking as Paint Shop Pro, Photoshop or CAMEDIA Master software. The files will need to open the card cover on the right of the operating system. The image is being copied. If you want to save in the computer (in the "Hard Disk" folder.... When the image file has been copied to the "Hard Disk" window. The lamp on the camera, load or remove the batteries, or connect or disconnect the AC adapter while the lamp is displayed. 5 Drag & drop the image you want to view the image a different size or...


