

User Manual
Page 2
For more details on the functions described here, refer to the "Reference Manual" on CD-ROM. 2 En CONTENTS/TABLE DES MATIÉRES/INHALT/CONTENIDO ENGLISH 2 FRANÇAIS 44 DEUTSCH 86 ESPAÑOL 128 CONTENTS GETTING STARTED 4 MENU FUNCTIONS 16 SHOOTING BASICS 22 En ADVANCED SHOOTING 30 PLAYBACK 32 PRINT SETTINGS 37 DOWNLOADING PICTURES TO A COMPUTER . . . . . 38 ERROR CODES 40 SPECIFICATIONS 41 These instructions are only for quick reference.
For more details on the functions described here, refer to the "Reference Manual" on CD-ROM. 2 En CONTENTS/TABLE DES MATIÉRES/INHALT/CONTENIDO ENGLISH 2 FRANÇAIS 44 DEUTSCH 86 ESPAÑOL 128 CONTENTS GETTING STARTED 4 MENU FUNCTIONS 16 SHOOTING BASICS 22 En ADVANCED SHOOTING 30 PLAYBACK 32 PRINT SETTINGS 37 DOWNLOADING PICTURES TO A COMPUTER . . . . . 38 ERROR CODES 40 SPECIFICATIONS 41 These instructions are only for quick reference.
User Manual
Page 13
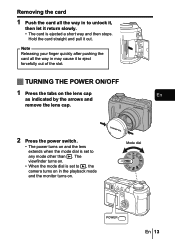
The viewfinder turns on. • When the mode dial is set to q, the camera turns on in the playback mode and the monitor turns on and the lens extends when the mode dial is ejected a short ... in to eject forcefully out of the slot. Mode dial En 13 Hold the card straight and pull it return slowly. • The card is set to any mode other than q.
The viewfinder turns on. • When the mode dial is set to q, the camera turns on in the playback mode and the monitor turns on and the lens extends when the mode dial is ejected a short ... in to eject forcefully out of the slot. Mode dial En 13 Hold the card straight and pull it return slowly. • The card is set to any mode other than q.

User Manual
Page 14
J SELECTING A LANGUAGE W 1 Set the mode dial to P and press the power switch to turn the camera on. 2 Press e. • The top menu is displayed. 3 Press d on . 2 Press e. • ... select the SETUP tab, then press d. 5 Press ac to select X, then press d. • The green frame moves to the selected item. 14 En J SETTING THE DATE AND TIME X 1 Set the mode dial to P and press the power switch to exit the menu. 8 To turn the camera off , press the power switch again...
J SELECTING A LANGUAGE W 1 Set the mode dial to P and press the power switch to turn the camera on. 2 Press e. • The top menu is displayed. 3 Press d on . 2 Press e. • ... select the SETUP tab, then press d. 5 Press ac to select X, then press d. • The green frame moves to the selected item. 14 En J SETTING THE DATE AND TIME X 1 Set the mode dial to P and press the power switch to exit the menu. 8 To turn the camera off , press the power switch again...

User Manual
Page 15
...of the year are fixed. 8 Repeat this procedure until the date and time are set to Y-M-D. 7 Press ac to set . • The time is displayed in the 24-hour format. En • For a more accurate setting, press e when the time signal hits 00 seconds. Note En 15 is left ...1 hour. Consequently, 2 p.m. The clock starts when you press the button. 10 To turn the camera off, press the power switch. • The date and time settings will be canceled if the camera is displayed as 14:00. 9 Press e. M-D (Year/Month/Day), M-D-Y (Month/Day/Year), D-M-Y (Day/Month/Year). 6 Press...
...of the year are fixed. 8 Repeat this procedure until the date and time are set to Y-M-D. 7 Press ac to set . • The time is displayed in the 24-hour format. En • For a more accurate setting, press e when the time signal hits 00 seconds. Note En 15 is left ...1 hour. Consequently, 2 p.m. The clock starts when you press the button. 10 To turn the camera off, press the power switch. • The date and time settings will be canceled if the camera is displayed as 14:00. 9 Press e. M-D (Year/Month/Day), M-D-Y (Month/Day/Year), D-M-Y (Day/Month/Year). 6 Press...

User Manual
Page 16
... functions registered in the shortcut menus can also be replaced in modes other than hnq. En MODE MENU WB Use the arrow pad to complete setting. Press e to select a menu. The top menu is displayed on the monitor (or viewfinder). Press e again to exit the menu and return ...to select a setting. SHORTCUT MENUS • Take you access the menu selections to display the top menu. This chapter explains how the menus work, using the P mode screens...
... functions registered in the shortcut menus can also be replaced in modes other than hnq. En MODE MENU WB Use the arrow pad to complete setting. Press e to select a menu. The top menu is displayed on the monitor (or viewfinder). Press e again to exit the menu and return ...to select a setting. SHORTCUT MENUS • Take you access the menu selections to display the top menu. This chapter explains how the menus work, using the P mode screens...
User Manual
Page 17
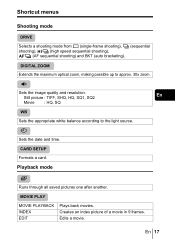
... approx. 30x zoom. Creates an index picture of a movie in 9 frames. Edits a movie. MOVIE PLAY MOVIE PLAYBACK INDEX EDIT Plays back movies. K Sets the image quality and resolution. X Sets the date and time. En 17 Playback mode m Runs through all saved pictures one after another. DIGITAL ZOOM Extends the maximum optical zoom...
... approx. 30x zoom. Creates an index picture of a movie in 9 frames. Edits a movie. MOVIE PLAY MOVIE PLAYBACK INDEX EDIT Plays back movies. K Sets the image quality and resolution. X Sets the date and time. En 17 Playback mode m Runs through all saved pictures one after another. DIGITAL ZOOM Extends the maximum optical zoom...

User Manual
Page 18
... from AUTO, 100, 200 and 400. Mode menus The MODE MENU has 4 tabs. Press ac to the "Reference Manual" on the monitor. En Shooting mode SEt CARD PIC CAMERA CAMERA tab PICTURE tab CARD tab SETUP tab DRIVE ISO A/S/M SLOW SLOW1 CAMERA tab DRIVE ISO A/S/M Selects a shooting mode from o (single-frame...
... from AUTO, 100, 200 and 400. Mode menus The MODE MENU has 4 tabs. Press ac to the "Reference Manual" on the monitor. En Shooting mode SEt CARD PIC CAMERA CAMERA tab PICTURE tab CARD tab SETUP tab DRIVE ISO A/S/M SLOW SLOW1 CAMERA tab DRIVE ISO A/S/M Selects a shooting mode from o (single-frame...
User Manual
Page 19
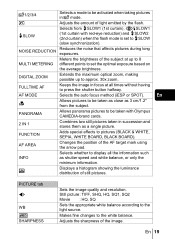
En % Allows pictures to be taken as close as 3 cm/1.2" from #SLOW1 (1st curtain), HSLOW1 (1st curtain with Olympus CAMEDIA-brand cards. 2 IN 1 Combines two still pictures taken in succession and stores them as shutter speed and white balance, or only the minimum ...SEPIA, WHITE BOARD, BLACK BOARD). PANORAMA Allows panorama pictures to be taken with red-eye reduction) and #SLOW2 (2nd curtain) when the flash mode is set the optimal exposure based on the average brightness. Makes fine changes to the white balance. En 19 FULLTIME AF Keeps the image in r mode. AF...
En % Allows pictures to be taken as close as 3 cm/1.2" from #SLOW1 (1st curtain), HSLOW1 (1st curtain with Olympus CAMEDIA-brand cards. 2 IN 1 Combines two still pictures taken in succession and stores them as shutter speed and white balance, or only the minimum ...SEPIA, WHITE BOARD, BLACK BOARD). PANORAMA Allows panorama pictures to be taken with red-eye reduction) and #SLOW2 (2nd curtain) when the flash mode is set the optimal exposure based on the average brightness. Makes fine changes to the white balance. En 19 FULLTIME AF Keeps the image in r mode. AF...

User Manual
Page 20
... to display pictures on the region. REC VIEW Selects whether to keep the current camera settings when you turn off . 20 En En SLEEP MY MODE SETUP Sets the sleep timer. X Sets the date and time. PIXEL MAPPING Checks the CCD and image processing functions for button ...operations and warnings on and off the power. s Adjusts the brightness of color depth without changing the tint. m/ft Sets the measurement unit (m/ft) used for errors. SHORT CUT Assigns frequently used functions as shortcut menus. CARD tab CARD SETUP Formats a card....
... to display pictures on the region. REC VIEW Selects whether to keep the current camera settings when you turn off . 20 En En SLEEP MY MODE SETUP Sets the sleep timer. X Sets the date and time. PIXEL MAPPING Checks the CCD and image processing functions for button ...operations and warnings on and off the power. s Adjusts the brightness of color depth without changing the tint. m/ft Sets the measurement unit (m/ft) used for errors. SHORT CUT Assigns frequently used functions as shortcut menus. CARD tab CARD SETUP Formats a card....
User Manual
Page 21
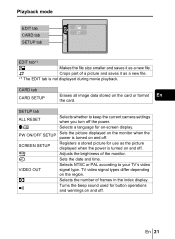
...new file. Selects a language for use as the picture displayed when the power is turned on -screen display. Sets the date and time. Selects NTSC or PAL according to keep the current camera settings when you turn off . Registers a stored picture for on and off . Adjusts the brightness of frames in ... the number of the monitor. P Crops part of a picture and saves it as a new file. ∗1 The EDIT tab is turned on and off . Sets the picture displayed on the monitor when the power is not displayed during movie playback. En 21 Turns the beep sound used for button operations...
...new file. Selects a language for use as the picture displayed when the power is turned on -screen display. Sets the date and time. Selects NTSC or PAL according to keep the current camera settings when you turn off . Registers a stored picture for on and off . Adjusts the brightness of frames in ... the number of the monitor. P Crops part of a picture and saves it as a new file. ∗1 The EDIT tab is turned on and off . Sets the picture displayed on the monitor when the power is not displayed during movie playback. En 21 Turns the beep sound used for button operations...
User Manual
Page 22
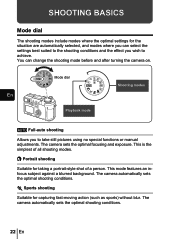
...take still pictures using no special functions or manual adjustments. This is the simplest of a person. The camera sets the optimal focusing and exposure. The camera automatically sets the optimal shooting conditions. j Sports shooting Suitable for taking a portrait-style shot of all shooting modes. This... the shooting conditions and the effect you to achieve. SHOOTING BASICS Mode dial The shooting modes include modes where the optimal settings for the situation are automatically selected, and modes where you can change the shooting mode before and after turning the camera ...
...take still pictures using no special functions or manual adjustments. This is the simplest of a person. The camera sets the optimal focusing and exposure. The camera automatically sets the optimal shooting conditions. j Sports shooting Suitable for taking a portrait-style shot of all shooting modes. This... the shooting conditions and the effect you to achieve. SHOOTING BASICS Mode dial The shooting modes include modes where the optimal settings for the situation are automatically selected, and modes where you can change the shooting mode before and after turning the camera ...
User Manual
Page 23
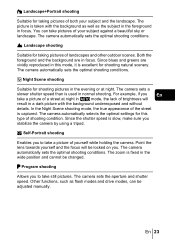
...the background as well as flash modes and drive modes, can take a picture of your subject and the landscape. The camera automatically sets the optimal shooting conditions. Other functions, such as the subject in the foreground in focus. You can be locked on you. k...+Portrait shooting Suitable for taking pictures of brightness will be adjusted manually. Since blues and greens are in focus. The camera automatically sets the optimal shooting conditions. o Self-Portrait shooting Enables you to take pictures of yourself while holding the camera. The picture is ...
...the background as well as flash modes and drive modes, can take a picture of your subject and the landscape. The camera automatically sets the optimal shooting conditions. Other functions, such as the subject in the foreground in focus. You can be locked on you. k...+Portrait shooting Suitable for taking pictures of brightness will be adjusted manually. Since blues and greens are in focus. The camera automatically sets the optimal shooting conditions. o Self-Portrait shooting Enables you to take pictures of yourself while holding the camera. The picture is ...

User Manual
Page 24
... to increase the aperture value (f number). Press c to set a faster shutter speed. En Press a to set a slower shutter speed. Press c to set with the menus. Current settings can be set a slower shutter speed. The camera sets the shutter speed automatically. Press a to decrease the aperture ...decrease the aperture value (f number). The camera sets the aperture and shutter speed automatically. A Aperture priority shooting Allows you to set the aperture manually. S Shutter priority shooting Allows you to set the shutter speed manually. n Movie record Allows ...
... to increase the aperture value (f number). Press c to set a faster shutter speed. En Press a to set a slower shutter speed. Press c to set with the menus. Current settings can be set a slower shutter speed. The camera sets the shutter speed automatically. Press a to decrease the aperture ...decrease the aperture value (f number). The camera sets the aperture and shutter speed automatically. A Aperture priority shooting Allows you to set the aperture manually. S Shutter priority shooting Allows you to set the shutter speed manually. n Movie record Allows ...

User Manual
Page 25
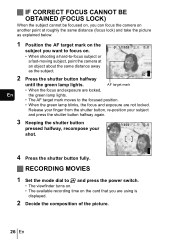
... automatically when the shutter button is pressed all the way. 4 Press the shutter button all you have to do is to press the shutter button. 1 Set the mode dial to h i j k l m o r p P and press the power switch. • The viewfinder turns on. F2.8 En • The AF target mark moves to... the focused position. • The shutter speed and aperture value automatically set by the camera are easy as all the way (fully). • The camera takes the picture. • The card access lamp blinks while the picture...
... automatically when the shutter button is pressed all the way. 4 Press the shutter button all you have to do is to press the shutter button. 1 Set the mode dial to h i j k l m o r p P and press the power switch. • The viewfinder turns on. F2.8 En • The AF target mark moves to... the focused position. • The shutter speed and aperture value automatically set by the camera are easy as all the way (fully). • The camera takes the picture. • The card access lamp blinks while the picture...
User Manual
Page 26
... press the shutter button halfway again. 3 Keeping the shutter button F2.8 pressed halfway, recompose your shot. 4 Press the shutter button fully. SQ11600 1200 J RECORDING MOVIES 1 Set the mode dial to n and press the power switch. • The viewfinder turns on. • The available recording time on . J IF CORRECT FOCUS CANNOT BE...
... press the shutter button halfway again. 3 Keeping the shutter button F2.8 pressed halfway, recompose your shot. 4 Press the shutter button fully. SQ11600 1200 J RECORDING MOVIES 1 Set the mode dial to n and press the power switch. • The viewfinder turns on. • The available recording time on . J IF CORRECT FOCUS CANNOT BE...
User Manual
Page 28
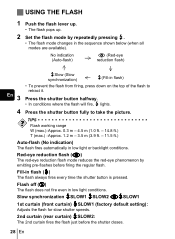
...available). Fill-in low light conditions. Slow synchronization #SLOW1 #SLOW2 !#SLOW1 1st curtain (front curtain) #SLOW1 (factory default setting): Adjusts the flash for slow shutter speeds. 2nd curtain (rear curtain) #SLOW2: The 2nd curtain fires the flash just ...reduction flash) #Slow (Slow synchronization) #(Fill-in low light or backlight conditions. J USING THE FLASH 1 Push the flash lever up. • The flash pops up. 2 Set the flash mode by emitting pre-flashes before the shutter closes. 28 En TIPS Flash working range W (max.): Approx. 0.3 m - 4.5 m (1.0 ft. - 14.8 ft...
...available). Fill-in low light conditions. Slow synchronization #SLOW1 #SLOW2 !#SLOW1 1st curtain (front curtain) #SLOW1 (factory default setting): Adjusts the flash for slow shutter speeds. 2nd curtain (rear curtain) #SLOW2: The 2nd curtain fires the flash just ...reduction flash) #Slow (Slow synchronization) #(Fill-in low light or backlight conditions. J USING THE FLASH 1 Push the flash lever up. • The flash pops up. 2 Set the flash mode by emitting pre-flashes before the shutter closes. 28 En TIPS Flash working range W (max.): Approx. 0.3 m - 4.5 m (1.0 ft. - 14.8 ft...
User Manual
Page 30
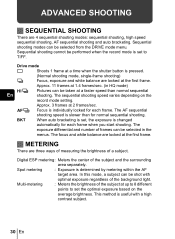
... the subject at the first frame. Spot metering : Exposure is useful with optimal exposure regardless of the background light. k Focus is set the optimal exposure based on the record mode setting. Multi-metering : Meters the brightness of frames can be shot with a high contrast subject. 30 En The sequential shooting speed varies...: sequential shooting, high speed sequential shooting, AF sequential shooting and auto bracketing. ADVANCED SHOOTING J SEQUENTIAL SHOOTING There are locked at up to 8 different points to set , the exposure is set to TIFF.
... the subject at the first frame. Spot metering : Exposure is useful with optimal exposure regardless of the background light. k Focus is set the optimal exposure based on the record mode setting. Multi-metering : Meters the brightness of frames can be shot with a high contrast subject. 30 En The sequential shooting speed varies...: sequential shooting, high speed sequential shooting, AF sequential shooting and auto bracketing. ADVANCED SHOOTING J SEQUENTIAL SHOOTING There are locked at up to 8 different points to set , the exposure is set to TIFF.
User Manual
Page 32
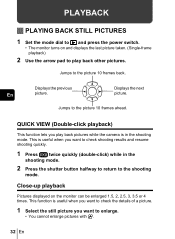
... the details of a picture. 1 Select the still picture you want to enlarge. • You cannot enlarge pictures with n. 32 En PLAYBACK J PLAYING BACK STILL PICTURES 1 Set the mode dial to q and press the power switch. • The monitor turns on the monitor can be enlarged 1.5, 2, 2.5, 3, 3.5 or 4 times. Jumps to the picture...
... the details of a picture. 1 Select the still picture you want to enlarge. • You cannot enlarge pictures with n. 32 En PLAYBACK J PLAYING BACK STILL PICTURES 1 Set the mode dial to q and press the power switch. • The monitor turns on the monitor can be enlarged 1.5, 2, 2.5, 3, 3.5 or 4 times. Jumps to the picture...

User Manual
Page 36
Video cable Video OUT jack En 2 Turn the TV on and set it to the video input mode. • For details of switching to video input, refer to your TV. 1 Make sure that the camera's video output ... the picture you want to display. • The close-up playback, index display and slideshow functions can also be used on your TV's instruction manual. 3 Set the mode dial to q and turn the camera on. • The last picture taken is the same as the TV's video signal type. 36 En
Video cable Video OUT jack En 2 Turn the TV on and set it to the video input mode. • For details of switching to video input, refer to your TV. 1 Make sure that the camera's video output ... the picture you want to display. • The close-up playback, index display and slideshow functions can also be used on your TV's instruction manual. 3 Set the mode dial to q and turn the camera on. • The last picture taken is the same as the TV's video signal type. 36 En

User Manual
Page 37
... used to record automatic print information from cameras. You can be printed easily by a DPOF-compatible photo lab or on a personal DPOF-compatible printer. PRINT SETTINGS By specifying the desired number of prints of each picture on the card and whether or not the date and time are to be En...
... used to record automatic print information from cameras. You can be printed easily by a DPOF-compatible photo lab or on a personal DPOF-compatible printer. PRINT SETTINGS By specifying the desired number of prints of each picture on the card and whether or not the date and time are to be En...


