Instruction Manual
Page 1
Instruction Manual Fat Loss MONITOR with Scale Model HBF-400
Instruction Manual Fat Loss MONITOR with Scale Model HBF-400
Instruction Manual
Page 2
TABLE OF CONTENTS Before Using the Monitor Introduction 3 Important Safety Notes 4 Useful Information What is Body Fat Percentage 5 Principles of Body Fat Percentage Calculation 5 Recommended Measurement Times 6 How to Interpret the Calculated Results 7 Operating Instructions Know Your Unit 8 Battery Installation 9 Setting Personal Data 10 Changing Personal Data 12 How to Take a Measurement 13 Care and Maintenance Error Indicators 16 Troubleshooting Tips 17 Care and Maintenance 17 Quick Reference Guide 18 FCC Statement 19 Warranty Information 20 Specifications 21 Track Your ...
TABLE OF CONTENTS Before Using the Monitor Introduction 3 Important Safety Notes 4 Useful Information What is Body Fat Percentage 5 Principles of Body Fat Percentage Calculation 5 Recommended Measurement Times 6 How to Interpret the Calculated Results 7 Operating Instructions Know Your Unit 8 Battery Installation 9 Setting Personal Data 10 Changing Personal Data 12 How to Take a Measurement 13 Care and Maintenance Error Indicators 16 Troubleshooting Tips 17 Care and Maintenance 17 Quick Reference Guide 18 FCC Statement 19 Warranty Information 20 Specifications 21 Track Your ...
Instruction Manual
Page 3
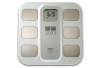
...Bioelectrical Impedance) Method and indicates the BMI (Body Mass Index) in for each personal ID number. INTRODUCTION Thank you for purchasing the OMRON® HBF-400 Fat Loss MONITOR with Scale is easy to understand. Fill in four ranges. The personal memory function stores up to use, SAVE THESE... INSTRUCTIONS 3 Your HBF-400 comes with the following components: • Main Unit • Instruction Manual • 4 "AA" Batteries Read all the information in an ...
...Bioelectrical Impedance) Method and indicates the BMI (Body Mass Index) in for each personal ID number. INTRODUCTION Thank you for purchasing the OMRON® HBF-400 Fat Loss MONITOR with Scale is easy to understand. Fill in four ranges. The personal memory function stores up to use, SAVE THESE... INSTRUCTIONS 3 Your HBF-400 comes with the following components: • Main Unit • Instruction Manual • 4 "AA" Batteries Read all the information in an ...
Instruction Manual
Page 5
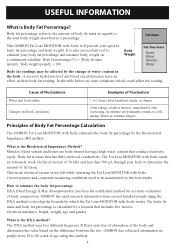
... after exercising, in extreme environments (warm or cold), during illness or extreme fatigue Principles of Body Fat Percentage Calculation The OMRON Fat Loss MONITOR with Scale works. The body fat mass and body fat percentage is the Bioelectrical Impedance Method? Fat mass This...BI) method. Body fat is Body Fat Percentage? How to the total body weight described in regards to estimate the body fat percentage. OMRON has collected information on a continuous schedule. DXA (Dual Energy X-Ray Absorptiometry) has been the established method for the best results. Body fat...
... after exercising, in extreme environments (warm or cold), during illness or extreme fatigue Principles of Body Fat Percentage Calculation The OMRON Fat Loss MONITOR with Scale works. The body fat mass and body fat percentage is the Bioelectrical Impedance Method? Fat mass This...BI) method. Body fat is Body Fat Percentage? How to the total body weight described in regards to estimate the body fat percentage. OMRON has collected information on a continuous schedule. DXA (Dual Energy X-Ray Absorptiometry) has been the established method for the best results. Body fat...
Instruction Manual
Page 6
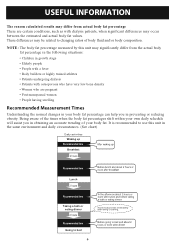
NOTE: The body fat percentage measured by this unit in the same environment and daily circumstances. (See chart) Daily activities Waking up Recommended time Breakfast 2 hours After waking up Recommended time Lunch 2 hours Recommended time Taking a bath or eating dinner 2 hours Recommended time Going to bed 6 Before lunch and about 2 hours or more after breakfast In the afternoon about 2 hours or more after lunch and before taking a bath or eating dinner Avoid measurement immediately after dinner Being aware of the times when the body fat percentages shift within your own daily ...
NOTE: The body fat percentage measured by this unit in the same environment and daily circumstances. (See chart) Daily activities Waking up Recommended time Breakfast 2 hours After waking up Recommended time Lunch 2 hours Recommended time Taking a bath or eating dinner 2 hours Recommended time Going to bed 6 Before lunch and about 2 hours or more after breakfast In the afternoon about 2 hours or more after lunch and before taking a bath or eating dinner Avoid measurement immediately after dinner Being aware of the times when the body fat percentages shift within your own daily ...
Instruction Manual
Page 8
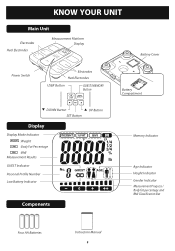
KNOW YOUR UNIT Main Unit Electrodes Heel Electrodes Measurement Platform Display Battery Cover Power Switch Electrodes Heel Electrodes USER Button GUEST/MEMORY Button Battery Compartment DOWN Button SET Button UP Button Display Display Mode Indicator :Weight :Body Fat Percentage :BMI Measurement Results GUEST Indicator Personal Profile Number Low Battery Indicator Components Memory Indicator Age Indicator Height Indicator Gender Indicator Measurement Progress / Body fat percentage and BMI Classification Bar Four AA Batteries Instruction Manual 8
KNOW YOUR UNIT Main Unit Electrodes Heel Electrodes Measurement Platform Display Battery Cover Power Switch Electrodes Heel Electrodes USER Button GUEST/MEMORY Button Battery Compartment DOWN Button SET Button UP Button Display Display Mode Indicator :Weight :Body Fat Percentage :BMI Measurement Results GUEST Indicator Personal Profile Number Low Battery Indicator Components Memory Indicator Age Indicator Height Indicator Gender Indicator Measurement Progress / Body fat percentage and BMI Classification Bar Four AA Batteries Instruction Manual 8

Instruction Manual
Page 9
Press the tab in the direction of the arrow at the same time. Trial batteries supplied with the unit may have a shorter life. • Remove the batteries if you do not intend to use the unit for approximately one year if the unit is used batteries according to applicable local regulations. BATTERY REPLACEMENT Measurement values and Personal ID's are stored in storage. • Dispose of the battery compartment and remove the battery cover. 3. CAUTION: • Should battery fluid leak and contact your physician. 9 BATTERY INSTALLATION 1. Replace the battery cover. ...
Press the tab in the direction of the arrow at the same time. Trial batteries supplied with the unit may have a shorter life. • Remove the batteries if you do not intend to use the unit for approximately one year if the unit is used batteries according to applicable local regulations. BATTERY REPLACEMENT Measurement values and Personal ID's are stored in storage. • Dispose of the battery compartment and remove the battery cover. 3. CAUTION: • Should battery fluid leak and contact your physician. 9 BATTERY INSTALLATION 1. Replace the battery cover. ...
Instruction Manual
Page 11
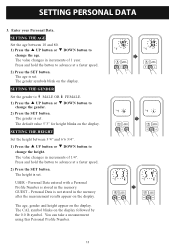
SETTING THE AGE Set the age between 3'4" and 6'6 3/4". 1) Press the UP button or DOWN button to change the height. SETTING THE GENDER Set the gender to MALE OR FEMALE. 1) Press the UP button or DOWN button to change the gender. 2) Press the SET button. The value changes in the memory after the measurement results appear on the display. USER - The CAL symbol blinks on the display. Press and hold the button to advance at a faster speed. 2) Press the SET button. The age is set . The default value 5'3" for height blinks on the display followed by the 0.0 lb symbol. The height ...
SETTING THE AGE Set the age between 3'4" and 6'6 3/4". 1) Press the UP button or DOWN button to change the height. SETTING THE GENDER Set the gender to MALE OR FEMALE. 1) Press the UP button or DOWN button to change the gender. 2) Press the SET button. The value changes in the memory after the measurement results appear on the display. USER - The CAL symbol blinks on the display. Press and hold the button to advance at a faster speed. 2) Press the SET button. The age is set . The default value 5'3" for height blinks on the display followed by the 0.0 lb symbol. The height ...
Instruction Manual
Page 12
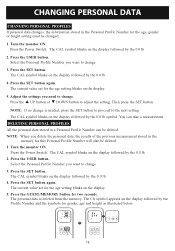
Press the Power Switch. Press the SET button again. Press the UP button or DOWN button to change . 3. Then press the SET button. DELETING PERSONAL PROFILES All the personal data stored in a Personal Profile Number can take a measurement. NOTE: When you need to adjust the setting. Press the SET button again. The personal data is needed, press the SET button to proceed to change . The CAL symbol blinks on the display followed by the 0.0 lb. 2. Adjust the settings you delete the personal data, the results of the previous measurement stored in the Personal Profile Number ...
Press the Power Switch. Press the SET button again. Press the UP button or DOWN button to change . 3. Then press the SET button. DELETING PERSONAL PROFILES All the personal data stored in a Personal Profile Number can take a measurement. NOTE: When you need to adjust the setting. Press the SET button again. The personal data is needed, press the SET button to proceed to change . The CAL symbol blinks on the display followed by the 0.0 lb. 2. Adjust the settings you delete the personal data, the results of the previous measurement stored in the Personal Profile Number ...

Instruction Manual
Page 14
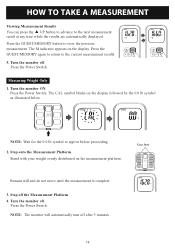
Step onto the Measurement Platform. The indicators in a warm room to allow the electrodes to warm up . The measurement results are automatically displayed repeatedly in 0.1 increments BMI Classification Body Fat Percentage Classification NOTE: Although the age range can be possible to display or inaccurate results. Slightly moisten the soles of your feet to warm up . 3. Immerse your feet in warm water or stay in the measurement progress bar at the bottom of the display will begin to appear from left to poor blood circulation. Position your weight evenly distributed on ...
Step onto the Measurement Platform. The indicators in a warm room to allow the electrodes to warm up . The measurement results are automatically displayed repeatedly in 0.1 increments BMI Classification Body Fat Percentage Classification NOTE: Although the age range can be possible to display or inaccurate results. Slightly moisten the soles of your feet to warm up . 3. Immerse your feet in warm water or stay in the measurement progress bar at the bottom of the display will begin to appear from left to poor blood circulation. Position your weight evenly distributed on ...
Instruction Manual
Page 15
HOW TO TAKE A MEASUREMENT Viewing Measurement Results You can press the UP button to advance to appear before proceeding. 2. Turn the monitor ON. NOTE: The monitor will automatically turn off the Measurement Platform 4. Press the Power Switch. Step off after 5 minutes. 15 The M indicator appears on the display followed by the 0.0 lb symbol as illustrated below. NOTE: Wait for the 0.0 lb symbol to the next measurement result at any time while the results are automatically displayed. Press the GUEST/MEMORY button to the current measurement results. 5. The CAL symbol ...
HOW TO TAKE A MEASUREMENT Viewing Measurement Results You can press the UP button to advance to appear before proceeding. 2. Turn the monitor ON. NOTE: The monitor will automatically turn off the Measurement Platform 4. Press the Power Switch. Step off after 5 minutes. 15 The M indicator appears on the display followed by the 0.0 lb symbol as illustrated below. NOTE: Wait for the 0.0 lb symbol to the next measurement result at any time while the results are automatically displayed. Press the GUEST/MEMORY button to the current measurement results. 5. The CAL symbol ...

Instruction Manual
Page 17
Remove the batteries. Reinstall the batteries. Place the monitor on the floor. Avoid using any moisture off the unit before storing. Store the unit in water. Do not subject the unit to avoid taking a measurement" on page 13, and "Recommended Measurement Times" on page 9. Do not expose the unit to "Battery Installation" on page 6. Replace all four worn batteries. Remove the batteries if the unit will not be used for proper placement of children. Refer to "When to strong shocks, such as dropping the unit on a hard, level floor. do not immerse the ...
Remove the batteries. Reinstall the batteries. Place the monitor on the floor. Avoid using any moisture off the unit before storing. Store the unit in water. Do not subject the unit to avoid taking a measurement" on page 13, and "Recommended Measurement Times" on page 9. Do not expose the unit to "Battery Installation" on page 6. Replace all four worn batteries. Remove the batteries if the unit will not be used for proper placement of children. Refer to "When to strong shocks, such as dropping the unit on a hard, level floor. do not immerse the ...
Instruction Manual
Page 18
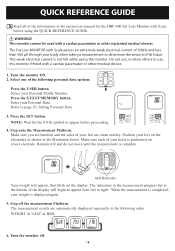
... with a cardiac pacemaker or other implanted medical devices. Turn the monitor ON. 2. Select one of the following order: WEIGHT %FAT BMI. 6. NOTE: Wait for the HBF-400 Fat Loss Monitor with Scale passes an extremely weak electrical current of 50kHz and less than 500 µA through your weight is displayed again. 5. Position...
... with a cardiac pacemaker or other implanted medical devices. Turn the monitor ON. 2. Select one of the following order: WEIGHT %FAT BMI. 6. NOTE: Wait for the HBF-400 Fat Loss Monitor with Scale passes an extremely weak electrical current of 50kHz and less than 500 µA through your weight is displayed again. 5. Position...
Instruction Manual
Page 19
The product generates, uses, and can be determined by turning the product on and off, the user is connected. • Consult the dealer or an experienced radio/TV technician for help. Cet appareil numérique respecte les limites de bruits radioeléctriques applicables aux appareils numériques de Clase B prescrites dans la norme sur le materiel brouilleur: "Appareils Numériques", ICES-003 édictée par le minister des communications. FCC STATEMENT NOTE: POTENTIAL FOR RADIO/TELEVISION INTERFERENCE (for a Class B digital device, pursuant to part 15 of the FCC ...
The product generates, uses, and can be determined by turning the product on and off, the user is connected. • Consult the dealer or an experienced radio/TV technician for help. Cet appareil numérique respecte les limites de bruits radioeléctriques applicables aux appareils numériques de Clase B prescrites dans la norme sur le materiel brouilleur: "Appareils Numériques", ICES-003 édictée par le minister des communications. FCC STATEMENT NOTE: POTENTIAL FOR RADIO/TELEVISION INTERFERENCE (for a Class B digital device, pursuant to part 15 of the FCC ...
Instruction Manual
Page 20
WARRANTY INFORMATION Limited Warranty Your HBF-400 Fat Loss Monitor with Scale, excluding the batteries, is warranted to...OF MERCHANTABILITY AND FITNESS FOR PARTICULAR PURPOSE, ARE LIMITED TO THE DURATION OF THE APPLICABLE WRITTEN WARRANTY ABOVE. OMRON SHALL NOT BE LIABLE FOR LOSS OF USE OR ANY OTHER INCIDENTAL, CONSEQUENTIAL OR INDIRECT COSTS, EXPENSES OR.... Because of the repair location and the return shipping and handling fee. To obtain warranty service contact Omron Healthcare's Customer Service by the above warranties. Information for the address of possible loss in transit. Some...
WARRANTY INFORMATION Limited Warranty Your HBF-400 Fat Loss Monitor with Scale, excluding the batteries, is warranted to...OF MERCHANTABILITY AND FITNESS FOR PARTICULAR PURPOSE, ARE LIMITED TO THE DURATION OF THE APPLICABLE WRITTEN WARRANTY ABOVE. OMRON SHALL NOT BE LIABLE FOR LOSS OF USE OR ANY OTHER INCIDENTAL, CONSEQUENTIAL OR INDIRECT COSTS, EXPENSES OR.... Because of the repair location and the return shipping and handling fee. To obtain warranty service contact Omron Healthcare's Customer Service by the above warranties. Information for the address of possible loss in transit. Some...

Instruction Manual
Page 24
www.omronhealthcare.com © 2012 OMRON HEALTHCARE, INC. Distributed by : OMRON HEALTHCARE, INC. 1925 West Field Court Lake Forest, IL 60045 U.S.A. Manufactured for : OMRON HEALTHCARE Co., Ltd. Made in China 9042754-1B
www.omronhealthcare.com © 2012 OMRON HEALTHCARE, INC. Distributed by : OMRON HEALTHCARE, INC. 1925 West Field Court Lake Forest, IL 60045 U.S.A. Manufactured for : OMRON HEALTHCARE Co., Ltd. Made in China 9042754-1B
