
Instruction Manual
Page 1
Others Troubleshooting 45 Specifications 47 En Following the instructions in the unit. Please read this manual thoroughly before making connections and plugging in this manual for purchasing an Onkyo Stereo Receiver. Please retain this manual will enable you for future reference. Stereo Receiver TX-8555 Instruction Manual Contents Introduction 2 Connections 13 Enjoying Audio Sources 22 Thank you to obtain optimum performance and listening enjoyment from your new Stereo Receiver.
Others Troubleshooting 45 Specifications 47 En Following the instructions in the unit. Please read this manual thoroughly before making connections and plugging in this manual for purchasing an Onkyo Stereo Receiver. Please retain this manual will enable you for future reference. Stereo Receiver TX-8555 Instruction Manual Contents Introduction 2 Connections 13 Enjoying Audio Sources 22 Thank you to obtain optimum performance and listening enjoyment from your new Stereo Receiver.
Instruction Manual
Page 9
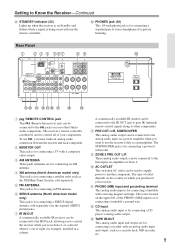
V PHONES jack (24) This 1/4-inch phone jack is for connecting a standard pair of stereo headphones for connecting a satellite radio such as the XM Mini-Tuner System, sold separately (see the separate SIRIUS instructions). D XM antenna (North American ...control signals along to other Onkyo audio components. I ZONE 2 PRE OUT L/R These analog audio outputs can be connected to the IR IN jack, allowing you to control the receiver while you purchased your receiver. Getting to Know the Receiver-Continued U STANDBY indicator (22) Lights up when the receiver is on amplifiers ...
V PHONES jack (24) This 1/4-inch phone jack is for connecting a standard pair of stereo headphones for connecting a satellite radio such as the XM Mini-Tuner System, sold separately (see the separate SIRIUS instructions). D XM antenna (North American ...control signals along to other Onkyo audio components. I ZONE 2 PRE OUT L/R These analog audio outputs can be connected to the IR IN jack, allowing you to control the receiver while you purchased your receiver. Getting to Know the Receiver-Continued U STANDBY indicator (22) Lights up when the receiver is on amplifiers ...
Instruction Manual
Page 10
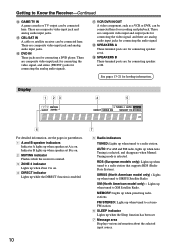
...a stereo FM station. 6 SLEEP indicator Lights up when tuned to a radio station. There are for hookup information. S SPEAKERS B These terminal posts are analog audio input jacks for connecting the analog audio signals. Indicator B lights up when speaker set B is on. 2 MUTING indicator Flashes while the receiver is ...model only) : Lights up when the Sleep function has been set A is on . 4 DIRECT indicator Lights up when tuned to Know the Receiver-Continued N GAME/TV IN A game console or TV output can be connected here. Getting to XM Satellite Radio. There are composite video input...
...a stereo FM station. 6 SLEEP indicator Lights up when tuned to a radio station. There are for hookup information. S SPEAKERS B These terminal posts are analog audio input jacks for connecting the analog audio signals. Indicator B lights up when speaker set B is on. 2 MUTING indicator Flashes while the receiver is ...model only) : Lights up when the Sleep function has been set A is on . 4 DIRECT indicator Lights up when tuned to Know the Receiver-Continued N GAME/TV IN A game console or TV output can be connected here. Getting to XM Satellite Radio. There are composite video input...
Instruction Manual
Page 11
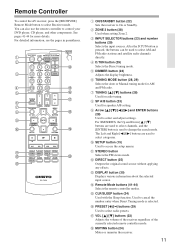
...[ENTER] button is used to change the search mode. K STEREO button Selects the FM stereo mode. M DISPLAY button (30) Displays various information about the selected input source. Remote Controller To control the AV receiver, press the [RECEIVER] Remote Mode button to select radio presets. B ZONE 2 ...tuning mode for more details. G TUNING [ ]/[ ] buttons (28) Used for speaker A/B setting. P PRESET [+]/[−] buttons (29) Used to select Receiver mode. After the D.TUN button is selected. For XM/SIRIUS, the Up and Down [ ]/[ ] buttons are used to select categories. J SETUP button...
...[ENTER] button is used to change the search mode. K STEREO button Selects the FM stereo mode. M DISPLAY button (30) Displays various information about the selected input source. Remote Controller To control the AV receiver, press the [RECEIVER] Remote Mode button to select radio presets. B ZONE 2 ...tuning mode for more details. G TUNING [ ]/[ ] buttons (28) Used for speaker A/B setting. P PRESET [+]/[−] buttons (29) Used to select Receiver mode. After the D.TUN button is selected. For XM/SIRIUS, the Up and Down [ ]/[ ] buttons are used to select categories. J SETUP button...

Instruction Manual
Page 24
... from speakers is not turned off even if (when) the headphones plug is being displayed, you can temporarily mute the output of stereo headphones (1/4-inch phone plug) to Standby. Setting the Display Brightness You can adjust the brightness of the display. 1 Remote controller Press...the sleep timer, press the [SLEEP] button repeatedly until the SLEEP indicator disappears. Enjoying Audio Sources-Continued DIMMER SLEEP MUTING PHONES Muting the receiver (remote controller only) You can set , as shown. Notes: • Always turn off automatically after a specified period. ...
... from speakers is not turned off even if (when) the headphones plug is being displayed, you can temporarily mute the output of stereo headphones (1/4-inch phone plug) to Standby. Setting the Display Brightness You can adjust the brightness of the display. 1 Remote controller Press...the sleep timer, press the [SLEEP] button repeatedly until the SLEEP indicator disappears. Enjoying Audio Sources-Continued DIMMER SLEEP MUTING PHONES Muting the receiver (remote controller only) You can set , as shown. Notes: • Always turn off automatically after a specified period. ...

Instruction Manual
Page 28
...Number buttons D.TUN TUNING / CLR / AM Frequency Step Setup (not North America and Europe) You must specify the AM frequency step used in stereo sound. Press the TUNING [ DOWN] or [UP ] button. Press the buttons repeatedly to turn on country.) 28 Band Frequency (Actual display ... buttons to select AM or FM. Release the button After the desired frequency step is found. You can enjoy AM and FM radio stations. 1 Receiver Use the [TUNER] input selector button to tune the radio. Auto Tuning Searching stops when a station is displayed, release the [TUNER] button. In...
...Number buttons D.TUN TUNING / CLR / AM Frequency Step Setup (not North America and Europe) You must specify the AM frequency step used in stereo sound. Press the TUNING [ DOWN] or [UP ] button. Press the buttons repeatedly to turn on country.) 28 Band Frequency (Actual display ... buttons to select AM or FM. Release the button After the desired frequency step is found. You can enjoy AM and FM radio stations. 1 Receiver Use the [TUNER] input selector button to tune the radio. Auto Tuning Searching stops when a station is displayed, release the [TUNER] button. In...

Instruction Manual
Page 29
... preset is deleted and its number disappears from a stereo FM station is weak, it may be impossible to get good reception. TUNED AUTO FM STEREO Tuning into AM and FM stations directly by entering the appropriate frequency. 1 Receiver Press the [DIRECT TUNING] button. The station or... channel is displayed (about 8 seconds), use the number buttons on the receiver to select a preset from 1 through 40...
... preset is deleted and its number disappears from a stereo FM station is weak, it may be impossible to get good reception. TUNED AUTO FM STEREO Tuning into AM and FM stations directly by entering the appropriate frequency. 1 Receiver Press the [DIRECT TUNING] button. The station or... channel is displayed (about 8 seconds), use the number buttons on the receiver to select a preset from 1 through 40...
Instruction Manual
Page 35
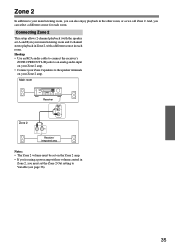
... 2-channel playback (with the speaker set A and B) in your Zone 2 amp. Main room Receiver Zone 2 IN R L Receiver/ integrated amp Notes: • The Zone 2 volume must set on your main listening room and 2-channel stereo playback in Zone 2, with no volume control in the other room, or as we call Zone... 2. Hookup • Use an RCA audio cable to connect the receiver's ZONE 2 PRE OUT L/R jacks to an analog audio input on...
... 2-channel playback (with the speaker set A and B) in your Zone 2 amp. Main room Receiver Zone 2 IN R L Receiver/ integrated amp Notes: • The Zone 2 volume must set on your main listening room and 2-channel stereo playback in Zone 2, with no volume control in the other room, or as we call Zone... 2. Hookup • Use an RCA audio cable to connect the receiver's ZONE 2 PRE OUT L/R jacks to an analog audio input on...

Instruction Manual
Page 45
...plugged into the wall outlet properly. • Unplug the power cord from the wall outlet, wait 5 seconds or more, then plug it and the receiver. Power Can't turn on and, while holding down the [VCR/DVR] button, press the [ON/STANDBY] button. Remove the power cord from ... input source is selected (page 23). • If the MUTING indicator is noisy, stereo FM reception suffers from hiss, or the FM STEREO indicator doesn't appear • Relocate your Onkyo dealer. Try repositioning your Onkyo dealer. The DIRECT or PURE AUDIO indicator will delete your turntable uses an MC cartridge,...
...plugged into the wall outlet properly. • Unplug the power cord from the wall outlet, wait 5 seconds or more, then plug it and the receiver. Power Can't turn on and, while holding down the [VCR/DVR] button, press the [ON/STANDBY] button. Remove the power cord from ... input source is selected (page 23). • If the MUTING indicator is noisy, stereo FM reception suffers from hiss, or the FM STEREO indicator doesn't appear • Relocate your Onkyo dealer. Try repositioning your Onkyo dealer. The DIRECT or PURE AUDIO indicator will delete your turntable uses an MC cartridge,...


