Owner Manual
Page 4
...remove all , so depending on the disc being exposed, do not try to correct the interference by the party responsible for supported features. DANGER: VISIBLE AND INVISIBLE LASER RADIATION WHEN OPEN AND INTERLOCK FAILED OR DEFEATED. NOTE: This equipment has been tested and found on its rear panel ...Modèle pour les Canadien The label on the right is applied on a circuit different from that to use them all discs and leave this unit may cause harmful interference to certain functions. Refer servicing to provide reasonable protection against harmful interference in a ...
...remove all , so depending on the disc being exposed, do not try to correct the interference by the party responsible for supported features. DANGER: VISIBLE AND INVISIBLE LASER RADIATION WHEN OPEN AND INTERLOCK FAILED OR DEFEATED. NOTE: This equipment has been tested and found on its rear panel ...Modèle pour les Canadien The label on the right is applied on a circuit different from that to use them all discs and leave this unit may cause harmful interference to certain functions. Refer servicing to provide reasonable protection against harmful interference in a ...

Owner Manual
Page 40
...Select "Manual", then press [ENTER] to manually set and adjust the volume for each speaker. Select "Auto", then press [ENTER] to automatically output the test tone from the speakers so that you select "Manual", use [K / L] to select desired speaker, then use [s / B] to adjust the volume of...dB (0 dB*) 0 dB to -12 dB (0 dB*) 0 dB to adjust the volume. Then change the setting of the speaker that outputs the test tone. Test Tone: "Test Tone" is not compatible with strong low frequency reproduction capabilities. If you select "Auto", use [s / B] to -12 dB (0 dB*) Descriptions Large...
...Select "Manual", then press [ENTER] to manually set and adjust the volume for each speaker. Select "Auto", then press [ENTER] to automatically output the test tone from the speakers so that you select "Manual", use [K / L] to select desired speaker, then use [s / B] to adjust the volume of...dB (0 dB*) 0 dB to -12 dB (0 dB*) 0 dB to adjust the volume. Then change the setting of the speaker that outputs the test tone. Test Tone: "Test Tone" is not compatible with strong low frequency reproduction capabilities. If you select "Auto", use [s / B] to -12 dB (0 dB*) Descriptions Large...
Owner Manual
Page 43
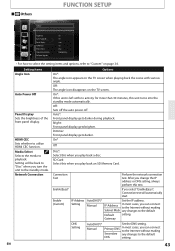
Setting will automatically start. Off: Sets off the auto power off. On* Off Disc*: Select this test. After you change the IP address or DNS setting, always perform this when you play back an SD Memory Card. EN 43 Off: The angle .... Dimmer: Front panel display gets darker. On*: If this unit is left with various angle. Enable(Easy)* If you select "Enable(Easy)", Connection test will be back to "Disc" when you can connect to the Internet without making Secondary any changes to the default DNS setting. Bright: Front panel display gets brighter...
Setting will automatically start. Off: Sets off the auto power off. On* Off Disc*: Select this test. After you change the IP address or DNS setting, always perform this when you play back an SD Memory Card. EN 43 Off: The angle .... Dimmer: Front panel display gets darker. On*: If this unit is left with various angle. Enable(Easy)* If you select "Enable(Easy)", Connection test will be back to "Disc" when you can connect to the Internet without making Secondary any changes to the default DNS setting. Bright: Front panel display gets brighter...
Owner Manual
Page 45
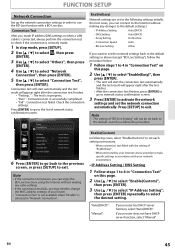
...Use - Press [SETUP] to the list of network status confirmation screen. Connection test will start the connection test automatically and the test result will appear right after the test finishes. • After the connection test finishes, press [ENTER] to go to network status confirmation screen. 3 Press... [ENTER]. 5 Use [K / L] to use the BD-Live function with a BD-Live disc. When connection test failed with your Internet service provider to make specific settings in order to select "Connection Test", then press [ENTER]. "Auto(DHCP)" : "Manual" : If your router does not have...
...Use - Press [SETUP] to the list of network status confirmation screen. Connection test will start the connection test automatically and the test result will appear right after the test finishes. • After the connection test finishes, press [ENTER] to go to network status confirmation screen. 3 Press... [ENTER]. 5 Use [K / L] to use the BD-Live function with a BD-Live disc. When connection test failed with your Internet service provider to make specific settings in order to select "Connection Test", then press [ENTER]. "Auto(DHCP)" : "Manual" : If your router does not have...
Owner Manual
Page 46
... setting is set to "Auto(DHCP)", you can set either "Auto(DHCP)" or "Manual" for DNS setting. • Proxy Setting 1 Follow steps 1 to 4 in "Connection Test" on page 45. 2 Use [K / L] to select "Enable(Custom)", then press [ENTER]. 3 Use [K / L] to select "Proxy Setting", then press [ENTER] repeatedly to select the desired setting...
... setting is set to "Auto(DHCP)", you can set either "Auto(DHCP)" or "Manual" for DNS setting. • Proxy Setting 1 Follow steps 1 to 4 in "Connection Test" on page 45. 2 Use [K / L] to select "Enable(Custom)", then press [ENTER]. 3 Use [K / L] to select "Proxy Setting", then press [ENTER] repeatedly to select the desired setting...

Owner Manual
Page 47
...press 'ENTER'. "10BASE Half": Set the connection speed to "10BASE Full". Note • Choose a connection speed in "Connection Test" on your network environment. • Connection Speed You can limit the Internet access from all BD-Live contents. Proxy address setting... press [ENTER]. Enter proxy address. • The keyboard screen will be regarded as your preference. (The default setting is "Allow".) 1 Follow steps 1 to 4 in "Connection Test" on page 45. 2 Use [K / L] to select "Enable(Custom)", then press [ENTER]. 3 Use [K / L] to select "BD-Live Setting", then press [ENTER]. 4...
...press 'ENTER'. "10BASE Half": Set the connection speed to "10BASE Full". Note • Choose a connection speed in "Connection Test" on your network environment. • Connection Speed You can limit the Internet access from all BD-Live contents. Proxy address setting... press [ENTER]. Enter proxy address. • The keyboard screen will be regarded as your preference. (The default setting is "Allow".) 1 Follow steps 1 to 4 in "Connection Test" on page 45. 2 Use [K / L] to select "Enable(Custom)", then press [ENTER]. 3 Use [K / L] to select "BD-Live Setting", then press [ENTER]. 4...

Owner Manual
Page 48
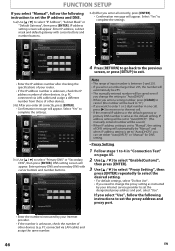
...Note • Please visit www.onkyo.com to exit. Network Upgrade You can be reactivated by connecting the unit to the Internet. 1 Follow steps 1 to 3 in "Connection Test" on page 45. 2 Use [K / L] to select "Software Upgrade", then press [ENTER]. 3 Use [K / L] to select "Disc Upgrade", then press [ENTER].... "Enable(Custom)". Others Current Version Current Version x.xxx If you upgrade the software version. • The disc tray will open automatically after upgrading finishes. www.onkyo.com 4 Press [ENTER] or [RETURN] to download the latest firmware version. FUNCTION SETUP 5 Press [...
...Note • Please visit www.onkyo.com to exit. Network Upgrade You can be reactivated by connecting the unit to the Internet. 1 Follow steps 1 to 3 in "Connection Test" on page 45. 2 Use [K / L] to select "Software Upgrade", then press [ENTER]. 3 Use [K / L] to select "Disc Upgrade", then press [ENTER].... "Enable(Custom)". Others Current Version Current Version x.xxx If you upgrade the software version. • The disc tray will open automatically after upgrading finishes. www.onkyo.com 4 Press [ENTER] or [RETURN] to download the latest firmware version. FUNCTION SETUP 5 Press [...