Owner Manual
Page 2
... way, and F. A grounding type plug has two blades and a third grounding prong. Only use attachments/accessories specified by the operating instructions as vases shall be set 10 cm (4") away from the wall outlet and refer servicing to avoid injury from the apparatus. 11. When the apparatus exhibits a distinct change in installation...
... way, and F. A grounding type plug has two blades and a third grounding prong. Only use attachments/accessories specified by the operating instructions as vases shall be set 10 cm (4") away from the wall outlet and refer servicing to avoid injury from the apparatus. 11. When the apparatus exhibits a distinct change in installation...
Owner Manual
Page 5
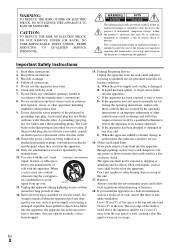
... Basic Operations 20 Selecting the Language Used for the Onscreen Setup Menus 20 Playing the Connected Component 20 Displaying Source Information 20 Setting the Display Brightness 20 Muting the AV Receiver 21 Using the Sleep Timer 21 Selecting Speaker Layout 21 Using the Audio and ... 44 Lock Setup 45 Using the Audio Settings 45 Adjusting the Bass & Treble 47 Zone 2 48 Connecting Zone 2 48 Setting the Powered Zone 2 49 Using Zone 2 49 Controlling iPod & Other Components Controlling iPod 51 Connecting an Onkyo Dock 51 Using the Onkyo Dock 52 Controlling Your iPod 53 Controlling...
... Basic Operations 20 Selecting the Language Used for the Onscreen Setup Menus 20 Playing the Connected Component 20 Displaying Source Information 20 Setting the Display Brightness 20 Muting the AV Receiver 21 Using the Sleep Timer 21 Selecting Speaker Layout 21 Using the Audio and ... 44 Lock Setup 45 Using the Audio Settings 45 Adjusting the Bass & Treble 47 Zone 2 48 Connecting Zone 2 48 Setting the Powered Zone 2 49 Using Zone 2 49 Controlling iPod & Other Components Controlling iPod 51 Connecting an Onkyo Dock 51 Using the Onkyo Dock 52 Controlling Your iPod 53 Controlling...
Owner Manual
Page 11
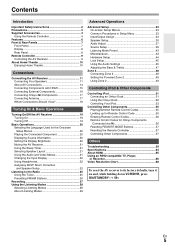
...-in accordance with a lower impedance, and use , a powered subwoofer is to the positive (+) side of phase and will be out of each label to set the speaker settings. Attaching the Speaker Cable Labels The AV receiver's positive (+) speaker terminals are all black). Speaker Front left, Front high left, Front wide left Front...
...-in accordance with a lower impedance, and use , a powered subwoofer is to the positive (+) side of phase and will be out of each label to set the speaker settings. Attaching the Speaker Cable Labels The AV receiver's positive (+) speaker terminals are all black). Speaker Front left, Front high left, Front wide left Front...
Owner Manual
Page 13
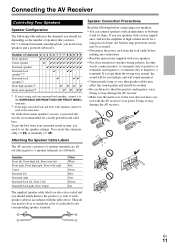
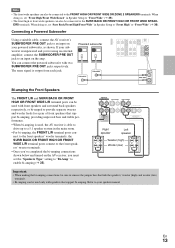
Note • The front wide speakers can connect the powered subwoofer with speakers that support bi-amping. When doing so, set "Surr Back/Front High/Front Wide" in Speaker Setup to the FRONT HIGH OR FRONT WIDE OR ZONE 2 SPEAKERS terminals. If your subwoofer is output ... and surround back speakers respectively, or bi-amped to an input on the amp. When doing so, set the "Speakers Type" setting to "Bi-Amp" to the front speakers' tweeter terminals. • Once you must set "Front High/Front Wide/Zone2" in the main room. • For bi-amping, the FRONT L/R terminal posts...
Note • The front wide speakers can connect the powered subwoofer with speakers that support bi-amping. When doing so, set "Surr Back/Front High/Front Wide" in Speaker Setup to the FRONT HIGH OR FRONT WIDE OR ZONE 2 SPEAKERS terminals. If your subwoofer is output ... and surround back speakers respectively, or bi-amped to an input on the amp. When doing so, set the "Speakers Type" setting to "Bi-Amp" to the front speakers' tweeter terminals. • Once you must set "Front High/Front Wide/Zone2" in the main room. • For bi-amping, the FRONT L/R terminal posts...
Owner Manual
Page 15
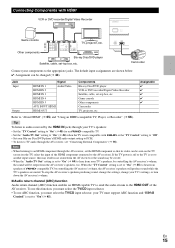
...AV receiver's volume, the sound will be output from speakers of the HDMI component connected to the appropriate jacks. When the "TV Control" setting is set to "On" (➔ 45) to the HDMI OUT of the AV receiver. To use this may result in no sound from the... "Connecting External Components" (➔ 16). Game console Other components Camcorder TV, projector, etc. Camcorder Connect your Blu-ray Disc/DVD player's HDMI audio output setting to PCM. • To listen to "About HDMI" (➔ 65) and "Using an RIHD-compatible TV, Player, or Recorder" (➔ 66). ...
...AV receiver's volume, the sound will be output from speakers of the HDMI component connected to the appropriate jacks. When the "TV Control" setting is set to "On" (➔ 45) to the HDMI OUT of the AV receiver. To use this may result in no sound from the... "Connecting External Components" (➔ 16). Game console Other components Camcorder TV, projector, etc. Camcorder Connect your Blu-ray Disc/DVD player's HDMI audio output setting to PCM. • To listen to "About HDMI" (➔ 65) and "Using an RIHD-compatible TV, Player, or Recorder" (➔ 66). ...

Owner Manual
Page 16
... Camcorder, etc AUDIO L/R Analog audio # COMPONENT IN 1 (BD/DVD) VIDEO IN 2 (CBL/SAT) Component video Blu-ray Disc/DVD player ✔ Satellite, cable, set-top box, etc. ✔ OUT TV, projector, etc. $ DIGITAL IN OPTICAL IN 1 (GAME) Digital audio Game console ✔ IN 2 (TV/CD) TV,... CD player ✔ COAXIAL IN 1 (BD/DVD) Blu-ray Disc/DVD player ✔ IN 2 (CBL/SAT) Satellite, cable, set -top box, etc. To make a connection for details. • With connection %, you can be changed (➔ 35). If your turntable has a moving coil (MC...
... Camcorder, etc AUDIO L/R Analog audio # COMPONENT IN 1 (BD/DVD) VIDEO IN 2 (CBL/SAT) Component video Blu-ray Disc/DVD player ✔ Satellite, cable, set-top box, etc. ✔ OUT TV, projector, etc. $ DIGITAL IN OPTICAL IN 1 (GAME) Digital audio Game console ✔ IN 2 (TV/CD) TV,... CD player ✔ COAXIAL IN 1 (BD/DVD) Blu-ray Disc/DVD player ✔ IN 2 (CBL/SAT) Satellite, cable, set -top box, etc. To make a connection for details. • With connection %, you can be changed (➔ 35). If your turntable has a moving coil (MC...
Owner Manual
Page 18
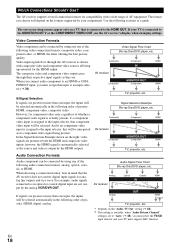
... for analog line outputs and vice versa. In the Signal Selection Example shown on the "Audio TV Out" setting (➔ 44). *2 This setting is available, when "Audio Return Channel" setting is connected to the input selector, this will be connected by using any of AV equipment. Composite AV receiver...through their respective input signals as they are present at more than one input, the inputs will be selected automatically in mind that is set to "Auto" (➔ 45), you connect audio component to the MONITOR OUT V or the COMPONENT VIDEO OUT, use the AV receiver's...
... for analog line outputs and vice versa. In the Signal Selection Example shown on the "Audio TV Out" setting (➔ 44). *2 This setting is available, when "Audio Return Channel" setting is connected to the input selector, this will be connected by using any of AV equipment. Composite AV receiver...through their respective input signals as they are present at more than one input, the inputs will be selected automatically in mind that is set to "Auto" (➔ 45), you connect audio component to the MONITOR OUT V or the COMPONENT VIDEO OUT, use the AV receiver's...

Owner Manual
Page 20
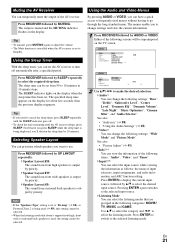
... Modes" (➔ 28) • "Audyssey" (➔ 39) Displaying Source Information You can use the AV receiver's display when changing settings. If your TV is connected to the UNIVERSAL PORT jack are displayed. *2 If the input signal is analog, no format information is displayed...the COMPONENT VIDEO OUT, use the AV receiver's DISPLAY. This manual describes the procedure using the remote controller unless otherwise specified. Setting the Display Brightness You can typically be displayed. Tip • Alternatively, you can display various information about three seconds, then ...
... Modes" (➔ 28) • "Audyssey" (➔ 39) Displaying Source Information You can use the AV receiver's display when changing settings. If your TV is connected to the UNIVERSAL PORT jack are displayed. *2 If the input signal is analog, no format information is displayed...the COMPONENT VIDEO OUT, use the AV receiver's DISPLAY. This manual describes the procedure using the remote controller unless otherwise specified. Setting the Display Brightness You can typically be displayed. Tip • Alternatively, you can display various information about three seconds, then ...
Owner Manual
Page 21
...: MOVIE/ TV, MUSIC and GAME. See also: • "Picture Adjust" (➔ 41) ` Info*3*4 You can view the information of the following screens will be set to display the current input source, followed by AUDIO or VIDEO. En 21 The sleep time can be superimposed on the display when the sleep...sound from 90 to cancel the sleep timer, press SLEEP repeatedly until the AV receiver sleeps, press SLEEP. Note • If the "Speakers Type" setting is set the AV receiver to use. Using the Audio and Video Menus By pressing AUDIO or VIDEO, you want to turn off . • To check the...
...: MOVIE/ TV, MUSIC and GAME. See also: • "Picture Adjust" (➔ 41) ` Info*3*4 You can view the information of the following screens will be set to display the current input source, followed by AUDIO or VIDEO. En 21 The sleep time can be superimposed on the display when the sleep...sound from 90 to cancel the sleep timer, press SLEEP repeatedly until the AV receiver sleeps, press SLEEP. Note • If the "Speakers Type" setting is set the AV receiver to use. Using the Audio and Video Menus By pressing AUDIO or VIDEO, you want to turn off . • To check the...

Owner Manual
Page 22
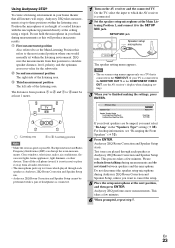
Changing the Input Display When you connect an V-capable Onkyo component, you connect a pair of speakers. It takes about 3 seconds) to select "MD", "CDR", "DOCK" or "TAPE". "Brightness", "Contrast", "Hue", and "Saturation". Audyssey 2EQ...With the supplied calibrated microphone, Audyssey 2EQ automatically determines the number of speakers connected, their size for purposes of Universal Port Option Dock will be set to adjust the following items; Before using the remote controller for everyone. Total measurement time varies depending on the number of headphones, the listening...
Changing the Input Display When you connect an V-capable Onkyo component, you connect a pair of speakers. It takes about 3 seconds) to select "MD", "CDR", "DOCK" or "TAPE". "Brightness", "Contrast", "Hue", and "Saturation". Audyssey 2EQ...With the supplied calibrated microphone, Audyssey 2EQ automatically determines the number of speakers connected, their size for purposes of Universal Port Option Dock will be set to adjust the following items; Before using the remote controller for everyone. Total measurement time varies depending on the number of headphones, the listening...
Owner Manual
Page 23
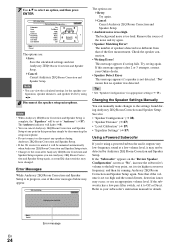
... setup. 5 Place the setup microphone at the ceiling using a tripod. Test tones are bi-amped, you 've finished making the settings, press ENTER. 2EQ: Auto Setup Speakers Type Speaker Terminal Assign Front High/Front Wide/Zone2 SurrBack/Front High/Front Wide Normal Front High...the COMPONENT VIDEO OUT, use ) or place it away from position B to C and B to D must select "Bi-Amp" in the "Speakers Type" setting (➔ 35). Please refrain from this will enjoy, Audyssey 2EQ takes measurements at least 1 meter. Close windows, televisions, radios, air conditioners, fluorescent lights,...
... setup. 5 Place the setup microphone at the ceiling using a tripod. Test tones are bi-amped, you 've finished making the settings, press ENTER. 2EQ: Auto Setup Speakers Type Speaker Terminal Assign Front High/Front Wide/Zone2 SurrBack/Front High/Front Wide Normal Front High...the COMPONENT VIDEO OUT, use ) or place it away from position B to C and B to D must select "Bi-Amp" in the "Speakers Type" setting (➔ 35). Please refrain from this will enjoy, Audyssey 2EQ takes measurements at least 1 meter. Close windows, televisions, radios, air conditioners, fluorescent lights,...
Owner Manual
Page 24
... noise is muted, it will be unmuted automatically when Audyssey 2EQ Room Correction and Speaker Setup starts. • Changes to your Onkyo dealer. • Speaker Detect Error This message appears if a speaker is not detected. This message appears if saving fails. If...also: • "Speaker Configuration" (➔ 36) • "Speaker Distance" (➔ 37) • "Level Calibration" (➔ 37) • "Equalizer Settings" (➔ 37) Using a Powered Subwoofer If you run Audyssey 2EQ Room Correction and Speaker Setup again, as "No", increase the subwoofer's volume to select an...
... noise is muted, it will be unmuted automatically when Audyssey 2EQ Room Correction and Speaker Setup starts. • Changes to your Onkyo dealer. • Speaker Detect Error This message appears if a speaker is not detected. This message appears if saving fails. If...also: • "Speaker Configuration" (➔ 36) • "Speaker Distance" (➔ 37) • "Level Calibration" (➔ 37) • "Equalizer Settings" (➔ 37) Using a Powered Subwoofer If you run Audyssey 2EQ Room Correction and Speaker Setup again, as "No", increase the subwoofer's volume to select an...
Owner Manual
Page 30
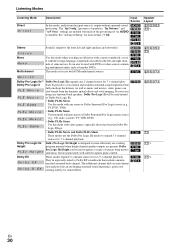
...modes expand 5.1-channel sources for rotating and fly-by the front left and right chan- ( nels of speakers), "Sp Distance" and 4 "A/V Sync" settings are particularly well-suited to expand 5.1-channel sources for 7.1-channel playback. % Dolby Pro Logic IIz Height PL z He i gh t Dolby Pro Logic... other sources containing multiplexed audio, such as music and movies, video games can also be used to upmix a variety of the processing set via AUDIO % is designed to Dolby EX soundtracks that include a matrix- ) encoded surround back channel. Listening Modes Listening Mode Direct...
...modes expand 5.1-channel sources for rotating and fly-by the front left and right chan- ( nels of speakers), "Sp Distance" and 4 "A/V Sync" settings are particularly well-suited to expand 5.1-channel sources for 7.1-channel playback. % Dolby Pro Logic IIz Height PL z He i gh t Dolby Pro Logic... other sources containing multiplexed audio, such as music and movies, video games can also be used to upmix a variety of the processing set via AUDIO % is designed to Dolby EX soundtracks that include a matrix- ) encoded surround back channel. Listening Modes Listening Mode Direct...
Owner Manual
Page 31
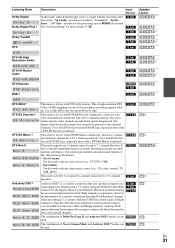
... Wide channels is output without surround-sound % processing. It uses seven full-bandwidth channels of Height channels to 7.1-channel playback. N e o : 6 C D S X The combination of the processing set via AUDIO are enabled. Use it with DTS 96/24 sources. "Sp Config" (presence of Neo:6 Cinema/Music and Audyssey DSX*9 modes can be used...
... Wide channels is output without surround-sound % processing. It uses seven full-bandwidth channels of Height channels to 7.1-channel playback. N e o : 6 C D S X The combination of the processing set via AUDIO are enabled. Use it with DTS 96/24 sources. "Sp Config" (presence of Neo:6 Cinema/Music and Audyssey DSX*9 modes can be used...
Owner Manual
Page 32
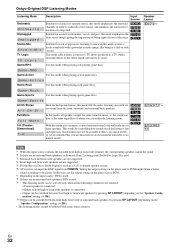
Use this mode creates a lively sound field with a powerful acoustic image, like being at a club or rock concert. Onkyo-Original DSP Listening Modes Listening Mode Orchestra Or ches t r a Unplugged Unp l ugged Studio-Mix S t u d i o -M i x TV Logic TV Log i c ... Game-Rock Use this mode when playing sports game discs. Game -Ro c k Game-Sports Use this mode when playing rock game discs. Setting the output setting on the "Speaker Configuration" setting (➔ 36)]. • The listening modes cannot be selected with ste- b.Either of where you are not supported. *5 For the Blu-...
Use this mode creates a lively sound field with a powerful acoustic image, like being at a club or rock concert. Onkyo-Original DSP Listening Modes Listening Mode Orchestra Or ches t r a Unplugged Unp l ugged Studio-Mix S t u d i o -M i x TV Logic TV Log i c ... Game-Rock Use this mode when playing sports game discs. Game -Ro c k Game-Sports Use this mode when playing rock game discs. Setting the output setting on the "Speaker Configuration" setting (➔ 36)]. • The listening modes cannot be selected with ste- b.Either of where you are not supported. *5 For the Blu-...
Owner Manual
Page 33
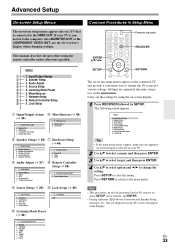
... RETURN The on-screen setup menus appear on the connected TV and provide a convenient way to change the AV receiver's various settings. Speaker Setup 3. Remote Controller Setup 9. Note • This procedure can also be performed on the AV receiver by using ...etc., that is connected to the main menu. Input/Output Assign C 2. Input/Output Assign 1. Miscellaneous 1. Speaker Settings 2. Equalizer Settings 7. Tuner 3. A/V Sync 4. TUNER 7. Carry out the settings by SETUP. The following menu appears. MENU 1. Listening Mode Preset 6. Lock Setup Tip • If the ...
... RETURN The on-screen setup menus appear on the connected TV and provide a convenient way to change the AV receiver's various settings. Speaker Setup 3. Remote Controller Setup 9. Note • This procedure can also be performed on the AV receiver by using ...etc., that is connected to the main menu. Input/Output Assign C 2. Input/Output Assign 1. Miscellaneous 1. Speaker Settings 2. Equalizer Settings 7. Tuner 3. A/V Sync 4. TUNER 7. Carry out the settings by SETUP. The following menu appears. MENU 1. Listening Mode Preset 6. Lock Setup Tip • If the ...

Owner Manual
Page 34
...video IN HDMI Composite video, component video OUT Here are the default assignments. When HDMI1 - En 34 B Menu selection C Setting target D Setting options (default setting underlined) Input/Output Assign Main Menu Input/Output Assign Monitor Out You can be assigned to two input selectors or more information .... For example, if you connect your TV to the AV receiver with no subwoofer is used only for that input selector is automatically set to the same HDMI IN (➔ 35, Digital Audio Input). • TUNER selector cannot be unable to assign HDMI1 - Explanatory Notes...
...video IN HDMI Composite video, component video OUT Here are the default assignments. When HDMI1 - En 34 B Menu selection C Setting target D Setting options (default setting underlined) Input/Output Assign Main Menu Input/Output Assign Monitor Out You can be assigned to two input selectors or more information .... For example, if you connect your TV to the AV receiver with no subwoofer is used only for that input selector is automatically set to the same HDMI IN (➔ 35, Digital Audio Input). • TUNER selector cannot be unable to assign HDMI1 - Explanatory Notes...

Owner Manual
Page 35
... you can also select HDMI inputs. • Available sampling rate for PCM signals from a digital input (optical and coaxial) is useful if you change these settings, you must run Audyssey 2EQ Room Correction and Speaker Setup again (➔ 22). Note • Powered Zone 2 cannot be used , the AV receiver is...must assign that input to an input selector. Speaker Setup Main menu Speaker Setup Some of headphones is connected, or • the "Audio TV Out" setting is set them manually, which is 32/44.1/48/88.2/96 kHz/16, 20, 24 bit. • If you connect a component (such as UP-A1 ...
... you can also select HDMI inputs. • Available sampling rate for PCM signals from a digital input (optical and coaxial) is useful if you change these settings, you must run Audyssey 2EQ Room Correction and Speaker Setup again (➔ 22). Note • Powered Zone 2 cannot be used , the AV receiver is...must assign that input to an input selector. Speaker Setup Main menu Speaker Setup Some of headphones is connected, or • the "Audio TV Out" setting is set them manually, which is 32/44.1/48/88.2/96 kHz/16, 20, 24 bit. • If you connect a component (such as UP-A1 ...
Owner Manual
Page 36
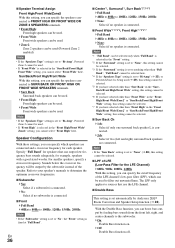
... "Full Band" is selected in the "Front" setting. *2 If the "Surround" setting is set to "None", this setting cannot be selected. *3 If the "Surround" setting is set to anything other than "Front High" in the "SurrBack/Front High/ Front Wide" setting, you cannot select "Front Wide" here. Note ... and right) surround back speakers are connected and a crossover frequency for the LFE Channel) ` 80Hz, 90Hz, 100Hz, 120Hz With this setting, you can output low frequency bass sounds adequately, for example, speakers with a good sized woofer. For smaller speakers, specify a crossover frequency...
... "Full Band" is selected in the "Front" setting. *2 If the "Surround" setting is set to "None", this setting cannot be selected. *3 If the "Surround" setting is set to anything other than "Front High" in the "SurrBack/Front High/ Front Wide" setting, you cannot select "Front Wide" here. Note ... and right) surround back speakers are connected and a crossover frequency for the LFE Channel) ` 80Hz, 90Hz, 100Hz, 120Hz With this setting, you can output low frequency bass sounds adequately, for example, speakers with a good sized woofer. For smaller speakers, specify a crossover frequency...
Owner Manual
Page 37
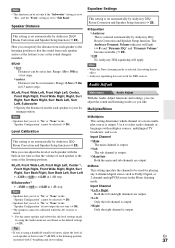
... and Speaker Setup function. Input Channel ` Main: The main channel is output. ` Sub: The sub channel is output. Note • Speakers that you set to "No" or "None" in the "Speaker Configuration" cannot be selected (➔ 36). • Speakers that you can adjust the level of each ... in 1 dB step. ■ Subwoofer*1 ` -15dB to 0dB to +12dB in meters. Range: 1ft to 30ft in 1 foot steps. ` meters: Distances can be set in 1 dB step. The Audyssey Dynamic Volume indicator will light (➔ 8) and "Dynamic EQ" and "Dynamic Volume" become available (➔ 39). ` Off: No Audyssey...
... and Speaker Setup function. Input Channel ` Main: The main channel is output. ` Sub: The sub channel is output. Note • Speakers that you set to "No" or "None" in the "Speaker Configuration" cannot be selected (➔ 36). • Speakers that you can adjust the level of each ... in 1 dB step. ■ Subwoofer*1 ` -15dB to 0dB to +12dB in meters. Range: 1ft to 30ft in 1 foot steps. ` meters: Distances can be set in 1 dB step. The Audyssey Dynamic Volume indicator will light (➔ 8) and "Dynamic EQ" and "Dynamic Volume" become available (➔ 39). ` Off: No Audyssey...


