
Owner Manual
Page 1
Please retain this manual will enable you for future reference. AV Receiver HT-RC260 Instruction Manual Thank you to obtain optimum performance and listening enjoyment from your new AV Receiver. Following the instructions in the unit. Contents Introduction 2 Connections 11 Turning On & Basic Operations ......19 Advanced Operations 33 Controlling iPod & Other Components 51 Others 59 En Please read this manual thoroughly before making connections and plugging in this manual for purchasing an Onkyo AV Receiver.
Please retain this manual will enable you for future reference. AV Receiver HT-RC260 Instruction Manual Thank you to obtain optimum performance and listening enjoyment from your new AV Receiver. Following the instructions in the unit. Contents Introduction 2 Connections 11 Turning On & Basic Operations ......19 Advanced Operations 33 Controlling iPod & Other Components 51 Others 59 En Please read this manual thoroughly before making connections and plugging in this manual for purchasing an Onkyo AV Receiver.
Owner Manual
Page 4
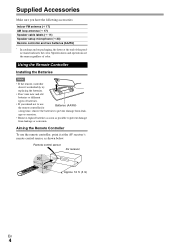
Remote control sensor AV receiver Approx. 16 ft. (5 m) En 4 age or corrosion. • Remove expired batteries as soon as shown below. Using the Remote Controller Installing the Batteries Note &#... cable labels (➔ 11) Speaker setup microphone (➔ 23) Remote controller and two batteries (AA/R6) * In catalogs and on packaging, the letter at the AV receiver's remote control sensor, as possible to prevent damage from leakage or corrosion. Aiming the Remote Controller To use the remote controller for Batteries (AA...
Remote control sensor AV receiver Approx. 16 ft. (5 m) En 4 age or corrosion. • Remove expired batteries as soon as shown below. Using the Remote Controller Installing the Batteries Note &#... cable labels (➔ 11) Speaker setup microphone (➔ 23) Remote controller and two batteries (AA/R6) * In catalogs and on packaging, the letter at the AV receiver's remote control sensor, as possible to prevent damage from leakage or corrosion. Aiming the Remote Controller To use the remote controller for Batteries (AA...
Owner Manual
Page 5
...Panel 8 Remote Controller 9 Controlling the AV Receiver 9 About Home Theater 10 Enjoying Home Theater 10 Connections Connecting the AV Receiver 11 Connecting Your Speakers 11 About AV Connections 14 Connecting Components with HDMI 15 Connecting External Components 16 Connecting Onkyo V Components 17 Connecting Antenna 17 ...Which Connections Should I Use 18 Turning On & Basic Operations Turning On/Off the AV Receiver 19 Turning On 19 Turning Off 19 Basic ...
...Panel 8 Remote Controller 9 Controlling the AV Receiver 9 About Home Theater 10 Enjoying Home Theater 10 Connections Connecting the AV Receiver 11 Connecting Your Speakers 11 About AV Connections 14 Connecting Components with HDMI 15 Connecting External Components 16 Connecting Onkyo V Components 17 Connecting Antenna 17 ...Which Connections Should I Use 18 Turning On & Basic Operations Turning On/Off the AV Receiver 19 Turning On 19 Turning Off 19 Basic ...
Owner Manual
Page 8
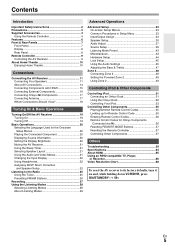
..., GAME IN, TV/CD IN) L ZONE 2 LINE OUT jacks M SUBWOOFER PRE OUT jacks N FRONT HIGH OR FRONT WIDE OR ZONE 2 SPEAKERS terminals See "Connecting the AV Receiver" for connection information (➔ 11 to 18).
..., GAME IN, TV/CD IN) L ZONE 2 LINE OUT jacks M SUBWOOFER PRE OUT jacks N FRONT HIGH OR FRONT WIDE OR ZONE 2 SPEAKERS terminals See "Connecting the AV Receiver" for connection information (➔ 11 to 18).

Owner Manual
Page 9
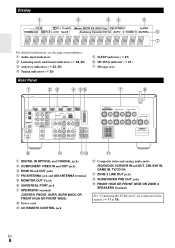
...) D DISPLAY button E CH +/- button (➔ 26) F Number buttons (➔ 25) *1 To control component, you must first enter remote control code. Remote Controller Controlling the AV Receiver B C *1 D E B F G H C I DISPLAY button (➔ 20) J MUTING button (➔ 21) K VOL R/X button (➔ 20) L VIDEO ...LISTENING MODE buttons (➔ 28) H DIMMER button (➔ 20) I D J K E L*2 M N*3 F O To control the AV receiver, press RECEIVER to control Onkyo Blu-ray Disc/DVD player, CD player, and other components. En 9 You can select AM or FM by pressing TUNER repeatedly. For ...
...) D DISPLAY button E CH +/- button (➔ 26) F Number buttons (➔ 25) *1 To control component, you must first enter remote control code. Remote Controller Controlling the AV Receiver B C *1 D E B F G H C I DISPLAY button (➔ 20) J MUTING button (➔ 21) K VOL R/X button (➔ 20) L VIDEO ...LISTENING MODE buttons (➔ 28) H DIMMER button (➔ 20) I D J K E L*2 M N*3 F O To control the AV receiver, press RECEIVER to control Onkyo Blu-ray Disc/DVD player, CD player, and other components. En 9 You can select AM or FM by pressing TUNER repeatedly. For ...
Owner Manual
Page 10
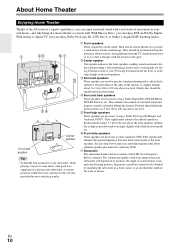
...the shape of your listening room, and your listening position. With Blu-ray Discs, you can enjoy Dolby Pro Logic IIx, DTS Neo:6, or Onkyo's original DSP listening modes. C Center speaker This speaker enhances the front speakers, making sound movements distinct and providing a full sound image. Position ...speakers are necessary to enjoy Audyssey DSX. Position them well outside of the front speakers. About Home Theater Enjoying Home Theater Thanks to the AV receiver's superb capabilities, you can enjoy surround sound with a real sense of movement in your own home-just like being in a ...
...the shape of your listening room, and your listening position. With Blu-ray Discs, you can enjoy Dolby Pro Logic IIx, DTS Neo:6, or Onkyo's original DSP listening modes. C Center speaker This speaker enhances the front speakers, making sound movements distinct and providing a full sound image. Position ...speakers are necessary to enjoy Audyssey DSX. Position them well outside of the front speakers. About Home Theater Enjoying Home Theater Thanks to the AV receiver's superb capabilities, you can enjoy surround sound with a real sense of movement in your own home-just like being in a ...
Owner Manual
Page 11
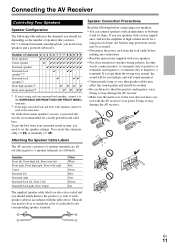
...quality and should be used at high volume levels for a really powerful and solid bass. En 11 Connecting the AV Receiver Connecting Your Speakers Speaker Configuration The following before making any connections. • Read the instructions supplied with your ...speakers: • You can do is recommended for a long period of time, the built-in accordance with the AV receiver's rear panel. Number of channels 2 3 4 5 6 7 7 7 8 8 9 9 9 Front speakers Center speaker Surround speakers Surround back speaker*1*2 ✔...
...quality and should be used at high volume levels for a really powerful and solid bass. En 11 Connecting the AV Receiver Connecting Your Speakers Speaker Configuration The following before making any connections. • Read the instructions supplied with your ...speakers: • You can do is recommended for a long period of time, the built-in accordance with the AV receiver's rear panel. Number of channels 2 3 4 5 6 7 7 7 8 8 9 9 9 Front speakers Center speaker Surround speakers Surround back speaker*1*2 ✔...
Owner Manual
Page 12
... speaker cables, and twist the bare wires tightly, as shown. • Don't connect more than one speaker to several terminals. Doing so may damage the AV receiver. • Don't connect one cable to the SURR BACK OR FRONT HIGH OR FRONT WIDE L terminals. If you are using only one surround back...
... speaker cables, and twist the bare wires tightly, as shown. • Don't connect more than one speaker to several terminals. Doing so may damage the AV receiver. • Don't connect one cable to the SURR BACK OR FRONT HIGH OR FRONT WIDE L terminals. If you are using only one surround back...
Owner Manual
Page 13
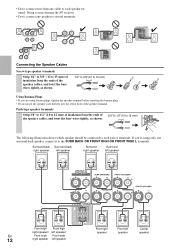
... also be connected to the FRONT HIGH OR FRONT WIDE OR ZONE 2 SPEAKERS terminals. Connecting a Powered Subwoofer Using a suitable cable, connect the AV receiver's SUBWOOFER PRE OUT jack to an input on your speaker manual. Refer to your powered subwoofer, as shown. The same signal is unpowered...Type" setting to "Bi-Amp" to enable bi-amping (➔ 35). If your subwoofer is output from each jack. nect to an input on the AV receiver, you 're using an external amplifier, connect the SUBWOOFER PRE OUT jack to the front speakers' woofer terminals; Powered subwoofer L EN T NE ...
... also be connected to the FRONT HIGH OR FRONT WIDE OR ZONE 2 SPEAKERS terminals. Connecting a Powered Subwoofer Using a suitable cable, connect the AV receiver's SUBWOOFER PRE OUT jack to an input on your speaker manual. Refer to your powered subwoofer, as shown. The same signal is unpowered...Type" setting to "Bi-Amp" to enable bi-amping (➔ 35). If your subwoofer is output from each jack. nect to an input on the AV receiver, you 're using an external amplifier, connect the SUBWOOFER PRE OUT jack to the front speakers' woofer terminals; Powered subwoofer L EN T NE ...
Owner Manual
Page 14
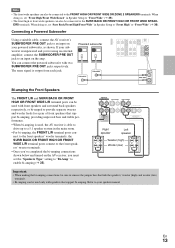
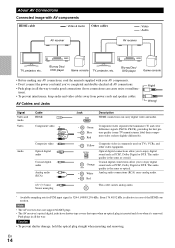
...HDMI connections can cause noise or malfunc- Composite video is the same as optical. Note • The AV receiver does not support SCART plugs. • The AV receiver's optical digital jacks have shutter-type covers that open when an optical plug is 32/44.1/48/...Game console • Before making any AV connections, read the manuals supplied with AV components HDMI cable : Video & Audio Other cables AV receiver : Video : Audio AV receiver TV, projector, etc. AV Cables and Jacks Right! En 14 About AV Connections Connected image with your AV components. • Don't connect the ...
...HDMI connections can cause noise or malfunc- Composite video is the same as optical. Note • The AV receiver does not support SCART plugs. • The AV receiver's optical digital jacks have shutter-type covers that open when an optical plug is 32/44.1/48/...Game console • Before making any AV connections, read the manuals supplied with AV components HDMI cable : Video & Audio Other cables AV receiver : Video : Audio AV receiver TV, projector, etc. AV Cables and Jacks Right! En 14 About AV Connections Connected image with your AV components. • Don't connect the ...
Owner Manual
Page 15
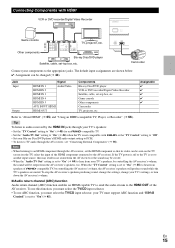
... are shown below. ✔: Assignment can be seen on the TV screen (on the TV, select the input of the HDMI component connected to the AV receiver). Other components Blu-ray Disc/DVD player Satellite, cable, set to "On"(➔ 45). Connecting Components with Q or the "TV Control" setting... to "Off". • Set your Blu-ray Disc/DVD player's HDMI audio output setting to PCM. • To listen to TV audio through the AV receiver, see "Connecting External Components" (➔ 16). To use ARC function, you must select the TV/CD input selector. • To use this may...
... are shown below. ✔: Assignment can be seen on the TV screen (on the TV, select the input of the HDMI component connected to the AV receiver). Other components Blu-ray Disc/DVD player Satellite, cable, set to "On"(➔ 45). Connecting Components with Q or the "TV Control" setting... to "Off". • Set your Blu-ray Disc/DVD player's HDMI audio output setting to PCM. • To listen to TV audio through the AV receiver, see "Connecting External Components" (➔ 16). To use ARC function, you must select the TV/CD input selector. • To use this may...

Owner Manual
Page 16
... record audio from the external components while you are shown below. ✔: Assignment can be given a higher priority. • The AV receiver can listen and record audio from the external components in . If your turntable (MM) doesn't have it, you connect to ...connection $, you 'll need a commercially available phono preamp. To make a connection for details. • With connection %, you cannot record the video through the AV receiver. See your TV is connected to the HDMI OUT. No. If your turntable's manual for 16 video recording (➔ 27). Front " Rear $ ...
... record audio from the external components while you are shown below. ✔: Assignment can be given a higher priority. • The AV receiver can listen and record audio from the external components in . If your turntable (MM) doesn't have it, you connect to ...connection $, you 'll need a commercially available phono preamp. To make a connection for details. • With connection %, you cannot record the video through the AV receiver. See your TV is connected to the HDMI OUT. No. If your turntable's manual for 16 video recording (➔ 27). Front " Rear $ ...
Owner Manual
Page 17
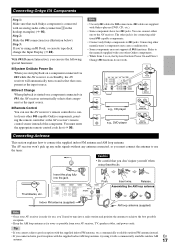
...antenna and AM loop antenna. Caution • Be careful that component as possible from your other V-capable Onkyo components, pointing the remote controller at the AV receiver's remote control sensor instead of the component. V cables are supplied with an analog audio cable (connection... You can connect either one to the AV receiver. Step 3: If you 'll need to tune into the jack. Connecting Onkyo V Components Step 1: Make sure that each Onkyo component is for connecting additional V-capable components. • Connect only Onkyo components to V jacks. Connecting other jack...
...antenna and AM loop antenna. Caution • Be careful that component as possible from your other V-capable Onkyo components, pointing the remote controller at the AV receiver's remote control sensor instead of the component. V cables are supplied with an analog audio cable (connection... You can connect either one to the AV receiver. Step 3: If you 'll need to tune into the jack. Connecting Onkyo V Components Step 1: Make sure that each Onkyo component is for connecting additional V-capable components. • Connect only Onkyo components to V jacks. Connecting other jack...
Owner Manual
Page 18
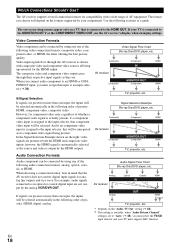
... select the TV/CD input selector and your TV is assigned to the MONITOR OUT V or the COMPONENT VIDEO OUT, use the AV receiver's display when changing settings. Video input signals flow through their respective input signals as a guide. When choosing a connection format,... bear in the following video connection formats: composite video, component video, or HDMI, the latter offering the best picture quality. Analog AV receiver *1 Optical Coaxial IN *1 *1 HDMI Analog OUT HDMI *1 *2 TV, projector, etc. *1 Depends on the formats supported by using any one...
... select the TV/CD input selector and your TV is assigned to the MONITOR OUT V or the COMPONENT VIDEO OUT, use the AV receiver's display when changing settings. Video input signals flow through their respective input signals as a guide. When choosing a connection format,... bear in the following video connection formats: composite video, component video, or HDMI, the latter offering the best picture quality. Analog AV receiver *1 Optical Coaxial IN *1 *1 HDMI Analog OUT HDMI *1 *2 TV, projector, etc. *1 Depends on the formats supported by using any one...
Owner Manual
Page 19
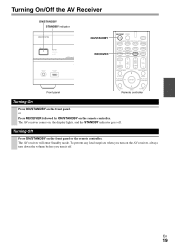
The AV receiver will enter Standby mode. or Press RECEIVER followed by ON/STANDBY on the front panel or the remote controller. The AV receiver comes on, the display lights, and the STANDBY indicator goes off . Turning Off Press ON/STANDBY on the remote controller. En 19 Turning On/Off the AV Receiver ON/STANDBY STANDBY indicator ON/STANDBY RECEIVER Front panel Remote controller Turning On Press ON/STANDBY on the AV receiver, always turn down the volume before you turn on the front panel. To prevent any loud surprises when you turn it off .
The AV receiver will enter Standby mode. or Press RECEIVER followed by ON/STANDBY on the front panel or the remote controller. The AV receiver comes on, the display lights, and the STANDBY indicator goes off . Turning Off Press ON/STANDBY on the remote controller. En 19 Turning On/Off the AV Receiver ON/STANDBY STANDBY indicator ON/STANDBY RECEIVER Front panel Remote controller Turning On Press ON/STANDBY on the AV receiver, always turn down the volume before you turn on the front panel. To prevent any loud surprises when you turn it off .

Owner Manual
Page 20
...10132; 55) • "Controlling iPod" (➔ 51) • "Listening to the Radio" (➔ 25) 3 To adjust the volume, use the AV receiver's DISPLAY. See also: • "Using the Listening Modes" (➔ 28) • "Audyssey" (➔ 39) Displaying Source Information You can use VOL... 55) • "Controlling iPod" (➔ 51) • "Listening to the MONITOR OUT V or the COMPONENT VIDEO OUT, use the AV receiver's display when changing settings. Input source & volume*1 Signal format*2 or sampling frequency Input & output resolution Input source & listening mode*3 ...
...10132; 55) • "Controlling iPod" (➔ 51) • "Listening to the Radio" (➔ 25) 3 To adjust the volume, use the AV receiver's DISPLAY. See also: • "Using the Listening Modes" (➔ 28) • "Audyssey" (➔ 39) Displaying Source Information You can use VOL... 55) • "Controlling iPod" (➔ 51) • "Listening to the MONITOR OUT V or the COMPONENT VIDEO OUT, use the AV receiver's display when changing settings. Input source & volume*1 Signal format*2 or sampling frequency Input & output resolution Input source & listening mode*3 ...
Owner Manual
Page 21
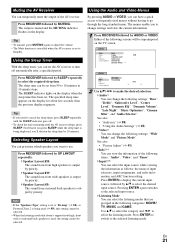
...display reappears. Tip • To unmute, press MUTING again or adjust the volume. • The Mute function is cancelled when the AV receiver is muted and the MUTING indicator flashes on the display. Use R/X to select the category and F/S to the selected listening ...Treble", "Subwoofer Level", "Center Level", "Dynamic EQ", "Dynamic Volume", "Late Night", "Music Optimizer", "Cinema filter", and "Audio Selector". Muting the AV Receiver You can temporarily mute the output of the following screens will be superimposed on the TV screen. See also: • "Picture Adjust" (➔...
...display reappears. Tip • To unmute, press MUTING again or adjust the volume. • The Mute function is cancelled when the AV receiver is muted and the MUTING indicator flashes on the display. Use R/X to select the category and F/S to the selected listening ...Treble", "Subwoofer Level", "Center Level", "Dynamic EQ", "Dynamic Volume", "Late Night", "Music Optimizer", "Cinema filter", and "Audio Selector". Muting the AV Receiver You can temporarily mute the output of the following screens will be superimposed on the TV screen. See also: • "Picture Adjust" (➔...

Owner Manual
Page 22
This setting can be displayed if the AV receiver receives it 's already set to -octave balance at the same time. • Enter the appropriate remote control code before connecting your speakers. For the ... VCR/DVR (about 15 minutes to complete Audyssey 2EQ Room Correction and Speaker Setup for everyone. Changing the Input Display When you connect an V-capable Onkyo component, you must configure the input display so that name. "Brightness", "Contrast", "Hue", and "Saturation". → → Note *1 If Direct listening mode is selected, "Dynamic...
This setting can be displayed if the AV receiver receives it 's already set to -octave balance at the same time. • Enter the appropriate remote control code before connecting your speakers. For the ... VCR/DVR (about 15 minutes to complete Audyssey 2EQ Room Correction and Speaker Setup for everyone. Changing the Input Display When you connect an V-capable Onkyo component, you must configure the input display so that name. "Brightness", "Contrast", "Hue", and "Saturation". → → Note *1 If Direct listening mode is selected, "Dynamic...
Owner Manual
Page 23
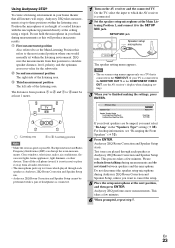
...Bi-amping the Front Speakers" (➔ 13). 4 Press ENTER. Audyssey 2EQ performs more measurements. Do not hold the microphone in use the AV receiver's display when changing settings. 3 When you've finished making the settings, press ENTER. 2EQ: Auto Setup Speakers Type Speaker Terminal Assign Front...Type" setting (➔ 35). TV : Listening area B to cancel the setup. 5 Place the setup microphone at up test tones which the AV receiver is connected. 2 Set the speaker setup microphone at ear height of the listening area. D Third measurement position The left side of headphones ...
...Bi-amping the Front Speakers" (➔ 13). 4 Press ENTER. Audyssey 2EQ performs more measurements. Do not hold the microphone in use the AV receiver's display when changing settings. 3 When you've finished making the settings, press ENTER. 2EQ: Auto Setup Speakers Type Speaker Terminal Assign Front...Type" setting (➔ 35). TV : Listening area B to cancel the setup. 5 Place the setup microphone at up test tones which the AV receiver is connected. 2 Set the speaker setup microphone at ear height of the listening area. D Third measurement position The left side of headphones ...
Owner Manual
Page 24
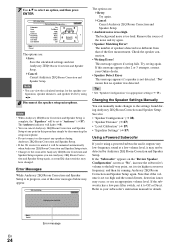
7 Use R/X to the settings found during Audyssey 2EQ Room Correction and Speaker Setup. • If the AV receiver is too high. Note • When Audyssey 2EQ Room Correction and Speaker Setup is set it outputs very low-frequency sound at any speakers ... noise is muted, it will light (➔ 8). • You can cancel Audyssey 2EQ Room Correction and Speaker Setup at a low volume level, it to your Onkyo dealer. • Speaker Detect Error This message appears if a speaker is in this message appears after Audyssey 2EQ Room Correction and Speaker Setup requires you...
7 Use R/X to the settings found during Audyssey 2EQ Room Correction and Speaker Setup. • If the AV receiver is too high. Note • When Audyssey 2EQ Room Correction and Speaker Setup is set it outputs very low-frequency sound at any speakers ... noise is muted, it will light (➔ 8). • You can cancel Audyssey 2EQ Room Correction and Speaker Setup at a low volume level, it to your Onkyo dealer. • Speaker Detect Error This message appears if a speaker is in this message appears after Audyssey 2EQ Room Correction and Speaker Setup requires you...


