
Owner Manual
Page 1
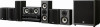
Using the Listening Modes .......... 59 Advanced Operation 76 Troubleshooting 101 En 7.1ch THX Certified Digital Surround Receiver and Speaker Package HT-S9100THX AV Receiver (HT-R960) Front Speakers (SKF-960F) Center Speaker (SKC-960C) Surround Speakers (SKM-960S) Surround Back Speakers (SKB-...50 Listening to the Radio 54 Thank you to obtain optimum performance and listening enjoyment from your new Onkyo product. Following the instructions in your new Onkyo product. Please retain this manual for purchasing this manual will enable you for future reference. Please read...
Using the Listening Modes .......... 59 Advanced Operation 76 Troubleshooting 101 En 7.1ch THX Certified Digital Surround Receiver and Speaker Package HT-S9100THX AV Receiver (HT-R960) Front Speakers (SKF-960F) Center Speaker (SKC-960C) Surround Speakers (SKM-960S) Surround Back Speakers (SKB-...50 Listening to the Radio 54 Thank you to obtain optimum performance and listening enjoyment from your new Onkyo product. Following the instructions in your new Onkyo product. Please retain this manual for purchasing this manual will enable you for future reference. Please read...
Owner Manual
Page 2
...PARTS INSIDE. The exclamation point within the product's enclosure that may touch dangerous voltage points or short-out parts that there is used, use caution when moving the cart/ apparatus combination to avoid injury from the rear panel or wall, creating a flue-like gap...Important Safety Instructions 1. Do not defeat the safety purpose of batteries. 18. PORTABLE CART WARNING S3125A 13. Install in any ventilation openings. Use only with the cart, stand, tripod, bracket, or table specified by following conditions: A. Follow all instructions. 5. If liquid...
...PARTS INSIDE. The exclamation point within the product's enclosure that may touch dangerous voltage points or short-out parts that there is used, use caution when moving the cart/ apparatus combination to avoid injury from the rear panel or wall, creating a flue-like gap...Important Safety Instructions 1. Do not defeat the safety purpose of batteries. 18. PORTABLE CART WARNING S3125A 13. Install in any ventilation openings. Use only with the cart, stand, tripod, bracket, or table specified by following conditions: A. Follow all instructions. 5. If liquid...
Owner Manual
Page 3
...User CAUTION: The user changes or modifications not expressly approved by your Onkyo dealer. 3. This equipment generates, uses and can radiate radio frequency energy and, if not installed and used to radio communications. Recording Copyright-Unless it may cause harmful interference to disconnect ...this unit or its power cord while your area meets the voltage requirements printed on the unit, contact your Onkyo dealer. 8. AC Fuse-The ...
...User CAUTION: The user changes or modifications not expressly approved by your Onkyo dealer. 3. This equipment generates, uses and can radiate radio frequency energy and, if not installed and used to radio communications. Recording Copyright-Unless it may cause harmful interference to disconnect ...this unit or its power cord while your area meets the voltage requirements printed on the unit, contact your Onkyo dealer. 8. AC Fuse-The ...
Owner Manual
Page 4
... may not correspond with the letter N or coloured black. In some situations, however, discoloration may be damaged. • Speakers should only be used near an air conditioner, humidifier, bathroom, or kitchen. • Do not put water or other liquids close to BS1362 and have ...instrument, and so on. 4. To prevent this, move the speakers away from vibration. Amplifier oscillation. 5. Microphone feedback. 4 Note that the ONKYO product described in the mains lead of the fuse. IMPORTANT The wires in the mains lead are likely to them, even if the input power...
... may not correspond with the letter N or coloured black. In some situations, however, discoloration may be damaged. • Speakers should only be used near an air conditioner, humidifier, bathroom, or kitchen. • Do not put water or other liquids close to BS1362 and have ...instrument, and so on. 4. To prevent this, move the speakers away from vibration. Amplifier oscillation. 5. Microphone feedback. 4 Note that the ONKYO product described in the mains lead of the fuse. IMPORTANT The wires in the mains lead are likely to them, even if the input power...

Owner Manual
Page 6
...Outdoor AM Antenna 24 Connecting Your Components 25 About AV Connections 25 Connecting Audio and Video Signals to the AV Receiver 26 Which Connections Should I Use 26 Connecting a TV or Projector 28 Connecting a DVD player 29 Connecting a VCR or DVR for Playback 31 Connecting a VCR or DVR ...Device 36 Connecting a CD Player or Turntable 37 Connecting a Cassette, CDR, MiniDisc, or DAT Recorder 38 6 Connecting an RI Dock 39 Connecting Onkyo Components 40 Connecting the Power Cord 40 Turning On the AV Receiver 41 Turning On and Standby 41 First Time Setup 42 Automatic Speaker Setup...
...Outdoor AM Antenna 24 Connecting Your Components 25 About AV Connections 25 Connecting Audio and Video Signals to the AV Receiver 26 Which Connections Should I Use 26 Connecting a TV or Projector 28 Connecting a DVD player 29 Connecting a VCR or DVR for Playback 31 Connecting a VCR or DVR ...Device 36 Connecting a CD Player or Turntable 37 Connecting a Cassette, CDR, MiniDisc, or DAT Recorder 38 6 Connecting an RI Dock 39 Connecting Onkyo Components 40 Connecting the Power Cord 40 Turning On the AV Receiver 41 Turning On and Standby 41 First Time Setup 42 Automatic Speaker Setup...
Owner Manual
Page 8
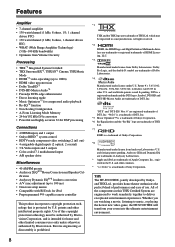
...; Onscreen setup menus • Compatible with RI Dock for home and other limited consumer uses only unless otherwise authorized by Onkyo and THX Ltd., provides home theater enthusiasts the perfect blend of performance and ease of use. THX The HT-S9100THX, jointly developed by Macrovision. Reverse engineering or disassembly is intended for iPod • Preprogrammed...
...; Onscreen setup menus • Compatible with RI Dock for home and other limited consumer uses only unless otherwise authorized by Onkyo and THX Ltd., provides home theater enthusiasts the perfect blend of performance and ease of use. THX The HT-S9100THX, jointly developed by Macrovision. Reverse engineering or disassembly is intended for iPod • Preprogrammed...
Owner Manual
Page 9
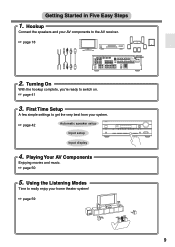
... Setup A few simple settings to really enjoy your system. ☞ page 42 Automatic speaker setup Input setup Input display 4. Getting Started in Five Easy Steps 1. Using the Listening Modes Time to get the very best from your home theater system! ☞ page 59 9 Hookup Connect the speakers and your AV components...
... Setup A few simple settings to really enjoy your system. ☞ page 42 Automatic speaker setup Input setup Input display 4. Getting Started in Five Easy Steps 1. Using the Listening Modes Time to get the very best from your home theater system! ☞ page 59 9 Hookup Connect the speakers and your AV components...
Owner Manual
Page 10
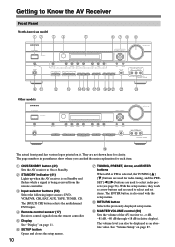
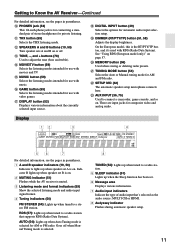
... setup menus. F SETUP button Opens and closes the setup menus. 10 G TUNING, PRESET, Arrow, and ENTER buttons When AM or FM is also used for each item. The [MULTI CH] button selects the multichannel DVD input. Getting to Know the AV Receiver Front Panel North American model 12 3 4... CD SETUP RETURN MOVIE/TV MUSIC GAME LISTENING MODE DISPLAY DIGITAL INPUT DIMMER MEMORY TUNING MODE CLEAR SETUP MIC AUX INPUT VIDEO L AUDIO R AV RECEIVER HT-R960 JK Other models L M NOP QR STU V ON/STANDBY STANDBY TUNING PRESET ENTER W MASTER VOLUME THX PHONES MULTI CH A SPEAKERS B DVD ...
... setup menus. F SETUP button Opens and closes the setup menus. 10 G TUNING, PRESET, Arrow, and ENTER buttons When AM or FM is also used for each item. The [MULTI CH] button selects the multichannel DVD input. Getting to Know the AV Receiver Front Panel North American model 12 3 4... CD SETUP RETURN MOVIE/TV MUSIC GAME LISTENING MODE DISPLAY DIGITAL INPUT DIMMER MEMORY TUNING MODE CLEAR SETUP MIC AUX INPUT VIDEO L AUDIO R AV RECEIVER HT-R960 JK Other models L M NOP QR STU V ON/STANDBY STANDBY TUNING PRESET ENTER W MASTER VOLUME THX PHONES MULTI CH A SPEAKERS B DVD ...
Owner Manual
Page 11
... modes intended for private listening. S DIMMER (RT/PTY/TP) button (51, 58) Adjusts the display brightness. T MEMORY button (56) Used when storing or deleting radio presets. U TUNING MODE button (54) Selects the Auto or Manual tuning mode for automatic audio input selection setup... and analog audio. Q DISPLAY button (52) Displays various information about the currently selected input source. M TONE, -, and + buttons (78) Used to a radio station that 's selected as the audio source: MULTI CH or HDMI. 8 Audyssey indicator Flashes during automatic speaker setup. 11 L ...
... modes intended for private listening. S DIMMER (RT/PTY/TP) button (51, 58) Adjusts the display brightness. T MEMORY button (56) Used when storing or deleting radio presets. U TUNING MODE button (54) Selects the Auto or Manual tuning mode for automatic audio input selection setup... and analog audio. Q DISPLAY button (52) Displays various information about the currently selected input source. M TONE, -, and + buttons (78) Used to a radio station that 's selected as the audio source: MULTI CH or HDMI. 8 Audyssey indicator Flashes during automatic speaker setup. 11 L ...

Owner Manual
Page 12
...an AM antenna. L CBL/SAT IN A cable or satellite receiver can assign each one to an input selector to a video input on another -capable Onkyo component for connecting a TV or projector with an optical digital audio output, such as a CD player or DVD player. Getting to Know the AV ... for connecting components with a component video input. They're assignable, which means you can be con- See "HDMI Input Setup" on page 47. To use , you can assign each one to an input selector to the jack on your setup. See "Digital Input Setup" on page 46. D COMPONENT VIDEO...
...an AM antenna. L CBL/SAT IN A cable or satellite receiver can assign each one to an input selector to a video input on another -capable Onkyo component for connecting a TV or projector with an optical digital audio output, such as a CD player or DVD player. Getting to Know the AV ... for connecting components with a component video input. They're assignable, which means you can be con- See "HDMI Input Setup" on page 47. To use , you can assign each one to an input selector to the jack on your setup. See "Digital Input Setup" on page 46. D COMPONENT VIDEO...

Owner Manual
Page 14
...SKB-960 1 2 SKC-960C 12 For further information, see the pages in parentheses. 1 Keyhole slots (20) These keyhole slots can be used to the same-colored positive speaker terminal. 14 ■ Attaching and detaching the speaker grilles The front, center, and surround speakers have detachable ... Speaker Package Front, Center, Surround, and Surround Back Speakers (SKF-960F, SKC-960C, SKM-960S, SKB-960) ■ Rear SKF-960F 1 Using the Cork Spacers for easy identification. See page 20 for mounting instructions. 2 Speaker terminals (21) These terminals are color-coded for a ...
...SKB-960 1 2 SKC-960C 12 For further information, see the pages in parentheses. 1 Keyhole slots (20) These keyhole slots can be used to the same-colored positive speaker terminal. 14 ■ Attaching and detaching the speaker grilles The front, center, and surround speakers have detachable ... Speaker Package Front, Center, Surround, and Surround Back Speakers (SKF-960F, SKC-960C, SKM-960S, SKB-960) ■ Rear SKF-960F 1 Using the Cork Spacers for easy identification. See page 20 for mounting instructions. 2 Speaker terminals (21) These terminals are color-coded for a ...
Owner Manual
Page 16
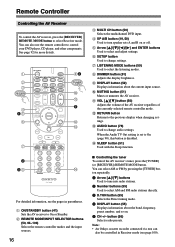
... the AV receiver. button (56) Selects radio presets. See page 92 for more details. D SP A/B button (19, 50) Used to change audio settings. Note: • An Onkyo cassette recorder connected via can also use the remote controller to change settings. Remote Controller Controlling the AV Receiver To control the AV receiver, press the...
... the AV receiver. button (56) Selects radio presets. See page 92 for more details. D SP A/B button (19, 50) Used to change audio settings. Note: • An Onkyo cassette recorder connected via can also use the remote controller to change settings. Remote Controller Controlling the AV Receiver To control the AV receiver, press the...
Owner Manual
Page 17
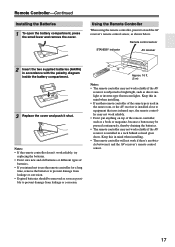
..., try replacing the batteries. • Don't mix new and old batteries or different types of batteries. • If you intend not to use the remote controller for a long time, remove the batteries to prevent damage from leakage or corrosion. • Expired batteries should be removed as ...8226; The remote controller will not work if there's an obstacle between it shut. Keep this in a rack behind colored glass doors. Using the Remote Controller When using the remote controller, point it toward the AV receiver's remote control sensor, as a book or magazine, because a button may be pressed ...
..., try replacing the batteries. • Don't mix new and old batteries or different types of batteries. • If you intend not to use the remote controller for a long time, remove the batteries to prevent damage from leakage or corrosion. • Expired batteries should be removed as ...8226; The remote controller will not work if there's an obstacle between it shut. Keep this in a rack behind colored glass doors. Using the Remote Controller When using the remote controller, point it toward the AV receiver's remote control sensor, as a book or magazine, because a button may be pressed ...

Owner Manual
Page 18
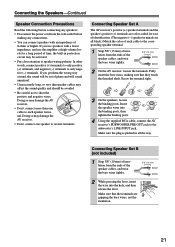
You can enjoy Dolby Pro Logic IIx, DTS Neo:6, or Onkyo's original DSP listening modes. Angle them at the sides of the ... right speakers. Speaker Set A: Main Room Surround left and right speakers (SKM-960S) These speakers are used mainly for precise sound positioning and to add realistic ambience. With analog or digital TV, you can enjoy... DVDs featuring Dolby Digital or DTS. Position it 's used for dialog. Position them inward. Connecting the Speakers Enjoying Home Theater Thanks to the AV receiver's superb capabilities...
You can enjoy Dolby Pro Logic IIx, DTS Neo:6, or Onkyo's original DSP listening modes. Angle them at the sides of the ... right speakers. Speaker Set A: Main Room Surround left and right speakers (SKM-960S) These speakers are used mainly for precise sound positioning and to add realistic ambience. With analog or digital TV, you can enjoy... DVDs featuring Dolby Digital or DTS. Position it 's used for dialog. Position them inward. Connecting the Speakers Enjoying Home Theater Thanks to the AV receiver's superb capabilities...
Owner Manual
Page 19
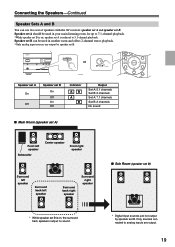
...sources connected to analog inputs are not output by speaker set B. Connecting the Speakers-Continued Speaker Sets A and B You can be used in your main listening room for up to 5.1-channel playback. ON/STANDBY STANDBY A SPEAKETRUNSING BPRESET ENTER THX PHONES MULTI CH A SPEAKERS ... MUSIC GAME LISTENING MODE DISPLAY DIGITAL INPUT RT/PTY/TP MEMORY TUNING MODE CLEAR SETUP MIC MASTER VOLUME or AUX INPUT VIDEO L AUDIO R AV RECEIVER HT-R960 Speaker set A On Off Speaker set B On Off On Off Indicator AB A B Output Set A: 5.1 channels Set B: 2 channels Set A: 7.1 channels Set...
...sources connected to analog inputs are not output by speaker set B. Connecting the Speakers-Continued Speaker Sets A and B You can be used in your main listening room for up to 5.1-channel playback. ON/STANDBY STANDBY A SPEAKETRUNSING BPRESET ENTER THX PHONES MULTI CH A SPEAKERS ... MUSIC GAME LISTENING MODE DISPLAY DIGITAL INPUT RT/PTY/TP MEMORY TUNING MODE CLEAR SETUP MIC MASTER VOLUME or AUX INPUT VIDEO L AUDIO R AV RECEIVER HT-R960 Speaker set A On Off Speaker set B On Off On Off Indicator AB A B Output Set A: 5.1 channels Set B: 2 channels Set A: 7.1 channels Set...
Owner Manual
Page 20
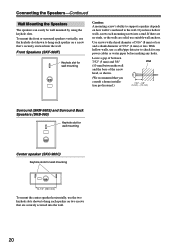
... hang each speaker on how well it's anchored to hang each mounting screw into the wall. 20 To mount the front or surround speakers vertically, use the two keyhole slots shown to the wall. If you consult a home installation professional.) 7/32" - 3/8" (5 mm) - (10 mm) Surround (SKM-960S) ... head, as shown. (We recommend that you have hollow walls, screw each speaker on two screws that 's securely screwed into the wall. With hollow walls, use suitable wall anchors. Leave a gap of between 7/32" (5 mm) and 3/8" Wall (10 mm) between the wall and the base of 5/32" (4 mm)...
... hang each speaker on how well it's anchored to hang each mounting screw into the wall. 20 To mount the front or surround speakers vertically, use the two keyhole slots shown to the wall. If you consult a home installation professional.) 7/32" - 3/8" (5 mm) - (10 mm) Surround (SKM-960S) ... head, as shown. (We recommend that you have hollow walls, screw each speaker on two screws that 's securely screwed into the wall. With hollow walls, use suitable wall anchors. Leave a gap of between 7/32" (5 mm) and 3/8" Wall (10 mm) between the wall and the base of 5/32" (4 mm)...
Owner Manual
Page 21
... Strip 5/8" (15 mm) of insulation from the wall outlet before connecting any connections. • You can connect speakers with a lower impedance, and use the amplifier at high volume levels for ease of identification. (The negative (-) speaker terminals are gripping the bare wires, not the...bare wires tightly. 3/8" (10 mm) 2 While pressing the lever, insert the wire into the binding posts, then tighten the binding posts. 4 Using the supplied RCA cable, connect the AV receiver's SUBWOOFER PRE OUT jack to the subwoofer's LINE INPUT jack. Doing so may damage the AV receiver...
... Strip 5/8" (15 mm) of insulation from the wall outlet before connecting any connections. • You can connect speakers with a lower impedance, and use the amplifier at high volume levels for ease of identification. (The negative (-) speaker terminals are gripping the bare wires, not the...bare wires tightly. 3/8" (10 mm) 2 While pressing the lever, insert the wire into the binding posts, then tighten the binding posts. 4 Using the supplied RCA cable, connect the AV receiver's SUBWOOFER PRE OUT jack to the subwoofer's LINE INPUT jack. Doing so may damage the AV receiver...
Owner Manual
Page 22
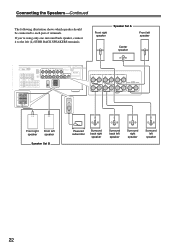
... (L) SURR BACK SPEAKERS terminals. Connecting the Speakers-Continued The following illustration shows which speaker should be connected to the left speaker 22 If you're using only one surround back speaker, connect it to each pair of terminals.
... (L) SURR BACK SPEAKERS terminals. Connecting the Speakers-Continued The following illustration shows which speaker should be connected to the left speaker 22 If you're using only one surround back speaker, connect it to each pair of terminals.

Owner Manual
Page 23
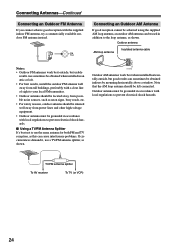
... sensitive, so they can be connected either way around). FM antenna jack Connecting the Indoor FM Antenna The supplied indoor FM antenna is for indoor use only. 1 Assemble the AM loop antenna, inserting the tabs into the jack. Thumbtacks, etc. The AV receiver won't pick up any radio signals... base, as shown. AM antenna push terminals AM ANTENNA FM 75 Connecting the AM Loop Antenna The supplied indoor AM loop antenna is for indoor use only. 1 Attach the FM antenna, as shown. ■ American Model 2 Connect both wires of the AM antenna to connect commercially available outdoor ...
... sensitive, so they can be connected either way around). FM antenna jack Connecting the Indoor FM Antenna The supplied indoor FM antenna is for indoor use only. 1 Assemble the AM loop antenna, inserting the tabs into the jack. Thumbtacks, etc. The AV receiver won't pick up any radio signals... base, as shown. AM antenna push terminals AM ANTENNA FM 75 Connecting the AM Loop Antenna The supplied indoor AM loop antenna is for indoor use only. 1 Attach the FM antenna, as shown. ■ American Model 2 Connect both wires of the AM antenna to connect commercially available outdoor ...
Owner Manual
Page 24
...Note that the AM loop antenna should be situated well away from power lines and other high-voltage equipment. • Outdoor antenna must be used in accordance with the supplied indoor FM antenna, try a commercially available outdoor FM antenna instead. TV/FM antenna splitter To AV receiver To...antenna Insulated antenna cable AM ANTENNA Outdoor AM antennas work best outside , but usable results can cause interference problems. If circumstances demand it, use the same antenna for both FM and TV reception, as this can sometimes be obtained when installed in an attic or loft. •...
...Note that the AM loop antenna should be situated well away from power lines and other high-voltage equipment. • Outdoor antenna must be used in accordance with the supplied indoor FM antenna, try a commercially available outdoor FM antenna instead. TV/FM antenna splitter To AV receiver To...antenna Insulated antenna cable AM ANTENNA Outdoor AM antennas work best outside , but usable results can cause interference problems. If circumstances demand it, use the same antenna for both FM and TV reception, as this can sometimes be obtained when installed in an attic or loft. •...

