
Owner Manual
Page 2
...for purchasing the Onkyo C-707CHX Compact Disc Changer. CAUTION: TO REDUCE THE RISK OF ELECTRIC SHOCK, DO NOT REMOVE COVER (OR BACK). The exclamation point within the product's enclosure that may be of sufficient magnitude to constitute a risk of electric shock to the presence of CD-singles •...is intended to alert the user to persons. Thank you to obtain the optimum performance and listening enjoyment from your new Compact Disc Changer. Please retain this manual for purchasing ... Following the instructions in this manual thoroughly before making connections and plugging in the unit....
...for purchasing the Onkyo C-707CHX Compact Disc Changer. CAUTION: TO REDUCE THE RISK OF ELECTRIC SHOCK, DO NOT REMOVE COVER (OR BACK). The exclamation point within the product's enclosure that may be of sufficient magnitude to constitute a risk of electric shock to the presence of CD-singles •...is intended to alert the user to persons. Thank you to obtain the optimum performance and listening enjoyment from your new Compact Disc Changer. Please retain this manual for purchasing ... Following the instructions in this manual thoroughly before making connections and plugging in the unit....
Owner Manual
Page 8
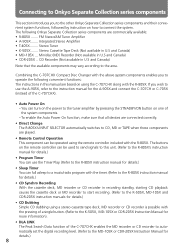
... manual for details.) 8 Combining the C-707CHX Compact Disc Changer with the above system components enables you to operate the following Onkyo Separate Collection series components are based on using a stereo cassette tape deck, MD recorder or CD recorder is possible with the R-805X. Connecting to Onkyo Separate Collection series components This section introduces you to...
... manual for details.) 8 Combining the C-707CHX Compact Disc Changer with the above system components enables you to operate the following Onkyo Separate Collection series components are based on using a stereo cassette tape deck, MD recorder or CD recorder is possible with the R-805X. Connecting to Onkyo Separate Collection series components This section introduces you to...
Owner Manual
Page 12
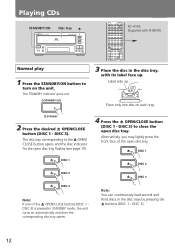
...the open disc tray flashes (see page 15). 4 Press the OPEN/CLOSE button (DISC 1 - Playing CDs STANDBY/ON Disc tray COMPACT CD CHANGER STANDBY / ON DISC MODE STANDBY DISPLAY 3 DISC CHANGER DUAL OPTICAL OUTPUT DISC 1 DISC 2 DISC 3 DISC C-707CHX Normal play 1 Press the STANDBY/ON button... unit. STANDBY / ON G.EQUALIZER POWER CLOCK SLEEP EFFECT MODE TUNER PRESET FM AM INPUT TAPE DVD PAUSE/STEP MD REPEAT SCROLL PLAY MODE CLEAR REC CD REPEAT RANDOM MEMORY CLEAR DISC CDR REPEAT PLAY MODE TONE CLEAR REC TIMER 1 2 3 MUTING 4 5 6 UP/DOWN 7 ENTER - - / - - - 8 9 VOLUME...
...the open disc tray flashes (see page 15). 4 Press the OPEN/CLOSE button (DISC 1 - Playing CDs STANDBY/ON Disc tray COMPACT CD CHANGER STANDBY / ON DISC MODE STANDBY DISPLAY 3 DISC CHANGER DUAL OPTICAL OUTPUT DISC 1 DISC 2 DISC 3 DISC C-707CHX Normal play 1 Press the STANDBY/ON button... unit. STANDBY / ON G.EQUALIZER POWER CLOCK SLEEP EFFECT MODE TUNER PRESET FM AM INPUT TAPE DVD PAUSE/STEP MD REPEAT SCROLL PLAY MODE CLEAR REC CD REPEAT RANDOM MEMORY CLEAR DISC CDR REPEAT PLAY MODE TONE CLEAR REC TIMER 1 2 3 MUTING 4 5 6 UP/DOWN 7 ENTER - - / - - - 8 9 VOLUME...
Owner Manual
Page 13
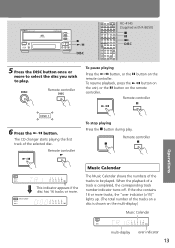
Before Using COMPACT CD CHANGER STANDBY / ON DISC MODE STANDBY DISPLAY 3 DISC CHANGER DUAL OPTICAL OUTPUT DISC 1 DISC 2 DISC 3 DISC C-707CHX DISC G.EQUALIZER POWER CLOCK SLEEP EFFECT MODE TUNER PRESET FM AM INPUT TAPE DVD PAUSE/STEP MD REPEAT SCROLL PLAY MODE CLEAR REC CD REPEAT RANDOM MEMORY CLEAR DISC CDR REPEAT PLAY MODE TONE... 11 12 13 14 15 15 This indicator appears if the disc has 16 tracks or more tracks, the "over indicator 13 Other Information The CD changer starts playing the first track of the tracks to play .
Before Using COMPACT CD CHANGER STANDBY / ON DISC MODE STANDBY DISPLAY 3 DISC CHANGER DUAL OPTICAL OUTPUT DISC 1 DISC 2 DISC 3 DISC C-707CHX DISC G.EQUALIZER POWER CLOCK SLEEP EFFECT MODE TUNER PRESET FM AM INPUT TAPE DVD PAUSE/STEP MD REPEAT SCROLL PLAY MODE CLEAR REC CD REPEAT RANDOM MEMORY CLEAR DISC CDR REPEAT PLAY MODE TONE... 11 12 13 14 15 15 This indicator appears if the disc has 16 tracks or more tracks, the "over indicator 13 Other Information The CD changer starts playing the first track of the tracks to play .
Owner Manual
Page 14
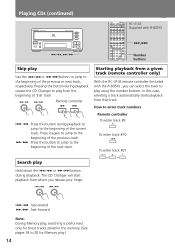
... Hold down the or button during playback to jump to the beginning of the next track. Pressing the button during playback causes the CD Changer to play from where you can select the track to the beginning of the previous or next track, respectively. In this button to... the number buttons. Starting playback from that track Remote controller : Press this button during playback. Playing CDs (continued) COMPACT CD CHANGER STANDBY / ON DISC MODE STANDBY DISPLAY 3 DISC CHANGER DUAL OPTICAL OUTPUT DISC 1 DISC 2 DISC 3 DISC C-707CHX , G.EQUALIZER POWER CLOCK SLEEP EFFECT...
... Hold down the or button during playback to jump to the beginning of the next track. Pressing the button during playback causes the CD Changer to play from where you can select the track to the beginning of the previous or next track, respectively. In this button to... the number buttons. Starting playback from that track Remote controller : Press this button during playback. Playing CDs (continued) COMPACT CD CHANGER STANDBY / ON DISC MODE STANDBY DISPLAY 3 DISC CHANGER DUAL OPTICAL OUTPUT DISC 1 DISC 2 DISC 3 DISC C-707CHX , G.EQUALIZER POWER CLOCK SLEEP EFFECT...

Owner Manual
Page 15
...backward internally. IMPORTANT! Off: No disc is loaded in the disc tray. On: A disc is loaded in the disc tray. Notes: • This CD Changer has three disc trays that disc opens. Connections Operations Changing the discs during playback DISC 1 DISC 2 DISC 1 DISC 2 DISC 3 DISC 3 The ...disc indicator for another disc tray. Note: The disc indicator stays lit until the presence/ absence detection is especially important when removing a CD-single. Replace the disc in the disc tray below. Before Using Understanding the meaning of the buttons will cause the all the trays...
...backward internally. IMPORTANT! Off: No disc is loaded in the disc tray. On: A disc is loaded in the disc tray. Notes: • This CD Changer has three disc trays that disc opens. Connections Operations Changing the discs during playback DISC 1 DISC 2 DISC 1 DISC 2 DISC 3 DISC 3 The ...disc indicator for another disc tray. Note: The disc indicator stays lit until the presence/ absence detection is especially important when removing a CD-single. Replace the disc in the disc tray below. Before Using Understanding the meaning of the buttons will cause the all the trays...
Owner Manual
Page 16
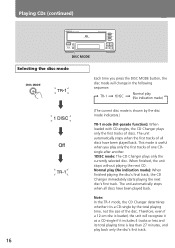
... TR-1 Each time you play only the first tracks of one CDsingle after another. 1DISC mode: The CD Changer plays only the currently selected disc. Note: In the TR-1 mode, the CD Changer determines whether it includes 4 tracks or less and its total playing time is shown by the total playing... back only the disc's first track. 16 Therefore, even if a 12-cm disc is a CD-single by the disc mode indicators.) TR-1 mode (hit-parade function): When loaded with CD-singles, the CD Changer plays only the first tracks of all discs have been played back. The unit automatically stops when...
... TR-1 Each time you play only the first tracks of one CDsingle after another. 1DISC mode: The CD Changer plays only the currently selected disc. Note: In the TR-1 mode, the CD Changer determines whether it includes 4 tracks or less and its total playing time is shown by the total playing... back only the disc's first track. 16 Therefore, even if a 12-cm disc is a CD-single by the disc mode indicators.) TR-1 mode (hit-parade function): When loaded with CD-singles, the CD Changer plays only the first tracks of all discs have been played back. The unit automatically stops when...
Owner Manual
Page 17
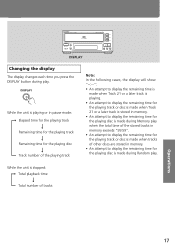
...". • An attempt to display the remaining time for the playing track or disc is made during play . Before Using Connections COMPACT CD CHANGER STANDBY / ON DISC MODE STANDBY DISPLAY 3 DISC CHANGER DISPLAY DUAL OPTICAL OUTPUT DISC 1 DISC 2 DISC 3 DISC C-707CHX Changing the display The display changes each time you press the DISPLAY...
...". • An attempt to display the remaining time for the playing track or disc is made during play . Before Using Connections COMPACT CD CHANGER STANDBY / ON DISC MODE STANDBY DISPLAY 3 DISC CHANGER DISPLAY DUAL OPTICAL OUTPUT DISC 1 DISC 2 DISC 3 DISC C-707CHX Changing the display The display changes each time you press the DISPLAY...
Owner Manual
Page 18
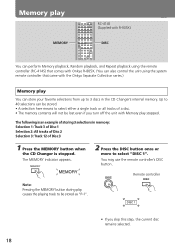
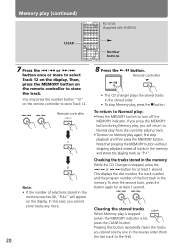
...off the unit with the Onkyo Separate Collection series.) Memory play You can store your favorite selections from up to 3 discs in memory: Selection 1: Track 3 of Disc 1 Selection 2: All tracks of Disc 2 Selection 3: Track 12 of Disc 3 1 Press the MEMORY button when the CD Changer is stopped. MEMORY MEMORY ...can perform Memory playback, Random playback, and Repeat playback using the remote controller (RC-414S) that comes with Onkyo R-805X. (You can also control the unit using the system remote controller that came with Memory play stopped. Up to 40 selections can be lost even if you skip...
...off the unit with the Onkyo Separate Collection series.) Memory play You can store your favorite selections from up to 3 discs in memory: Selection 1: Track 3 of Disc 1 Selection 2: All tracks of Disc 2 Selection 3: Track 12 of Disc 3 1 Press the MEMORY button when the CD Changer is stopped. MEMORY MEMORY ...can perform Memory playback, Random playback, and Repeat playback using the remote controller (RC-414S) that comes with Onkyo R-805X. (You can also control the unit using the system remote controller that came with Memory play stopped. Up to 40 selections can be lost even if you skip...
Owner Manual
Page 20
Remote controller --/--- 1 2 Note: • If the number of the first track in the memory While the CD Changer is lit), press the CLEAR button. To return to Normal play (continued) CLEAR G.EQUALIZER POWER CLOCK SLEEP EFFECT MODE TUNER PRESET FM AM INPUT ... to store Track 12. Clearing the stored tracks CLEAR When Memory play again, first stop Memory play, press the button. Remote controller • The CD changer plays the stored tracks in the reverse order (from the currently playing track. • To return to Memory play is stopped (when the MEMORY indicator...
Remote controller --/--- 1 2 Note: • If the number of the first track in the memory While the CD Changer is lit), press the CLEAR button. To return to Normal play (continued) CLEAR G.EQUALIZER POWER CLOCK SLEEP EFFECT MODE TUNER PRESET FM AM INPUT ... to store Track 12. Clearing the stored tracks CLEAR When Memory play again, first stop Memory play, press the button. Remote controller • The CD changer plays the stored tracks in the reverse order (from the currently playing track. • To return to Memory play is stopped (when the MEMORY indicator...
Owner Manual
Page 21
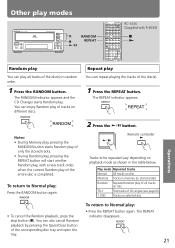
...CD CHANGER STANDBY / ON DISC MODE STANDBY DISPLAY 3 DISC CHANGER DUAL OPTICAL OUTPUT DISC 1 DISC 2 DISC 3 DISC C-707CHX RANDOM REPEAT G.EQUALIZER POWER CLOCK SLEEP EFFECT MODE TUNER PRESET FM AM INPUT TAPE DVD PAUSE/STEP MD REPEAT SCROLL PLAY MODE CLEAR REC CD... on disc Memory Tracks in memory (in stored order) Random Repeats Random play of all tracks of CD-singles (see page16) 1 DISC Tracks on selected disc To return to be repeated vary depending on ...open the tray. The RANDOM indicator appears and the CD Changer starts Random play : Press the RANDOM button again.
...CD CHANGER STANDBY / ON DISC MODE STANDBY DISPLAY 3 DISC CHANGER DUAL OPTICAL OUTPUT DISC 1 DISC 2 DISC 3 DISC C-707CHX RANDOM REPEAT G.EQUALIZER POWER CLOCK SLEEP EFFECT MODE TUNER PRESET FM AM INPUT TAPE DVD PAUSE/STEP MD REPEAT SCROLL PLAY MODE CLEAR REC CD... on disc Memory Tracks in memory (in stored order) Random Repeats Random play of all tracks of CD-singles (see page16) 1 DISC Tracks on selected disc To return to be repeated vary depending on ...open the tray. The RANDOM indicator appears and the CD Changer starts Random play : Press the RANDOM button again.
Owner Manual
Page 22
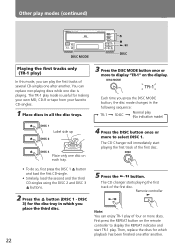
...is playing. DISC 3) for which you place the third disc. 22 5 Press the button. Other play modes (continued) COMPACT CD CHANGER STANDBY / ON DISC MODE STANDBY DISPLAY 3 DISC CHANGER DISC MODE DUAL OPTICAL OUTPUT DISC 1 DISC 2 DISC 3 DISC C-707CHX DISC Playing the first tracks only (TR-1 play)...four or more to display "TR-1" on the remote controller to select DISC 1. The CD changer starts playing the first track of the first disc. First press the REPEAT button on the display. The CD Changer will immediately start TR-1 play (No indication made) DISC 1 Label side up DISC ...
...is playing. DISC 3) for which you place the third disc. 22 5 Press the button. Other play modes (continued) COMPACT CD CHANGER STANDBY / ON DISC MODE STANDBY DISPLAY 3 DISC CHANGER DISC MODE DUAL OPTICAL OUTPUT DISC 1 DISC 2 DISC 3 DISC C-707CHX DISC Playing the first tracks only (TR-1 play)...four or more to display "TR-1" on the remote controller to select DISC 1. The CD changer starts playing the first track of the first disc. First press the REPEAT button on the display. The CD Changer will immediately start TR-1 play (No indication made) DISC 1 Label side up DISC ...
Owner Manual
Page 23
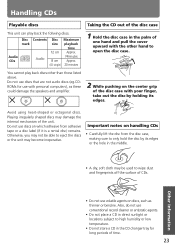
... may damage the internal mechanism of the unit. Do not use conventional record cleaner or antistatic agents. • Do not place a CD in the CD changer tray for long periods of time. 23 You cannot play back the follwing discs. Connections Operations Other Information • Do not use ...with personal computers), as thinner or benzine. Before Using Handling CDs Playable discs Taking the CD out of the disc case This unit can ...
... may damage the internal mechanism of the unit. Do not use conventional record cleaner or antistatic agents. • Do not place a CD in the CD changer tray for long periods of time. 23 You cannot play back the follwing discs. Connections Operations Other Information • Do not use ...with personal computers), as thinner or benzine. Before Using Handling CDs Playable discs Taking the CD out of the disc case This unit can ...
Owner Manual
Page 24
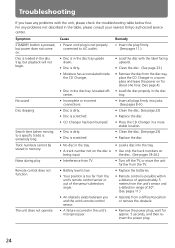
...Onkyo authorized service center. Cause • Power cord plug is not properly connected to a specific track) is pressed, but playback will not begin. For any problems with the label facing upward. • Clean the disc. (See page 23.) • Remove the disc from the disc tray, place the CD Changer... • Insert all plugs firmly into jacks. (See pages 8-9.) • Clean the disc. (See page 23) • Replace the disc. • Place the CD Changer in a more stable location. • Clean the disc. (See page 23) • Replace the disc. • Load a disc into the tray. • ...
...Onkyo authorized service center. Cause • Power cord plug is not properly connected to a specific track) is pressed, but playback will not begin. For any problems with the label facing upward. • Clean the disc. (See page 23.) • Remove the disc from the disc tray, place the CD Changer... • Insert all plugs firmly into jacks. (See pages 8-9.) • Clean the disc. (See page 23) • Replace the disc. • Place the CD Changer in a more stable location. • Clean the disc. (See page 23) • Replace the disc. • Load a disc into the tray. • ...
