Owner Manual
Page 4
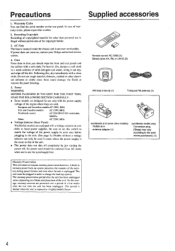
... set this , dry immediately with the power supply voltage of the unit. • The power does not shut off completely by just turning the power off the dirt. Power WARNING BEFORE PLUGGING IN THE UNIT FOR THE FIRST TIME. Supplied accessories Remote control RC-330S (1) Battery...50/60Hz Other: AC 220V, 60Hz • Voltage Selector (Rear Panel) Worldwide models are protected over a period of the power supply in your Onkyo authorized service station. 4. A built-in memory power back-up system. This period is shorter when the unit is not user-serviceable. European and...
... set this , dry immediately with the power supply voltage of the unit. • The power does not shut off completely by just turning the power off the dirt. Power WARNING BEFORE PLUGGING IN THE UNIT FOR THE FIRST TIME. Supplied accessories Remote control RC-330S (1) Battery...50/60Hz Other: AC 220V, 60Hz • Voltage Selector (Rear Panel) Worldwide models are protected over a period of the power supply in your Onkyo authorized service station. 4. A built-in memory power back-up system. This period is shorter when the unit is not user-serviceable. European and...
Owner Manual
Page 6
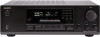
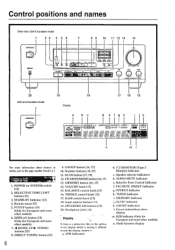
....'ECM 'Mc' ijA1 itigif t Ellaj /7 1717 /7 7 7 ,: t0:17 71 / C0 ii/09 McikHz.1 MHz GROIUP ABC SLEEP il m For more information about buttons or knobs, turn to read the display, remove it. Control positions and names Other than USA & Canadian model 1 23 4 5 6 7 I 8 9 10 11 12 13 14 FF=F4 u u raa•...
....'ECM 'Mc' ijA1 itigif t Ellaj /7 1717 /7 7 7 ,: t0:17 71 / C0 ii/09 McikHz.1 MHz GROIUP ABC SLEEP il m For more information about buttons or knobs, turn to read the display, remove it. Control positions and names Other than USA & Canadian model 1 23 4 5 6 7 I 8 9 10 11 12 13 14 FF=F4 u u raa•...
Owner Manual
Page 9
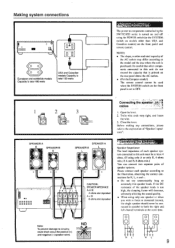
... models Capacity is total 100 watts USA and Canadian models Capacity is total 120 watts , The power to components connected t9 the SWITCHED outlet is turned on and off using the POWER switch (or the SYSTEM switch on models other components connected to this unit must be connected in parallel to...
... models Capacity is total 100 watts USA and Canadian models Capacity is total 120 watts , The power to components connected t9 the SWITCHED outlet is turned on and off using the POWER switch (or the SYSTEM switch on models other components connected to this unit must be connected in parallel to...
Owner Manual
Page 12
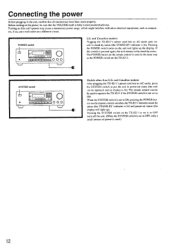
...SYSTEM switch to ON. Before turning on the remote control is used .) 12 SYSTEM switch 9 oesf 01001 CI= 0=0 000 00 1=1===== 0 0 0 Models other electrical equipment, such as the POWER switch on this switch is pressed again, the unit returns to operate the TX-8211 if the SYSTEM switch is ...used in the same way as computers. Connecting the power Before plugging in the unit, confirm that the VOLUME knob is fully turned counterclockwise. Turning on the TX-821I. The remote control cannot be sure ...
...SYSTEM switch to ON. Before turning on the remote control is used .) 12 SYSTEM switch 9 oesf 01001 CI= 0=0 000 00 1=1===== 0 0 0 Models other electrical equipment, such as the POWER switch on this switch is pressed again, the unit returns to operate the TX-8211 if the SYSTEM switch is ...used in the same way as computers. Connecting the power Before plugging in the unit, confirm that the VOLUME knob is fully turned counterclockwise. Turning on the TX-821I. The remote control cannot be sure ...
Owner Manual
Page 13
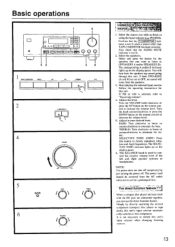
...PHONE/ C D 1 2 A SPEAKERS B L 4 s/CunAE ..... 5 UTZ 6 " :CS O BALANCE O TREBLE O Listening'to using the input selector (e.g. BASS: Turn clockwise to boost or counterclockwise to clearly reproduce ultralow and -high frequencies. you can use for the speakers that the T-2 MONITOR indicator is not necessary...5 2 r r 5 6 _a T_ TAPE•2 MONITOR TAPE-I 1 3 0 . - .. - The BALANCE knob is selected, refer to attenuate the treble. Turn the VOLUME knob clockwise or press the UP button on the display panel. 6. If FM or AM is used to increase the volume level. TREBLE...
...PHONE/ C D 1 2 A SPEAKERS B L 4 s/CunAE ..... 5 UTZ 6 " :CS O BALANCE O TREBLE O Listening'to using the input selector (e.g. BASS: Turn clockwise to boost or counterclockwise to clearly reproduce ultralow and -high frequencies. you can use for the speakers that the T-2 MONITOR indicator is not necessary...5 2 r r 5 6 _a T_ TAPE•2 MONITOR TAPE-I 1 3 0 . - .. - The BALANCE knob is selected, refer to attenuate the treble. Turn the VOLUME knob clockwise or press the UP button on the display panel. 6. If FM or AM is used to increase the volume level. TREBLE...
Owner Manual
Page 14
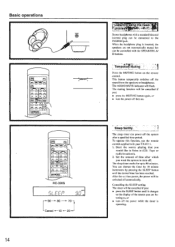
...). 2. When the headphone plug is operating. 14 Set the amount of the source you : • press the MUTING button again, or • turn off then on the remote control. Cancelling the SLEEP setting The tinier will be switched off . The AUDIO MUTE indicator will be cancelled if you...specified time period. You can power off the sound from the speakers or headphones. Basic operations PQM MUTE Ltstening alpgjhe_headphonea401100 Stereo headphones with your TX-8211. 1. This button temporarily switches off the system after which you would like to listen to 90 minutes.
...). 2. When the headphone plug is operating. 14 Set the amount of the source you : • press the MUTING button again, or • turn off then on the remote control. Cancelling the SLEEP setting The tinier will be switched off . The AUDIO MUTE indicator will be cancelled if you...specified time period. You can power off the sound from the speakers or headphones. Basic operations PQM MUTE Ltstening alpgjhe_headphonea401100 Stereo headphones with your TX-8211. 1. This button temporarily switches off the system after which you would like to listen to 90 minutes.
Owner Manual
Page 21
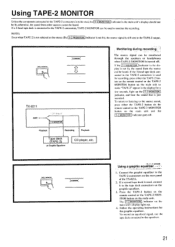
...-2 connectors is used for recording, press either the TAPE-2 button on the remote control or the TAPE-2 MONITOR button on the rear panel of the TX-8211. 2. MISR, Using a-graphic equalizer..-•~ I T-2 MONITOR indicator in the display is still sent to the TAPE-2 output. If a 3-head tape deck ... indicator on the main unit. otherwise, the sound from the source can be monitored through the speakers or headphones when TAPE-2 MONITOR is turned off . Monitoring during recording The source signal can be lit; Press the TAPE-2 button on the remote control or the TAPE-2 MONITOR button...
...-2 connectors is used for recording, press either the TAPE-2 button on the remote control or the TAPE-2 MONITOR button on the rear panel of the TX-8211. 2. MISR, Using a-graphic equalizer..-•~ I T-2 MONITOR indicator in the display is still sent to the TAPE-2 output. If a 3-head tape deck ... indicator on the main unit. otherwise, the sound from the source can be monitored through the speakers or headphones when TAPE-2 MONITOR is turned off . Monitoring during recording The source signal can be lit; Press the TAPE-2 button on the remote control or the TAPE-2 MONITOR button...
Owner Manual
Page 22
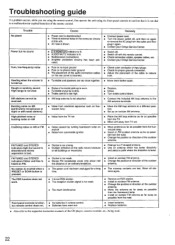
...cable to reduce hum. AM stations cannot be received. • AM loop antenna is too high. • Replace. • Clean. • Turn treble control down. The RDS function does not work. • Station is too strong. • Multiple reflection of the radio waves because of tall...and then on AM (particularly conspicuous at night or with the remote control. • Check connection cables, speaker cables, etc. • Contact your Onkyo Service Center. • Switch off. • Switch off • Noise from automobile ignition • Move antenna as far as possible from the ...
...cable to reduce hum. AM stations cannot be received. • AM loop antenna is too high. • Replace. • Clean. • Turn treble control down. The RDS function does not work. • Station is too strong. • Multiple reflection of the radio waves because of tall...and then on AM (particularly conspicuous at night or with the remote control. • Check connection cables, speaker cables, etc. • Contact your Onkyo Service Center. • Switch off. • Switch off • Noise from automobile ignition • Move antenna as far as possible from the ...


