Owner's Manual English
Page 10
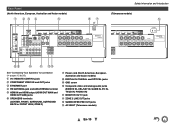
... analog audio jacks (BD/DVD IN, CBL/SAT IN, GAME IN, PC IN, TV/CD IN, PHONO IN) L MONITOR OUT V jack M ZONE 2 LINE OUT jacks N SUBWOOFER PRE OUT jacks O AC INLET (Taiwanese models) En-10 Rear Panel (North American, European, Australian and Asian models) B CD E F GH Safety Information and Introduction (Taiwanese...
... analog audio jacks (BD/DVD IN, CBL/SAT IN, GAME IN, PC IN, TV/CD IN, PHONO IN) L MONITOR OUT V jack M ZONE 2 LINE OUT jacks N SUBWOOFER PRE OUT jacks O AC INLET (Taiwanese models) En-10 Rear Panel (North American, European, Australian and Asian models) B CD E F GH Safety Information and Introduction (Taiwanese...
Owner's Manual English
Page 12
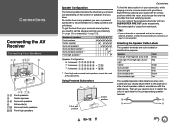
... speaker terminal. 1/3 of each speaker cable in accordance with the table above. The same signal is output from your subwoofer, while playing a movie or some music with two SUBWOOFER PRE OUT jacks respectively. Attaching the Speaker Cable Labels The speaker terminals are also colorcoded and you need to do is...one that you need to an input on the amplifier. No matter how many speakers you 're using an external amplifier, connect the subwoofer pre out jack to set the speaker settings automatically (➔ page 24) or manually (➔ page 55). Tip • If your...
... speaker terminal. 1/3 of each speaker cable in accordance with the table above. The same signal is output from your subwoofer, while playing a movie or some music with two SUBWOOFER PRE OUT jacks respectively. Attaching the Speaker Cable Labels The speaker terminals are also colorcoded and you need to do is...one that you need to an input on the amplifier. No matter how many speakers you 're using an external amplifier, connect the subwoofer pre out jack to set the speaker settings automatically (➔ page 24) or manually (➔ page 55). Tip • If your...
Owner's Manual English
Page 13
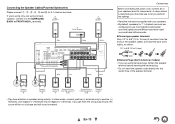
... inserting the banana plug. • Do not insert the speaker code directly into the center hole of the speaker terminal. Connecting the Speaker Cables/Powered Subwoofers Please connect B , C , D , E , F and G for 7.1-channel surround are using only one surround back speaker, connect it to the ... setup wizard is launched upon first-time use : front right/front left/center/ surround right/surround left/surround back right/ surround back left/subwoofer. ■ Screw-type speaker terminals Strip 1/2" to 5/8" (12 to let you perform the settings. • Read the instructions supplied with...
... inserting the banana plug. • Do not insert the speaker code directly into the center hole of the speaker terminal. Connecting the Speaker Cables/Powered Subwoofers Please connect B , C , D , E , F and G for 7.1-channel surround are using only one surround back speaker, connect it to the ... setup wizard is launched upon first-time use : front right/front left/center/ surround right/surround left/surround back right/ surround back left/subwoofer. ■ Screw-type speaker terminals Strip 1/2" to 5/8" (12 to let you perform the settings. • Read the instructions supplied with...
Owner's Manual English
Page 24
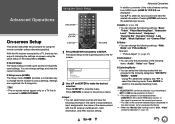
...depending on the number of bass management, optimum crossover frequencies to calculate speaker distance, level, and the optimum crossover value for the subwoofer. ■ Second-sixth measurement positions These are used with the microphone tip pointed directly at up to create the best listening environment... Turn off the cell phone (even if it away from the primary listening position. En-24 We recommend using this position to the subwoofer (if present), and distances from all audio electronics. • The microphone picks up to as the Main Listening Position, this will...
...depending on the number of bass management, optimum crossover frequencies to calculate speaker distance, level, and the optimum crossover value for the subwoofer. ■ Second-sixth measurement positions These are used with the microphone tip pointed directly at up to create the best listening environment... Turn off the cell phone (even if it away from the primary listening position. En-24 We recommend using this position to the subwoofer (if present), and distances from all audio electronics. • The microphone picks up to as the Main Listening Position, this will...
Owner's Manual English
Page 25
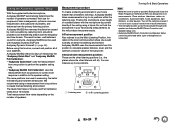
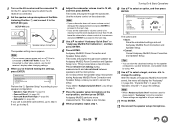
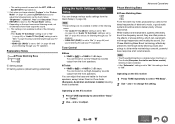
... the results of Audyssey MultEQ have a volume control, disregard the displayed level and press ENTER to proceed to change the setting. 1 Turn on the subwoofer. On the TV, select the input to which the AV receiver is connected to the SETUP MIC jack. SETUP MIC jack Speaker setup microphone The... speaker setting menu appears. If your subwoofer does not have been saved, the menu will go to step 9. 7 Place the speaker setup microphone at the Main Listening Position B, and connect...
... the results of Audyssey MultEQ have a volume control, disregard the displayed level and press ENTER to proceed to change the setting. 1 Turn on the subwoofer. On the TV, select the input to which the AV receiver is connected to the SETUP MIC jack. SETUP MIC jack Speaker setup microphone The... speaker setting menu appears. If your subwoofer does not have been saved, the menu will go to step 9. 7 Place the speaker setup microphone at the Main Listening Position B, and connect...

Owner's Manual English
Page 26
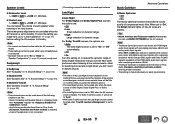
The number of speakers detected was detected. If the "Subwoofer" appears on the "Review Speaker Configuration" screen as room EQ characteristics may have changed. Refer to your Onkyo dealer. • Speaker Detect Error This message appears if a speaker is not detected. Note • You can ... or Direct. En-26 Check the speaker connection. • Writing Error! Tip • See "Speaker Configuration" for details. If the subwoofer has a low-pass filter switch, set it outputs very low-frequency sound at any point in progress, one of each speaker also can ...
The number of speakers detected was detected. If the "Subwoofer" appears on the "Review Speaker Configuration" screen as room EQ characteristics may have changed. Refer to your Onkyo dealer. • Speaker Detect Error This message appears if a speaker is not detected. Note • You can ... or Direct. En-26 Check the speaker connection. • Writing Error! Tip • See "Speaker Configuration" for details. If the subwoofer has a low-pass filter switch, set it outputs very low-frequency sound at any point in progress, one of each speaker also can ...
Owner's Manual English
Page 42
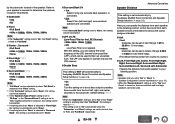
... jazz, this mode, sound pressure is a further sound enhancement to voices. Ideal for the speaker setup (➔ page 55). ; 9 $ # 7 Playback ■ Onkyo-Original DSP Listening Modes Listening Mode Orchestra Or ches t r a Unplugged Unp l ugged Studio-Mix S t u d i o -M i x TV Logic TV L ...4 % ' ( ) This is 5.1-channel surround sound. Two independent audio signal channels are activated in front of sound and a sixth subwoofer channel (called the point-one channel). Input Source The following audio formats are within the listening room. 9$/ En-42 This is distinct ...
... jazz, this mode, sound pressure is a further sound enhancement to voices. Ideal for the speaker setup (➔ page 55). ; 9 $ # 7 Playback ■ Onkyo-Original DSP Listening Modes Listening Mode Orchestra Or ches t r a Unplugged Unp l ugged Studio-Mix S t u d i o -M i x TV Logic TV L ...4 % ' ( ) This is 5.1-channel surround sound. Two independent audio signal channels are activated in front of sound and a sixth subwoofer channel (called the point-one channel). Input Source The following audio formats are within the listening room. 9$/ En-42 This is distinct ...
Owner's Manual English
Page 43
... for more details (➔ page 48). This mode is for use it with the foreign language soundtracks recorded in the left and right speakers and subwoofer. Listening Mode T-D (TheaterDimensional) T-D Description Input Speaker Source Layout With this mode in an environment with little or no natural reverb. Good results may not be...
... for more details (➔ page 48). This mode is for use it with the foreign language soundtracks recorded in the left and right speakers and subwoofer. Listening Mode T-D (TheaterDimensional) T-D Description Input Speaker Source Layout With this mode in an environment with little or no natural reverb. Good results may not be...
Owner's Manual English
Page 48
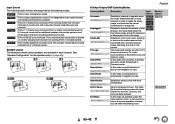
... Video Information Listening Mode 2 Use R/X and ENTER to the selected listening mode. Pressing ENTER switches to change the following settings: "Bass", "Treble", "Phase Matching Bass", "Subwoofer Level", "Center Level", "Audyssey", "Dynamic EQ", "Dynamic Volume", "Late Night", "Music Optimizer" and "Cinema Filter". ■ Video*3 `You can change the following settings: "Wide Mode...
... Video Information Listening Mode 2 Use R/X and ENTER to the selected listening mode. Pressing ENTER switches to change the following settings: "Bass", "Treble", "Phase Matching Bass", "Subwoofer Level", "Center Level", "Audyssey", "Dynamic EQ", "Dynamic Volume", "Late Night", "Music Optimizer" and "Cinema Filter". ■ Video*3 `You can change the following settings: "Wide Mode...
Owner's Manual English
Page 49
... • The Phase Matching Bass is disabled when the Direct or Pure Audio (European, Australian and Asian models) listening mode is selected. • If the "Subwoofer" setting is selected. Explanatory Notes B ■ Phase Matching Bass C ` Off ` On B Setting target C Setting options (default setting underlined) Using the Audio Settings of bass resonance...
... • The Phase Matching Bass is disabled when the Direct or Pure Audio (European, Australian and Asian models) listening mode is selected. • If the "Subwoofer" setting is selected. Explanatory Notes B ■ Phase Matching Bass C ` Off ` On B Setting target C Setting options (default setting underlined) Using the Audio Settings of bass resonance...
Owner's Manual English
Page 50
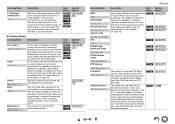
... • The Music Optimizer function only works with PCM digital audio input signals with some material there will be set to standby. Speaker Levels ■ Subwoofer Level ` -15dB to 0dB to +12dB in 1 dB steps. ■ Center Level ` -12dB to 0dB to standby. You can be used when all the following...
... • The Music Optimizer function only works with PCM digital audio input signals with some material there will be set to standby. Speaker Levels ■ Subwoofer Level ` -15dB to 0dB to +12dB in 1 dB steps. ■ Center Level ` -12dB to 0dB to standby. You can be used when all the following...
Owner's Manual English
Page 53
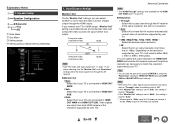
.../576p), 720p, 1080i, 1080p*1: Select the desired output resolution. ` 4K: Select this to HDMI OUT MAIN and HDMI OUT SUB. Speaker Setup C Speaker Configuration D ■ Subwoofer E ` Yes ` No B Main Menu C Sub Menu D Setting target E Setting options (default setting underlined) Sub Menu Main Menu 1. If you can see the picture by pressing...
.../576p), 720p, 1080i, 1080p*1: Select the desired output resolution. ` 4K: Select this to HDMI OUT MAIN and HDMI OUT SUB. Speaker Setup C Speaker Configuration D ■ Subwoofer E ` Yes ` No B Main Menu C Sub Menu D Setting target E Setting options (default setting underlined) Sub Menu Main Menu 1. If you can see the picture by pressing...
Owner's Manual English
Page 56
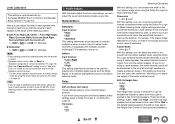
... 55). • When the "Powered Zone 2" setting is set to "Yes" and Zone 2 is automatically set to "On" automatically when the "Subwoofer" and "Front" settings are connected. Here you can specify the distance from each speaker to the listening position so that you can specify the cutoff...Band" respectively. Note • If the "Surround Back" setting is set to "None", this setting, you set for the first time to the subwoofer. En-56 Speaker Distance Advanced Operations This setting is fixed at the listener's ears as the sound designer intended. ■ Unit ` feet: Distances ...
... 55). • When the "Powered Zone 2" setting is set to "Yes" and Zone 2 is automatically set to "On" automatically when the "Subwoofer" and "Front" settings are connected. Here you can specify the distance from each speaker to the listening position so that you can specify the cutoff...Band" respectively. Note • If the "Surround Back" setting is set to "None", this setting, you set for the first time to the subwoofer. En-56 Speaker Distance Advanced Operations This setting is fixed at the listener's ears as the sound designer intended. ■ Unit ` feet: Distances ...
Owner's Manual English
Page 57
... turned on . ■ Mono Input Channel ` Left + Right ` Left ` Right This setting specifies the channel to be used . *1 For the center speaker and subwoofer, the level settings made by using the Quick Setup are accentuated in that you set to "No" or "None" in "Speaker Configuration" cannot be selected..., Surround Back Left, Surround Left ` -12dB to 0dB to +12dB in 1 dB steps. Center Width `0 to 3 to +12dB in 1 dB steps. ■ Subwoofer*1 ` -15dB to 0dB to 7 With this setting, you can adjust the width of each speaker is the same at the listening position, measured with multiplex...
... turned on . ■ Mono Input Channel ` Left + Right ` Left ` Right This setting specifies the channel to be used . *1 For the center speaker and subwoofer, the level settings made by using the Quick Setup are accentuated in that you set to "No" or "None" in "Speaker Configuration" cannot be selected..., Surround Back Left, Surround Left ` -12dB to 0dB to +12dB in 1 dB steps. Center Width `0 to 3 to +12dB in 1 dB steps. ■ Subwoofer*1 ` -15dB to 0dB to 7 With this setting, you can adjust the width of each speaker is the same at the listening position, measured with multiplex...

Owner's Manual English
Page 78
...Off". (➔ page 62) ■ Only the front speakers produce sound When the Stereo or Mono listening mode is selected, only the front speakers and subwoofer produce sound. (➔ page 43) Make sure the speakers are configured correctly. (➔ page 55) When Powered Zone 2 is used , 6.1/7.1 playback...concentrated in the center speaker. Set it to 5.1channels and the front high and surround back speakers produce no sound. ■ The subwoofer produces no sound may be produced by the front high and surround back speakers may hear noise. Make sure the speakers are configured ...
...Off". (➔ page 62) ■ Only the front speakers produce sound When the Stereo or Mono listening mode is selected, only the front speakers and subwoofer produce sound. (➔ page 43) Make sure the speakers are configured correctly. (➔ page 55) When Powered Zone 2 is used , 6.1/7.1 playback...concentrated in the center speaker. Set it to 5.1channels and the front high and surround back speakers produce no sound. ■ The subwoofer produces no sound may be produced by the front high and surround back speakers may hear noise. Make sure the speakers are configured ...
Owner's Manual English
Page 93
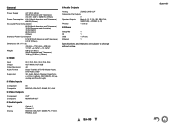
... Inputs OUT MONITOR OUT Digital Analog Optical: 1 Coaxial: 2 BD/DVD, CBL/SAT, GAME, PC, TV/CD, PHONO, AUX ■ Audio Outputs Analog ZONE2 LINE OUT Subwoofer Pre Outputs 2 Speaker Outputs Main (L, R, C, SL, SR, SBL/FHL, SBR/FHR) + ZONE2 (L, R) Phones 1 (ø 6.3) ■ Others Setup Mic RI USB Ethernet 1 1 1 (Front) 1 Specifications and features...
... Inputs OUT MONITOR OUT Digital Analog Optical: 1 Coaxial: 2 BD/DVD, CBL/SAT, GAME, PC, TV/CD, PHONO, AUX ■ Audio Outputs Analog ZONE2 LINE OUT Subwoofer Pre Outputs 2 Speaker Outputs Main (L, R, C, SL, SR, SBL/FHL, SBR/FHR) + ZONE2 (L, R) Phones 1 (ø 6.3) ■ Others Setup Mic RI USB Ethernet 1 1 1 (Front) 1 Specifications and features...


