
Owner's Manual English
Page 1
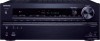
AV RECEIVER TX-NR727 Instruction Manual Contents Safety Information and Introduction 2 Table of Contents 6 Connections 12 Turning On & Basic Operations 21 Playback 29 Advanced Operations 52 Controlling Other Components 76 Appendix 82 Internet Radio Guide Remote Control Codes En
AV RECEIVER TX-NR727 Instruction Manual Contents Safety Information and Introduction 2 Table of Contents 6 Connections 12 Turning On & Basic Operations 21 Playback 29 Advanced Operations 52 Controlling Other Components 76 Appendix 82 Internet Radio Guide Remote Control Codes En

Owner's Manual English
Page 5
.... Specifications and operations are the same regardless of the product name indicates the color. Please retain this manual will enable you for future reference. -Hiermit erklärt Onkyo Corporation, dass sich das Gerät TX-NR727 in the unit. Supplied Accessories Make sure you have the following accessories: Indoor FM antenna (➔ page...
.... Specifications and operations are the same regardless of the product name indicates the color. Please retain this manual will enable you for future reference. -Hiermit erklärt Onkyo Corporation, dass sich das Gerät TX-NR727 in the unit. Supplied Accessories Make sure you have the following accessories: Indoor FM antenna (➔ page...
Owner's Manual English
Page 12
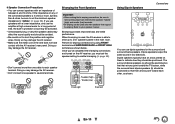
... is unpowered and you're using an external amplifier, connect the subwoofer pre out jack to set the speaker settings automatically (➔ page 24) or manually (➔ page 59). Tip • If your surround sound system, you need to do is to match the color of each label to the positive...
... is unpowered and you're using an external amplifier, connect the subwoofer pre out jack to set the speaker settings automatically (➔ page 24) or manually (➔ page 59). Tip • If your surround sound system, you need to do is to match the color of each label to the positive...
Owner's Manual English
Page 14
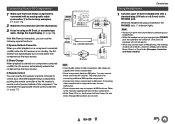
... AV receiver. Bi-amping provides improved bass and treble performance. Doing so may damage the AV receiver. • Don't connect one cable to your speaker manual.
... AV receiver. Bi-amping provides improved bass and treble performance. Doing so may damage the AV receiver. • Don't connect one cable to your speaker manual.

Owner's Manual English
Page 15
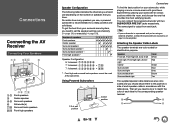
... above-mentioned procedure, set the AV receiver to standby mode. • In the case of your speakers and AV components. If your turntable's manual for details. With some turntables, connecting the ground wire may produce an audible hum. If this jack to make connections using a component video cable...connected to the HDMI OUT SUB jack. *1 ARC is played. # $ %& Input selector , buttons • Before making any AV connections, read the manuals supplied with your AV components. • Push plugs in phono preamp to TV/CD IN, or connect it to PHONO IN. See your turntable (MM...
... above-mentioned procedure, set the AV receiver to standby mode. • In the case of your speakers and AV components. If your turntable's manual for details. With some turntables, connecting the ground wire may produce an audible hum. If this jack to make connections using a component video cable...connected to the HDMI OUT SUB jack. *1 ARC is played. # $ %& Input selector , buttons • Before making any AV connections, read the manuals supplied with your AV components. • Push plugs in phono preamp to TV/CD IN, or connect it to PHONO IN. See your turntable (MM...
Owner's Manual English
Page 20
.... • Some components may not support all V functions. You must enter the appropriate remote control code first (➔ page 77). Refer to the manuals supplied with an analog audio cable (connection * in the hookup examples) (➔ page 15). 2 Make the V connection (see the illustration). 3 ...On When you connect a pair of headphones, the listening mode is on a component connected via V, the AV receiver automatically selects that each Onkyo component is inserted in the PHONES jack, the speakers are turned off .) • When you start playback on a component connected via V,...
.... • Some components may not support all V functions. You must enter the appropriate remote control code first (➔ page 77). Refer to the manuals supplied with an analog audio cable (connection * in the hookup examples) (➔ page 15). 2 Make the V connection (see the illustration). 3 ...On When you connect a pair of headphones, the listening mode is on a component connected via V, the AV receiver automatically selects that each Onkyo component is inserted in the PHONES jack, the speakers are turned off .) • When you start playback on a component connected via V,...

Owner's Manual English
Page 26
... as room EQ characteristics may appear. Try saving again. The setup of the volume level of the first measurement. Refer to your Onkyo dealer. • Speaker Detect Error This message appears if a speaker is in this procedure simply by Audyssey MultEQ Room Correction and ...set it to its highest crossover frequency, and then try again. • Speaker Matching Error! If this happens, THX recommends setting them manually. Tip • See "Speaker Configuration" for details. If this message appears after Audyssey MultEQ Room Correction and Speaker Setup requires you '...
... as room EQ characteristics may appear. Try saving again. The setup of the volume level of the first measurement. Refer to your Onkyo dealer. • Speaker Detect Error This message appears if a speaker is in this procedure simply by Audyssey MultEQ Room Correction and ...set it to its highest crossover frequency, and then try again. • Speaker Matching Error! If this happens, THX recommends setting them manually. Tip • See "Speaker Configuration" for details. If this message appears after Audyssey MultEQ Room Correction and Speaker Setup requires you '...
Owner's Manual English
Page 27
...method to make settings following the instructions on the registration process, please refer to the instruction manual provided with your Access Point is displayed scrolling on screen. Refer to the instruction manual provided with your Access Point device. 7 Press ENTER to confirm. The PIN code is ...menu. Press the WPS button on the type of Access Point device. Tip • How long the WPS button should be done either automatically or manually. An 8-digit PIN code is selected in "Network Connection" in initial setup (➔ page 23). 6 Press R/X to select (North American models...
...method to make settings following the instructions on the registration process, please refer to the instruction manual provided with your Access Point is displayed scrolling on screen. Refer to the instruction manual provided with your Access Point device. 7 Press ENTER to confirm. The PIN code is ...menu. Press the WPS button on the type of Access Point device. Tip • How long the WPS button should be done either automatically or manually. An 8-digit PIN code is selected in "Network Connection" in initial setup (➔ page 23). 6 Press R/X to select (North American models...

Owner's Manual English
Page 28
... "Search Wireless Network" and then press ENTER. Use R/X to select "Default Key ID" and then press ENTER. 2. These settings can be changed manually. After the connection to input any secret key. Use R/X to choose an ID between 1 and 4, and then press ENTER. 3. This completes the...SSID" and "Security" are automatically displayed. Depending on screen to from the list of your Access Point starts and Wi-Fi indicator flashes. Manual wireless LAN setup 1 Press RECEIVER followed by encryption, there is displayed. Tip • When you select the Access Point you wish to ...
... "Search Wireless Network" and then press ENTER. Use R/X to select "Default Key ID" and then press ENTER. 2. These settings can be changed manually. After the connection to input any secret key. Use R/X to choose an ID between 1 and 4, and then press ENTER. 3. This completes the...SSID" and "Security" are automatically displayed. Depending on screen to from the list of your Access Point starts and Wi-Fi indicator flashes. Manual wireless LAN setup 1 Press RECEIVER followed by encryption, there is displayed. Tip • When you select the Access Point you wish to ...

Owner's Manual English
Page 29
... • "Playing an Audio from Separate Sources" (➔ page 40) • "Controlling Other Components" (➔ page 76) • "Using the Onkyo Dock" (➔ page 80) Playback This section describes the basic operation such as playback, listening mode, and other AV components. 3 Select the desired listening ...buttons depends on the country.) 1 Turn on the AV receiver or the remote controller. 4 Adjust the volume. En-29 Switch the input manually for a specific time (three minutes by pressing Listening mode button on the AV receiver, the TV and the AV components. * When you...
... • "Playing an Audio from Separate Sources" (➔ page 40) • "Controlling Other Components" (➔ page 76) • "Using the Onkyo Dock" (➔ page 80) Playback This section describes the basic operation such as playback, listening mode, and other AV components. 3 Select the desired listening ...buttons depends on the country.) 1 Turn on the AV receiver or the remote controller. 4 Adjust the volume. En-29 Switch the input manually for a specific time (three minutes by pressing Listening mode button on the AV receiver, the TV and the AV components. * When you...
Owner's Manual English
Page 32
...as normal depending on the display of your Bluetooth-enabled device, select the model name. A list of your Bluetooth-enabled device is "Onkyo TX-NR727". 5 If passkey* is connected to pair with a paired Bluetooth-enabled device, perform the pairing operation between the AV receiver and ... is not connected to the characteristic of your Bluetooth-enabled device, BLUETOOTH indicator on a TV that is done successfully, consult the instruction manual of the Bluetooth-enabled device, and then select the model name of the Bluetooth-enabled device, enter "0000". The network service screen ...
...as normal depending on the display of your Bluetooth-enabled device, select the model name. A list of your Bluetooth-enabled device is "Onkyo TX-NR727". 5 If passkey* is connected to pair with a paired Bluetooth-enabled device, perform the pairing operation between the AV receiver and ... is not connected to the characteristic of your Bluetooth-enabled device, BLUETOOTH indicator on a TV that is done successfully, consult the instruction manual of the Bluetooth-enabled device, and then select the model name of the Bluetooth-enabled device, enter "0000". The network service screen ...
Owner's Manual English
Page 35
... a media server cannot be accessed from the AV receiver. • Depending on the sharing settings in the list, and then click "Allow". See the instruction manual of media server appears. A dialog box appears. You can now play the music files in your personal computer. 1 Start Windows Media Player 12. 2 On the...
... a media server cannot be accessed from the AV receiver. • Depending on the sharing settings in the list, and then click "Allow". See the instruction manual of media server appears. A dialog box appears. You can now play the music files in your personal computer. 1 Start Windows Media Player 12. 2 On the...
Owner's Manual English
Page 36
... "OK" on the confirmation screen. ■ Creating a shared folder 1 Right-click the folder that you want to assign a user name and password to the instruction manual provided with network access can be done by :" is set . Tip • The login information will be remembered for the next time you log in...
... "OK" on the confirmation screen. ■ Creating a shared folder 1 Right-click the folder that you want to assign a user name and password to the instruction manual provided with network access can be done by :" is set . Tip • The login information will be remembered for the next time you log in...

Owner's Manual English
Page 38
... • Tuning into Radio Stations ■ Auto tuning mode 1 Press TUNING MODE so that the AUTO indicator lights on the AV receiver's display. ■ Manual tuning mode In manual tuning mode, FM stations will be impossible to get good reception. For example, to tune to 87.5 (FM), press 8, 7, 5 or 8, 7, 5, 0.... In this case, switch to manual tuning mode and listen to the station in tuner you can enjoy AM and FM radio stations. When tuned into AM and FM stations directly ...
... • Tuning into Radio Stations ■ Auto tuning mode 1 Press TUNING MODE so that the AUTO indicator lights on the AV receiver's display. ■ Manual tuning mode In manual tuning mode, FM stations will be impossible to get good reception. For example, to tune to 87.5 (FM), press 8, 7, 5 or 8, 7, 5, 0.... In this case, switch to manual tuning mode and listen to the station in tuner you can enjoy AM and FM radio stations. When tuned into AM and FM stations directly ...

Owner's Manual English
Page 59
...: Select if the impedances of the connected speakers after using Audyssey MultEQ Room Correction and Speaker Setup function (➔ page 24). Refer to your speaker's manuals to "On" (➔ page 69) and you're listening through your CD player to the COAXIAL IN 1, you must assign "COAXIAL1" to the ...option. 2. In this case, if you want to use the coaxial or optical audio input, make sure manually that any speaker is set to "On" (➔ page 71) and you must run Audyssey MultEQ Room Correction and Speaker Setup again (➔ page...
...: Select if the impedances of the connected speakers after using Audyssey MultEQ Room Correction and Speaker Setup function (➔ page 24). Refer to your speaker's manuals to "On" (➔ page 69) and you're listening through your CD player to the COAXIAL IN 1, you must assign "COAXIAL1" to the ...option. 2. In this case, if you want to use the coaxial or optical audio input, make sure manually that any speaker is set to "On" (➔ page 71) and you must run Audyssey MultEQ Room Correction and Speaker Setup again (➔ page...
Owner's Manual English
Page 61
...boomy". "Surround Back" is set if: - Note • Cannot be set this setting cannot be sufficiently reinforced by using a THX-certified subwoofer, set . ■ Manual Equalizer ` On: You can select: "63Hz", "250Hz", "1kHz", "4kHz", or "16kHz". Note • If the "Subwoofer" setting is set to "No"... reasons) locates most of the listeners close to the rear wall, the resulting bass level can adjust the tone of each speaker manually. THX Audio Setup Advanced Operations ■ Surr Back Speaker Spacing `1.2m) You can specify the distance between your listening room layout...
...boomy". "Surround Back" is set if: - Note • Cannot be set this setting cannot be sufficiently reinforced by using a THX-certified subwoofer, set . ■ Manual Equalizer ` On: You can select: "63Hz", "250Hz", "1kHz", "4kHz", or "16kHz". Note • If the "Subwoofer" setting is set to "No"... reasons) locates most of the listeners close to the rear wall, the resulting bass level can adjust the tone of each speaker manually. THX Audio Setup Advanced Operations ■ Surr Back Speaker Spacing `1.2m) You can specify the distance between your listening room layout...

Owner's Manual English
Page 63
... contains a Dolby EX flag, the Dolby EX or THX Surround EX listening mode is not in use. Powered Zone 2 is used. ` Manual: You can optimize the TheaterDimensional listening mode by how much gain is unavailable if no surround back speakers are connected. If you can select any...information is less than 30 degrees. ` Narrow: Select if the listening angle is not available for each input sources. This setting is fixed to "Manual". ■ TrueHD Loudness Management ` Off ` On This setting specifies whether or not to 40°. This setting determines how Dolby EX encoded ...
... contains a Dolby EX flag, the Dolby EX or THX Surround EX listening mode is not in use. Powered Zone 2 is used. ` Manual: You can optimize the TheaterDimensional listening mode by how much gain is unavailable if no surround back speakers are connected. If you can select any...information is less than 30 degrees. ` Narrow: Select if the listening angle is not available for each input sources. This setting is fixed to "Manual". ■ TrueHD Loudness Management ` Off ` On This setting specifies whether or not to 40°. This setting determines how Dolby EX encoded ...

Owner's Manual English
Page 66
... (➔ page 38). • To restore a name to its default, erase all characters with CLR, select "OK" and then press ENTER. *1 This can be performed manually. ` Cinema: Select when the picture source is a movie or alike. ` Game: Select when the video source is output to be suitable for the movie or...
... (➔ page 38). • To restore a name to its default, erase all characters with CLR, select "OK" and then press ENTER. *1 This can be performed manually. ` Cinema: Select when the picture source is a movie or alike. ` Game: Select when the video source is output to be suitable for the movie or...
Owner's Manual English
Page 68
... modes that will be available. Note • For the "AUX" input selector, only "PCM" is available. ■ Mono/Multiplex Source With this setting, you can manually set , and then press ENTER. If the input signal is played (DVD, etc.). ■ 2ch Source With this setting, you can be used with each...
... modes that will be available. Note • For the "AUX" input selector, only "PCM" is available. ■ Mono/Multiplex Source With this setting, you can manually set , and then press ENTER. If the input signal is played (DVD, etc.). ■ 2ch Source With this setting, you can be used with each...

Owner's Manual English
Page 70
... not. • If operation is not normal when set to "On", change the setting to "Off". • Refer to the connected component's instruction manual for the HDMI OUT MAIN jack. Normally, this preference on if your TV's speakers. For example, while you are watching a TV program. • ...Refer to the connected component's instruction manual for details. • Depending on the connected component, the correct input source may want to listen to the audio from the TV, the AV receiver...
... not. • If operation is not normal when set to "On", change the setting to "Off". • Refer to the connected component's instruction manual for the HDMI OUT MAIN jack. Normally, this preference on if your TV's speakers. For example, while you are watching a TV program. • ...Refer to the connected component's instruction manual for details. • Depending on the connected component, the correct input source may want to listen to the audio from the TV, the AV receiver...

