
User's Manual
Page 1
...Introduction 6 Product Features 6 Package Overview 7 Product Overview 8 Main Unit...8 Control Panel...9 Connection Ports 10 Remote Control...11 Installation 12 Connecting the Projector 12 Connect to Computer/Notebook 12 Connect to Video Sources 14 Powering...'s Zoom / Focus 19 Adjusting Projected Image Size 19 User Controls 20 Control Panel & Remote Control 20 On-screen Display Menus 23 How to operate ...23 Menu Tree...24 Image......Problems 44 Projector Status Indication 44 Remote Control Problems 46 Replacing the Lamp 47 Compatibility Modes 49 RS232 Commands 50 Ceiling ...
...Introduction 6 Product Features 6 Package Overview 7 Product Overview 8 Main Unit...8 Control Panel...9 Connection Ports 10 Remote Control...11 Installation 12 Connecting the Projector 12 Connect to Computer/Notebook 12 Connect to Video Sources 14 Powering...'s Zoom / Focus 19 Adjusting Projected Image Size 19 User Controls 20 Control Panel & Remote Control 20 On-screen Display Menus 23 How to operate ...23 Menu Tree...24 Image......Problems 44 Projector Status Indication 44 Remote Control Problems 46 Replacing the Lamp 47 Compatibility Modes 49 RS232 Commands 50 Ceiling ...

User's Manual
Page 3
.... ▀■ Warning- The bright light may cause electric shock. ▀■ Warning- Use the "Lamp Reset" function from the on the remote control and do not expose this projector to cool down , and follow the procedures listed under "Replacing the Lamp" section on until the lamp module... has been replaced. This remote control is in this may damage your local reseller or service center to the end of its life time, the message "Lamp Warning: Lamp...
.... ▀■ Warning- The bright light may cause electric shock. ▀■ Warning- Use the "Lamp Reset" function from the on the remote control and do not expose this projector to cool down , and follow the procedures listed under "Replacing the Lamp" section on until the lamp module... has been replaced. This remote control is in this may damage your local reseller or service center to the end of its life time, the message "Lamp Warning: Lamp...

User's Manual
Page 6
.../NTSC4.43/PAL/PAL-M/PAL-N/SECAM and HDTV compatible (480i/p, 576i/p, 720p, 1080i) Auto source detection with user definable settings Full function IR remote mouse control with laser pointer User friendly multilingual On Screen Menu Advanced digital keystone correction and high quality full screen image re-scaling...
.../NTSC4.43/PAL/PAL-M/PAL-N/SECAM and HDTV compatible (480i/p, 576i/p, 720p, 1080i) Auto source detection with user definable settings Full function IR remote mouse control with laser pointer User friendly multilingual On Screen Menu Advanced digital keystone correction and high quality full screen image re-scaling...

User's Manual
Page 7
Check to the difference in applications for each country, some regions may have different accessories. Projector Power Cord 1.8m VGA Cable 1.8m Due to make sure your dealer immediately if anything is complete. Introduction Package Overview This projector comes with all the items shown below. Contact your unit is missing. USB Cable 1.8m 2 x AAA Batteries IR Remote Control Carrying Case Documentation : User's Manaul Warranty Card Quick Start Card WEEE Card 7 English
Check to the difference in applications for each country, some regions may have different accessories. Projector Power Cord 1.8m VGA Cable 1.8m Due to make sure your dealer immediately if anything is complete. Introduction Package Overview This projector comes with all the items shown below. Contact your unit is missing. USB Cable 1.8m 2 x AAA Batteries IR Remote Control Carrying Case Documentation : User's Manaul Warranty Card Quick Start Card WEEE Card 7 English
User's Manual
Page 10
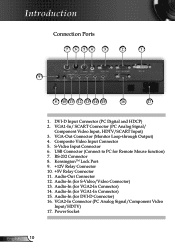
VGA-Out Connector (Monitor Loop-through Output) 4. RS-232 Connector 8. Audio-In (for Remote Mouse function) 7. DVI-D Input Connector (PC Digital and HDCP) 2. USB Connector (Connect to PC for VGA1-In Connector) 15. Audio-Out Connector 12. Power Socket ...
VGA-Out Connector (Monitor Loop-through Output) 4. RS-232 Connector 8. Audio-In (for Remote Mouse function) 7. DVI-D Input Connector (PC Digital and HDCP) 2. USB Connector (Connect to PC for VGA1-In Connector) 15. Audio-Out Connector 12. Power Socket ...
User's Manual
Page 11
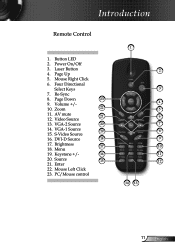
Power On/Off 3. Menu 19. Four Directional Select Keys 7. Zoom 22 11. VGA-1 Source 19 15. DVI-D Source 18 17. Mouse Left Click 23. Button LED 2. AV mute 21 12. Source 15 21. Keystone +/- 16 20. Mouse Right Click 6. Page Down 23 9. Enter 22. Re-Sync 8. Video Source 13. S-Video Source 16. Brightness 17 18. Page Up 5. VGA-2 Source 20 14. PC/Mouse control 1 2 3 4 5 6 7 8 9 10 11 12 14 13 11 English Introduction Remote Control 1. Laser Button 4. Volume +/- 10.
Power On/Off 3. Menu 19. Four Directional Select Keys 7. Zoom 22 11. VGA-1 Source 19 15. DVI-D Source 18 17. Mouse Left Click 23. Button LED 2. AV mute 21 12. Source 15 21. Keystone +/- 16 20. Mouse Right Click 6. Page Down 23 9. Enter 22. Re-Sync 8. Video Source 13. S-Video Source 16. Brightness 17 18. Page Up 5. VGA-2 Source 20 14. PC/Mouse control 1 2 3 4 5 6 7 8 9 10 11 12 14 13 11 English Introduction Remote Control 1. Laser Button 4. Volume +/- 10.

User's Manual
Page 16
... use the projector, you connect multiple sources at the same time, press the "Source" button on the control panel or direct source key on the remote control to switch between inputs. 2 Power/Standby 1 Lens Door Turn on the...
... use the projector, you connect multiple sources at the same time, press the "Source" button on the control panel or direct source key on the remote control to switch between inputs. 2 Power/Standby 1 Lens Door Turn on the...

User's Manual
Page 20
.../Standby Refer to the input source. To exit OSD, Press "Menu" again. Source Press "Source" to control the functions: Control Panel and Remote Control. User Controls Control Panel & Remote Control There are two ways for you to select an input signal. Keystone / Adjusts image distortion caused by tilting the projector (±16...
.../Standby Refer to the input source. To exit OSD, Press "Menu" again. Source Press "Source" to control the functions: Control Panel and Remote Control. User Controls Control Panel & Remote Control There are two ways for you to select an input signal. Keystone / Adjusts image distortion caused by tilting the projector (±16...

User's Manual
Page 21
... Adjusts to select an input signal. L Button Mouse left click. Use this button to activate the laser pointer. Laser Aim the remote at the viewing screen, press and hold this button to your item selection. Page - Press "Source" to increase/decrease the volume.... the image. 21 English R Button Mouse right click. Adjusts image distortion caused by tilting the projector. User Controls Remote Control Using the Remote Control Power Refer to page up. Re-Sync Automatically synchronizes the projector to connect your computer and the projector. justments...
... Adjusts to select an input signal. L Button Mouse left click. Use this button to activate the laser pointer. Laser Aim the remote at the viewing screen, press and hold this button to your item selection. Page - Press "Source" to increase/decrease the volume.... the image. 21 English R Button Mouse right click. Adjusts image distortion caused by tilting the projector. User Controls Remote Control Using the Remote Control Power Refer to page up. Re-Sync Automatically synchronizes the projector to connect your computer and the projector. justments...
User's Manual
Page 22
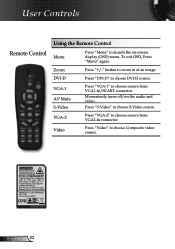
To exit OSD, Press "Menu" again. DVI-D Press "DVI-D" to choose S-Video source. Press "S-Video" to choose DVI-D source. VGA-1 AV Mute S-Video Press "VGA-1" to choose source from VGA2-In connector. Video Press "Video" to zoom in of an image. Momentarily turns off/on -screen display (OSD) menu. English 22 VGA-2 Press "VGA-2" to choose source from VGA1-In/SCART connector. User Controls Remote Control Using the Remote Control Menu Press "Menu" to launch the on the audio and video. Zoom Press "+/-" button to choose Composite video source.
To exit OSD, Press "Menu" again. DVI-D Press "DVI-D" to choose S-Video source. Press "S-Video" to choose DVI-D source. VGA-1 AV Mute S-Video Press "VGA-1" to choose source from VGA2-In connector. Video Press "Video" to zoom in of an image. Momentarily turns off/on -screen display (OSD) menu. English 22 VGA-2 Press "VGA-2" to choose source from VGA1-In/SCART connector. User Controls Remote Control Using the Remote Control Menu Press "Menu" to launch the on the audio and video. Zoom Press "+/-" button to choose Composite video source.

User's Manual
Page 23
... screen will automatically detect the source. The OSD menu will close and the projector will automatically save the new settings. While making a selection on the Remote Control or Projector Keypad. 2 When OSD is displayed, use keys to make image adjustments and change a variety of settings.
... screen will automatically detect the source. The OSD menu will close and the projector will automatically save the new settings. While making a selection on the Remote Control or Projector Keypad. 2 When OSD is displayed, use keys to make image adjustments and change a variety of settings.

User's Manual
Page 37
... old password. 2. Press " " to activate. 4. Enter new password again and press " " to reveal next OSD menu. 3. Use number buttons on the remote, then press " " to confirm your selection. Use number button to enter current password, and then press " " key again to confirm. 37 English Enter new... password (4 digits in length) using the number buttons on the remote to select your password, and then press " " key to confirm. 5. The Password is 4 digits, DEFAULT VALUE is "0000". (first time) 2....
... old password. 2. Press " " to activate. 4. Enter new password again and press " " to reveal next OSD menu. 3. Use number buttons on the remote, then press " " to confirm your selection. Use number button to enter current password, and then press " " key again to confirm. 37 English Enter new... password (4 digits in length) using the number buttons on the remote to select your password, and then press " " key to confirm. 5. The Password is 4 digits, DEFAULT VALUE is "0000". (first time) 2....

User's Manual
Page 38
Background Colour Use this function, use the remote control or press the "Enter" key on the control panel for 3 seconds to return the display parameters on , the control panel will search specified connection ... other signals if the current input signal is lost. Off: The projector will be locked, but the projector can still be operated by the remote control. Operates the fans at full speed continuously to show the searching message. English 38 Keypad Lock When the keypad lock function is available. If...
Background Colour Use this function, use the remote control or press the "Enter" key on the control panel for 3 seconds to return the display parameters on , the control panel will search specified connection ... other signals if the current input signal is lost. Off: The projector will be locked, but the projector can still be operated by the remote control. Operates the fans at full speed continuously to show the searching message. English 38 Keypad Lock When the keypad lock function is available. If...

User's Manual
Page 39
The timer will begin, with or without pressing the "Power/Standby" key on the projector control panel or "Power" key on the remote control. Then the projector will automatically power on Direct Power On mode. The projector will automatically power off when the countdown has finished (in minutes) ...
The timer will begin, with or without pressing the "Power/Standby" key on the projector control panel or "Power" key on the remote control. Then the projector will automatically power on Direct Power On mode. The projector will automatically power off when the countdown has finished (in minutes) ...

User's Manual
Page 41
..." button. Verify the resolution setting is lower than or equal to change the monitor display you are using . If the projector is switched on the remote control or control panel. If you are using a PC: For Windows 95, 98, 2000, XP: 1. Partial, scrolling or incorrectly displayed image Press "Re...
..." button. Verify the resolution setting is lower than or equal to change the monitor display you are using . If the projector is switched on the remote control or control panel. If you are using a PC: For Windows 95, 98, 2000, XP: 1. Partial, scrolling or incorrectly displayed image Press "Re...

User's Manual
Page 43
... that it is centered on the screen and below the bottom of the screen. Press [Keystone +/-] button on the remote control or [ / ] on the projector panel, until the sides are vertical on the remote control or projector panel, go to or further from the screen. Press [Menu] button on the... remote control. Use of Keystone is not recommended. See page 19. Image is too small or too large Adjust the Zoom Ring on the ...
... that it is centered on the screen and below the bottom of the screen. Press [Keystone +/-] button on the remote control or [ / ] on the projector panel, until the sides are vertical on the remote control or projector panel, go to or further from the screen. Press [Menu] button on the... remote control. Use of Keystone is not recommended. See page 19. Image is too small or too large Adjust the Zoom Ring on the ...
User's Manual
Page 46
Appendices Remote Control Problems If the remote control does not work Check the operating angle for the remote control is approximately ±22.5°. Make sure there are inserted correctly. Replace weak batteries in the remote control. English 46 Move to within 6 m (20 ft) of the projector. Make sure the batteries are no obstructions between the remote control and the projector.
Appendices Remote Control Problems If the remote control does not work Check the operating angle for the remote control is approximately ±22.5°. Make sure there are inserted correctly. Replace weak batteries in the remote control. English 46 Move to within 6 m (20 ft) of the projector. Make sure the batteries are no obstructions between the remote control and the projector.

User's Manual
Page 52
... 30 30 31 31 32 20 31 Reset Yes ~XX112 2 7E 30 30 31 31 32 20 32 No SEND to Remote ~XX140 1 7E 30 30 31 34 30 20 31 Power ~XX140 3 7E 30 30 31 34 30 20 33... Remote Mouse Up ~XX140 4 7E 30 30 31 34 30 20 34 Remote Mouse Left ~XX140 5 7E 30 30 31 34 30 20 35 Remote Mouse Enter ~XX140 6 7E 30 30 31 34 30 20 36... Remote Mouse Right ~XX140 7 7E 30 30 31 34 30 20 37 Remote Mouse Down ~XX140 8 7E 30 30...
... 30 30 31 31 32 20 31 Reset Yes ~XX112 2 7E 30 30 31 31 32 20 32 No SEND to Remote ~XX140 1 7E 30 30 31 34 30 20 31 Power ~XX140 3 7E 30 30 31 34 30 20 33... Remote Mouse Up ~XX140 4 7E 30 30 31 34 30 20 34 Remote Mouse Left ~XX140 5 7E 30 30 31 34 30 20 35 Remote Mouse Enter ~XX140 6 7E 30 30 31 34 30 20 36... Remote Mouse Right ~XX140 7 7E 30 30 31 34 30 20 37 Remote Mouse Down ~XX140 8 7E 30 30...

Datasheet
Page 1
... the extensive connectivity options and ease-of-use factors that won't fade or degrade over time. EP761 Always Impressive, Always Bright...Always Better The Optoma EP761 digital projector delivers bright pictures and sharp images in Both Normal and Standby Modes) I/O Connectors DVI-D w/HDCP... rubber feet for added stability Presentation friendly IR remote with Texas Instruments' DLP® chipset, the Optoma EP761 ensures long-lasting images that are essential functions in this series of projectors form Optoma. And, with laser pointer Specifications Display Technology 0.55" DDR...
... the extensive connectivity options and ease-of-use factors that won't fade or degrade over time. EP761 Always Impressive, Always Bright...Always Better The Optoma EP761 digital projector delivers bright pictures and sharp images in Both Normal and Standby Modes) I/O Connectors DVI-D w/HDCP... rubber feet for added stability Presentation friendly IR remote with Texas Instruments' DLP® chipset, the Optoma EP761 ensures long-lasting images that are essential functions in this series of projectors form Optoma. And, with laser pointer Specifications Display Technology 0.55" DDR...

Brochure
Page 1
...added stability Presentation friendly IR remote with Texas Instruments' DLP® chipset, the Optoma EP761 ensures long-lasting images that are essential functions in a stylish and feature-rich form. The EP761 features the extensive connectivity options and ease-of projectors from Optoma. Optoma EP761 I Multimedia Projector Bright,....q1MES.• co O cro O +5V Trigger Keni sington ck Audio-Out USB Audio-In VGA-Out DVI AC Power The Optoma EP761 digital projector delivers bright pictures and sharp images in this series of -use factors that won't fade or degrade over time. And...
...added stability Presentation friendly IR remote with Texas Instruments' DLP® chipset, the Optoma EP761 ensures long-lasting images that are essential functions in a stylish and feature-rich form. The EP761 features the extensive connectivity options and ease-of projectors from Optoma. Optoma EP761 I Multimedia Projector Bright,....q1MES.• co O cro O +5V Trigger Keni sington ck Audio-Out USB Audio-In VGA-Out DVI AC Power The Optoma EP761 digital projector delivers bright pictures and sharp images in this series of -use factors that won't fade or degrade over time. And...


