

User Manual
Page 1
......2 Introduction 4 Product Features 4 Package Overview 5 Product Overview 6 Main Unit...6 Control Panel ...7 Connection Ports ...8 Remote Control...9 Installation 10 Connecting the Projector 10 Powering On/Off the Projector 11 Powering On the Projector 11 Powering Off... 13 Adjusting the Projector Zoom / Focus 14 Adjusting Projected Image Size 14 User Controls 15 Control Panel & Remote Control 15 On-Screen Display Menus 18 How to operate ...18 Language ...19 Image-I ...20 Image-II... Modes 35 Ceiling Mount Installation 36 RS232 Commands 37 Optoma Global Offices 38 1 ...
......2 Introduction 4 Product Features 4 Package Overview 5 Product Overview 6 Main Unit...6 Control Panel ...7 Connection Ports ...8 Remote Control...9 Installation 10 Connecting the Projector 10 Powering On/Off the Projector 11 Powering On the Projector 11 Powering Off... 13 Adjusting the Projector Zoom / Focus 14 Adjusting Projected Image Size 14 User Controls 15 Control Panel & Remote Control 15 On-Screen Display Menus 18 How to operate ...18 Language ...19 Image-I ...20 Image-II... Modes 35 Ceiling Mount Installation 36 RS232 Commands 37 Optoma Global Offices 38 1 ...

User Manual
Page 4
...® projector. Introduction Product Features Congratulations and Thank You for digital signal with HDCP function and supports 480p, 576p, 720p and 1080i Full function remote control User friendly multilingual on screen display menu Advanced digital keystone correction and high quality full screen image re-scaling User friendly... DLP® technology NTSC/NTSC4.43/PAL/PAL-M/PAL-N/SECAM and HDTV compatible (480i/p, 576i/p, 720p, 1080i) High-tech DVI connection for choosing Optoma projectors.
...® projector. Introduction Product Features Congratulations and Thank You for digital signal with HDCP function and supports 480p, 576p, 720p and 1080i Full function remote control User friendly multilingual on screen display menu Advanced digital keystone correction and high quality full screen image re-scaling User friendly... DLP® technology NTSC/NTSC4.43/PAL/PAL-M/PAL-N/SECAM and HDTV compatible (480i/p, 576i/p, 720p, 1080i) High-tech DVI connection for choosing Optoma projectors.
User Manual
Page 5
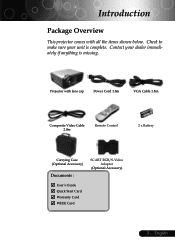
Check to make sure your dealer immediately if anything is complete. Projector with all the items shown below. Introduction Package Overview This projector comes with lens cap Power Cord 1.8m VGA Cable 1.8m Composite Video Cable 2.0m Remote Control 2 x Battery Carrying Case (Optional Accessory) Documents : User's Guide Quick Start Card Warranty Card WEEE Card SCART RGB/S-Video Adaptor (Optional Accessory) 5 ... Contact your unit is missing. English
Check to make sure your dealer immediately if anything is complete. Projector with all the items shown below. Introduction Package Overview This projector comes with lens cap Power Cord 1.8m VGA Cable 1.8m Composite Video Cable 2.0m Remote Control 2 x Battery Carrying Case (Optional Accessory) Documents : User's Guide Quick Start Card Warranty Card WEEE Card SCART RGB/S-Video Adaptor (Optional Accessory) 5 ... Contact your unit is missing. English

User Manual
Page 6
Zoom Lens 4. Elevator Button 5. Focus Ring 2. Zoom Ring 3. Introduction Product Overview Main Unit 2 1 3 6 4 5 9 7 8 English ... 6 1. Elevator Foot 6. Power Socket 9. Connection Ports 8. Control Panel Remote Control Receiver 7.
Zoom Lens 4. Elevator Button 5. Focus Ring 2. Zoom Ring 3. Introduction Product Overview Main Unit 2 1 3 6 4 5 9 7 8 English ... 6 1. Elevator Foot 6. Power Socket 9. Connection Ports 8. Control Panel Remote Control Receiver 7.
User Manual
Page 15
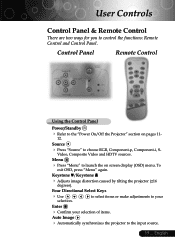
...Standby Refer to the "Power On/Off the Projector" section on screen display (OSD) menu. Menu Press "Menu" to control the functions: Remote Control and Control Panel. Video, Composite Video and HDTV sources. To exit OSD, press "Menu" again. Keystone /Keystone Adjusts image distortion caused by ..., Component-p, Component-i, S- English Four Directional Select Keys Use selection. Source Press "Source" to the input source. 15 ... User Controls Control Panel & Remote Control There are two ways for you to launch the on pages 11- 12.
...Standby Refer to the "Power On/Off the Projector" section on screen display (OSD) menu. Menu Press "Menu" to control the functions: Remote Control and Control Panel. Video, Composite Video and HDTV sources. To exit OSD, press "Menu" again. Keystone /Keystone Adjusts image distortion caused by ..., Component-p, Component-i, S- English Four Directional Select Keys Use selection. Source Press "Source" to the input source. 15 ... User Controls Control Panel & Remote Control There are two ways for you to launch the on pages 11- 12.

User Manual
Page 16
.... To exit OSD, press "Menu" again. Page Up (Computer mode only) Use this button to the input source. User Controls English ... 16 Using the Remote Control Power/Standby Refer to page up.
.... To exit OSD, press "Menu" again. Page Up (Computer mode only) Use this button to the input source. User Controls English ... 16 Using the Remote Control Power/Standby Refer to page up.

User Manual
Page 18
...firm, and the screen will automatically detect the source. When OSD is displayed, use keys to enter sub menu. 3. While making a selection on the Remote Control or Control Panel. 2. The OSD menu will close and the projector will automatically save the new settings. To open the OSD menu, press "Menu...
...firm, and the screen will automatically detect the source. When OSD is displayed, use keys to enter sub menu. 3. While making a selection on the Remote Control or Control Panel. 2. The OSD menu will close and the projector will automatically save the new settings. To open the OSD menu, press "Menu...

User Manual
Page 30
... "Setting" tab. 3. Select the "Change" button under the "Monitor" tab. Problem: Partial, scrolling or incorrectly displayed image. Press the "Re-Sync" button on the Remote Control or press the "Auto Image" button on the Control Panel. If you use a PC: If the resolution of connectors are not crooked or...
... "Setting" tab. 3. Select the "Change" button under the "Monitor" tab. Problem: Partial, scrolling or incorrectly displayed image. Press the "Re-Sync" button on the Remote Control or press the "Auto Image" button on the Control Panel. If you use a PC: If the resolution of connectors are not crooked or...


