
User's Manual
Page 1
......51 Troubleshooting/Help On-screen Display Menu 51 Image Problems...51 Intermission Problems...56 Projector Status Indication...57 Remote Control Problems...58 Audio Problems...59 Replacing the Lamp...60 Cleaning the Projector...61 Cleaning the Lens...61 Cleaning the Case...61 Compatibility Modes...62 RS232 Commands...64 RS232 Protocol Function List...65...
......51 Troubleshooting/Help On-screen Display Menu 51 Image Problems...51 Intermission Problems...56 Projector Status Indication...57 Remote Control Problems...58 Audio Problems...59 Replacing the Lamp...60 Cleaning the Projector...61 Cleaning the Lens...61 Cleaning the Case...61 Compatibility Modes...62 RS232 Commands...64 RS232 Protocol Function List...65...
User's Manual
Page 4
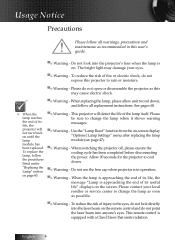
...approaching the end of injury to the eyes, do not look into the laser beam on until the lamp module has been replaced. Usage Notice Precautions Please follow all replacement instructions. Please be sure to cool down , and follow all warnings, precautions and maintenance as this... look directly into the projector's lens when the lamp is equipped with a Class II laser that emits radiation. Use the "Lamp Reset" function from the on page 60. ▀■ Warning - When replacing the lamp, please allow unit to change the lamp when it shows warning messages. ▀■ ...
...approaching the end of injury to the eyes, do not look into the laser beam on until the lamp module has been replaced. Usage Notice Precautions Please follow all replacement instructions. Please be sure to cool down , and follow all warnings, precautions and maintenance as this... look directly into the projector's lens when the lamp is equipped with a Class II laser that emits radiation. Use the "Lamp Reset" function from the on page 60. ▀■ Warning - When replacing the lamp, please allow unit to change the lamp when it shows warning messages. ▀■ ...

User's Manual
Page 47
A confirmation screen displays. 2. Select Yes to reset the lamp counter to accurately reflect the new lamp's life span. 1. User Controls Options | Lamp Setting Lamp Reset After replacing the lamp, reset the lamp counter to zero. 47 English Select Lamp Reset.
A confirmation screen displays. 2. Select Yes to reset the lamp counter to accurately reflect the new lamp's life span. 1. User Controls Options | Lamp Setting Lamp Reset After replacing the lamp, reset the lamp counter to zero. 47 English Select Lamp Reset.

User's Manual
Page 52
...(1600 x 1200). 6. Verify the resolution setting is switched on. Next, select Standard monitor types under the "Models" box. 8. Please refer to the Replacing the lamp section. 4 Make sure you need to UXGA (1600 x 1200). 4. Partial, scrolling or incorrectly displayed image 4 Press "Re-Sync" on Show all ... and then double click on the Advanced Properties button. Refer to UXGA (1600 x 1200). (*) English 52 Appendices 4 Check if the projection lamp has been securely installed. If the projector is lower than or equal to change the monitor display you are using a PC: For Windows 95...
...(1600 x 1200). 6. Verify the resolution setting is switched on. Next, select Standard monitor types under the "Models" box. 8. Please refer to the Replacing the lamp section. 4 Make sure you need to UXGA (1600 x 1200). 4. Partial, scrolling or incorrectly displayed image 4 Press "Re-Sync" on Show all ... and then double click on the Advanced Properties button. Refer to UXGA (1600 x 1200). (*) English 52 Appendices 4 Check if the projection lamp has been securely installed. If the projector is lower than or equal to change the monitor display you are using a PC: For Windows 95...
User's Manual
Page 56
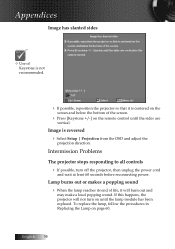
...make a loud popping sound. To replace the lamp, follow the procedures in Replacing the Lamp on until the sides are vertical. Appendices Image has slanted sides v Use of the screen. 4 Press [Keystone +/-] on the remote control until the lamp module has been replaced. English 56 Lamp burns out or makes a popping ...sound 4 When the lamp reaches its end of life, it is centered on the screen and below the bottom of Keystone ...
...make a loud popping sound. To replace the lamp, follow the procedures in Replacing the Lamp on until the sides are vertical. Appendices Image has slanted sides v Use of the screen. 4 Press [Keystone +/-] on the remote control until the lamp module has been replaced. English 56 Lamp burns out or makes a popping ...sound 4 When the lamp reaches its end of life, it is centered on the screen and below the bottom of Keystone ...
User's Manual
Page 58
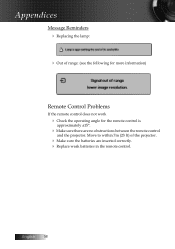
Move to within 7m (23 ft) of range: (see the following for more information) Remote Control Problems If the remote control does not work 4 Check the operating angle for the remote control is approximately ±15°. 4 Make sure there are inserted correctly. 4 Replace weak batteries in the remote control. Appendices Message Reminders 4 Replacing the lamp: 4 Out of the projector. 4 Make sure the batteries are no obstructions between the remote control and the projector. English 58
Move to within 7m (23 ft) of range: (see the following for more information) Remote Control Problems If the remote control does not work 4 Check the operating angle for the remote control is approximately ±15°. 4 Make sure there are inserted correctly. 4 Replace weak batteries in the remote control. Appendices Message Reminders 4 Replacing the lamp: 4 Out of the projector. 4 Make sure the batteries are no obstructions between the remote control and the projector. English 58

User's Manual
Page 60
... the projector at least an hour before replacing the lamp. English 1. After replacing the lamp, the lamp hours counter must be replaced with a certified replacement part, which you can order from the lamp module. 4. Insert the replacement lamp and push down firmly. Replace the lamp compartment lid and tighten the captive screws. Appendices Replacing the Lamp The projection lamp should be disposed of according to...
... the projector at least an hour before replacing the lamp. English 1. After replacing the lamp, the lamp hours counter must be replaced with a certified replacement part, which you can order from the lamp module. 4. Insert the replacement lamp and push down firmly. Replace the lamp compartment lid and tighten the captive screws. Appendices Replacing the Lamp The projection lamp should be disposed of according to...

