

User Manual
Page 1
...6 Product Features 6 Package Overview 7 Product Overview 8 Main Unit...8 Control Panel ...9 Connection Ports 10 Remote Control...11 Installation 12 Connecting the Projector 12 Powering On/Off the Projector 13 Powering On the Projector ...'s Zoom / Focus 16 Adjusting Projected Image Size 16 User Controls 17 Control Panel & Remote Control 17 On-screen Display Menus 20 How to operate ...20 Menu Tree...21 Image... Problems 36 Intermission Problems 38 Projector Status Indication 39 Remote Control Problems 40 Replacing the Lamp 41 Compatibility Modes 42 RS232 Commands and Protocol...
...6 Product Features 6 Package Overview 7 Product Overview 8 Main Unit...8 Control Panel ...9 Connection Ports 10 Remote Control...11 Installation 12 Connecting the Projector 12 Powering On/Off the Projector 13 Powering On the Projector ...'s Zoom / Focus 16 Adjusting Projected Image Size 16 User Controls 17 Control Panel & Remote Control 17 On-screen Display Menus 20 How to operate ...20 Menu Tree...21 Image... Problems 36 Intermission Problems 38 Projector Status Indication 39 Remote Control Problems 40 Replacing the Lamp 41 Compatibility Modes 42 RS232 Commands and Protocol...

User Manual
Page 6
... 1080i/p) ▪ RGB signal: HD, XGA, SVGA, VGA res-sizing ▀■ Macintosh compatible ▀■ Full function IR remote control with back light ▀■ Advanced vertical digital keystone correction and high quality full screen image re-scaling ▀■ User friendly... control panel ▀■ Optoma's patent-pending O2AirTM Photo Catalyst air purification technology ▀■ HDMI & DVI support HDCP function. ▀■ HDMI(...
... 1080i/p) ▪ RGB signal: HD, XGA, SVGA, VGA res-sizing ▀■ Macintosh compatible ▀■ Full function IR remote control with back light ▀■ Advanced vertical digital keystone correction and high quality full screen image re-scaling ▀■ User friendly... control panel ▀■ Optoma's patent-pending O2AirTM Photo Catalyst air purification technology ▀■ HDMI & DVI support HDCP function. ▀■ HDMI(...

User Manual
Page 7
... below. Contact your unit is missing. Introduction Package Overview This projector comes with lens cap Power Cord 1.8m RS232 Cable 1.8m RCA Component Cable IR Remote Controller for YPbPr 2.0m Available in European version only 2 x AA Batteries Noottee Due to the difference in applications for each country, some regions may have...
... below. Contact your unit is missing. Introduction Package Overview This projector comes with lens cap Power Cord 1.8m RS232 Cable 1.8m RCA Component Cable IR Remote Controller for YPbPr 2.0m Available in European version only 2 x AA Batteries Noottee Due to the difference in applications for each country, some regions may have...
User Manual
Page 11
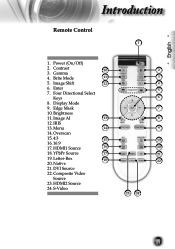
Image AI 13 12. Native 21. HDMI2 Source 24. English Introduction Remote Control 1 1. Gamma 4. Letter-Box 18 20. Enter 7. Display Mode 9. S-Video 2 3 4 5 6 7 86 9 19 20 21 22 23 24 11 Brite Mode 11 5. Menu 14 14. YPbPr Source 17 19. Brightness 11. IRIS 13. Power (On/Off) 2. Contrast 10 3. Image Shift 12 6. Four Directional Select Keys 8. Edge Mask 10. Overscan 15. 4:3 15 16. 16:9 17. HDMI1 Source 16 18. DVI Source 22. Composite Video Source 23.
Image AI 13 12. Native 21. HDMI2 Source 24. English Introduction Remote Control 1 1. Gamma 4. Letter-Box 18 20. Enter 7. Display Mode 9. S-Video 2 3 4 5 6 7 86 9 19 20 21 22 23 24 11 Brite Mode 11 5. Menu 14 14. YPbPr Source 17 19. Brightness 11. IRIS 13. Power (On/Off) 2. Contrast 10 3. Image Shift 12 6. Four Directional Select Keys 8. Edge Mask 10. Overscan 15. 4:3 15 16. 16:9 17. HDMI1 Source 16 18. DVI Source 22. Composite Video Source 23.

User Manual
Page 13
Turn on the lamp by pressing " " button on the remote control to "Off". ▀■ If you can select your source (computer, notebook, video player, etc.). Noottee Turn on your preferred language from quick menu ...
Turn on the lamp by pressing " " button on the remote control to "Off". ▀■ If you can select your source (computer, notebook, video player, etc.). Noottee Turn on your preferred language from quick menu ...
User Manual
Page 17
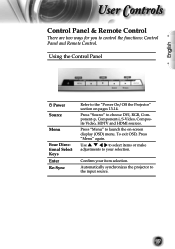
... Enter Re-Sync Refer to launch the on pages 13-14. Use to select items or make adjustments to control the functions: Control Panel and Remote Control. To exit OSD, Press "Menu" again. English User Controls Control Panel & Remote Control There are two ways for you to your item selection.
... Enter Re-Sync Refer to launch the on pages 13-14. Use to select items or make adjustments to control the functions: Control Panel and Remote Control. To exit OSD, Press "Menu" again. English User Controls Control Panel & Remote Control There are two ways for you to your item selection.
User Manual
Page 18
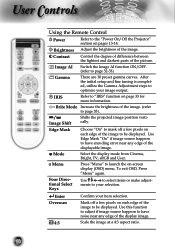
... this function to adjust if image source happens to have encoding error near any edge of the image to be displayed. User Controls Using the Remote Control Power Refer to the "Power On/Off the Projector" section on -screen display (OSD) menu. After the initial setup and fine tuning is...
... this function to adjust if image source happens to have encoding error near any edge of the image to be displayed. User Controls Using the Remote Control Power Refer to the "Power On/Off the Projector" section on -screen display (OSD) menu. After the initial setup and fine tuning is...
User Manual
Page 20
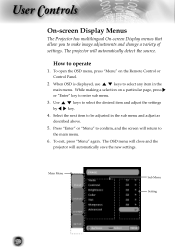
... "Enter" key to the main menu. 6. The OSD menu will close and the projector will return to enter sub menu. 3. While making a selection on the Remote Control or Control Panel. 2 When OSD is displayed, use keys to confirm, and the screen will automatically save the new settings. Press "Enter...
... "Enter" key to the main menu. 6. The OSD menu will close and the projector will return to enter sub menu. 3. While making a selection on the Remote Control or Control Panel. 2 When OSD is displayed, use keys to confirm, and the screen will automatically save the new settings. Press "Enter...

User Manual
Page 38
... the screen and below the bottom of the screen. Use "Display-->V.Keystone" from the screen. Press [ 4:3], [ 16:9], [ Letter-Box], [ Native] button on the remote control or [Menu] on the projector panel, go to make an adjust- If the image is still stretched, you play 4:3 format DVD title, please change...
... the screen and below the bottom of the screen. Use "Display-->V.Keystone" from the screen. Press [ 4:3], [ 16:9], [ Letter-Box], [ Native] button on the remote control or [Menu] on the projector panel, go to make an adjust- If the image is still stretched, you play 4:3 format DVD title, please change...

User Manual
Page 40
Move to within 6 m (20 ft) of the projector. Make sure batteries are inserted correctly. Make sure batteries are not any obstructions between the remote con- If so, replace weak batteries in the remote control. 40 trol and the projector. Appendices Over temperature: Replacing the lamp: Remote Control Problems If the remote control does not work Check the operating angle for the remote control is approximately ±22.5°. Make sure there are exhausted.
Move to within 6 m (20 ft) of the projector. Make sure batteries are inserted correctly. Make sure batteries are not any obstructions between the remote con- If so, replace weak batteries in the remote control. 40 trol and the projector. Appendices Over temperature: Replacing the lamp: Remote Control Problems If the remote control does not work Check the operating angle for the remote control is approximately ±22.5°. Make sure there are exhausted.


