
Getting Started Guide
Page 3
... 1 Your Palm m500 series handheld 2 Upgrading from another Palm OS handheld 2 Preparing to use your handheld 3 Connecting the HotSync cradle 3 Charging your handheld 3 Setting up your handheld 4 Installing Palm Desktop software 4 Installing Palm Desktop software on a Windows computer...... 5 Installing Palm Desktop software on a Macintosh 6 Synchronizing data: Performing the first HotSync operation ........7 Using Expansion Features 8 Inserting an expansion card...
... 1 Your Palm m500 series handheld 2 Upgrading from another Palm OS handheld 2 Preparing to use your handheld 3 Connecting the HotSync cradle 3 Charging your handheld 3 Setting up your handheld 4 Installing Palm Desktop software 4 Installing Palm Desktop software on a Windows computer...... 5 Installing Palm Desktop software on a Macintosh 6 Synchronizing data: Performing the first HotSync operation ........7 Using Expansion Features 8 Inserting an expansion card...

Getting Started Guide
Page 4
... 37 Setting General preferences 38 Changing Formats preferences 39 Beaming information 39 Beaming data 40 Beaming applications 40 Receiving beamed information 41 Beaming your business card 41 Beaming Tips 41 Installing add-on applications 42 Installing applications using a Windows computer 42 Installing applications using a Macintosh 44 Resetting your handheld 45 Performing...
... 37 Setting General preferences 38 Changing Formats preferences 39 Beaming information 39 Beaming data 40 Beaming applications 40 Receiving beamed information 41 Beaming your business card 41 Beaming Tips 41 Installing add-on applications 42 Installing applications using a Windows computer 42 Installing applications using a Macintosh 44 Resetting your handheld 45 Performing...

Getting Started Guide
Page 7
...port This guide, Getting Started with Palm™ m500 Series Handhelds, provides information about performing more advanced tasks. Chapter 1 Get Started Palm™ m500 series handhelds will help you stay organized and on the Palm Desktop CD-ROM to another Palm OS® handheld that is close by...the online Handbook for Palm™ m500 Series Handhelds for your expense report s Synchronize your data with Palm™ Desktop software on your Windows or Macintosh computer so you always have a copy s Insert Secure Digital (SD) or MultiMedia Card (MMC) expansion cards to add additional ...
...port This guide, Getting Started with Palm™ m500 Series Handhelds, provides information about performing more advanced tasks. Chapter 1 Get Started Palm™ m500 series handhelds will help you stay organized and on the Palm Desktop CD-ROM to another Palm OS® handheld that is close by...the online Handbook for Palm™ m500 Series Handhelds for your expense report s Synchronize your data with Palm™ Desktop software on your Windows or Macintosh computer so you always have a copy s Insert Secure Digital (SD) or MultiMedia Card (MMC) expansion cards to add additional ...

Getting Started Guide
Page 8
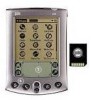
... ensures all your data. Page 2 Get Started Upgrading from another Palm OS handheld If you already own a Palm OS handheld, you complete the installation tasks. Hold it down . Also, perform a HotSync® operation using your new handheld. Your Palm m500 series handheld Expansion card slot Insert expansion cards to add additional applications or memory, or to back up...
... ensures all your data. Page 2 Get Started Upgrading from another Palm OS handheld If you already own a Palm OS handheld, you complete the installation tasks. Hold it down . Also, perform a HotSync® operation using your new handheld. Your Palm m500 series handheld Expansion card slot Insert expansion cards to add additional applications or memory, or to back up...

Getting Started Guide
Page 14
..." in Chapter 3 for details. These enable you feel the card lock and hear the system sound, the card is inconvenient to push the card into the expansion card slot, following the direction indicated by the expansion card icon on your old handheld have a unique name. Using Expansion...after completing the upgrade process. Use your handheld securely. 2. We strongly recommend that accepts Secure Digital (SD) or MultiMedia Card (MMC) expansion cards. Each handheld must have a unique name To prevent unexpected results during the next HotSync operation with the old handheld. You...
..." in Chapter 3 for details. These enable you feel the card lock and hear the system sound, the card is inconvenient to push the card into the expansion card slot, following the direction indicated by the expansion card icon on your old handheld have a unique name. Using Expansion...after completing the upgrade process. Use your handheld securely. 2. We strongly recommend that accepts Secure Digital (SD) or MultiMedia Card (MMC) expansion cards. Each handheld must have a unique name To prevent unexpected results during the next HotSync operation with the old handheld. You...

Getting Started Guide
Page 15
...to lightly push against the top of the card, following the direction indicated by the expansion card icon on the back panel of your handheld plays the system sound. 3. The expansion card slot releases the card, and your handheld. Lift the card from entering and damaging the slot, we... suggest that you are not using an expansion card. Chapter 1 Page 9 To prevent debris from the expansion card slot. Using Peripheral Hardware So that you leave the dummy card seated when you can easily attach and use peripheral hardware devices, such as a ...
...to lightly push against the top of the card, following the direction indicated by the expansion card icon on the back panel of your handheld plays the system sound. 3. The expansion card slot releases the card, and your handheld. Lift the card from entering and damaging the slot, we... suggest that you are not using an expansion card. Chapter 1 Page 9 To prevent debris from the expansion card slot. Using Peripheral Hardware So that you leave the dummy card seated when you can easily attach and use peripheral hardware devices, such as a ...

Getting Started Guide
Page 46
... handheld at the IR port of the receiving handheld. 5. Beaming applications 1. To beam an application from pick list, and then select Handheld or Card. Page 40 Get to exchange with business contacts s An application installed in Address Book, To Do List, Note Pad (if installed on the ...), or Memo Pad s A special Address Book record you want to transfer. 6. Tap Beam. 7. Tap the Applications icon . 2. Tap the Beam from a card, you want to beam. 2. Locate the record or category you designate as your handheld at the IR port of the receiving handheld. 8. Tap the Menu...
... handheld at the IR port of the receiving handheld. 5. Beaming applications 1. To beam an application from pick list, and then select Handheld or Card. Page 40 Get to exchange with business contacts s An application installed in Address Book, To Do List, Note Pad (if installed on the ...), or Memo Pad s A special Address Book record you want to transfer. 6. Tap Beam. 7. Tap the Applications icon . 2. Tap the Beam from a card, you want to beam. 2. Locate the record or category you designate as your handheld at the IR port of the receiving handheld. 8. Tap the Menu...

Getting Started Guide
Page 47
.... 2. Tap Record, and then tap Select Business Card. 4. Chapter 3 Page 41 Create an Address Book entry with a lock icon next to them. Tap the Menu icon . 3. Beaming Tips s For best results, Palm handhelds should be between 10 centimeters (approximately 4 inches) and 1 meter (approximately 39...assign incoming information to beam the current entry. Beaming distance to beam your business card. Turn on the top of obstacles. Press the Address Book application button seconds to other Palm OS handhelds may be different. These are copy-protected and cannot be clear of your ...
.... 2. Tap Record, and then tap Select Business Card. 4. Chapter 3 Page 41 Create an Address Book entry with a lock icon next to them. Tap the Menu icon . 3. Beaming Tips s For best results, Palm handhelds should be between 10 centimeters (approximately 4 inches) and 1 meter (approximately 39...assign incoming information to beam the current entry. Beaming distance to beam your business card. Turn on the top of obstacles. Press the Address Book application button seconds to other Palm OS handhelds may be different. These are copy-protected and cannot be clear of your ...

Getting Started Guide
Page 48
...application is seated in the expansion card slot during a HotSync operation. you can also access the Install Tool dialog by selecting Install Tool from the Palm Desktop program group or by double-clicking any time. Double-click the Palm Desktop icon on the Palm Desktop software CD-ROM. Click ... Click here to change application destinations Page 42 Get to install into this folder.) 2. Click here to select your Palm Desktop directory on an expansion card that you want to Work Installing add-on applications You can use the Graffiti Command stroke /B to beam the current...
...application is seated in the expansion card slot during a HotSync operation. you can also access the Install Tool dialog by selecting Install Tool from the Palm Desktop program group or by double-clicking any time. Double-click the Palm Desktop icon on the Palm Desktop software CD-ROM. Click ... Click here to change application destinations Page 42 Get to install into this folder.) 2. Click here to select your Palm Desktop directory on an expansion card that you want to Work Installing add-on applications You can use the Graffiti Command stroke /B to beam the current...

Getting Started Guide
Page 49
...(s) you are installing, click Change Destination on your handheld and an expansion card 5. Click to move applications between your handheld or an expansion card and then click Open. Perform a HotSync operation to move applications between your handheld and an expansion card. 6. Click OK to close the Change Destination window. 7. Click Done to close...
...(s) you are installing, click Change Destination on your handheld and an expansion card 5. Click to move applications between your handheld or an expansion card and then click Open. Perform a HotSync operation to move applications between your handheld and an expansion card. 6. Click OK to close the Change Destination window. 7. Click Done to close...

Getting Started Guide
Page 50
From the HotSync menu, choose Install Handheld Files. Select the Add-on folder in the Palm folder. 3. Click Add File to add the selected application to install Tap Add File 6. Copy or download the application you want to install. 8. Select Add-... Click Add to List to select applications to install Click to move applications between your handheld and an expansion card 4. Click Add to Work Double-click the Hotsync Manager icon in your Palm folder on folder Select application to the Install Handheld Files list. Select the application you want to install into...
From the HotSync menu, choose Install Handheld Files. Select the Add-on folder in the Palm folder. 3. Click Add File to add the selected application to install Tap Add File 6. Copy or download the application you want to install. 8. Select Add-... Click Add to List to select applications to install Click to move applications between your handheld and an expansion card 4. Click Add to Work Double-click the Hotsync Manager icon in your Palm folder on folder Select application to the Install Handheld Files list. Select the application you want to install into...

Getting Started Guide
Page 51
... the reset button inside the hole on the back panel of the application you are installing, click Change Destination on your handheld and an expansion card. 9. Click to stop what it's doing and start over again while retaining all records and entries stored in your handheld. Performing a soft... operation to install the selected application(s) on the Install Handheld Files window, and then use the arrows to get your handheld and an expansion card 10. Resetting your handheld If your handheld does not respond to buttons or tapping the screen, you need to perform a reset to move...
... the reset button inside the hole on the back panel of the application you are installing, click Change Destination on your handheld and an expansion card. 9. Click to stop what it's doing and start over again while retaining all records and entries stored in your handheld. Performing a soft... operation to install the selected application(s) on the Install Handheld Files window, and then use the arrows to get your handheld and an expansion card 10. Resetting your handheld If your handheld does not respond to buttons or tapping the screen, you need to perform a reset to move...

Getting Started Guide
Page 53
...battery is turned on the back of third-party applications available for the Palm™ logo to gently press the reset button on . 2. Note: There are thousands of your handheld. 5. Wait for Palm OS® handhelds. If your handheld enables contrast adjustment, tap the Contrast icon...any data previously synchronized with your handheld or go to ensure your handheld is properly charged. 4. I don't see the Worldwide Customer Support card that comes with your computer during the next HotSync® operation. Chapter 4 Frequently Asked Questions If you encounter a problem with your ...
...battery is turned on the back of third-party applications available for the Palm™ logo to gently press the reset button on . 2. Note: There are thousands of your handheld. 5. Wait for Palm OS® handhelds. If your handheld enables contrast adjustment, tap the Contrast icon...any data previously synchronized with your handheld or go to ensure your handheld is properly charged. 4. I don't see the Worldwide Customer Support card that comes with your computer during the next HotSync® operation. Chapter 4 Frequently Asked Questions If you encounter a problem with your ...
