

Handbook
Page 3
Contents About This Book 1 Chapter 1: Setting Up Your Palm™ Zire™ 71 Handheld 3 System requirements 4 Minimum requirements: Windows computers 4 Minimum requirements: Mac computers 5 Audio and video requirements 5 E-mail requirements 5 SMS requirements 5 ...Perform a HotSync operation 8 Step 6: Register your handheld 8 Congratulations 8 Chapter 2: Exploring Your Handheld 9 Locating handheld components 10 Opening the camera 10 Locating front panel controls 11 Locating top panel components 12 Using the backlight 13 Locating back panel components 14 Adding an expansion...
Contents About This Book 1 Chapter 1: Setting Up Your Palm™ Zire™ 71 Handheld 3 System requirements 4 Minimum requirements: Windows computers 4 Minimum requirements: Mac computers 5 Audio and video requirements 5 E-mail requirements 5 SMS requirements 5 ...Perform a HotSync operation 8 Step 6: Register your handheld 8 Congratulations 8 Chapter 2: Exploring Your Handheld 9 Locating handheld components 10 Opening the camera 10 Locating front panel controls 11 Locating top panel components 12 Using the backlight 13 Locating back panel components 14 Adding an expansion...

Handbook
Page 46
... (*.aba) s Text (*.txt) For information on the right. 8. You do not exist, create them now; To add the imported data to step 10. See Palm Desktop online Help for more information on your Windows computer. You can import data stored in any of the following : Select All in the application.... 10. To import data into the Unfiled category. 4. If the categories do not have to specify which fields correspond to your handheld from...
... (*.aba) s Text (*.txt) For information on the right. 8. You do not exist, create them now; To add the imported data to step 10. See Palm Desktop online Help for more information on your Windows computer. You can import data stored in any of the following : Select All in the application.... 10. To import data into the Unfiled category. 4. If the categories do not have to specify which fields correspond to your handheld from...
Handbook
Page 81
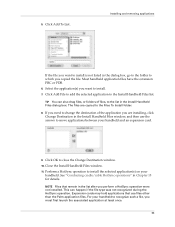
...selected application(s) on your handheld. Perform a HotSync operation to close the Change Destination window. 10. See "Conducting cradle/cable HotSync operations" in the Install Handheld Files dialog box....the application(s) you must first launch the associated application at least once. 71 Close the Install Handheld Files window. 11. The files are installing, click Change Destination in the list ... may hold applications that remain in the Install Handheld Files window, and then use files other than the Palm application files. Installing and removing applications If the file you...
...selected application(s) on your handheld. Perform a HotSync operation to close the Change Destination window. 10. See "Conducting cradle/cable HotSync operations" in the Install Handheld Files dialog box....the application(s) you must first launch the associated application at least once. 71 Close the Install Handheld Files window. 11. The files are installing, click Change Destination in the list ... may hold applications that remain in the Install Handheld Files window, and then use files other than the Palm application files. Installing and removing applications If the file you...
Handbook
Page 240
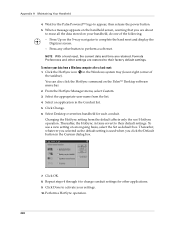
then release the power button. 5. Press any other button to activate your settings. 10. To restore your handheld, do one of the taskbar). Select the appropriate user name from the default affects only the next HotSync operation. Changing...application in the Custom dialog box. 7. Thereafter, whatever you selected as default box. Click the HotSync icon in the Windows system tray (lower-right corner of the following: - Wait for the Palm Powered™ logo to their default settings. Thereafter, the HotSync Actions revert to change conduit settings for each conduit....
then release the power button. 5. Press any other button to activate your settings. 10. To restore your handheld, do one of the taskbar). Select the appropriate user name from the default affects only the next HotSync operation. Changing...application in the Custom dialog box. 7. Thereafter, whatever you selected as default box. Click the HotSync icon in the Windows system tray (lower-right corner of the following: - Wait for the Palm Powered™ logo to their default settings. Thereafter, the HotSync Actions revert to change conduit settings for each conduit....
Handbook
Page 241
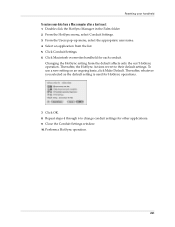
... the HotSync setting from a Mac computer after a hard reset: 1. Thereafter, the HotSync Actions revert to change conduit settings for HotSync operations. 7. Close the Conduit Settings window. 10. Resetting your handheld To restore your data from the default affects only the next HotSync operation. Click OK. 8. Select an application from the list. 5. Click...
... the HotSync setting from a Mac computer after a hard reset: 1. Thereafter, the HotSync Actions revert to change conduit settings for HotSync operations. 7. Close the Conduit Settings window. 10. Resetting your handheld To restore your data from the default affects only the next HotSync operation. Click OK. 8. Select an application from the list. 5. Click...

