
Plasma Display
Page 4
...have many years of your new Plasma Display. For NTSC AV images 36 COLOR SYSTEM / Panasonic AUTO 37 3:2 PULLDOWN / VIDEO NR 37 SYNC 38 H-FREQ. (kHz) / V-FREQ. (Hz 38 Options Adjustments 39 Shipping condition 42 Troubleshooting 43 VIDEO/COMPONENT/RGB/PC input signals........ 44 Specifications ...DISPLAY 33 How to the Panasonic family of these Instructions before making any adjustments, and retain them for Input Signals 36 COMPONENT / RGB IN SELECT 36 3D Y/C FILTER - To obtain maximum benefit from your set the Display location number for each Plasma Display 34 Option F ...
...have many years of your new Plasma Display. For NTSC AV images 36 COLOR SYSTEM / Panasonic AUTO 37 3:2 PULLDOWN / VIDEO NR 37 SYNC 38 H-FREQ. (kHz) / V-FREQ. (Hz 38 Options Adjustments 39 Shipping condition 42 Troubleshooting 43 VIDEO/COMPONENT/RGB/PC input signals........ 44 Specifications ...DISPLAY 33 How to the Panasonic family of these Instructions before making any adjustments, and retain them for Input Signals 36 COMPONENT / RGB IN SELECT 36 3D Y/C FILTER - To obtain maximum benefit from your set the Display location number for each Plasma Display 34 Option F ...
Plasma Display
Page 6
...or reflected light from the wall outlet as a safety precaution before moving the Plasma Display. • Moving the Display with any cleaning. • Electric shocks can ... Terminal Board TY-42TM6D • RGB Active Through Terminal Board TY-42TM6G • PC Input Terminal Board TY-42TM6P • Composite / Component Video Terminal Board........ Use with its ventilation...; HDMI Terminal Board TY-FB8HM • Wireless Presentation Board TY-FB7WPU • Touch Panel TY-TP42P8-S (TH-42PWD8UK, TH-42PHD8UK), TY-TP50P8-S (TH-50PHD8UK) Always be displayed for use only with ...
...or reflected light from the wall outlet as a safety precaution before moving the Plasma Display. • Moving the Display with any cleaning. • Electric shocks can ... Terminal Board TY-42TM6D • RGB Active Through Terminal Board TY-42TM6G • PC Input Terminal Board TY-42TM6P • Composite / Component Video Terminal Board........ Use with its ventilation...; HDMI Terminal Board TY-FB8HM • Wireless Presentation Board TY-FB7WPU • Touch Panel TY-TP42P8-S (TH-42PWD8UK, TH-42PHD8UK), TY-TP50P8-S (TH-50PHD8UK) Always be displayed for use only with ...

Plasma Display
Page 10
... cannot be displayed properly if the signals exceed 1,200 lines.) • The display resolution is a maximum of 640 × 480 dots (TH-37PWD8UK, TH-42PWD8UK), 768 × 720 dots (TH-37PHD8UK), 768 × 768 dots (TH-42PHD8UK), 1,024 × 768 dots (TH-50PHD8UK) when the aspect mode ... not be possible to use an adapter for computers with DOS/V compatible D-sub 15P terminal. • The computer shown in the illustration is for PC Input 4 Terminal 5 Signal Name R (PR/CR) G (Y) B (PB/CB) GND (Ground) GND (Ground) Pin No. 6 7 8 9 10 Signal Name GND (Ground) GND (Ground) GND (Ground)...
... cannot be displayed properly if the signals exceed 1,200 lines.) • The display resolution is a maximum of 640 × 480 dots (TH-37PWD8UK, TH-42PWD8UK), 768 × 720 dots (TH-37PHD8UK), 768 × 768 dots (TH-42PHD8UK), 1,024 × 768 dots (TH-50PHD8UK) when the aspect mode ... not be possible to use an adapter for computers with DOS/V compatible D-sub 15P terminal. • The computer shown in the illustration is for PC Input 4 Terminal 5 Signal Name R (PR/CR) G (Y) B (PB/CB) GND (Ground) GND (Ground) Pin No. 6 7 8 9 10 Signal Name GND (Ground) GND (Ground) GND (Ground)...

Plasma Display
Page 11
... Connections 6789 12345 Pin layout for RS-232C D-sub 9p Notes: • Use the RS-232C cable to connect the computer to the Plasma Display. • The computer shown is for control data The transmission of control data which is connected to this unit will send an "ER401... SELF Control details Power ON Power OFF Volume 00 - 63 Audio MUTE OFF Audio MUTE ON Input select (toggle) Slot1 input Slot2 input Slot3 input PC input Screen mode select (toggle) NORMAL (4 : 3) ZOOM FULL JUST Panasonic AUTO With the power off, this set. The computer will require software which allows the sending ...
... Connections 6789 12345 Pin layout for RS-232C D-sub 9p Notes: • Use the RS-232C cable to connect the computer to the Plasma Display. • The computer shown is for control data The transmission of control data which is connected to this unit will send an "ER401... SELF Control details Power ON Power OFF Volume 00 - 63 Audio MUTE OFF Audio MUTE ON Input select (toggle) Slot1 input Slot2 input Slot3 input PC input Screen mode select (toggle) NORMAL (4 : 3) ZOOM FULL JUST Panasonic AUTO With the power off, this set. The computer will require software which allows the sending ...
Plasma Display
Page 12
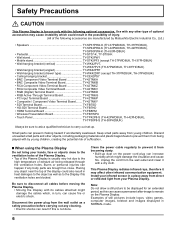
... 36) • Additional equipment, cables and adapter plugs shown are not supplied with this set . Connections AV & COMPONENT connection COMPONENT VIDEO OUT RR Example of input signal source DVD Y, PB, PR, PB OUT Y Digital TV-SET-TOP-BOX (DTV-STB) L AUDIO OUT R RCA-BNC adapter plug SLOT1 Example of... input signal source S VIDEO VCR CAMCORDER R AUDIO L IN VIDEO IN VIDEO OUT S VIDEO IN SLOT2 R AUDIO L PR/CR/R PB/CB/B Y/G COMPONENT/RGB IN SLOT3 PC IN ...
... 36) • Additional equipment, cables and adapter plugs shown are not supplied with this set . Connections AV & COMPONENT connection COMPONENT VIDEO OUT RR Example of input signal source DVD Y, PB, PR, PB OUT Y Digital TV-SET-TOP-BOX (DTV-STB) L AUDIO OUT R RCA-BNC adapter plug SLOT1 Example of... input signal source S VIDEO VCR CAMCORDER R AUDIO L IN VIDEO IN VIDEO OUT S VIDEO IN SLOT2 R AUDIO L PR/CR/R PB/CB/B Y/G COMPONENT/RGB IN SLOT3 PC IN ...
Plasma Display
Page 13
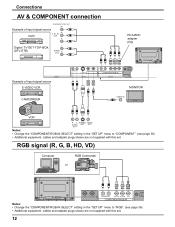
... the AC cord plug to turn the set on , the screen shown below is displayed for a while after the Plasma Display is turned on. (setting condition is an example.) TH-42PWD8 INPUT MENU -/ VOL +/ ENTER/ TH-42PWD8 Power Indicator Remote Control Sensor When the POWER is turned on or in the... power off . Fix the AC cord plug securely to the Plasma Display with the clamper. (see page 18) Select the desired...
... the AC cord plug to turn the set on , the screen shown below is displayed for a while after the Plasma Display is turned on. (setting condition is an example.) TH-42PWD8 INPUT MENU -/ VOL +/ ENTER/ TH-42PWD8 Power Indicator Remote Control Sensor When the POWER is turned on or in the... power off . Fix the AC cord plug securely to the Plasma Display with the clamper. (see page 18) Select the desired...

Plasma Display
Page 14
... to move the cursor down (see page 16) Enter / Aspect button (see page 21) SURROUND ON 14 Basic Controls Remote control sensor TH-42PWD8 INPUT MENU -/ VOL +/ ENTER/ Volume Adjustment Volume Up "+" Down "-" When the menu screen is displayed: "+": press to move the cursor up "-":...cinema. just as the power cord is still inserted into the wall outlet.) • Standby ......... Green • DPMS Orange (With PC input signal and during operation of surround sound are memorized separately for each time the SURROUND button is pressed. Indicator not illuminated (The unit will ...
... to move the cursor down (see page 16) Enter / Aspect button (see page 21) SURROUND ON 14 Basic Controls Remote control sensor TH-42PWD8 INPUT MENU -/ VOL +/ ENTER/ Volume Adjustment Volume Up "+" Down "-" When the menu screen is displayed: "+": press to move the cursor up "-":...cinema. just as the power cord is still inserted into the wall outlet.) • Standby ......... Green • DPMS Orange (With PC input signal and during operation of surround sound are memorized separately for each time the SURROUND button is pressed. Indicator not illuminated (The unit will ...

Plasma Display
Page 15
...button to access Digital Zoom. Basic Controls Standby (ON / OFF) button The Plasma Display must first be used to switch directly to INPUT mode. Note: After-image (image lag) may occur on the plasma display panel when a still picture is 3 displayed only when the off timer has been ...set. OFF TIMER button The Plasma Display can only display the slot which is pressed....
...button to access Digital Zoom. Basic Controls Standby (ON / OFF) button The Plasma Display must first be used to switch directly to INPUT mode. Note: After-image (image lag) may occur on the plasma display panel when a still picture is 3 displayed only when the off timer has been ...set. OFF TIMER button The Plasma Display can only display the slot which is pressed....

Plasma Display
Page 16
...SET UP 2/2 SCREENSAVER MULTI DISPLAY SETUP SET UP TIMER PRESENT TIME SETUP POS. /SIZE NORMALIZE H-POS H-SIZE V-POS V-SIZE NORMAL During "RGB/PC" input signal. POS. /SIZE NORMALIZE NORMAL H-POS H-SIZE V-POS V-SIZE CLOCK PHASE 16 To SOUND adjust menu (see page 23, 24) ADVANCED SETTINGS ...NORMALIZE NORMAL BLACK EXTENSION INPUT LEVEL W/B HIGH R W/B HIGH B W/B LOW R W/B LOW B GAMMA AGC 0 0 0 0 0 0 2.2 OFF The MENU button on the unit can also be pressed. ...
...SET UP 2/2 SCREENSAVER MULTI DISPLAY SETUP SET UP TIMER PRESENT TIME SETUP POS. /SIZE NORMALIZE H-POS H-SIZE V-POS V-SIZE NORMAL During "RGB/PC" input signal. POS. /SIZE NORMALIZE NORMAL H-POS H-SIZE V-POS V-SIZE CLOCK PHASE 16 To SOUND adjust menu (see page 23, 24) ADVANCED SETTINGS ...NORMALIZE NORMAL BLACK EXTENSION INPUT LEVEL W/B HIGH R W/B HIGH B W/B LOW R W/B LOW B GAMMA AGC 0 0 0 0 0 0 2.2 OFF The MENU button on the unit can also be pressed. ...

Plasma Display
Page 17
... ON FUNCTION OFF POWER ON TIME 0:00 POWER OFF FUNCTION OFF POWER OFF TIME 0:00 17 On-Screen Menu Displays 2 Press to access each input signal. (see page 27) PRESENT TIME SETUP PRESENT TIME OF DAY 99:99 SET PRESENT TIME OF DAY 99:99 Press to select POWER ON...for RGB (see page 37, 38) SIGNAL [ RGB ] To SIGNAL screen for DVI (see page 37, 38) SIGNAL [ Digital ] 3D Y/C FILTER (NTSC) COLOR SYSTEM 3 : 2 PULLDOWN Panasonic AUTO (4 : 3) VIDEO NR ON AUTO OFF NORMAL OFF 3 : 2 PULLDOWN OFF VIDEO NR OFF SYNC 3 : 2 PULLDOWN VIDEO NR H-FREQ. 33.8 V-FREQ. 60.0 AUTO OFF OFF kHz...
... ON FUNCTION OFF POWER ON TIME 0:00 POWER OFF FUNCTION OFF POWER OFF TIME 0:00 17 On-Screen Menu Displays 2 Press to access each input signal. (see page 27) PRESENT TIME SETUP PRESENT TIME OF DAY 99:99 SET PRESENT TIME OF DAY 99:99 Press to select POWER ON...for RGB (see page 37, 38) SIGNAL [ RGB ] To SIGNAL screen for DVI (see page 37, 38) SIGNAL [ Digital ] 3D Y/C FILTER (NTSC) COLOR SYSTEM 3 : 2 PULLDOWN Panasonic AUTO (4 : 3) VIDEO NR ON AUTO OFF NORMAL OFF 3 : 2 PULLDOWN OFF VIDEO NR OFF SYNC 3 : 2 PULLDOWN VIDEO NR H-FREQ. 33.8 V-FREQ. 60.0 AUTO OFF OFF kHz...

Plasma Display
Page 18
...page 36) • In 2 screen display, the same input mode cannot be selected if the terminal board is not installed into the SLOT. • Select to match the signals from the equipment which has been connected to the Plasma Display. Press to select OSD LANGUAGE. Press to select ...your preferred language. Input signals will change as follows: • TH-37PWD8UK, TH-37PHD8UK INPUT1 INPUT2 PC IN • TH-42PWD8UK, TH-42PHD8UK, TH-50PHD8UK INPUT1 INPUT2 INPUT3 PC IN...
...page 36) • In 2 screen display, the same input mode cannot be selected if the terminal board is not installed into the SLOT. • Select to match the signals from the equipment which has been connected to the Plasma Display. Press to select OSD LANGUAGE. Press to select ...your preferred language. Input signals will change as follows: • TH-37PWD8UK, TH-37PHD8UK INPUT1 INPUT2 PC IN • TH-42PWD8UK, TH-42PHD8UK, TH-50PHD8UK INPUT1 INPUT2 INPUT3 PC IN...

Plasma Display
Page 19
...Plasma Display will allow the picture to the center of the screen so that the ASPECT be set to "FULL" mode, and switching is not possible. • Panasonic AUTO can cause a permanent after-image to move through the aspect options: NORMAL ZOOM FULL Panasonic AUTO JUST INPUT... the picture at its maximum size but with the Panasonic AUTO mode setting (see page 37). Mode NORMAL ... 4 3 Panasonic For an elongated image AUTO 4 3 For a 4:3 image 16 Panasonic AUTO 9 Image is not possible. Notes: • For PC signal input, the mode...Video signal input. • The aspect mode is only...
...Plasma Display will allow the picture to the center of the screen so that the ASPECT be set to "FULL" mode, and switching is not possible. • Panasonic AUTO can cause a permanent after-image to move through the aspect options: NORMAL ZOOM FULL Panasonic AUTO JUST INPUT... the picture at its maximum size but with the Panasonic AUTO mode setting (see page 37). Mode NORMAL ... 4 3 Panasonic For an elongated image AUTO 4 3 For a 4:3 image 16 Panasonic AUTO 9 Image is not possible. Notes: • For PC signal input, the mode...Video signal input. • The aspect mode is only...

Plasma Display
Page 20
During "VIDEO (S VIDEO)", "COMPONENT" and "DVI" input signal. V-SIZE Adjust the vertical size. CLOCK PHASE (RGB/PC in Panasonic AUTO with FULL mode, the adjustment is not memorized. POS. /SIZE NORMALIZE NORMAL H-POS H-SIZE V-POS V-SIZE CLOCK PHASE H-POS Adjust the horizontal position. H-SIZE ...
During "VIDEO (S VIDEO)", "COMPONENT" and "DVI" input signal. V-SIZE Adjust the vertical size. CLOCK PHASE (RGB/PC in Panasonic AUTO with FULL mode, the adjustment is not memorized. POS. /SIZE NORMALIZE NORMAL H-POS H-SIZE V-POS V-SIZE CLOCK PHASE H-POS Adjust the horizontal position. H-SIZE ...

Plasma Display
Page 21
...screen display, depending on the 2-picture display mode. • Due to change input signal. Notes: • This button is selected in the clarity of the sub picture will be selected for TH-37PWD8UK and TH-42PWD8UK; BA BA B A [Example] Main picture label is bright Sub picture label... in Picture] Main picture Sub picture Main picture Sub picture MULTI PIP MULTI PIP AB MULTI PIP AB A B SWAP SWAP SWAP Press to select the input mode. Each time the location of the pictures. PC (RGB), PC (RGB) - PC (RGB) 21 Component, Component - C VIDEO2 VIDEO1 B A PC1 ...
...screen display, depending on the 2-picture display mode. • Due to change input signal. Notes: • This button is selected in the clarity of the sub picture will be selected for TH-37PWD8UK and TH-42PWD8UK; BA BA B A [Example] Main picture label is bright Sub picture label... in Picture] Main picture Sub picture Main picture Sub picture MULTI PIP MULTI PIP AB MULTI PIP AB A B SWAP SWAP SWAP Press to select the input mode. Each time the location of the pictures. PC (RGB), PC (RGB) - PC (RGB) 21 Component, Component - C VIDEO2 VIDEO1 B A PC1 ...

Plasma Display
Page 22
... 1366x768@60Hz (RGB, DVI, HDMI) 1280x768@60Hz (DVI) • Sound output is from Options menu. Component, PC (RGB) - Maximum VOL level INPUT lock Studio W/B Off 0 Off Off Advanced PIP Off Press to confirm. There may not be possible to discern details on the 2-picture display... the picture which is selected in Audio OUT (PIP) (See page 25). • In 2 screen display, the same input mode cannot be displayed simultaneously for TH-37PWD8UK and TH-42PWD8UK; Component, Component - Advanced PIP 1 Press to display the Setup menu. 2 Press to select "OSD Language". 3 Press ...
... 1366x768@60Hz (RGB, DVI, HDMI) 1280x768@60Hz (DVI) • Sound output is from Options menu. Component, PC (RGB) - Maximum VOL level INPUT lock Studio W/B Off 0 Off Off Advanced PIP Off Press to confirm. There may not be possible to discern details on the 2-picture display... the picture which is selected in Audio OUT (PIP) (See page 25). • In 2 screen display, the same input mode cannot be displayed simultaneously for TH-37PWD8UK and TH-42PWD8UK; Component, Component - Advanced PIP 1 Press to display the Setup menu. 2 Press to select "OSD Language". 3 Press ...

Plasma Display
Page 23
... to display the PICTURE menu. 2 Select to adjust. This menu selects higher than normal levels of BRIGHTNESS and PICTURE. ADVANCED SETTINGS NORMALIZE NORMAL BLACK EXTENSION INPUT LEVEL W/B HIGH R W/B HIGH B W/B LOW R W/B LOW B GAMMA AGC 0 0 0 0 0 0 2.2 OFF ADVANCED SETTINGS OFF Displays images with settings of the selected PICTURE menu to switch between modes. Select...
... to display the PICTURE menu. 2 Select to adjust. This menu selects higher than normal levels of BRIGHTNESS and PICTURE. ADVANCED SETTINGS NORMALIZE NORMAL BLACK EXTENSION INPUT LEVEL W/B HIGH R W/B HIGH B W/B LOW R W/B LOW B GAMMA AGC 0 0 0 0 0 0 2.2 OFF ADVANCED SETTINGS OFF Displays images with settings of the selected PICTURE menu to switch between modes. Select...

Plasma Display
Page 24
... saturation. Adjusts the white balance for light blue areas. Repeat steps 1 and 2 to the factory settings. 24 ADVANCED SETTINGS Item BLACK EXTENSION INPUT LEVEL Effect Less More Less More W/B HIGH R Less More W/B HIGH B Less More W/B LOW R Less More W/B LOW B Less More...MENU. • The setting details for STANDARD, DYNAMIC and CINEMA respectively are memorized separately for NTSC signal only during "VIDEO (S VIDEO)" input signal. • In PICTURE, there is not a noticeable change even when contrast is pressed during "NORMALIZE", then all adjustment values are...
... saturation. Adjusts the white balance for light blue areas. Repeat steps 1 and 2 to the factory settings. 24 ADVANCED SETTINGS Item BLACK EXTENSION INPUT LEVEL Effect Less More Less More W/B HIGH R Less More W/B HIGH B Less More W/B LOW R Less More W/B LOW B Less More...MENU. • The setting details for STANDARD, DYNAMIC and CINEMA respectively are memorized separately for NTSC signal only during "VIDEO (S VIDEO)" input signal. • In PICTURE, there is not a noticeable change even when contrast is pressed during "NORMALIZE", then all adjustment values are...
Plasma Display
Page 26
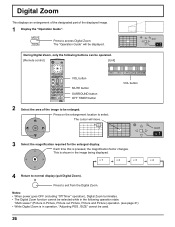
... enlarged display. This is shown in the following buttons can be operated. [Remote control] [Unit] EXIT 1 VOL button MUTE button SURROUND button OFF TIMER button INPUT MENU -/ VOL +/ ENTER/ VOL button 2 Select the area of the displayed image. 1 Display the "Operation Guide". Digital Zoom This displays an enlargement of the designated...
... enlarged display. This is shown in the following buttons can be operated. [Remote control] [Unit] EXIT 1 VOL button MUTE button SURROUND button OFF TIMER button INPUT MENU -/ VOL +/ ENTER/ VOL button 2 Select the area of the displayed image. 1 Display the "Operation Guide". Digital Zoom This displays an enlargement of the designated...
Plasma Display
Page 27
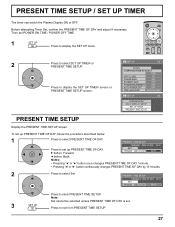
... screen. Before attempting Timer Set, confirm the PRESENT TIME OF DAY and adjust if necessary. SET UP 1/2 SIGNAL COMPONENT/RGB-IN SELECT RGB INPUT LABEL PC POWER SAVE OFF STANDBY SAVE OFF Press to select SET UP TIMER or PRESENT TIME SETUP. PRESENT TIME SETUP / SET UP TIMER The...
... screen. Before attempting Timer Set, confirm the PRESENT TIME OF DAY and adjust if necessary. SET UP 1/2 SIGNAL COMPONENT/RGB-IN SELECT RGB INPUT LABEL PC POWER SAVE OFF STANDBY SAVE OFF Press to select SET UP TIMER or PRESENT TIME SETUP. PRESENT TIME SETUP / SET UP TIMER The...
Plasma Display
Page 32
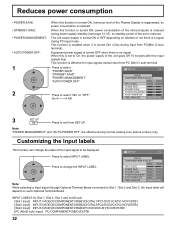
... SAVE" "POWER MANAGEMENT" "AUTO POWER OFF". INPUT LABELS for input signals except input from SET UP. Note: "POWER MANAGEMENT" and "AUTO POWER OFF" are effective during power supply standby (see page 13-15), so standby power of the Plasma Display is suppressed, so power consumption is effective for... Slot 1, Slot 2, Slot 3 and miniD-sub: [Slot1 Input] INPUT1/VIDEO1/COMPONENT1/RGB1/DIGITAL1/PC1/DVD1/CATV1/VCR1/STB1 [Slot2 Input] INPUT2/VIDEO2/COMPONENT2/RGB2/DIGITAL2/PC2/DVD2/CATV2...
... SAVE" "POWER MANAGEMENT" "AUTO POWER OFF". INPUT LABELS for input signals except input from SET UP. Note: "POWER MANAGEMENT" and "AUTO POWER OFF" are effective during power supply standby (see page 13-15), so standby power of the Plasma Display is suppressed, so power consumption is effective for... Slot 1, Slot 2, Slot 3 and miniD-sub: [Slot1 Input] INPUT1/VIDEO1/COMPONENT1/RGB1/DIGITAL1/PC1/DVD1/CATV1/VCR1/STB1 [Slot2 Input] INPUT2/VIDEO2/COMPONENT2/RGB2/DIGITAL2/PC2/DVD2/CATV2...


