Quick Start Guide
Page 7
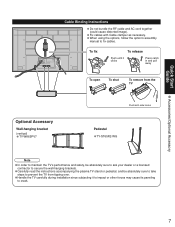
...Fix cables with Cable clamper as necessary. •When using the options, follow the option's assembly •manual to crack. 7 Carefully read the instructions accompanying the plasma TV stand or pedestal, and be absolutely sure to ask your dealer or a licensed •contractor to prevent the... TV from the TV Optional Accessory Wall-hanging bracket •(vertical) TY-WK65PV7 Push both side hooks Pedestal &#...
...Fix cables with Cable clamper as necessary. •When using the options, follow the option's assembly •manual to crack. 7 Carefully read the instructions accompanying the plasma TV stand or pedestal, and be absolutely sure to ask your dealer or a licensed •contractor to prevent the... TV from the TV Optional Accessory Wall-hanging bracket •(vertical) TY-WK65PV7 Push both side hooks Pedestal &#...
Quick Start Guide
Page 8
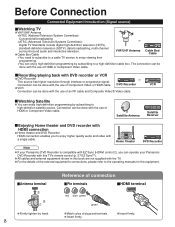
...Video or HDMI cable. Home Theater DVD Recorder Note If your Panasonic •DVD Recorder with this book are not supplied with a single cable. Before Connection Connected Equipment Introduction (Signal source) ■Watching TV VHF/UHF Antenna ••NTSC (National Television System Committee): ...Cable Box/Cable You need to subscribe to a cable TV service to enjoy higher quality audio and video with the TV. ••For the details of the external equipment's connections, please refer to the operating manuals for the equipment. ■Antenna terminal Reference of ...
...Video or HDMI cable. Home Theater DVD Recorder Note If your Panasonic •DVD Recorder with this book are not supplied with a single cable. Before Connection Connected Equipment Introduction (Signal source) ■Watching TV VHF/UHF Antenna ••NTSC (National Television System Committee): ...Cable Box/Cable You need to subscribe to a cable TV service to enjoy higher quality audio and video with the TV. ••For the details of the external equipment's connections, please refer to the operating manuals for the equipment. ■Antenna terminal Reference of ...

Quick Start Guide
Page 11
...DVD Recorder or e.g. For the details of the external equipment's connections, please refer to prevent recording. VCR S VIDEO OUT AV Equipment Basic Connection (TV + DVD Recorder or VCR) S VIDEO Standard-Definition L L white R R TO AU red NPUT INPUT PROG 1 2 •The S Video... HDMI terminals AV Equipment 1 AV IN 2 HDMI AV OUT e.g. Note ••Some programs contain a copyright protection signal to the operating manuals for the equipment. 11 Quick Start Guide High-Definition ■To use S VIDEO terminals yellow white yellow L white R COMPOSITE OUT red red...
...DVD Recorder or e.g. For the details of the external equipment's connections, please refer to prevent recording. VCR S VIDEO OUT AV Equipment Basic Connection (TV + DVD Recorder or VCR) S VIDEO Standard-Definition L L white R R TO AU red NPUT INPUT PROG 1 2 •The S Video... HDMI terminals AV Equipment 1 AV IN 2 HDMI AV OUT e.g. Note ••Some programs contain a copyright protection signal to the operating manuals for the equipment. 11 Quick Start Guide High-Definition ■To use S VIDEO terminals yellow white yellow L white R COMPOSITE OUT red red...

Quick Start Guide
Page 13
Connect •either S Video or Video cable. Basic Connection (TV + DVD Recorder or VCR + Satellite Receiver) 13 Note •For the details of the external equipment's connections, please refer to the operating manuals for the equipment. Connecting to S VIDEO terminals will override the composite video signal when S Video cable is connected. Quick Start...
Connect •either S Video or Video cable. Basic Connection (TV + DVD Recorder or VCR + Satellite Receiver) 13 Note •For the details of the external equipment's connections, please refer to the operating manuals for the equipment. Connecting to S VIDEO terminals will override the composite video signal when S Video cable is connected. Quick Start...

Quick Start Guide
Page 26
... each of your choice, then press OK. •During the selection, if no action is indicated. To operate other operations, see the manual of the connected equipment is taken for several seconds, the "Input select" menu disappears. (example) Video 1 VCR Terminal Label (example) ... to register the code of the equipment. (p. 43) 1 With the connected equipment turned On Display the Input select menu 2 Select the input mode Input select 1 TV 2 Component 1 3 Component 2 or 4 HDMI 1 5 HDMI 2 6 HDMI 3 7 Video 1 8 Video 2 9 Video 3 0 PC Press corresponding NUMBER button on the...
... each of your choice, then press OK. •During the selection, if no action is indicated. To operate other operations, see the manual of the connected equipment is taken for several seconds, the "Input select" menu disappears. (example) Video 1 VCR Terminal Label (example) ... to register the code of the equipment. (p. 43) 1 With the connected equipment turned On Display the Input select menu 2 Select the input mode Input select 1 TV 2 Component 1 3 Component 2 or 4 HDMI 1 5 HDMI 2 6 HDMI 3 7 Video 1 8 Video 2 9 Video 3 0 PC Press corresponding NUMBER button on the...

Quick Start Guide
Page 27
...to "EZ Sync Control" on p. 34-35. 1 Display EZ Sync menu 2 Select the equipment DVD recorder Home theater HD camcorder Speaker output TV select enter 3 Operate You can enjoy using more convenient functions. Viewing EZ SyncTM If you can operate the selected equipment with HDMI cable, you ...connect equipment that has "HDAVI Control 2" function to a TV with the TV's remote control. Follow the menu of the equipment and enjoy watching. Note •For details, see the manual for the equipment or ask your local dealer. ■ To return to p. 34.
...to "EZ Sync Control" on p. 34-35. 1 Display EZ Sync menu 2 Select the equipment DVD recorder Home theater HD camcorder Speaker output TV select enter 3 Operate You can enjoy using more convenient functions. Viewing EZ SyncTM If you can operate the selected equipment with HDMI cable, you ...connect equipment that has "HDAVI Control 2" function to a TV with the TV's remote control. Follow the menu of the equipment and enjoy watching. Note •For details, see the manual for the equipment or ask your local dealer. ■ To return to p. 34.
Quick Start Guide
Page 35
...only. select ■Available TV's remote control buttons Move the cursor/Select DVD recorder Home theater HD camcorder Speaker output TV access You can select HDMI connected Panasonic equipment and access it at the TV. •To operate the equipment, read the manual of the DIGA, Player ...theater, or RAM theater playback, the TV's input automatically switches to the theater system...
...only. select ■Available TV's remote control buttons Move the cursor/Select DVD recorder Home theater HD camcorder Speaker output TV access You can select HDMI connected Panasonic equipment and access it at the TV. •To operate the equipment, read the manual of the DIGA, Player ...theater, or RAM theater playback, the TV's input automatically switches to the theater system...
Quick Start Guide
Page 38
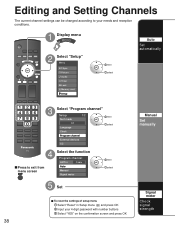
... All Language select Clock Program channel External devices CC 4 ■Press to exit from menu screen Select the function Program channel ANT in Cable Auto Manual Signal meter next select 5 Set ■ To reset the settings of setup menu Select "Reset" in Setup menu ( ) and press OK Input your 4-digit password...
... All Language select Clock Program channel External devices CC 4 ■Press to exit from menu screen Select the function Program channel ANT in Cable Auto Manual Signal meter next select 5 Set ■ To reset the settings of setup menu Select "Reset" in Setup menu ( ) and press OK Input your 4-digit password...

Quick Start Guide
Page 39
... - - 2 next Set favorite Select the number • Add Press OK to select "Yes (add)" or "No (skip)" Move cursor to channel number Manual program Edit Apply Cannnel Caption 2 ... 3 ... Select "ANT in" Select "Auto" Program channel ANT in " •(see below 5 ). All previously saved...Select scanning mode (p. 17) Auto program All channels Analog only Digital only ok select •• Settings are erased. Yes To cancel the Edit Manual program Edit Apply Cancel Cannnel Caption 2 ... 3 ... 4 ... 5 ... Yes ... Yes No ok (returns to the channel. Yes 5 ...
... - - 2 next Set favorite Select the number • Add Press OK to select "Yes (add)" or "No (skip)" Move cursor to channel number Manual program Edit Apply Cannnel Caption 2 ... 3 ... Select "ANT in" Select "Auto" Program channel ANT in " •(see below 5 ). All previously saved...Select scanning mode (p. 17) Auto program All channels Analog only Digital only ok select •• Settings are erased. Yes To cancel the Edit Manual program Edit Apply Cancel Cannnel Caption 2 ... 3 ... 4 ... 5 ... Yes ... Yes No ok (returns to the channel. Yes 5 ...

Quick Start Guide
Page 45
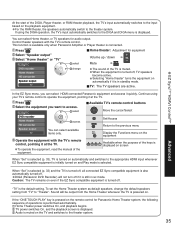
...to each model. Refer to an AV amp via HDMI, you cannot listen to the TV program through the theater system. ■Connecting this unit after connection After making connections as... to HDMI 2 (p. 26) initially before connecting to their •respective operating instruction manuals. When audio from other equipment connected to this unit via HDMI is not connected, you...Sync" audio-video amplifier and a compatible DIGA recorder, use a daisy chain connection as a Panasonic DIGADVD recorder, RAM theater, or Player theater system. If connection (or setting) of equipment compatible...
...to each model. Refer to an AV amp via HDMI, you cannot listen to the TV program through the theater system. ■Connecting this unit after connection After making connections as... to HDMI 2 (p. 26) initially before connecting to their •respective operating instruction manuals. When audio from other equipment connected to this unit via HDMI is not connected, you...Sync" audio-video amplifier and a compatible DIGA recorder, use a daisy chain connection as a Panasonic DIGADVD recorder, RAM theater, or Player theater system. If connection (or setting) of equipment compatible...


