
3 Ccd Dv Camcorder
Page 6
... Parts identification and handling 7 Lens cap and grip belt 9 Attaching the shoulder strap 9 Using the LCD monitor 9 Using the viewfinder 10 Power supply 10 Charging time and recordable time 11 Inserting/removing a cassette 12 Turning the camera on TV 27 Edit mode Copying onto a DVD recorder or...the Camera-Recorder before recording 18 Recording on a tape 19 Check the recording 19 Blank search function 19 Zoom in/out function 20 Adjusting the Microphone Sensitivity Level 20 Recording yourself 21 Backlight compensation function 21 Night view functions 21 Soft skin mode 22 Tele...
... Parts identification and handling 7 Lens cap and grip belt 9 Attaching the shoulder strap 9 Using the LCD monitor 9 Using the viewfinder 10 Power supply 10 Charging time and recordable time 11 Inserting/removing a cassette 12 Turning the camera on TV 27 Edit mode Copying onto a DVD recorder or...the Camera-Recorder before recording 18 Recording on a tape 19 Check the recording 19 Blank search function 19 Zoom in/out function 20 Adjusting the Microphone Sensitivity Level 20 Recording yourself 21 Backlight compensation function 21 Night view functions 21 Soft skin mode 22 Tele...

3 Ccd Dv Camcorder
Page 8
... S-VIDEO OUT VIDEO OUT L- can be attached here. (21) Microphone (built-in, stereo) -20(22) External microphone socket [EXT MIC] ≥Connect with an external microphone or audio equipment. (When this socket is in use, the built-in microphone does not operate.) (23) Zoom lever [W/T] -20-, -26(24) Grip belt -9- (35) ...(36) (37) (38) (34) DC Input socket [DC IN] -10(35) DV terminal [DV] -29- ≥Connect this is a hole for attaching the camera...
... S-VIDEO OUT VIDEO OUT L- can be attached here. (21) Microphone (built-in, stereo) -20(22) External microphone socket [EXT MIC] ≥Connect with an external microphone or audio equipment. (When this socket is in use, the built-in microphone does not operate.) (23) Zoom lever [W/T] -20-, -26(24) Grip belt -9- (35) ...(36) (37) (38) (34) DC Input socket [DC IN] -10(35) DV terminal [DV] -29- ≥Connect this is a hole for attaching the camera...
3 Ccd Dv Camcorder
Page 20
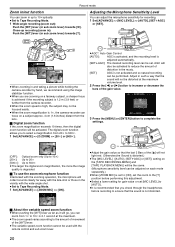
...zoom lever. 20 ZOOM ª About the variable speed zoom function ≥When pushing the [W/T] lever as far as it will go, you can zoom...ZOOM MIC] is set to [ON], set the zoom...5tW T 10tW T ≥When zooming in up recording (zoom in the music. [SET]: AGC ...Optical zoom only (Up to 10k) [20k]: Up to 20k [500k]: Up to 500k ≥The larger the digital zoom magnification, the more the image quality is degraded. ª To use the zoom microphone function Interlocked with the zooming operation, the microphone...zoom speed is high, the subject may not be focused easily. ≥When the zoom...
...zoom lever. 20 ZOOM ª About the variable speed zoom function ≥When pushing the [W/T] lever as far as it will go, you can zoom...ZOOM MIC] is set to [ON], set the zoom...5tW T 10tW T ≥When zooming in up recording (zoom in the music. [SET]: AGC ...Optical zoom only (Up to 10k) [20k]: Up to 20k [500k]: Up to 500k ≥The larger the digital zoom magnification, the more the image quality is degraded. ª To use the zoom microphone function Interlocked with the zooming operation, the microphone...zoom speed is high, the subject may not be focused easily. ≥When the zoom...

3 Ccd Dv Camcorder
Page 22
... the icon 1 appears. 2 Press the [2] button to select the soft skin icon [ ]. Wind noise reduction function This reduces the wind noise coming into the microphone when recording. ≥Set to Tape Recording Mode. 1 Set [BASIC] >> [WIND CUT] >> [ON]. ª To cancel the wind noise reduction function ...;If a sharper focus cannot be achieved, adjust the focus manually. ≥In the following cases, the tele-macro function is cancelled. ≥The zoom magnification becomes lower than 10k. ≥The [OFF/ON] switch or the mode switch is operated. ª To cancel fading Select the [ ]...
... the icon 1 appears. 2 Press the [2] button to select the soft skin icon [ ]. Wind noise reduction function This reduces the wind noise coming into the microphone when recording. ≥Set to Tape Recording Mode. 1 Set [BASIC] >> [WIND CUT] >> [ON]. ª To cancel the wind noise reduction function ...;If a sharper focus cannot be achieved, adjust the focus manually. ≥In the following cases, the tele-macro function is cancelled. ≥The zoom magnification becomes lower than 10k. ≥The [OFF/ON] switch or the mode switch is operated. ª To cancel fading Select the [ ]...

3 Ccd Dv Camcorder
Page 30
W STILL ADV PAUSE STILL ADV VOL STOP 3 Press the [A.DUB] button on the remote control to make audio dubbing ready. ¥REC A.DUB ZOOM T A.DUB ; V/REW PLAY FF/W STILL ADV PAUSE STILL ADV W VOL STOP ≥If a tape has a non-recorded portion when the tape is dubbed...sound added with audio dubbing You can add music or narration to the recorded cassette. ≥Set to Tape Playback Mode. 1 Insert an external microphone securely into the microphone. 5 Press the [;] button on the remote control. ª Before recording with audio dubbing ≥Set to Tape Recording Mode. ≥...
W STILL ADV PAUSE STILL ADV VOL STOP 3 Press the [A.DUB] button on the remote control to make audio dubbing ready. ¥REC A.DUB ZOOM T A.DUB ; V/REW PLAY FF/W STILL ADV PAUSE STILL ADV W VOL STOP ≥If a tape has a non-recorded portion when the tape is dubbed...sound added with audio dubbing You can add music or narration to the recorded cassette. ≥Set to Tape Playback Mode. 1 Insert an external microphone securely into the microphone. 5 Press the [;] button on the remote control. ª Before recording with audio dubbing ≥Set to Tape Recording Mode. ≥...

3 Ccd Dv Camcorder
Page 33
...on a tape with the accidental erasure prevention slider placed in the [SAVE] position. CINEMA : Cinema mode -23- : Digital zoom -20- REMOTE: An incorrect remote control mode has been selected. -172END: The tape came to record pictures on the screen....Tele macro -22- : Fade (White) -22- : Fade (Black) -22- : Color night view function -21- 0Lux : 0 Lux night view function -21- : ZOOM Zoom microphone -20- : Microphone sensitivity level -20- : 5: Wind noise reduction -22Sports mode (Scene mode) -23- : Portrait mode (Scene mode) -23- : Low light mode (Scene mode) -23...
...on a tape with the accidental erasure prevention slider placed in the [SAVE] position. CINEMA : Cinema mode -23- : Digital zoom -20- REMOTE: An incorrect remote control mode has been selected. -172END: The tape came to record pictures on the screen....Tele macro -22- : Fade (White) -22- : Fade (Black) -22- : Color night view function -21- 0Lux : 0 Lux night view function -21- : ZOOM Zoom microphone -20- : Microphone sensitivity level -20- : 5: Wind noise reduction -22Sports mode (Scene mode) -23- : Portrait mode (Scene mode) -23- : Low light mode (Scene mode) -23...
3 Ccd Dv Camcorder
Page 34
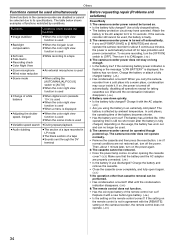
...is used ≥Soft skin ≥Tele-macro ≥Recording check ≥Color Night View ≥While recording to a tape ≥Zoom microphone ≥An external microphone is used ≥Wind noise reduction ≥Scene mode ≥When setting the [AUTO/MANUAL/FOCUS] switch to [ON] again. ... specifications. Charge the battery and remove the cassette. • Close the cassette cover completely, and fully open it with the AC adapter. (-10-) • Are you carry the camerarecorder from a cold place into a warm place, condensation may have operated. Attach the battery to the ...
...is used ≥Soft skin ≥Tele-macro ≥Recording check ≥Color Night View ≥While recording to a tape ≥Zoom microphone ≥An external microphone is used ≥Wind noise reduction ≥Scene mode ≥When setting the [AUTO/MANUAL/FOCUS] switch to [ON] again. ... specifications. Charge the battery and remove the cassette. • Close the cassette cover completely, and fully open it with the AC adapter. (-10-) • Are you carry the camerarecorder from a cold place into a warm place, condensation may have operated. Attach the battery to the ...

3 Ccd Dv Camcorder
Page 40
... lens cap) Operating temperature: 0 oC to 40 oC (32 oF to 104 oF) Operating humidity: 10% to 24.5 mm, Macro (Full range AF) Filter diameter: 43 mm Zoom: 10:1 Power zoom Monitor: 2.5-inch LCD Viewfinder: Color electronic viewfinder Microphone: Stereo (with a zoom function) Speaker: 1 round speaker ‰ 20 mm Standard illumination: 1,400 lx Minimum required illumination...
... lens cap) Operating temperature: 0 oC to 40 oC (32 oF to 104 oF) Operating humidity: 10% to 24.5 mm, Macro (Full range AF) Filter diameter: 43 mm Zoom: 10:1 Power zoom Monitor: 2.5-inch LCD Viewfinder: Color electronic viewfinder Microphone: Stereo (with a zoom function) Speaker: 1 round speaker ‰ 20 mm Standard illumination: 1,400 lx Minimum required illumination...

Dv Camcorder
Page 3
... Features of the camera unit 4 Features of the VTR unit 4 System configuration 5 Parts and their functions 6 Preparation 10 Using the AU-BP402 or AJ-BP490 battery pack made by Panasonic 10 Using a battery pack made by Anton Bauer..........11 Using the NP-1B battery pack made by Sony.......11 Using an...12 Attaching the lens 12 Mounting the unit on a tripod 13 Detaching the unit from the tripod attachment ......13 Attaching the viewfinder and microphone 13 Attaching the shoulder belt (optional accessory) ..13 Setting the camera ID 14 Setting the date and time 14 Lens adjustments and ...
... Features of the camera unit 4 Features of the VTR unit 4 System configuration 5 Parts and their functions 6 Preparation 10 Using the AU-BP402 or AJ-BP490 battery pack made by Panasonic 10 Using a battery pack made by Anton Bauer..........11 Using the NP-1B battery pack made by Sony.......11 Using an...12 Attaching the lens 12 Mounting the unit on a tripod 13 Detaching the unit from the tripod attachment ......13 Attaching the viewfinder and microphone 13 Attaching the shoulder belt (optional accessory) ..13 Setting the camera ID 14 Setting the date and time 14 Lens adjustments and ...

Dv Camcorder
Page 7
... sub-menu screen. @ FULL AUTO lamp This lights up red or flashes in green during interval recording. ON or OFF can be set for about 10 seconds. Parts and their functions 6 BREAKER switch If an excessively high current flows inside the unit due to some problem or other, the circuit breaker... to (MIC) the MIC IN connector are used to select the method used to switch the counter display. REAR : The input signals from the microphone connected to adjust the audio levels of CH1 and CH2. ; What can be monitored is displayed. TC : The time code is the mixed sound of ...
... sub-menu screen. @ FULL AUTO lamp This lights up red or flashes in green during interval recording. ON or OFF can be set for about 10 seconds. Parts and their functions 6 BREAKER switch If an excessively high current flows inside the unit due to some problem or other, the circuit breaker... to (MIC) the MIC IN connector are used to select the method used to switch the counter display. REAR : The input signals from the microphone connected to adjust the audio levels of CH1 and CH2. ; What can be monitored is displayed. TC : The time code is the mixed sound of ...

Dv Camcorder
Page 8
... audio component is connected to these jacks. OFF : The electronic shutter does not operate. The switch is attached here. 8 The power for the microphone is supplied from this mount. 4 AUTO W/B (white/black) BAL switch AWB: The white balance is operated. Bear in mind that the switch does...5 SHUTTER switch This is the ON/OFF selector switch of the lenses concerned. 8 MIC IN (mic input) jack (XLR, 3-pin) The accessory microphone is connected to this connector. > Viewfinder stopper screw This screw is set to secure the viewfinder. ? When the AWB memory selector switch on the ...
... audio component is connected to these jacks. OFF : The electronic shutter does not operate. The switch is attached here. 8 The power for the microphone is supplied from this mount. 4 AUTO W/B (white/black) BAL switch AWB: The white balance is operated. Bear in mind that the switch does...5 SHUTTER switch This is the ON/OFF selector switch of the lenses concerned. 8 MIC IN (mic input) jack (XLR, 3-pin) The accessory microphone is connected to this connector. > Viewfinder stopper screw This screw is set to secure the viewfinder. ? When the AWB memory selector switch on the ...

Dv Camcorder
Page 9
..., and the lamp flashes. This button cannot be output from the external source. 3 AUDIO IN CH1, CH2 (audio input channel 1, 2) jacks (XLR, 3-pin) An external microphone or line input signals are plugged in the future is connected here, it is being transferred to supply a 7 V voltage. 6 VIDEO OUT jack (BNC) This is...
..., and the lamp flashes. This button cannot be output from the external source. 3 AUDIO IN CH1, CH2 (audio input channel 1, 2) jacks (XLR, 3-pin) An external microphone or line input signals are plugged in the future is connected here, it is being transferred to supply a 7 V voltage. 6 VIDEO OUT jack (BNC) This is...
Dv Camcorder
Page 13
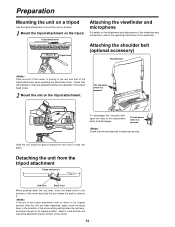
... the tripod attachment to the operating instructions of the viewfinder. Check that the diameter of the hole selected matches the diameter of the viewfinder and microphone, refer to mount the unit on a tripod. 1 Mount the tripod attachment on the tripod attachment. Slide the unit along the groove toward ... the arrow while pushing down the red lever, move the black lever in the center. 13 Tripod attachment Tripod head Attaching the viewfinder and microphone For details on the attachment and adjustments of the tripod head screw. 2 Mount the unit on the tripod. Bear in mind that of...
... the tripod attachment to the operating instructions of the viewfinder. Check that the diameter of the hole selected matches the diameter of the viewfinder and microphone, refer to mount the unit on a tripod. 1 Mount the tripod attachment on the tripod attachment. Slide the unit along the groove toward ... the arrow while pushing down the red lever, move the black lever in the center. 13 Tripod attachment Tripod head Attaching the viewfinder and microphone For details on the attachment and adjustments of the tripod head screw. 2 Mount the unit on the tripod. Bear in mind that of...
Dv Camcorder
Page 27
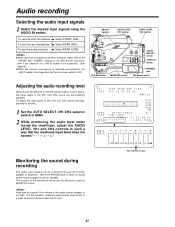
... the setting for the MIC/AUDIO sub-menu item if the phantom mic (+48 V) needs to be supported. (See page 35) ≥When the exterior microphone is set the mic power switch to MAN. 2 While monitoring the audio level meter inside the viewfinder, adjust the AUDIO LEVEL CH1 and CH2 controls... CH1 CH2 -32 -28 -24 -20 -16 -12 -8 -4 0dB The reference value 27 To use the audio products i Select REAR (LINE). ≥When the front microphone has been selected, select ON as follows: 1 Set the AUTO SELECT CH1/CH2 selector switch to ON. Audio recording Selecting the audio input signals 1 Select...
... the setting for the MIC/AUDIO sub-menu item if the phantom mic (+48 V) needs to be supported. (See page 35) ≥When the exterior microphone is set the mic power switch to MAN. 2 While monitoring the audio level meter inside the viewfinder, adjust the AUDIO LEVEL CH1 and CH2 controls... CH1 CH2 -32 -28 -24 -20 -16 -12 -8 -4 0dB The reference value 27 To use the audio products i Select REAR (LINE). ≥When the front microphone has been selected, select ON as follows: 1 Set the AUTO SELECT CH1/CH2 selector switch to ON. Audio recording Selecting the audio input signals 1 Select...
Dv Camcorder
Page 35
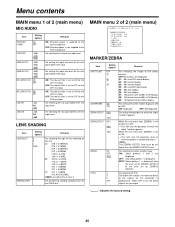
... for the rear jack AUDIO CH1 input. TIME/DATE.. SPOT: Zebra pattern 1 is supplied to the front microphone. Menu contents MAIN menu 1 of 2 (main menu) MIC/AUDIO Item FRONT MIC POWER Setting options ON... DETECT to the level set for ZEBRA2 DETECT. When OFF is not supplied to the front microphone. OFF:Phantom power is set higher than A, B or C For performing shading compensation for the... k 4.8IRS B: YH18 k 6.7KRS YH14 k 7.3KRS YH12 k 4.8KRS S14 k 7.5BRM4 S17 k 6.6BRM4 C: S14 k 7.3BRM (For AG-DVC200L) USER:Lens other than the ZEBRA1 DETECT level. VF DISPLAY 1/2..
... for the rear jack AUDIO CH1 input. TIME/DATE.. SPOT: Zebra pattern 1 is supplied to the front microphone. Menu contents MAIN menu 1 of 2 (main menu) MIC/AUDIO Item FRONT MIC POWER Setting options ON... DETECT to the level set for ZEBRA2 DETECT. When OFF is not supplied to the front microphone. OFF:Phantom power is set higher than A, B or C For performing shading compensation for the... k 4.8IRS B: YH18 k 6.7KRS YH14 k 7.3KRS YH12 k 4.8KRS S14 k 7.5BRM4 S17 k 6.6BRM4 C: S14 k 7.3BRM (For AG-DVC200L) USER:Lens other than the ZEBRA1 DETECT level. VF DISPLAY 1/2..
Dv Camcorder
Page 43
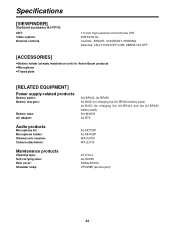
...PEAKING Switches: TALLY HIGH/OFF/LOW, ZEBRA ON/ OFF [ACCESSORIES] ≥Battery holder (already installed on unit) for Anton Bauer products ≥Microphone ≥Tripod plate [RELATED EQUIPMENT] Power supply-related products Battery packs: Battery chargers: Battery case: AC adapter: AU-BP402, AJ-BP490 AJ-... battery pack) AJ-B450 (for charging the AU-BP402 and the AJ-BP490 battery pack) AU-M402H AJ-B75 Audio products Microphone kit: Microphone holder: Wireless mic receiver: Camera attachment: AJ-MC700P AJ-MH700P WX-RJ700 WX-ZJ770 Maintenance products Cleaning tape: Soft carrying case...
...PEAKING Switches: TALLY HIGH/OFF/LOW, ZEBRA ON/ OFF [ACCESSORIES] ≥Battery holder (already installed on unit) for Anton Bauer products ≥Microphone ≥Tripod plate [RELATED EQUIPMENT] Power supply-related products Battery packs: Battery chargers: Battery case: AC adapter: AU-BP402, AJ-BP490 AJ-... battery pack) AJ-B450 (for charging the AU-BP402 and the AJ-BP490 battery pack) AU-M402H AJ-B75 Audio products Microphone kit: Microphone holder: Wireless mic receiver: Camera attachment: AJ-MC700P AJ-MH700P WX-RJ700 WX-ZJ770 Maintenance products Cleaning tape: Soft carrying case...


