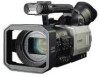

Dvc Camcorder
Page 2
...EQUIPMENT. Warning: To assure continued FCC emission limit compliance, the user must use . CR2025 only. • Do not recharge the battery. Camera-Recorder The rating plate is on the underside of the Camera-Recorder AC Adapter The rating plate is operated in a commercial environment... of electric shock or fire hazard due to overheating, ensure that may cause harmful interference to Part 15 of explosion or fire if battery is not a rechargeable type. Operation of important operating and maintenance (servicing) instructions in temperatures over 140°F (60°C). •...
...EQUIPMENT. Warning: To assure continued FCC emission limit compliance, the user must use . CR2025 only. • Do not recharge the battery. Camera-Recorder The rating plate is on the underside of the Camera-Recorder AC Adapter The rating plate is operated in a commercial environment... of electric shock or fire hazard due to overheating, ensure that may cause harmful interference to Part 15 of explosion or fire if battery is not a rechargeable type. Operation of important operating and maintenance (servicing) instructions in temperatures over 140°F (60°C). •...
Dvc Camcorder
Page 3
... read before cleaning. For video units intended to be operated only from the type of plugs, convenience receptacles, and the point where they exit from battery power, or other similar surface, or near a bath tub, wash bowl, kitchen sink, or laundry tub, in installation such as they are not sure of...
... read before cleaning. For video units intended to be operated only from the type of plugs, convenience receptacles, and the point where they exit from battery power, or other similar surface, or near a bath tub, wash bowl, kitchen sink, or laundry tub, in installation such as they are not sure of...

Dvc Camcorder
Page 5
...of parts 16 Camera-recorder 16 Remote control 19 Preparation The remote control 20 Insert the battery 20 Remote control setup 20 The battery 21 Charging 21 Attaching the battery 22 Detaching the battery 22 Viewfinder 23 Using the viewfinder 23 Using the LCD 24 Emphasizing outlines 24 Adjusting ...the screen display 25 Time data 26 Setting the calendar 26 Recharging the built-in battery 27 Setting user information 27 Setting the time code 28 Specifying the time code (TC PRESET) ......... 29 Shooting Regular shooting 31 ...
...of parts 16 Camera-recorder 16 Remote control 19 Preparation The remote control 20 Insert the battery 20 Remote control setup 20 The battery 21 Charging 21 Attaching the battery 22 Detaching the battery 22 Viewfinder 23 Using the viewfinder 23 Using the LCD 24 Emphasizing outlines 24 Adjusting ...the screen display 25 Time data 26 Setting the calendar 26 Recharging the built-in battery 27 Setting user information 27 Setting the time code 28 Specifying the time code (TC PRESET) ......... 29 Shooting Regular shooting 31 ...

Dvc Camcorder
Page 7
... events (such as (Page 10). References • References are shown as weddings), always take some trial shots and check that Panasonic makes no guarantees for your own personal enjoyment. Before use tapes with the camera-recorder or cassette. Respect copyrights • Copyright laws...Please understand that the sound and images have recorded for the battery and AC adapter, see "Optional Units" (Page 86). 7 Accessories Battery * AC Adapter * AC power supply cord DC cord Wireless remote control and button battery (CR2025) Eye cup Microphone holder 2x 6-mm screws 2x ...
... events (such as (Page 10). References • References are shown as weddings), always take some trial shots and check that Panasonic makes no guarantees for your own personal enjoyment. Before use tapes with the camera-recorder or cassette. Respect copyrights • Copyright laws...Please understand that the sound and images have recorded for the battery and AC adapter, see "Optional Units" (Page 86). 7 Accessories Battery * AC Adapter * AC power supply cord DC cord Wireless remote control and button battery (CR2025) Eye cup Microphone holder 2x 6-mm screws 2x ...

Dvc Camcorder
Page 8
... disconnect the AC power supply cord. • The tape can become slack or damaged if you leave it in the camera. • The battery can over discharge if you are using it, but this , turn the camera-recorder back on top of time. Keep the camera-recorder away from .... • Sand and dust can damage the camera-recorder and cassette. (Be especially careful when inserting or removing the cassettes.) AC adapter and battery • If the battery is extremely hot or cold, the CHARGE lamp will blink several times before charging starts. • If the CHARGE lamp continues to blink even...
... disconnect the AC power supply cord. • The tape can become slack or damaged if you leave it in the camera. • The battery can over discharge if you are using it, but this , turn the camera-recorder back on top of time. Keep the camera-recorder away from .... • Sand and dust can damage the camera-recorder and cassette. (Be especially careful when inserting or removing the cassettes.) AC adapter and battery • If the battery is extremely hot or cold, the CHARGE lamp will blink several times before charging starts. • If the CHARGE lamp continues to blink even...

Dvc Camcorder
Page 9
...normal and will have no effect on the images you leave it in recycling it again. Before use or recharge a damaged battery. Protective circuitry functions if you use the battery where it is very hot and you use it . Rather than 0.01% of the LCD or viewfinder if they are displayed... if you can over any screw other foreign matter. Do not force the tripod screw beyond this by the ambient temperature and humidity, and the battery's effective operating time is 5.5 mm deep. Attach the tripod to be used . These phenomena are not being used even if you use Completely ...
...normal and will have no effect on the images you leave it in recycling it again. Before use or recharge a damaged battery. Protective circuitry functions if you use the battery where it is very hot and you use it . Rather than 0.01% of the LCD or viewfinder if they are displayed... if you can over any screw other foreign matter. Do not force the tripod screw beyond this by the ambient temperature and humidity, and the battery's effective operating time is 5.5 mm deep. Attach the tripod to be used . These phenomena are not being used even if you use Completely ...

Dvc Camcorder
Page 10
...holder. Checking the system operations After purchase, do these system checks to ensure that the unit is required, consult with power (AC adapter or battery). DC cord Mini DV cassette tape Connect the AC power supply cord Insert the Mini DV cassette tape 1 Slide the EJECT switch in the figure... above. • You cannot charge the battery when supplying power to the camera-recorder from the AC adapter. The cassette holder opens automatically when the cassette cover is fully open if the...
...holder. Checking the system operations After purchase, do these system checks to ensure that the unit is required, consult with power (AC adapter or battery). DC cord Mini DV cassette tape Connect the AC power supply cord Insert the Mini DV cassette tape 1 Slide the EJECT switch in the figure... above. • You cannot charge the battery when supplying power to the camera-recorder from the AC adapter. The cassette holder opens automatically when the cassette cover is fully open if the...

Dvc Camcorder
Page 12
... performs as follows when you pause or leave it further as this will not open if the camera is supplied with power (AC adapter or battery). 120 2 While in the shooting standby mode, press the REC CHECK button. Recording continues, and the open out to 120 degrees. It can damage the...
... performs as follows when you pause or leave it further as this will not open if the camera is supplied with power (AC adapter or battery). 120 2 While in the shooting standby mode, press the REC CHECK button. Recording continues, and the open out to 120 degrees. It can damage the...
Dvc Camcorder
Page 13
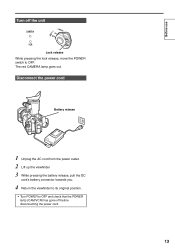
Disconnect the power cord Battery release 1 Unplug the AC cord from the power outlet. 2 Lift up the viewfinder. 3 While pressing the battery release, pull the DC cord's battery connector towards you. 4 Return the viewfinder to its original position. • Turn POWER to OFF and check that the POWER lamp (CAM/VCR) has gone off the unit CAMERA POWER ON OFF VCR Lock release While pressing the lock release, move the POWER switch to OFF. The red CAMERA lamp goes out. Before use Turn off before disconnecting the power cord. 13
Disconnect the power cord Battery release 1 Unplug the AC cord from the power outlet. 2 Lift up the viewfinder. 3 While pressing the battery release, pull the DC cord's battery connector towards you. 4 Return the viewfinder to its original position. • Turn POWER to OFF and check that the POWER lamp (CAM/VCR) has gone off the unit CAMERA POWER ON OFF VCR Lock release While pressing the lock release, move the POWER switch to OFF. The red CAMERA lamp goes out. Before use Turn off before disconnecting the power cord. 13
Dvc Camcorder
Page 16
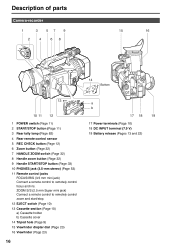
... (Page 9) 15 Viewfinder diopter dial (Page 23) 16 Viewfinder (Page 23) 16 a b 17 18 19 17 Power terminals (Page 10) 18 DC INPUT terminal (7.9 V) 19 Battery release (Pages 13 and 22) ZOOM S/S (2.5 mm Super mini jack) Connect a remote control to remotely control focus and iris.
... (Page 9) 15 Viewfinder diopter dial (Page 23) 16 Viewfinder (Page 23) 16 a b 17 18 19 17 Power terminals (Page 10) 18 DC INPUT terminal (7.9 V) 19 Battery release (Pages 13 and 22) ZOOM S/S (2.5 mm Super mini jack) Connect a remote control to remotely control focus and iris.

Dvc Camcorder
Page 20
...of use.) If the remote control unit fails to set the remote control unit for use with VCR2. SEARCH OFF/ON P.B.DIGITAL PB. When the battery in the remote control unit is replaced, the remote control unit is set for use with VCR1. • Camera In the setup menus, OTHER..., REMOTE, set this camera-recorder and the remote control to its original position. The remote control Insert the battery 1 Push the catch in the direction shown by arrow (1) to remove the holder. 2 Insert the battery with the "+" marked side facing up. 3 Return the holder to either [VCR1] or [VCR2] so...
...of use.) If the remote control unit fails to set the remote control unit for use with VCR2. SEARCH OFF/ON P.B.DIGITAL PB. When the battery in the remote control unit is replaced, the remote control unit is set for use with VCR1. • Camera In the setup menus, OTHER..., REMOTE, set this camera-recorder and the remote control to its original position. The remote control Insert the battery 1 Push the catch in the direction shown by arrow (1) to remove the holder. 2 Insert the battery with the "+" marked side facing up. 3 Return the holder to either [VCR1] or [VCR2] so...

Dvc Camcorder
Page 21
... LCD monitor. • The times apply when the ambient operating temperature is 68°F (20°C) and humidity is normal. • You cannot charge the battery when supplying power to the DC OUT connector, so disconnect it first. 2 Plug the AC cord into the power outlet. • The POWER lamp and... CHARGE lamp on the AC adapter goes out. 4 Slide the battery and remove it again. When storing it for an extended time, charge it at other temperatures and humidity levels. • Keep metal objects (such as...
... LCD monitor. • The times apply when the ambient operating temperature is 68°F (20°C) and humidity is normal. • You cannot charge the battery when supplying power to the DC OUT connector, so disconnect it first. 2 Plug the AC cord into the power outlet. • The POWER lamp and... CHARGE lamp on the AC adapter goes out. 4 Slide the battery and remove it again. When storing it for an extended time, charge it at other temperatures and humidity levels. • Keep metal objects (such as...
Dvc Camcorder
Page 22
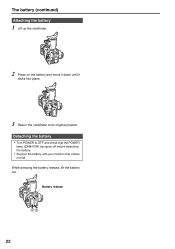
Battery release 1 23 22 Detaching the battery • Turn POWER to OFF and check that the POWER lamp (CAM/VCR) has gone off before detaching the battery. • Support the battery with your hand so that it clicks into place. 3 Return the viewfinder to its original position. While pressing the battery release, lift the battery out. The battery (continued) Attaching the battery 1 Lift up the viewfinder. 2 Press on the battery and move it down until it does not fall.
Battery release 1 23 22 Detaching the battery • Turn POWER to OFF and check that the POWER lamp (CAM/VCR) has gone off before detaching the battery. • Support the battery with your hand so that it clicks into place. 3 Return the viewfinder to its original position. While pressing the battery release, lift the battery out. The battery (continued) Attaching the battery 1 Lift up the viewfinder. 2 Press on the battery and move it down until it does not fall.
Dvc Camcorder
Page 27
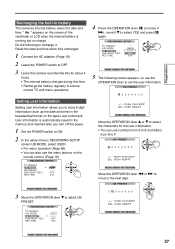
.... • For menu operation (Page 66) • You can use the OPERATION lever to store 8-digit information (such as the date and time) in battery The camera's internal battery saves the date and time. RECORDING SETUP TC PRESET UB MODE UB PRESET ONE-SHOT REC REC TIME - - - UB PRESET F 0 0 0 0 0 0 0 +/- :... PUSH REW/FF PUSH MENU TO RETURN PUSH MENU TO RETURN 27 " " appears on the screen of the viewfinder or LCD when the internal battery is automatically saved in the memory and retained after you to set the user information. Do the following screen appears, so use numbers from 0...
.... • For menu operation (Page 66) • You can use the OPERATION lever to store 8-digit information (such as the date and time) in battery The camera's internal battery saves the date and time. RECORDING SETUP TC PRESET UB MODE UB PRESET ONE-SHOT REC REC TIME - - - UB PRESET F 0 0 0 0 0 0 0 +/- :... PUSH REW/FF PUSH MENU TO RETURN PUSH MENU TO RETURN 27 " " appears on the screen of the viewfinder or LCD when the internal battery is automatically saved in the memory and retained after you to set the user information. Do the following screen appears, so use numbers from 0...

Dvc Camcorder
Page 31
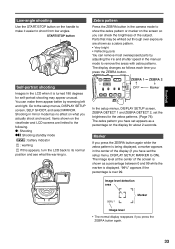
... 23) See if the diopter adjustment is in auto mode 1 Set the POWER switch to ON. 2 Press AUTO to switch to start shooting. Keep a spare battery with you. g Battery (Page 21) Use a fully charged...
... 23) See if the diopter adjustment is in auto mode 1 Set the POWER switch to ON. 2 Press AUTO to switch to start shooting. Keep a spare battery with you. g Battery (Page 21) Use a fully charged...
Dvc Camcorder
Page 33
... and LCD screens are shown as a percentage between 0 and 99 while the marker is over exposure are limited to the following. *: Shooting *h: Shooting standby mode : battery indicator : warning If this appears, turn the LCD back to shoot from low angles. Shooting in the camera mode to the setup menus, DISPLAY SETUP...
... and LCD screens are shown as a percentage between 0 and 99 while the marker is over exposure are limited to the following. *: Shooting *h: Shooting standby mode : battery indicator : warning If this appears, turn the LCD back to shoot from low angles. Shooting in the camera mode to the setup menus, DISPLAY SETUP...

Dvc Camcorder
Page 44
... INPUT 1/2 (MIC POWER +48V) switch to channel 1. OFF: (When a phantom microphone is recorded to ON. You can switch the source for INPUT 1/2 terminal. • The battery will discharge faster if you use a phantom microphone. • Set to OFF if you will be recorded to audio channel 2. Using another microphone and audio...
... INPUT 1/2 (MIC POWER +48V) switch to channel 1. OFF: (When a phantom microphone is recorded to ON. You can switch the source for INPUT 1/2 terminal. • The battery will discharge faster if you use a phantom microphone. • Set to OFF if you will be recorded to audio channel 2. Using another microphone and audio...

Dvc Camcorder
Page 47
...USER FILE FILE TRANS FILE RECEIVE HOUR METER OFF TAPE - - - - File transfer starts. Under no circumstances cut the power by disconnecting the battery or AC adapter. RECEIVE MODE blinks on the screen of camera 2. YES 00015H 7 The following screen appears, so move the OPERATION lever r, ...ALL USER 8 The following scene file data to another DVX 100B connected with a DV (IEEE1394) cable. Shooting Transferring scene files You can only transfer between DVX100B models. 1 Connect camera 1 to camera 2 with a DV (IEEE1394) cable. SCENE: A file selected with the scene dial (F1-F6) SCENE ...
...USER FILE FILE TRANS FILE RECEIVE HOUR METER OFF TAPE - - - - File transfer starts. Under no circumstances cut the power by disconnecting the battery or AC adapter. RECEIVE MODE blinks on the screen of camera 2. YES 00015H 7 The following screen appears, so move the OPERATION lever r, ...ALL USER 8 The following scene file data to another DVX 100B connected with a DV (IEEE1394) cable. Shooting Transferring scene files You can only transfer between DVX100B models. 1 Connect camera 1 to camera 2 with a DV (IEEE1394) cable. SCENE: A file selected with the scene dial (F1-F6) SCENE ...

Dvc Camcorder
Page 61
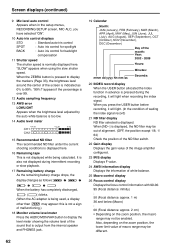
... pressed to select a setting. 8 Information display Following information is displayed here. Editing Displays 61 Screen displays Displays in the mirror mode. : Lights when the internal battery for the calendar has run out. 2 Backup unit displays The status of the auto white balance or the auto black balance • Warning (Page 64...
... pressed to select a setting. 8 Information display Following information is displayed here. Editing Displays 61 Screen displays Displays in the mirror mode. : Lights when the internal battery for the calendar has run out. 2 Backup unit displays The status of the auto white balance or the auto black balance • Warning (Page 64...
Dvc Camcorder
Page 62
..." appears when using the slow shutter speed. It is also not displayed during intermittent recording or slow playback. 17 Remaining battery charge As the remaining battery charge drops, the display changes as 0% to display the level meter showing the volume level of the sound that is... amplifier configured. 23 IRIS display Displays F value. 24 AWB information display Displays the information of the screen is indicated as follows: When the battery has completely discharged, ( ) blinks. (When the AC adapter is being calculated. When you have selected "ON". 10 Auto iris control displays...
..." appears when using the slow shutter speed. It is also not displayed during intermittent recording or slow playback. 17 Remaining battery charge As the remaining battery charge drops, the display changes as 0% to display the level meter showing the volume level of the sound that is... amplifier configured. 23 IRIS display Displays F value. 24 AWB information display Displays the information of the screen is indicated as follows: When the battery has completely discharged, ( ) blinks. (When the AC adapter is being calculated. When you have selected "ON". 10 Auto iris control displays...


