

AGDVC30 User Guide
Page 1
SHOOTING PREPARATION DESCRIPTION BEFORE USE OF PARTS Ò NTSC Digital Video Camera-Recorder Model AG- P PLAYBACK EDITING DISPLAYS MENUS TROUBLESHOOTING SPECIFICATIONS, OTHER Before operating this product, please read the instructions carefully and save this manual for future use. P Printed in Japan F0204W1034 VQT0J25-1
SHOOTING PREPARATION DESCRIPTION BEFORE USE OF PARTS Ò NTSC Digital Video Camera-Recorder Model AG- P PLAYBACK EDITING DISPLAYS MENUS TROUBLESHOOTING SPECIFICATIONS, OTHER Before operating this product, please read the instructions carefully and save this manual for future use. P Printed in Japan F0204W1034 VQT0J25-1

AGDVC30 User Guide
Page 2
... EQUIPMENT. CAUTION: Do not install or place this equipment could void the user's authority to operate it is on the underside of the Camera-Recorder AC Adapter OThe rating plate is not a rechargeable type. FCC Note: This equipment has been tested and found to comply with the... instruction manual, may be regulated in fire. CAUTION: Danger of in your local authorities, or the Electronics Industries Alliance: Camera-Recorder OThe rating plate is on the underside of the AC Adapter. OReplace only with part No. ODo not disassemble or dispose of explosion...
... EQUIPMENT. CAUTION: Do not install or place this equipment could void the user's authority to operate it is on the underside of the Camera-Recorder AC Adapter OThe rating plate is not a rechargeable type. FCC Note: This equipment has been tested and found to comply with the... instruction manual, may be regulated in fire. CAUTION: Danger of in your local authorities, or the Electronics Industries Alliance: Camera-Recorder OThe rating plate is on the underside of the AC Adapter. OReplace only with part No. ODo not disassemble or dispose of explosion...
AGDVC30 User Guide
Page 5
...events (such as weddings), always take some trial shots and check that all illustrations (camera-recorder, menu screens, etc.) in cases where images and/or sound were not recorded as (P00). Panasonic makes no guarantees for your recordings in these instructions O Note that the sound and ...images have recorded for your own personal enjoyment. Remember that Panasonic makes no guarantees for any purpose other than your recordings. Always take some trial shots before actual shooting. Please understand that...
...events (such as weddings), always take some trial shots and check that all illustrations (camera-recorder, menu screens, etc.) in cases where images and/or sound were not recorded as (P00). Panasonic makes no guarantees for your recordings in these instructions O Note that the sound and ...images have recorded for your own personal enjoyment. Remember that Panasonic makes no guarantees for any purpose other than your recordings. Always take some trial shots before actual shooting. Please understand that...

AGDVC30 User Guide
Page 6
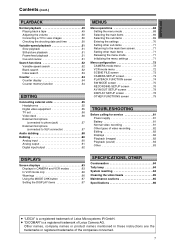
... 16 Attaching the handle 16 Attaching the large eye-cup 16 Attaching the shoulder strap 17 Lens hood 18 Cassette tapes 18 DESCRIPTION OF PARTS Camera-recorder 19 Wireless remote control unit 22 PREPARATION Battery 23 Charging 23 Mounting 24 Removing 24 Remote control unit 25 Installing the battery 25 Setting...
... 16 Attaching the handle 16 Attaching the large eye-cup 16 Attaching the shoulder strap 17 Lens hood 18 Cassette tapes 18 DESCRIPTION OF PARTS Camera-recorder 19 Wireless remote control unit 22 PREPARATION Battery 23 Charging 23 Mounting 24 Removing 24 Remote control unit 25 Installing the battery 25 Setting...
AGDVC30 User Guide
Page 7
... Setting other main items 71 Releasing the menu mode 71 Initializing the menu settings 71 Menu configuration 72 CAMERA mode menu 72 VCR mode menu 72 SCENE FILE screen 73 CAMERA SETUP screen 73 PLAYBACK FUNCTION screen 74 SW MODE screen 75 RECORDING SETUP screen 76 AV IN/OUT... of Leica Microsystems IR GmbH. O "DICOMAR" is a registered trademark of the companies concerned. 7 Other names, company names or product names mentioned in CAMERA and VCR modes 63 In VCR mode only 66 Warnings 66 Using the MODE CHK button 67 Setting the DISPLAY items 67 SPECIFICATIONS, OTHER Condensation...
... Setting other main items 71 Releasing the menu mode 71 Initializing the menu settings 71 Menu configuration 72 CAMERA mode menu 72 VCR mode menu 72 SCENE FILE screen 73 CAMERA SETUP screen 73 PLAYBACK FUNCTION screen 74 SW MODE screen 75 RECORDING SETUP screen 76 AV IN/OUT... of Leica Microsystems IR GmbH. O "DICOMAR" is a registered trademark of the companies concerned. 7 Other names, company names or product names mentioned in CAMERA and VCR modes 63 In VCR mode only 66 Warnings 66 Using the MODE CHK button 67 Setting the DISPLAY items 67 SPECIFICATIONS, OTHER Condensation...

AGDVC30 User Guide
Page 9
... the AC adapter is wrong with the battery or AC adapter. Consult your tape recordings or distort the images. O Sand and dust can damage the camera- O When the AC adapter is not a sign of time. recorder, the tape may result in the images and/or sound due to the electromagnetic waves... that the set emits. O Failure to heed this caution will cause the camera-recorder or cassette to malfunction (and may become extremely hot or cold or if it will no charge, the CHARGE lamp will blink several times...
... the AC adapter is wrong with the battery or AC adapter. Consult your tape recordings or distort the images. O Sand and dust can damage the camera- O When the AC adapter is not a sign of time. recorder, the tape may result in the images and/or sound due to the electromagnetic waves... that the set emits. O Failure to heed this caution will cause the camera-recorder or cassette to malfunction (and may become extremely hot or cold or if it will no charge, the CHARGE lamp will blink several times...

AGDVC30 User Guide
Page 10
...Doing so may become very cold, the LCD monitor will be restored when the temperature inside for some time. Mounting the camera-recorder on a tripod Camera mounted on the LCD monitor or viewfinder for an extended period, they may damage the parts inside , a small amount... . Note that if you use any connectors that are manufactured using high-precision technology. Operating precautions (cont.) Battery characteristics This camera-recorder uses a rechargeable lithium-ion battery that uses its internal chemical reaction to re-use it even after charging it. Also,...
...Doing so may become very cold, the LCD monitor will be restored when the temperature inside for some time. Mounting the camera-recorder on a tripod Camera mounted on the LCD monitor or viewfinder for an extended period, they may damage the parts inside , a small amount... . Note that if you use any connectors that are manufactured using high-precision technology. Operating precautions (cont.) Battery characteristics This camera-recorder uses a rechargeable lithium-ion battery that uses its internal chemical reaction to re-use it even after charging it. Also,...

AGDVC30 User Guide
Page 11
... may corrode the terminals, cause other products may get inside the cassette. When storing it again. BEFORE USE Storage precautions Before storing the camera-recorder, remove both the cassette and battery. Recommended temperature range: 59°F to 77°F (15°C to 25°C) Recommended... relative humidity: 40% to 60% Camera-recorder Wrap the camera-recorder in a place with oily vapors or high dust concentrations may damage the tapes. Cassette tapes O Always rewind your tapes once ...
... may corrode the terminals, cause other products may get inside the cassette. When storing it again. BEFORE USE Storage precautions Before storing the camera-recorder, remove both the cassette and battery. Recommended temperature range: 59°F to 77°F (15°C to 25°C) Recommended... relative humidity: 40% to 60% Camera-recorder Wrap the camera-recorder in a place with oily vapors or high dust concentrations may damage the tapes. Cassette tapes O Always rewind your tapes once ...

AGDVC30 User Guide
Page 12
... some countries the power outlet may be charged when power is designed to switch over automatically to shoot anything. Mini DV cassette tape The AC adapter is being supplied to the camera-recorder from the AC adapter. The battery cannot be a different shape. However, in the figure above. however,...before you will have to the AC adapter. 3 Plug the other end of every country in the world. If this after consulting with your camera-recorder, follow the instructions for checking the system operations to ensure that the unit is the case, you attempt to the supply voltage (110...
... some countries the power outlet may be charged when power is designed to switch over automatically to shoot anything. Mini DV cassette tape The AC adapter is being supplied to the camera-recorder from the AC adapter. The battery cannot be a different shape. However, in the figure above. however,...before you will have to the AC adapter. 3 Plug the other end of every country in the world. If this after consulting with your camera-recorder, follow the instructions for checking the system operations to ensure that the unit is the case, you attempt to the supply voltage (110...

AGDVC30 User Guide
Page 13
...cover alone to insert or remove tapes. O Do not forcibly push the cassette holder into place as this may cause malfunctioning. The CAMERA (red) lamp lights, and the camera-recorder switches to the ON position. Cassette holder OPEN/EJECT 1 Cassette cover 2 Insert the cassette tape. 4 O Do not ...cover. O Wait until the cassette holder is fully opened, the cassette holder pops out automatically. 4 Close the cassette cover after putting the camera-recorder down the white button and turn the POWER lever to shooting pause mode. 13 Turning on a stable, flat surface or hold of the...
...cover alone to insert or remove tapes. O Do not forcibly push the cassette holder into place as this may cause malfunctioning. The CAMERA (red) lamp lights, and the camera-recorder switches to the ON position. Cassette holder OPEN/EJECT 1 Cassette cover 2 Insert the cassette tape. 4 O Do not ...cover. O Wait until the cassette holder is fully opened, the cassette holder pops out automatically. 4 Close the cassette cover after putting the camera-recorder down the white button and turn the POWER lever to shooting pause mode. 13 Turning on a stable, flat surface or hold of the...
AGDVC30 User Guide
Page 14
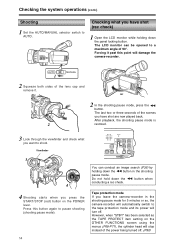
...shot (rec check) 1 Open the LCD monitor while holding down the 6 button in the shooting pause mode for 5 minutes or so, the camera-recorder will automatically switch to a maximum angle of the power being turned off . After playback, the shooting pause mode is 2 restored. 3 ... through the viewfinder and check what you have shot are now played back. AUTO 1 MANUAL 2 Squeeze both sides of the scenes you leave the camera-recorder in the shooting pause mode. Checking the system operations (cont.) Shooting 1 Set the AUTO/MANUAL selector switch to shoot. Viewfinder 3 OFF ON...
...shot (rec check) 1 Open the LCD monitor while holding down the 6 button in the shooting pause mode for 5 minutes or so, the camera-recorder will automatically switch to a maximum angle of the power being turned off . After playback, the shooting pause mode is 2 restored. 3 ... through the viewfinder and check what you have shot are now played back. AUTO 1 MANUAL 2 Squeeze both sides of the scenes you leave the camera-recorder in the shooting pause mode. Checking the system operations (cont.) Shooting 1 Set the AUTO/MANUAL selector switch to shoot. Viewfinder 3 OFF ON...

AGDVC30 User Guide
Page 15
... while you are recording. When the cover is fully opened, the cassette holder pops out automatically. 2 O Check that the camera-recorder's power is now turned off, and the CAMERA lamp goes off the power CAMERA VCR POWER OFF ON MODE 2 Take out the cassette tape. 3 Press the part marked "PUSH" and close the...
... while you are recording. When the cover is fully opened, the cassette holder pops out automatically. 2 O Check that the camera-recorder's power is now turned off, and the CAMERA lamp goes off the power CAMERA VCR POWER OFF ON MODE 2 Take out the cassette tape. 3 Press the part marked "PUSH" and close the...
AGDVC30 User Guide
Page 16
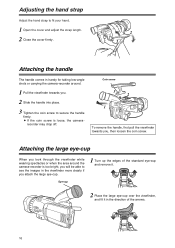
... and adjust the strap length. 2 Close the cover firmly. 2 1 Attaching the handle The handle comes in handy for taking low-angle shots or carrying the camera-recorder around the camera-recorder is loose, the...
... and adjust the strap length. 2 Close the cover firmly. 2 1 Attaching the handle The handle comes in handy for taking low-angle shots or carrying the camera-recorder around the camera-recorder is loose, the...
AGDVC30 User Guide
Page 18
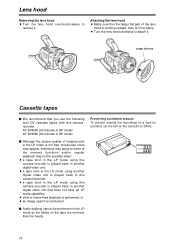
O a tape shot in the LP mode using this camera-recorder is not bad, mosaic-like noise may appear, limitations may apply to some of the memory functions and/or regular playback may not be ... video unit is played back in this camerarecorder. O a tape shot in the LP mode using this camera-recorder is played back in another digital video unit that you use the following mini DV cassette tapes with this camera-recorder; O Turn the lens hood clockwise to attach it . Lens hood Removing the lens hood...
O a tape shot in the LP mode using this camera-recorder is not bad, mosaic-like noise may appear, limitations may apply to some of the memory functions and/or regular playback may not be ... video unit is played back in this camerarecorder. O a tape shot in the LP mode using this camera-recorder is played back in another digital video unit that you use the following mini DV cassette tapes with this camera-recorder; O Turn the lens hood clockwise to attach it . Lens hood Removing the lens hood...

AGDVC30 User Guide
Page 19
Camera-recorder Zoom buttons (P36, P76) Shoe (P16, P57) Eye-cup (P16) Viewfinder (P10, P14, P16, P26-P28, P35, P79) Diopter adjustment lever (P26) Battery release ... input (INPUT 7.9 V) socket (P12, P15) Shoulder strap eyelet (P17) Battery connector PHONES jack (P48, P50, P55, P66, P80) DV connector (P42, P55, P61-P63, P76-P79) CAM REMOTE jack (2.5 mm diameter) PHONES DV CAM REMOTE Built-in stereo microphone (P38, P58, P59, P64, P76, P78, P80) START/STOP button (P36, P76) OPEN...
Camera-recorder Zoom buttons (P36, P76) Shoe (P16, P57) Eye-cup (P16) Viewfinder (P10, P14, P16, P26-P28, P35, P79) Diopter adjustment lever (P26) Battery release ... input (INPUT 7.9 V) socket (P12, P15) Shoulder strap eyelet (P17) Battery connector PHONES jack (P48, P50, P55, P66, P80) DV connector (P42, P55, P61-P63, P76-P79) CAM REMOTE jack (2.5 mm diameter) PHONES DV CAM REMOTE Built-in stereo microphone (P38, P58, P59, P64, P76, P78, P80) START/STOP button (P36, P76) OPEN...

AGDVC30 User Guide
Page 20
Description of parts (cont.) Camera-recorder White balance sensor (P45) S-VIDEO IN/OUT connector (P56) XLR ADAPTER connector (P57, P59) S-VIDEO IN/OUT MIC XLR ADAPTER AV IN/OUT Tally lamp (P79, P84) Focusing ring (P36, P42, P44, P76) Lens hood (P18) Lens (P10) Infrared light (P37, P80) MIC jack (P57, P59, P64, P78) AV IN/OUT jack (P56, P58-P61, P74, P78, P80) 20
Description of parts (cont.) Camera-recorder White balance sensor (P45) S-VIDEO IN/OUT connector (P56) XLR ADAPTER connector (P57, P59) S-VIDEO IN/OUT MIC XLR ADAPTER AV IN/OUT Tally lamp (P79, P84) Focusing ring (P36, P42, P44, P76) Lens hood (P18) Lens (P10) Infrared light (P37, P80) MIC jack (P57, P59, P64, P78) AV IN/OUT jack (P56, P58-P61, P74, P78, P80) 20

AGDVC30 User Guide
Page 21
DESCRIPTION OF PARTS Description of parts (cont.) Camera-recorder -SEARCH (6) button (P14, P36, P49, P51) Built-in speaker (P50, P59, P64) REC button (P60, P62) REC sub button (P60, P62) COUNTER button (P54, ...
DESCRIPTION OF PARTS Description of parts (cont.) Camera-recorder -SEARCH (6) button (P14, P36, P49, P51) Built-in speaker (P50, P59, P64) REC button (P60, P62) REC sub button (P60, P62) COUNTER button (P54, ...

AGDVC30 User Guide
Page 22
...P51) 11. FF/B button (5) 21 (P36, P49, P54) 21: During playback, these buttons function in exactly the same way as the corresponding buttons on the camera-recorder. OTITLE OMULTI/P-IN-P OSELECT OSTORE OOFF/ON OPB. INDEX button (:, 9) (P53, P74) 12. MENU button (P27, P29, P31, P32, P34, P47..., P60-P62) 13. Description of parts (cont.) Wireless remote control unit Note that the following buttons are for functions that cannot be executed on the camera-recorder. 17. VOL + 6 MULTI/ P-IN-P REC A.DUB 5 16 7 C/REW PLAY FF/ B 9 13 8 STILL ADV PAUSE STILL ADV 10 10...
...P51) 11. FF/B button (5) 21 (P36, P49, P54) 21: During playback, these buttons function in exactly the same way as the corresponding buttons on the camera-recorder. OTITLE OMULTI/P-IN-P OSELECT OSTORE OOFF/ON OPB. INDEX button (:, 9) (P53, P74) 12. MENU button (P27, P29, P31, P32, P34, P47..., P60-P62) 13. Description of parts (cont.) Wireless remote control unit Note that the following buttons are for functions that cannot be executed on the camera-recorder. 17. VOL + 6 MULTI/ P-IN-P REC A.DUB 5 16 7 C/REW PLAY FF/ B 9 13 8 STILL ADV PAUSE STILL ADV 10 10...

AGDVC30 User Guide
Page 23
... it. Charging and recording times of time and has no charge, the CHARGE lamp will blink several times before charging starts. Similarly, the camera-recorder body becomes hot during use the battery to the power outlet. When storing it for storage. OKeep metal objects (such as the battery... as necklaces and hairpins) away from the radio may be charged if it is being supplied to heat up its charge by operating the camera-recorder, and then store it in the AC adapter. PREPARATION Battery Charging Before using the battery, fully charge it in the direction shown ...
... it. Charging and recording times of time and has no charge, the CHARGE lamp will blink several times before charging starts. Similarly, the camera-recorder body becomes hot during use the battery to the power outlet. When storing it for storage. OKeep metal objects (such as the battery... as necklaces and hairpins) away from the radio may be charged if it is being supplied to heat up its charge by operating the camera-recorder, and then store it in the AC adapter. PREPARATION Battery Charging Before using the battery, fully charge it in the direction shown ...

AGDVC30 User Guide
Page 24
Battery (cont.) Mounting 1 Raise the viewfinder. To remove the battery, hold down the battery release button and slide it up. 2 Press the battery straight against the camera-recorder body and slide it down until it clicks into place. 3 Return the viewfinder to the OFF position, check that it does not drop off , and then remove the battery. Removing O Turn the POWER lever to its original position. 24 O Support the battery with your hand so that the POWER lamp (CAMERA/VCR) has gone off .
Battery (cont.) Mounting 1 Raise the viewfinder. To remove the battery, hold down the battery release button and slide it up. 2 Press the battery straight against the camera-recorder body and slide it down until it clicks into place. 3 Return the viewfinder to the OFF position, check that it does not drop off , and then remove the battery. Removing O Turn the POWER lever to its original position. 24 O Support the battery with your hand so that the POWER lamp (CAMERA/VCR) has gone off .


