
AGMX70 User Guide
Page 4
... Rounding" licensed from Quantel, Ltd. Contents AG-MX70 Overview 3 Parts and their functions 6 Front panel controls 6 Rear panel connection area 14 External interfaces 17 GPI 17 RS-422A 17 RS-232C 17 Tally 17 System diagram 18 Power supply and backup 20 Setting panel screen 20 [INTVideo... 50 [EQ Mid] equalizer midrange setting 50 [Voice] (voice changer) setting 50 [Mute] setting 50 [Setup] initial setting screen 51 [Power] (power ON) setting 52 [Direct Pattern] setting 52 [Audio Video Input] settings 54 [Memory] setting 55 [Gen Lock] external synchronization setting 55 ...
... Rounding" licensed from Quantel, Ltd. Contents AG-MX70 Overview 3 Parts and their functions 6 Front panel controls 6 Rear panel connection area 14 External interfaces 17 GPI 17 RS-422A 17 RS-232C 17 Tally 17 System diagram 18 Power supply and backup 20 Setting panel screen 20 [INTVideo... 50 [EQ Mid] equalizer midrange setting 50 [Voice] (voice changer) setting 50 [Mute] setting 50 [Setup] initial setting screen 51 [Power] (power ON) setting 52 [Direct Pattern] setting 52 [Audio Video Input] settings 54 [Memory] setting 55 [Gen Lock] external synchronization setting 55 ...

AGMX70 User Guide
Page 16
... cross point 1, 2, 3, 4, 5, 6, 7 or 8 output. current: 50 mA) Tally LED 5 AC IN power socket 16 AG-MX70 Example of tally connections (Max. voltage: 3.5V) TALLY output GND (Max. Parts and their functions L R 1 L 1 R 2 AUDIO IN L 2 R 3 L 3 R 4 L 4 AUDIO OUT 1 R 5 1 Analog audio 1 input connectors The audio signals supplied to these connectors are input to the cross point selected on...
... cross point 1, 2, 3, 4, 5, 6, 7 or 8 output. current: 50 mA) Tally LED 5 AC IN power socket 16 AG-MX70 Example of tally connections (Max. voltage: 3.5V) TALLY output GND (Max. Parts and their functions L R 1 L 1 R 2 AUDIO IN L 2 R 3 L 3 R 4 L 4 AUDIO OUT 1 R 5 1 Analog audio 1 input connectors The audio signals supplied to these connectors are input to the cross point selected on...
AGMX70 User Guide
Page 77
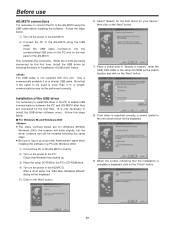
...may not be installed following the steps in "Installation of USB driver" below are being connected for your device," then click on the power to the AG-MX70. Installation of the AG-MX70. Check that the installation is complete is displayed, click on the "Next" button. 8) If the driver is searched correctly, a...the setup CD-ROM in the PC to enable USB communications between the PC and AG-MX70 after they are connected for the first time. (It is not supplied with Windows 2000. 1) Connect the PC to the AG-MX70 correctly. 2) Turn on the rear panel of the USB driver It is necessary to...
...may not be installed following the steps in "Installation of USB driver" below are being connected for your device," then click on the power to the AG-MX70. Installation of the AG-MX70. Check that the installation is complete is displayed, click on the "Next" button. 8) If the driver is searched correctly, a...the setup CD-ROM in the PC to enable USB communications between the PC and AG-MX70 after they are connected for the first time. (It is not supplied with Windows 2000. 1) Connect the PC to the AG-MX70 correctly. 2) Turn on the rear panel of the USB driver It is necessary to...
AGMX70 User Guide
Page 88
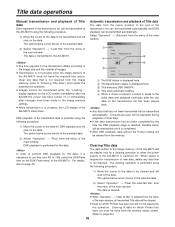
display appears on the LCD screen immediately after the AG-MX70's power has been turned on or immediately after the last data on the... setting will be cleared only by this operation. Clearing Title data The data written to the image memory of the AG-MX70 will be cleared from the image memory (refer to the selected data. 2) Select "Operation" > "Clear the...the main window, all transmitted Title data will not be cleared by a clearing operation or when the power supply of the AG-MX70 is possible using the following procedure. 1) Move the cursor to the data to be cleared and left...
display appears on the LCD screen immediately after the AG-MX70's power has been turned on or immediately after the last data on the... setting will be cleared only by this operation. Clearing Title data The data written to the image memory of the AG-MX70 will be cleared from the image memory (refer to the selected data. 2) Select "Operation" > "Clear the...the main window, all transmitted Title data will not be cleared by a clearing operation or when the power supply of the AG-MX70 is possible using the following procedure. 1) Move the cursor to the data to be cleared and left...


