

AJHVF21G User Guide
Page 3
... Notice (For Canada) THIS CLASS A DIGITAL APPRATUS COMPLIES WITH CANADIAN ICES-003. Contents Features 3 Parts and Their Functions 3 For cameras compatible with the standard slide rail 6 Mounting the Viewfinder 6 Adjusting the viewfinder's left-right position 7 Adjusting the viewfinder's front-back... position 7 Detaching the Viewfinder 8 For cameras compatible with the mounting unit 9 Mounting the Viewfinder 10 Detaching the Viewfinder 10 Position Adjustment 11 Diopter Adjustment 12 Screen ...
... Notice (For Canada) THIS CLASS A DIGITAL APPRATUS COMPLIES WITH CANADIAN ICES-003. Contents Features 3 Parts and Their Functions 3 For cameras compatible with the standard slide rail 6 Mounting the Viewfinder 6 Adjusting the viewfinder's left-right position 7 Adjusting the viewfinder's front-back... position 7 Detaching the Viewfinder 8 For cameras compatible with the mounting unit 9 Mounting the Viewfinder 10 Detaching the Viewfinder 10 Position Adjustment 11 Diopter Adjustment 12 Screen ...

AJHVF21G User Guide
Page 4
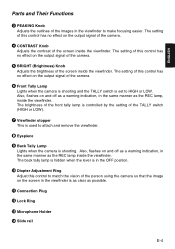
...on the eyes. OThe large eyepiece aperture makes it possible to the instruction manual of zebra pattern, will differ depending on the camera used with the viewfinder. OThe eyepiece is easily detachable. OFF: No zebra pattern displayed. Refer to see the screen even ...when holding the viewfinder at some distance from the camera. (AJ-HVF21G only) Parts and Their Functions = 7 ;6> 8 : < 341 2 5 9 ON OFF 1 ZEBRA (Zebra Pattern) Switch Displays a zebra pattern inside the viewfinder...
...on the eyes. OThe large eyepiece aperture makes it possible to the instruction manual of zebra pattern, will differ depending on the camera used with the viewfinder. OThe eyepiece is easily detachable. OFF: No zebra pattern displayed. Refer to see the screen even ...when holding the viewfinder at some distance from the camera. (AJ-HVF21G only) Parts and Their Functions = 7 ;6> 8 : < 341 2 5 9 ON OFF 1 ZEBRA (Zebra Pattern) Switch Displays a zebra pattern inside the viewfinder...
AJHVF21G User Guide
Page 5
... this control has no effect on the screen in the viewfinder to attach and remove the viewfinder. 8 Eyepiece 9 Back Tally Lamp Lights when the camera is as clear as possible. ; Connection Plug < Lock Ring = Microphone Holder > Slide rail E-4 The brightness of the front tally lamp is ...controlled by the setting of the person using the camera so that the image on the output signal of the images in the viewfinder is shooting. Also, flashes on and off as a warning indication, in...
... this control has no effect on the screen in the viewfinder to attach and remove the viewfinder. 8 Eyepiece 9 Back Tally Lamp Lights when the camera is as clear as possible. ; Connection Plug < Lock Ring = Microphone Holder > Slide rail E-4 The brightness of the front tally lamp is ...controlled by the setting of the person using the camera so that the image on the output signal of the images in the viewfinder is shooting. Also, flashes on and off as a warning indication, in...

AJHVF21G User Guide
Page 6
Refer to the instruction manual of the camera for details. TALLY / REC BATT SAVE E-5 Parts and Their Functions Internal LEDs The lamp and picture tube indications will differ depending on the camera used with the viewfinder.
Refer to the instruction manual of the camera for details. TALLY / REC BATT SAVE E-5 Parts and Their Functions Internal LEDs The lamp and picture tube indications will differ depending on the camera used with the viewfinder.

AJHVF21G User Guide
Page 7
... position anchoring ring. 4. E-6 While pulling up the viewfinder stopper, attach the viewfinder by sliding it in the direction of the camera is "OFF". 2. Viewfinder model number AJ-HVF21G AJ-HVF27BG Camera model number AJ-HDX400 AJ-HDX400P AJ-HDC27H AJ-HDC27HP AJ-HDC27HE AJ-HDC27HMC Mounting the Viewfinder 1. Loosen the ring. 3. Insert...
... position anchoring ring. 4. E-6 While pulling up the viewfinder stopper, attach the viewfinder by sliding it in the direction of the camera is "OFF". 2. Viewfinder model number AJ-HVF21G AJ-HVF27BG Camera model number AJ-HDX400 AJ-HDX400P AJ-HDC27H AJ-HDC27HP AJ-HDC27HE AJ-HDC27HMC Mounting the Viewfinder 1. Loosen the ring. 3. Insert...
AJHVF21G User Guide
Page 8
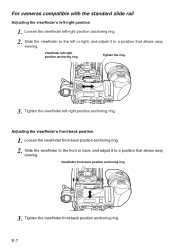
Adjusting the viewfinder's front-back position 1. For cameras compatible with the standard slide rail Adjusting the viewfinder's left -right position anchoring ring. Loosen the viewfinder front-back position anchoring ring. 2. Viewfinder front-back ...
Adjusting the viewfinder's front-back position 1. For cameras compatible with the standard slide rail Adjusting the viewfinder's left -right position anchoring ring. Loosen the viewfinder front-back position anchoring ring. 2. Viewfinder front-back ...
AJHVF21G User Guide
Page 9
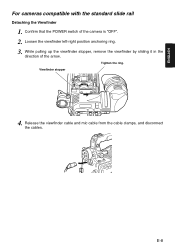
Loosen the viewfinder left-right position anchoring ring. 3. ENGLISH For cameras compatible with the standard slide rail Detaching the Viewfinder 1. E-8 Tighten the ring. While pulling up the viewfinder stopper, remove the viewfinder by sliding it in the direction of the camera is "OFF". 2. Confirm that the POWER switch of the arrow. Viewfinder stopper 4. Release the viewfinder cable and mic cable from the cable clamps, and disconnect the cables.
Loosen the viewfinder left-right position anchoring ring. 3. ENGLISH For cameras compatible with the standard slide rail Detaching the Viewfinder 1. E-8 Tighten the ring. While pulling up the viewfinder stopper, remove the viewfinder by sliding it in the direction of the camera is "OFF". 2. Confirm that the POWER switch of the arrow. Viewfinder stopper 4. Release the viewfinder cable and mic cable from the cable clamps, and disconnect the cables.

AJHVF21G User Guide
Page 10
... the mounting unit The standard slide rail can be removed and replaced with the two screws. Viewfinder model number AJ-HVF21G AJ-HVF27BG Camera model number AJ-HDC20A AJ-HDC20AP AJ-HDC27F AJ-HDC27FP AJ-HDC27FE AJ-HDC27FMC OChanging from the slide rail to the mounting unit ...1. Secure the mounting unit in mind that this unit is a repair part. The following cameras support the mounting unit. Detach the two screws, then detach the standard slide rail. Screws Mounting unit E-9 Screws Slide rail 2. To purchase ...
... the mounting unit The standard slide rail can be removed and replaced with the two screws. Viewfinder model number AJ-HVF21G AJ-HVF27BG Camera model number AJ-HDC20A AJ-HDC20AP AJ-HDC27F AJ-HDC27FP AJ-HDC27FE AJ-HDC27FMC OChanging from the slide rail to the mounting unit ...1. Secure the mounting unit in mind that this unit is a repair part. The following cameras support the mounting unit. Detach the two screws, then detach the standard slide rail. Screws Mounting unit E-9 Screws Slide rail 2. To purchase ...

AJHVF21G User Guide
Page 11
Use both hands to the viewfinder. 3. Confirm that the POWER switch of the camera is "OFF". 2. Insert the plug into the connection jack of the camera is "OFF". 2. The viewfinder may not detach smoothly with the mounting unit Mounting the Viewfinder 1. Stopper screw E-10 Loosen the stopper ... the stopper screw firmly. Stopper screw Detaching the Viewfinder 1. Be sure to insert the plug all the way into place. 4. ENGLISH For cameras compatible with one hand, resulting in damage to detach the viewfinder. Disconnect the connection jack from the viewfinder cable connector.
Use both hands to the viewfinder. 3. Confirm that the POWER switch of the camera is "OFF". 2. Insert the plug into the connection jack of the camera is "OFF". 2. The viewfinder may not detach smoothly with the mounting unit Mounting the Viewfinder 1. Stopper screw E-10 Loosen the stopper ... the stopper screw firmly. Stopper screw Detaching the Viewfinder 1. Be sure to insert the plug all the way into place. 4. ENGLISH For cameras compatible with one hand, resulting in damage to detach the viewfinder. Disconnect the connection jack from the viewfinder cable connector.

AJHVF21G User Guide
Page 12
Adjust the position of the viewfinder by moving it forward, backward, left -right position clamp lever to disengage the lock. E-11 Lever Viewfinder 2. For cameras compatible with the mounting unit Position Adjustment 1. Return the viewfinder forward-backward/left or right. 4. Loosen the viewfinder forward-backward/left -right position clamp lever to the locked position. Lift up the viewfinder forward-backward/left -right position clamp lever. 3.
Adjust the position of the viewfinder by moving it forward, backward, left -right position clamp lever to disengage the lock. E-11 Lever Viewfinder 2. For cameras compatible with the mounting unit Position Adjustment 1. Return the viewfinder forward-backward/left or right. 4. Loosen the viewfinder forward-backward/left -right position clamp lever to the locked position. Lift up the viewfinder forward-backward/left -right position clamp lever. 3.

AJHVF21G User Guide
Page 13
...focusing the lens. A picture will appear in the viewfinder. 2. Diopter Adjustment Ring ENGLISH Screen Adjustment Adjust the condition of the camera to adjust the diopter so that the viewfinder picture can be clearly seen. Contrast: Adjust the CONTRAST control. PEAKING CONTRAST BRIGHT PEAKING... control CONTRAST control BRIGHT control 1. Set the OUTPUT switch of the camera to "BAR". 3. Turning the PEAKING control makes the picture appear sharper. Turn the diopter adjustment ring to "ON". E-12 ...
...focusing the lens. A picture will appear in the viewfinder. 2. Diopter Adjustment Ring ENGLISH Screen Adjustment Adjust the condition of the camera to adjust the diopter so that the viewfinder picture can be clearly seen. Contrast: Adjust the CONTRAST control. PEAKING CONTRAST BRIGHT PEAKING... control CONTRAST control BRIGHT control 1. Set the OUTPUT switch of the camera to "BAR". 3. Turning the PEAKING control makes the picture appear sharper. Turn the diopter adjustment ring to "ON". E-12 ...

AJHVF21G User Guide
Page 16
... 3/16 inchesa8 1/8 inches) Weight: 750 g (1.65 lb) Weight and dimentions when shown are subject to change without notice. Specifications Power supply: DC 12 V (supplied by camera) Power consumption: 3.8 W (AJ-HVF21G) 4.1 W (AJ-HVF27BG) indicates safety information.
... 3/16 inchesa8 1/8 inches) Weight: 750 g (1.65 lb) Weight and dimentions when shown are subject to change without notice. Specifications Power supply: DC 12 V (supplied by camera) Power consumption: 3.8 W (AJ-HVF21G) 4.1 W (AJ-HVF27BG) indicates safety information.


