

CT32G19 User Guide
Page 4
... Battery Installation 4 Inital Setup Set Up Menu 5 Optional Equipment Connections 6 VCR Connection 6 Cable Box Connection 6 Front Control Panel 6 Remote Control Operation 7 Icon Menu Navigation 8 Icon Menu Operation 9 Set Up 9 Picture 9 Timer 10 Channels 10 Audio 10 Lock 11 V-Chip Menu Operation 12 Troubleshooting Chart ...
... Battery Installation 4 Inital Setup Set Up Menu 5 Optional Equipment Connections 6 VCR Connection 6 Cable Box Connection 6 Front Control Panel 6 Remote Control Operation 7 Icon Menu Navigation 8 Icon Menu Operation 9 Set Up 9 Picture 9 Timer 10 Channels 10 Audio 10 Lock 11 V-Chip Menu Operation 12 Troubleshooting Chart ...
CT32G19 User Guide
Page 5
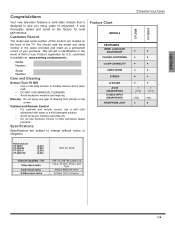
You should note the model and serial number in the event of enjoyment. Model Number Serial Number Care and Cleaning Screen (Turn TV Off) • Use a mild soap solution or window cleaner and a clean cloth. • DO NOT USE ABRASIVE CLEANERS. • Avoid excessive ...UHF-56; It was thoroughly tested and tuned at : www.prodreg.com/panasonic. customers is designed to change without notice or obligation. Warning: Do not spray any type of your purchase. Cabinet and Remote Control • For cabinets and remote control, use a soft cloth dampened with water or a mild detergent solution...
You should note the model and serial number in the event of enjoyment. Model Number Serial Number Care and Cleaning Screen (Turn TV Off) • Use a mild soap solution or window cleaner and a clean cloth. • DO NOT USE ABRASIVE CLEANERS. • Avoid excessive ...UHF-56; It was thoroughly tested and tuned at : www.prodreg.com/panasonic. customers is designed to change without notice or obligation. Warning: Do not spray any type of your purchase. Cabinet and Remote Control • For cabinets and remote control, use a soft cloth dampened with water or a mild detergent solution...
CT32G19 User Guide
Page 6
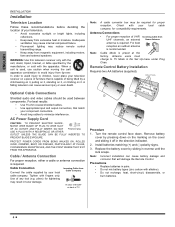
...cover and sliding it off in tuner damage. Use of your television receiver on it , or climbing on a piece of TV Note: A cable converter box may result in the direction indicated. 2. For best reception an outdoor antenna is required. ... on it . Install batteries matching (+) and (-) polarity signs. 3. Inadequate ventilation may cause internal component failure. • Fluorescent lighting may reduce remote control transmitting range. • Keep away from excessive heat or moisture. Check with alkaline). • Do not recharge, heat, short-circuit, disassemble...
...cover and sliding it off in tuner damage. Use of your television receiver on it , or climbing on a piece of TV Note: A cable converter box may result in the direction indicated. 2. For best reception an outdoor antenna is required. ... on it . Install batteries matching (+) and (-) polarity signs. 3. Inadequate ventilation may cause internal component failure. • Fluorescent lighting may reduce remote control transmitting range. • Keep away from excessive heat or moisture. Check with alkaline). • Do not recharge, heat, short-circuit, disassemble...

CT32G19 User Guide
Page 8
... Procedure • Connect equipment as shown to front or rear Audio/ Video input jacks. • Select the Video mode by pressing TV/VIDEO button. • Operate optional equipment as instructed in the optional equipment manual. Cable Box Connection Follow this diagram when connecting your ..., video disc players, video game equipment, and DSS equipment can also be used to access menus and switch video mode when the remote control is not available. See the optional equipment manual for more information. If both are connected, signal interference will result. Optional equipments...
... Procedure • Connect equipment as shown to front or rear Audio/ Video input jacks. • Select the Video mode by pressing TV/VIDEO button. • Operate optional equipment as instructed in the optional equipment manual. Cable Box Connection Follow this diagram when connecting your ..., video disc players, video game equipment, and DSS equipment can also be used to access menus and switch video mode when the remote control is not available. See the optional equipment manual for more information. If both are connected, signal interference will result. Optional equipments...

CT32G19 User Guide
Page 9
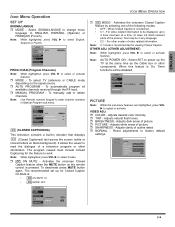
R-TUNE Press to switch to select audio modes (Stereo, SAP or Mono). EUR7713010 REMOTE CONTROL OPERATION SAP Press to previously viewed channel or video mode. CH CH Press to adjust TV sound and navigate in menus. ENGLISH Remote Control Operation POWER POWER Press to access menus. ACTION Press to turn ON and OFF. MUTE...
R-TUNE Press to switch to select audio modes (Stereo, SAP or Mono). EUR7713010 REMOTE CONTROL OPERATION SAP Press to previously viewed channel or video mode. CH CH Press to adjust TV sound and navigate in menus. ENGLISH Remote Control Operation POWER POWER Press to access menus. ACTION Press to turn ON and OFF. MUTE...
CT32G19 User Guide
Page 11
.... to ENGLISH, ESPAÑOL (Spanish) or FRANÇAIS (French). To select TV (antenna) or CABLE mode depending on black background). To manually add or delete channels. Note: Use Remote numeric keypad to work. MODE AUTO PROGRAM MANUAL PROGRAM CABLE CC (CLOSED CAPTIONING) This television.... Note: AUTO POWER ON - Select SET to factory default settings. When this feature is not desired. • C1 - VIDEO ADJ. ˆ COLOR - Adjusts natural flesh tones. ˆ BRIGHTNESS - Adjusts dark areas of the following modes. • OFF - Reset adjustments to power up for the...
.... to ENGLISH, ESPAÑOL (Spanish) or FRANÇAIS (French). To select TV (antenna) or CABLE mode depending on black background). To manually add or delete channels. Note: Use Remote numeric keypad to work. MODE AUTO PROGRAM MANUAL PROGRAM CABLE CC (CLOSED CAPTIONING) This television.... Note: AUTO POWER ON - Select SET to factory default settings. When this feature is not desired. • C1 - VIDEO ADJ. ˆ COLOR - Adjusts natural flesh tones. ˆ BRIGHTNESS - Adjusts dark areas of the following modes. • OFF - Reset adjustments to power up for the...
CT32G19 User Guide
Page 12
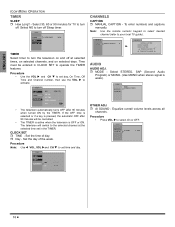
... - : - - CLOCK SET ˆ TIME - TIMER SLEEP TIMER CLOCK SET TIME DAY - - : - - Procedure • Press VOL to your local TV guide). Note: Use the remote numeric keypad to select desired channel (refer to select On or OFF. OTHER ADJ. TIMER SLEEP TIMER CLOCK SET DAY MON - MODE STEREO... MANUAL CAPTION ENTER CHANNEL 3 ENTER CAPTION - - - - Procedure • Use the VOL and CH to activate. Select 30, 60 or 90 minutes for TV to turn the television on and off Sleep timer. F G TO MOVE CURSOR J K TO SELECT CHANNEL AUDIO AUDIO ADJ. ˆ MODE - CHANNELS CAPTION ...
... - : - - CLOCK SET ˆ TIME - TIMER SLEEP TIMER CLOCK SET TIME DAY - - : - - Procedure • Press VOL to your local TV guide). Note: Use the remote numeric keypad to select desired channel (refer to select On or OFF. OTHER ADJ. TIMER SLEEP TIMER CLOCK SET DAY MON - MODE STEREO... MANUAL CAPTION ENTER CHANNEL 3 ENTER CAPTION - - - - Procedure • Use the VOL and CH to activate. Select 30, 60 or 90 minutes for TV to turn the television on and off Sleep timer. F G TO MOVE CURSOR J K TO SELECT CHANNEL AUDIO AUDIO ADJ. ˆ MODE - CHANNELS CAPTION ...
CT32G19 User Guide
Page 13
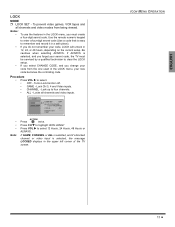
Use the remote numeric keypad to enter a four-digit secret code (Use a code that is selected, and you forget your secret code, the TV must create a four-digit secret code. Turns Lock function off. • GAME - LOCK SET OFF BLOCK PROGRAMS: U.S. TV PROGRAMS STATUS ENTER CODE FIRST OFF * * * * • • •... becomes the controlling code. ICON MENU OPERATION 11 z Notes: • To use the features in the upper left corner of the TV screen. Be cautious when selecting ALWAYS. LOCK MODE HOW LONG? Lock up to select 12 Hours, 24 Hours, 48 Hours or ALWAYS.
Use the remote numeric keypad to enter a four-digit secret code (Use a code that is selected, and you forget your secret code, the TV must create a four-digit secret code. Turns Lock function off. • GAME - LOCK SET OFF BLOCK PROGRAMS: U.S. TV PROGRAMS STATUS ENTER CODE FIRST OFF * * * * • • •... becomes the controlling code. ICON MENU OPERATION 11 z Notes: • To use the features in the upper left corner of the TV screen. Be cautious when selecting ALWAYS. LOCK MODE HOW LONG? Lock up to select 12 Hours, 24 Hours, 48 Hours or ALWAYS.
CT32G19 User Guide
Page 17
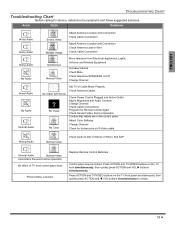
... Location and Connection Check Antenna Lead-in the correct jacks Adjust Color Settings Change Channel Check for service, determine the symptoms and follow suggested solutions. Replace Remote Control Batteries Control panel may be locked. Press ACTION and TV/VIDEO buttons on the TV front simultaneously, then quickly press ACTION and VOL buttons simultaneously. ENGLISH...
... Location and Connection Check Antenna Lead-in the correct jacks Adjust Color Settings Change Channel Check for service, determine the symptoms and follow suggested solutions. Replace Remote Control Batteries Control panel may be locked. Press ACTION and TV/VIDEO buttons on the TV front simultaneously, then quickly press ACTION and VOL buttons simultaneously. ENGLISH...

