

User Manual
Page 1
GN VQT2T58 H0210HM0 You can learn about advanced operation methods and check the Troubleshooting. Basic Operating Instructions Digital Camera DMC-F2 Model No. Before use, please read these instructions completely. Please also refer to Operating Instructions (PDF format) recorded on the CD-ROM containing the Operating Instructions (supplied).
GN VQT2T58 H0210HM0 You can learn about advanced operation methods and check the Troubleshooting. Basic Operating Instructions Digital Camera DMC-F2 Model No. Before use, please read these instructions completely. Please also refer to Operating Instructions (PDF format) recorded on the CD-ROM containing the Operating Instructions (supplied).
User Manual
Page 2
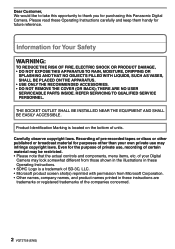
... note that the actual controls and components, menu items, etc. Recording of pre-recorded tapes or discs or other than your Digital Camera may look somewhat different from Microsoft Corporation. • Other names, company names, and product names printed in these instructions are trademarks or.... Dear Customer, We would like to take this opportunity to thank you for purposes other published or broadcast material for purchasing this Panasonic Digital Camera. Information for Your Safety WARNING: TO REDUCE THE RISK OF FIRE, ELECTRIC SHOCK OR PRODUCT DAMAGE, • DO NOT EXPOSE...
... note that the actual controls and components, menu items, etc. Recording of pre-recorded tapes or discs or other than your Digital Camera may look somewhat different from Microsoft Corporation. • Other names, company names, and product names printed in these instructions are trademarks or.... Dear Customer, We would like to take this opportunity to thank you for purposes other published or broadcast material for purchasing this Panasonic Digital Camera. Information for Your Safety WARNING: TO REDUCE THE RISK OF FIRE, ELECTRIC SHOCK OR PRODUCT DAMAGE, • DO NOT EXPOSE...

User Manual
Page 4
...lens or the LCD monitor may be adversely affected. „ Care of the camera • Do not strongly shake or bump the camera by dropping it for Use • Do not use any other cables except a genuine Panasonic AV cable (DMW-AVC1:optional). • Do not use any other USB ...connection cables except the supplied one. • Always use a genuine Panasonic AC adaptor (DMW-AC5G: optional). • When using it into a full or tight bag etc. Then reinsert the battery or reconnect AC adaptor and turn the camera off and remove the battery or disconnect AC adaptor (DMWAC5G: optional). ...
...lens or the LCD monitor may be adversely affected. „ Care of the camera • Do not strongly shake or bump the camera by dropping it for Use • Do not use any other cables except a genuine Panasonic AV cable (DMW-AVC1:optional). • Do not use any other USB ...connection cables except the supplied one. • Always use a genuine Panasonic AC adaptor (DMW-AC5G: optional). • When using it into a full or tight bag etc. Then reinsert the battery or reconnect AC adaptor and turn the camera off and remove the battery or disconnect AC adaptor (DMWAC5G: optional). ...
User Manual
Page 6
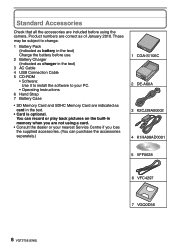
... in the text. • Card is optional. You can record or play back pictures on the built-in memory when you are not using the camera. Standard Accessories Check that all the accessories are included before use. 2 Battery Charger (Indicated as charger in the text) 3 AC Cable 4 USB Connection Cable 5 CD...
... in the text. • Card is optional. You can record or play back pictures on the built-in memory when you are not using the camera. Standard Accessories Check that all the accessories are included before use. 2 Battery Charger (Indicated as charger in the text) 3 AC Cable 4 USB Connection Cable 5 CD...
User Manual
Page 7
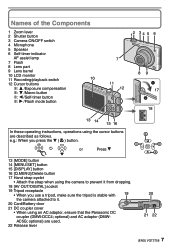
... 12 3 4 5 6 7 11 12 89 17 18 AV OUT 13 14 15 16 DIGITAL In these operating instructions, operations using an AC adaptor, ensure that the Panasonic DC coupler (DMW-DCC4; e.g.: When you press the r (p) button. ɹɹ or Press r 13 [MODE] button 14 [MENU/SET] button 15 [DISPLAY] button... 16 [Q.MENU]/Delete button 17 Hand strap eyelet • Attach the strap when using the camera to prevent it from dropping. 18 [AV OUT/DIGITAL] socket 19 Tripod receptacle • When you use a tripod, make sure the tripod is stable ...
... 12 3 4 5 6 7 11 12 89 17 18 AV OUT 13 14 15 16 DIGITAL In these operating instructions, operations using an AC adaptor, ensure that the Panasonic DC coupler (DMW-DCC4; e.g.: When you press the r (p) button. ɹɹ or Press r 13 [MODE] button 14 [MENU/SET] button 15 [DISPLAY] button... 16 [Q.MENU]/Delete button 17 Hand strap eyelet • Attach the strap when using the camera to prevent it from dropping. 18 [AV OUT/DIGITAL] socket 19 Tripod receptacle • When you use a tripod, make sure the tripod is stable ...
User Manual
Page 8
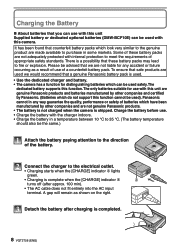
...turns off (after charging is completed. 8 VQT2T58 (ENG) Please be advised that we would recommend that a genuine Panasonic battery pack is used with this camera. The only batteries suitable for any way guarantee the quality, performance or safety of appropriate safety standards. Charging the Battery...;ed by other companies and are not genuine Panasonic products. • The battery is not charged when the camera is shipped. There is a possibility that safe products are not adequately protected with this function. Panasonic cannot in any accident or failure occurring as ...
...turns off (after charging is completed. 8 VQT2T58 (ENG) Please be advised that we would recommend that a genuine Panasonic battery pack is used with this camera. The only batteries suitable for any way guarantee the quality, performance or safety of appropriate safety standards. Charging the Battery...;ed by other companies and are not genuine Panasonic products. • The battery is not charged when the camera is shipped. There is a possibility that safe products are not adequately protected with this function. Panasonic cannot in any accident or failure occurring as ...
User Manual
Page 9
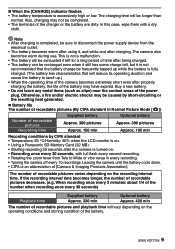
...• Temperature: 23 °C/Humidity: 50% when the LCD monitor is on. • Using a Panasonic SD Memory Card (32 MB) • Starting recording 30 seconds after the camera is fully charged. (The battery has characteristics that the battery charge be frequently topped up .) • When... Approx. 330 min Approx. 420 min The number of recordable pictures and playback time will be completed. • The terminals of the camera becomes extremely short even after charging. Also, charging may have expired. If the recording interval time becomes longer, the number of the battery...
...• Temperature: 23 °C/Humidity: 50% when the LCD monitor is on. • Using a Panasonic SD Memory Card (32 MB) • Starting recording 30 seconds after the camera is fully charged. (The battery has characteristics that the battery charge be frequently topped up .) • When... Approx. 330 min Approx. 420 min The number of recordable pictures and playback time will be completed. • The terminals of the camera becomes extremely short even after charging. Also, charging may have expired. If the recording interval time becomes longer, the number of the battery...
User Manual
Page 10
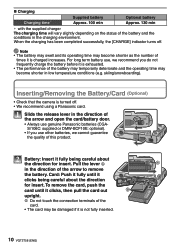
... the [CHARGE] indicator turns off . • We recommend using a Panasonic card. 1 Slide the release lever in the direction of the arrow to remove the battery. Inserting/Removing the Battery/Card (Optional) • Check that the camera is charged increases. Card: Push it fully until it is turned off .... A in the direction of the arrow and open the card/battery door. • Always use other batteries, we recommend you use genuine Panasonic batteries (CGAS/106C: supplied or DMW-BCF10E: optional). • If you do not frequently charge the battery before it fully being careful about...
... the [CHARGE] indicator turns off . • We recommend using a Panasonic card. 1 Slide the release lever in the direction of the arrow to remove the battery. Inserting/Removing the Battery/Card (Optional) • Check that the camera is charged increases. Card: Push it fully until it is turned off .... A in the direction of the arrow and open the card/battery door. • Always use other batteries, we recommend you use genuine Panasonic batteries (CGAS/106C: supplied or DMW-BCF10E: optional). • If you do not frequently charge the battery before it fully being careful about...

User Manual
Page 11
...remove the card, check its direction and then insert it again. Cq Dw 4 Press [MENU/SET]. • After completing the clock settings, turn the camera on , switch to Recording Mode, and check that the display reflects the settings that were performed. • When [MENU/SET] has been ... correctly by following the "Changing the clock setting" procedure. 11 (ENG) VQT2T58 Setting Date/Time (Clock Set) • The clock is not set when the camera is selected. C Time at the home area D Time at the travel destination 4: Cancel without the clock having been set, set . 3 1: Close the card...
...remove the card, check its direction and then insert it again. Cq Dw 4 Press [MENU/SET]. • After completing the clock settings, turn the camera on , switch to Recording Mode, and check that the display reflects the settings that were performed. • When [MENU/SET] has been ... correctly by following the "Changing the clock setting" procedure. 11 (ENG) VQT2T58 Setting Date/Time (Clock Set) • The clock is not set when the camera is selected. C Time at the home area D Time at the travel destination 4: Cancel without the clock having been set, set . 3 1: Close the card...

User Manual
Page 13
...the coloring, sensitivity, This menu lets you make it easier for taking pictures and playing them back just as you set to operate the camera. • Available in the desired setting. Check the settings of the pictures you to [OFF]. In particular, the [SETUP] menu ...contains some important settings relating to the scene. of Recording Modes ; About the menu operation The camera comes with audio. „ List of recorded pictures. of this menu before proceeding to use the menu 1 Press [MENU/SET] to display the...
...the coloring, sensitivity, This menu lets you make it easier for taking pictures and playing them back just as you set to operate the camera. • Available in the desired setting. Check the settings of the pictures you to [OFF]. In particular, the [SETUP] menu ...contains some important settings relating to the scene. of Recording Modes ; About the menu operation The camera comes with audio. „ List of recorded pictures. of this menu before proceeding to use the menu 1 Press [MENU/SET] to display the...
User Manual
Page 14
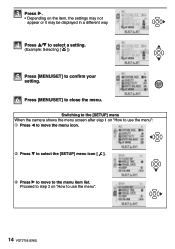
3 Press q. • Depending on "How to use the menu". 14 VQT2T58 (ENG) Switching to the [SETUP] menu When the camera shows the menu screen after step 1 on the item, the settings may not appear or it may be displayed in a different way. 4 Press e/r to select a setting. (Example: Selecting [3]) 5 Press [MENU/SET] to confirm your setting. 6 Press [MENU/SET] to use the menu": 1 Press w to move the menu icon. 2 Press r to select the [SETUP] menu icon [e]. 3 Press q to move to the menu item list. Proceed to step 2 on "How to close the menu.
3 Press q. • Depending on "How to use the menu". 14 VQT2T58 (ENG) Switching to the [SETUP] menu When the camera shows the menu screen after step 1 on the item, the settings may not appear or it may be displayed in a different way. 4 Press e/r to select a setting. (Example: Selecting [3]) 5 Press [MENU/SET] to confirm your setting. 6 Press [MENU/SET] to use the menu": 1 Press w to move the menu icon. 2 Press r to select the [SETUP] menu icon [e]. 3 Press q to move to the menu item list. Proceed to step 2 on "How to close the menu.
User Manual
Page 15
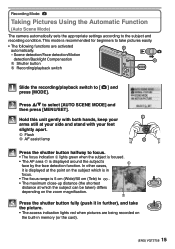
...; The focus range is 5 cm (Wide)/50 cm (Tele) to the subject and recording condition. Taking Pictures Using the Automatic Function (Auto Scene Mode) The camera automatically sets the appropriate settings according to 7. • The maximum close-up distance (the shortest distance at which the subject can be taken) differs depending...
...; The focus range is 5 cm (Wide)/50 cm (Tele) to the subject and recording condition. Taking Pictures Using the Automatic Function (Auto Scene Mode) The camera automatically sets the appropriate settings according to 7. • The maximum close-up distance (the shortest distance at which the subject can be taken) differs depending...

User Manual
Page 16
... Face detection When [3] or [5] is used - In this case, the subject will adjust the focus and exposure. Scene detection When the camera identifies the optimum scene, the icon of the scene concerned is displayed in the appropriate Recording Mode. „ The backlight compensation ...the subject, The contrast of the picture automatically. 16 VQT2T58 (ENG) Recording conditions: Sunset, Sunrise, Under low brightness conditions, When the camera is shaken • To take pictures in an intended scene, it will become dark, so this function compensates the backlight by brightening the ...
... Face detection When [3] or [5] is used - In this case, the subject will adjust the focus and exposure. Scene detection When the camera identifies the optimum scene, the icon of the scene concerned is displayed in the appropriate Recording Mode. „ The backlight compensation ...the subject, The contrast of the picture automatically. 16 VQT2T58 (ENG) Recording conditions: Sunset, Sunrise, Under low brightness conditions, When the camera is shaken • To take pictures in an intended scene, it will become dark, so this function compensates the backlight by brightening the ...
User Manual
Page 18
... you keep pressing w/q, the number of pictures forwarded/rewound increases. 18 VQT2T58 (ENG) When the mode was at [5]. 2 Press w/q to the Playback Mode. - When the camera was turned on the playback status.
... you keep pressing w/q, the number of pictures forwarded/rewound increases. 18 VQT2T58 (ENG) When the mode was at [5]. 2 Press w/q to the Playback Mode. - When the camera was turned on the playback status.
User Manual
Page 21
...: 1/2.5˝ CCD Total pixels: 10,300,000 pixels Primary color filter Lens: Optical 4 × zoom, f=5.5 to 22 mm [35 mm film camera equivalent: 33 to 132 mm] / F2.8 to F5.9 Digital zoom: Max. 4 × Extended optical zoom: Max. 7.1 × Focus: Normal / Macro Face detection / 9-area-focusing / 1-area-focusing Focus range...
...: 1/2.5˝ CCD Total pixels: 10,300,000 pixels Primary color filter Lens: Optical 4 × zoom, f=5.5 to 22 mm [35 mm film camera equivalent: 33 to 132 mm] / F2.8 to F5.9 Digital zoom: Max. 4 × Extended optical zoom: Max. 7.1 × Focus: Normal / Macro Face detection / 9-area-focusing / 1-area-focusing Focus range...
User Manual
Page 22
...], [* 2.5M] or [} 2M] is used.), [QVGA] 320 × 240 pixels Quality: Fine/Standard Recording file format Still Picture: JPEG (based on "Design rule for Camera File system", based on "Exif 2.21" standard)/DPOF corresponding Motion pictures: "QuickTime Motion JPEG" (motion pictures with audio) 22 VQT2T58 (ENG)
...], [* 2.5M] or [} 2M] is used.), [QVGA] 320 × 240 pixels Quality: Fine/Standard Recording file format Still Picture: JPEG (based on "Design rule for Camera File system", based on "Exif 2.21" standard)/DPOF corresponding Motion pictures: "QuickTime Motion JPEG" (motion pictures with audio) 22 VQT2T58 (ENG)

Brochure
Page 1
extended battery life Features long-lasting lithium ion battery. intelligent iso control Detects subject movement to capture the best photos. 2010 LUMIX® F2 DIGITAL CAMERA Auto Scene Mode with face recognition Recognizes specific scene elements to minimize motion blur. • 10.2 Megapixel • Intelligent Scene Selector • Simple, Easy Operation
extended battery life Features long-lasting lithium ion battery. intelligent iso control Detects subject movement to capture the best photos. 2010 LUMIX® F2 DIGITAL CAMERA Auto Scene Mode with face recognition Recognizes specific scene elements to minimize motion blur. • 10.2 Megapixel • Intelligent Scene Selector • Simple, Easy Operation
Brochure
Page 2
...Pet, Travel) - - Field of View : approx. 100%; 2010 LUMIX® F2 Digital Camera Specifications METRICS OPTICS Dimensions (W x H x D) Weight Pixels CCD Lens Focus Shutter Finder iA File Interface Recording Modes Camera Effective Pixels Sensor Size / Total Pixels / Filter Aperture Optical Zoom Focal Length Extra ....4 oF)/Humidity: 50% when LCD monitor is on. • Using a Panasonic SD Memory Card (32 MB). • Using the supplied battery. • Starting recording 30 seconds after the camera is turned on the screen." DMC-F2 98.4 x 55.2 x 23.4 mm/excl. LUMIX DC VARIO 6 elements ...
...Pet, Travel) - - Field of View : approx. 100%; 2010 LUMIX® F2 Digital Camera Specifications METRICS OPTICS Dimensions (W x H x D) Weight Pixels CCD Lens Focus Shutter Finder iA File Interface Recording Modes Camera Effective Pixels Sensor Size / Total Pixels / Filter Aperture Optical Zoom Focal Length Extra ....4 oF)/Humidity: 50% when LCD monitor is on. • Using a Panasonic SD Memory Card (32 MB). • Using the supplied battery. • Starting recording 30 seconds after the camera is turned on the screen." DMC-F2 98.4 x 55.2 x 23.4 mm/excl. LUMIX DC VARIO 6 elements ...


