
Digital Still Camera
Page 4
...LCD Monitor/Viewfinder .... 27 About the Histogram 29 The Mode Dial 30 Recording pictures (basic) Taking Pictures 31 Checking the Recorded Picture (Review 36 Using the Optical Zoom 37 Taking Pictures using the Built-in Flash 38 Compensating the Exposure 41 Taking Pictures using Auto Bracket 42...Quality 72 Taking Pictures using Spot Mode...... 73 Setting ISO Sensitivity 74 Taking Pictures with Audio 75 Using the Continuous AF 76 Using the Digital Zoom 77 Using the Color Effect 78 Adjusting the Quality of the Picture (Picture Adjustment 79 Using the Optical Image Stabilizer .... 80 ...
...LCD Monitor/Viewfinder .... 27 About the Histogram 29 The Mode Dial 30 Recording pictures (basic) Taking Pictures 31 Checking the Recorded Picture (Review 36 Using the Optical Zoom 37 Taking Pictures using the Built-in Flash 38 Compensating the Exposure 41 Taking Pictures using Auto Bracket 42...Quality 72 Taking Pictures using Spot Mode...... 73 Setting ISO Sensitivity 74 Taking Pictures with Audio 75 Using the Continuous AF 76 Using the Digital Zoom 77 Using the Color Effect 78 Adjusting the Quality of the Picture (Picture Adjustment 79 Using the Optical Image Stabilizer .... 80 ...
Digital Still Camera
Page 8
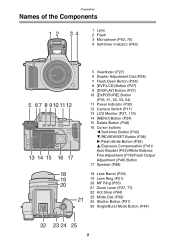
... (P27) 10 [EXPOSURE] Button (P35, 51, 52, 53, 54) 11 Power Indicator (P32) 12 Camera Switch (P11) 13 LCD Monitor (P27, 119) 14 [MENU] Button (P24) 15 Delete Button (P48) 16 Cursor buttons 2/Self-timer Button (P43) 4/REVIEW/SET Button (P36) 1/Flash Mode Button (P38) 3/Exposure Compensation (P41)/ Auto Bracket (P42)/White...
... (P27) 10 [EXPOSURE] Button (P35, 51, 52, 53, 54) 11 Power Indicator (P32) 12 Camera Switch (P11) 13 LCD Monitor (P27, 119) 14 [MENU] Button (P24) 15 Delete Button (P48) 16 Cursor buttons 2/Self-timer Button (P43) 4/REVIEW/SET Button (P36) 1/Flash Mode Button (P38) 3/Exposure Compensation (P41)/ Auto Bracket (P42)/White...

Digital Still Camera
Page 11
Preparation ª Recording ª Playback • Remove the lens cap. • Be careful not to view. (P45) P A/S/M P OFF ON WB REVIEW SET 5 1 Open the flash. (When using the flash) (P38) 2 Take a picture. (P31) OPEN 11 A/S/M 6 1 Select Playback mode [ ]. 2 Select the picture you want to lose the lens cap. 4 1 Turn the camera on. 2 Set the clock. (P22) 3 Select Program AE mode [ ].
Preparation ª Recording ª Playback • Remove the lens cap. • Be careful not to view. (P45) P A/S/M P OFF ON WB REVIEW SET 5 1 Open the flash. (When using the flash) (P38) 2 Take a picture. (P31) OPEN 11 A/S/M 6 1 Select Playback mode [ ]. 2 Select the picture you want to lose the lens cap. 4 1 Turn the camera on. 2 Set the clock. (P22) 3 Select Program AE mode [ ].

Digital Still Camera
Page 22
Preparation Setting the Date/Time (Clock Set) ª Initial setting The clock is not set when the camera is shipped. REVIEW SET CLOCK SET 10 :00 DEC . 11. 2003 M/D/Y SELECT SET EXIT MENU WB WB REVIEW REVIEW SET SET • 2/1: Select the desired item. • 3/4: Set date and time. 22 Set the ...clock on , the clock setting screen appears. When you turn the camera on it. MENU WB WB REVIEW SET WB REVIEW SET 2 Set date and time. PLEASE SET THE CLOCK CLOCK SET MENU 1 Select [CLOCK SET] from the [SETUP] menu. (P24...
Preparation Setting the Date/Time (Clock Set) ª Initial setting The clock is not set when the camera is shipped. REVIEW SET CLOCK SET 10 :00 DEC . 11. 2003 M/D/Y SELECT SET EXIT MENU WB WB REVIEW REVIEW SET SET • 2/1: Select the desired item. • 3/4: Set date and time. 22 Set the ...clock on , the clock setting screen appears. When you turn the camera on it. MENU WB WB REVIEW SET WB REVIEW SET 2 Set date and time. PLEASE SET THE CLOCK CLOCK SET MENU 1 Select [CLOCK SET] from the [SETUP] menu. (P24...
Digital Still Camera
Page 23
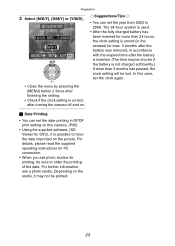
... shorter if the battery is possible to order the printing of the date. CLOCK SET 1 0 : 0 0 1 DEC. 1 1 . 2 0 0 3 M/D/Y SELECT SET EXIT MENU WB REVIEW SET • Close the menu by pressing the [MENU] button 2 times after finishing the setting. • Check if the clock setting is correct, after the... battery is stored (in accordance with the elapsed time after turning the camera off and on. ¬Suggestions/Tips ¬ • You can set the year from 2003 to 2099. For further information, ask a photo ...
... shorter if the battery is possible to order the printing of the date. CLOCK SET 1 0 : 0 0 1 DEC. 1 1 . 2 0 0 3 M/D/Y SELECT SET EXIT MENU WB REVIEW SET • Close the menu by pressing the [MENU] button 2 times after finishing the setting. • Check if the clock setting is correct, after the... battery is stored (in accordance with the elapsed time after turning the camera off and on. ¬Suggestions/Tips ¬ • You can set the year from 2003 to 2099. For further information, ask a photo ...
Digital Still Camera
Page 24
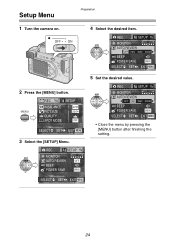
.... REC SETUP 1/3 MONITOR WB AUTO REVIEW OFF 1SEC. 3SEC. OFF ON 4 Select the desired item. SELECT SET EXIT MENU • Close the menu by pressing the [MENU] button after finishing the setting. 24 Setup Menu Preparation 1 Turn the camera on. MENU REC 1/4 SETUP W.BALANCE... AUTO PICT.SIZE 2304 QUALITY SPOT MODE OFF SELECT SET EXIT MENU 3 Select the [SETUP] Menu. ZOOM REVIEW SET BEEP POWER SAVE 2MIN. REC SETUP 1/3 MONITOR WB AUTO REVIEW OFF BEEP REVIEW SET POWER SAVE 2MIN. ZOOM REVIEW SET BEEP...
.... REC SETUP 1/3 MONITOR WB AUTO REVIEW OFF 1SEC. 3SEC. OFF ON 4 Select the desired item. SELECT SET EXIT MENU • Close the menu by pressing the [MENU] button after finishing the setting. 24 Setup Menu Preparation 1 Turn the camera on. MENU REC 1/4 SETUP W.BALANCE... AUTO PICT.SIZE 2304 QUALITY SPOT MODE OFF SELECT SET EXIT MENU 3 Select the [SETUP] Menu. ZOOM REVIEW SET BEEP POWER SAVE 2MIN. REC SETUP 1/3 MONITOR WB AUTO REVIEW OFF BEEP REVIEW SET POWER SAVE 2MIN. ZOOM REVIEW SET BEEP...
Digital Still Camera
Page 25
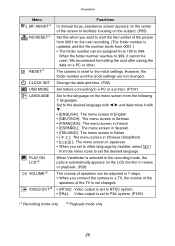
... images/during Slide Show, the power save mode.) • [OFF]: The camera is not automatically turned off if it is automatically turned off . • When using pictures with audio, the auto review function works while recording the audio or the data into the card regardless of... automatically appears on [SETUP] Menu. Then it has not been used for a predetermined amount of time. (Press the shutter button or turn the camera off and on the auto review function. (The picture is not enlarged.) • [ ]: The operational sound turns high. • [ ]: The operational sound turns low. &#...
... images/during Slide Show, the power save mode.) • [OFF]: The camera is not automatically turned off if it is automatically turned off . • When using pictures with audio, the auto review function works while recording the audio or the data into the card regardless of... automatically appears on [SETUP] Menu. Then it has not been used for a predetermined amount of time. (Press the shutter button or turn the camera off and on the auto review function. (The picture is not enlarged.) • [ ]: The operational sound turns high. • [ ]: The operational sound turns low. &#...
Digital Still Camera
Page 26
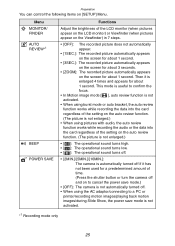
...by mistake, select [ ] from the menu icons to set to PAL system. (P106) 1 ° Recording mode only 2 ° Playback mode only 26 The camera is reset to the language on the menu screen from the following 7 languages. Change the date and time. (P22) Set before connecting to a PC or...a printer. (P107) Set to the initial settings. When Viewfinder is selected in the recording mode, the picture automatically appears on the LCD monitor in review or playback. (P28) The volume of the TV is not changed . Preparation Menu MF ASSIST°1 NO.RESET°1 RESET°1 CLOCK SET USB...
...by mistake, select [ ] from the menu icons to set to PAL system. (P106) 1 ° Recording mode only 2 ° Playback mode only 26 The camera is reset to the language on the menu screen from the following 7 languages. Change the date and time. (P22) Set before connecting to a PC or...a printer. (P107) Set to the initial settings. When Viewfinder is selected in the recording mode, the picture automatically appears on the LCD monitor in review or playback. (P28) The volume of the TV is not changed . Preparation Menu MF ASSIST°1 NO.RESET°1 RESET°1 CLOCK SET USB...
Digital Still Camera
Page 28
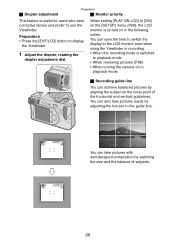
... and prefer to use the Viewfinder. Preparation ª Diopter adjustment ª Monitor priority This feature is switched to playback mode. • When reviewing pictures (P36) • When turning the camera on in playback mode. ª Recording guide line You can achieve balanced pictures by aligning the subject on in the following cases...
... and prefer to use the Viewfinder. Preparation ª Diopter adjustment ª Monitor priority This feature is switched to playback mode. • When reviewing pictures (P36) • When turning the camera on in playback mode. ª Recording guide line You can achieve balanced pictures by aligning the subject on in the following cases...
Digital Still Camera
Page 35
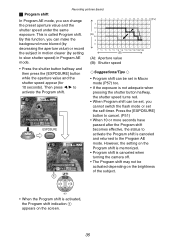
... in motion clearer (by setting 0 1/2 1/4 1/8 1/15 1/30 1/60 1/125 1/250 1/500 1/1000 1/2000 (B) to activate the Program shift. WB REVIEW SET • When the Program shift is canceled when turning the camera off. • The Program shift may not be set in Program AE mode. (A): Aperture value (B): Shutter speed • Press the...
... in motion clearer (by setting 0 1/2 1/4 1/8 1/15 1/30 1/60 1/125 1/250 1/500 1/1000 1/2000 (B) to activate the Program shift. WB REVIEW SET • When the Program shift is canceled when turning the camera off. • The Program shift may not be set in Program AE mode. (A): Aperture value (B): Shutter speed • Press the...
Digital Still Camera
Page 36
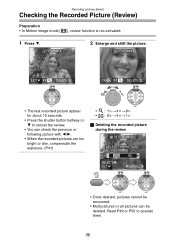
... • Press the shutter button halfway or 4 to operate them. 36 REVIEW1X 2 Enlarge and shift the picture. YES SELECT SET NO MULTI/ALL WB WB REVIEW REVIEW SET SET • Once deleted, pictures cannot be recovered. • Multi pictures or all pictures can check the previous or following picture with 2/1. • When... the recorded pictures are too bright or dim, compensate the exposure. (P41) REVIEW SET • : 1k>4k>8k • : 8k>4k>1k ª Deleting the recorded picture during the...
... • Press the shutter button halfway or 4 to operate them. 36 REVIEW1X 2 Enlarge and shift the picture. YES SELECT SET NO MULTI/ALL WB WB REVIEW REVIEW SET SET • Once deleted, pictures cannot be recovered. • Multi pictures or all pictures can check the previous or following picture with 2/1. • When... the recorded pictures are too bright or dim, compensate the exposure. (P41) REVIEW SET • : 1k>4k>8k • : 8k>4k>1k ª Deleting the recorded picture during the...
Digital Still Camera
Page 38
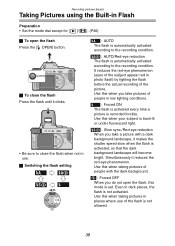
... open the flash Press the [ OPEN] button. OPEN ª To close the flash when not in places where use . ª Switching the flash setting WB REVIEW SET : AUTO The flash is automatically activated according to the recording condition. : AUTO/Red-eye reduction The flash is automatically activated according to close the...
... open the flash Press the [ OPEN] button. OPEN ª To close the flash when not in places where use . ª Switching the flash setting WB REVIEW SET : AUTO The flash is automatically activated according to the recording condition. : AUTO/Red-eye reduction The flash is automatically activated according to close the...
Digital Still Camera
Page 40
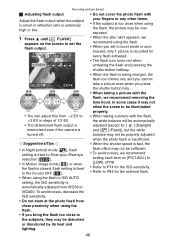
...scene to be illuminated properly. • When taking a picture with the flash, we recommend removing the lens hood. FLASH SELECT WB WB EXIT WB REVIEW REVIEW REVIEW SET SET SET • You can adjust this from close proximity when using the flash. • If you bring the flash too close to the... stare at the photo flash from j2 EV to i2 EV in steps of 1/3 EV. • The determined flash output is memorized even if the camera is turned off. ¬Suggestions/Tips ¬ • In Night portrait mode [ ], flash setting is fixed to Slow sync./Red-eye reduction [ ]. •...
...scene to be illuminated properly. • When taking a picture with the flash, we recommend removing the lens hood. FLASH SELECT WB WB EXIT WB REVIEW REVIEW REVIEW SET SET SET • You can adjust this from close proximity when using the flash. • If you bring the flash too close to the... stare at the photo flash from j2 EV to i2 EV in steps of 1/3 EV. • The determined flash output is memorized even if the camera is turned off. ¬Suggestions/Tips ¬ • In Night portrait mode [ ], flash setting is fixed to Slow sync./Red-eye reduction [ ]. •...
Digital Still Camera
Page 41
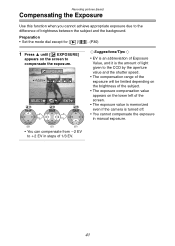
... (P30) 1 Press 3 until [ EXPOSURE] appears on the lower left of brightness between the subject and the background. EXPOSURE SELECT WB WB EXIT WB REVIEW REVIEW REVIEW SET SET SET • You can compensate from j2 EV to i2 EV in steps of 1/3 EV. ¬Suggestions/Tips ¬ • EV...The exposure compensation value appears on the screen to the difference of the screen. • The exposure value is memorized even if the camera is turned off. • You cannot compensate the exposure in manual exposure. 41 Recording pictures (basic) Compensating the Exposure Use this ...
... (P30) 1 Press 3 until [ EXPOSURE] appears on the lower left of brightness between the subject and the background. EXPOSURE SELECT WB WB EXIT WB REVIEW REVIEW REVIEW SET SET SET • You can compensate from j2 EV to i2 EV in steps of 1/3 EV. ¬Suggestions/Tips ¬ • EV...The exposure compensation value appears on the screen to the difference of the screen. • The exposure value is memorized even if the camera is turned off. • You cannot compensate the exposure in manual exposure. 41 Recording pictures (basic) Compensating the Exposure Use this ...

Digital Still Camera
Page 42
... activated, you can select the exposure from j1 EV to set the compensation range of the exposure. AUTO BRACKET SELECT WB EXIT WB REVIEW SET WB REVIEW SET WB REVIEW REVIEW SET SET • You can take only 1 picture. When the exposure is compensated, the compensated exposure value appears on the lower left of...
... activated, you can select the exposure from j1 EV to set the compensation range of the exposure. AUTO BRACKET SELECT WB EXIT WB REVIEW SET WB REVIEW SET WB REVIEW REVIEW SET SET • You can take only 1 picture. When the exposure is compensated, the compensated exposure value appears on the lower left of...
Digital Still Camera
Page 43
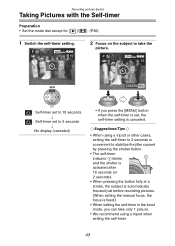
... self-timer to 2 seconds is convenient to 10 seconds ; : Self-timer set , the self-timer setting is set to 2 seconds ; P 2304 1 19 CANCEL MENU WB REVIEW SET : Self-timer set to stabilize the jitter caused by pressing the shutter button. • The self-timer indicator 1 blinks and the shutter is activated...
... self-timer to 2 seconds is convenient to 10 seconds ; : Self-timer set , the self-timer setting is set to 2 seconds ; P 2304 1 19 CANCEL MENU WB REVIEW SET : Self-timer set to stabilize the jitter caused by pressing the shutter button. • The self-timer indicator 1 blinks and the shutter is activated...
Digital Still Camera
Page 45
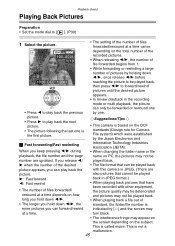
... reaching the picture to be played back, then press 2/1 to forward/rewind WB pictures until the desired picture appears. • In review playback in the recording REVIEW mode or multi playback, the picture SET can only be forwarded or rewound one • Press 2 to play back the previous by... one is the first picture. ¬Suggestions/Tips ¬ • This camera is based on the DCF standards (Design rule for Camera File system)...
... reaching the picture to be played back, then press 2/1 to forward/rewind WB pictures until the desired picture appears. • In review playback in the recording REVIEW mode or multi playback, the picture SET can only be forwarded or rewound one • Press 2 to play back the previous by... one is the first picture. ¬Suggestions/Tips ¬ • This camera is based on the DCF standards (Design rule for Camera File system)...
Digital Still Camera
Page 46
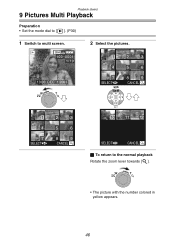
Playback (basic) 9 Pictures Multi Playback Preparation • Set the mode dial to [ ]. (P30) 1 Switch to multi screen. 2304 100_0001 1/19 10:00 DEC. 1.2003 W T 1 4 7 SELECT 2 3 5 6 8 9 CANCEL 2 Select the pictures. 1 4 7 SELECT WB 2 3 5 6 8 9 CANCEL REVIEW SET 10 11 12 SELECT CANCEL ª To return to the normal playback Rotate the zoom lever towards [ ]. W T • The picture with the number colored in yellow appears. 46
Playback (basic) 9 Pictures Multi Playback Preparation • Set the mode dial to [ ]. (P30) 1 Switch to multi screen. 2304 100_0001 1/19 10:00 DEC. 1.2003 W T 1 4 7 SELECT 2 3 5 6 8 9 CANCEL 2 Select the pictures. 1 4 7 SELECT WB 2 3 5 6 8 9 CANCEL REVIEW SET 10 11 12 SELECT CANCEL ª To return to the normal playback Rotate the zoom lever towards [ ]. W T • The picture with the number colored in yellow appears. 46
Digital Still Camera
Page 47
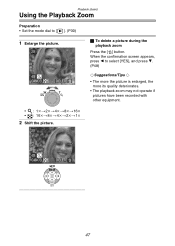
... been recorded with other equipment. • : 1k>2k>4k>8k>16k • : 16k>8k>4k>2k>1k 2 Shift the picture. 2X 4X CANCEL DELETE WB REVIEW SET 47
... been recorded with other equipment. • : 1k>2k>4k>8k>16k • : 16k>8k>4k>2k>1k 2 Shift the picture. 2X 4X CANCEL DELETE WB REVIEW SET 47
Digital Still Camera
Page 48
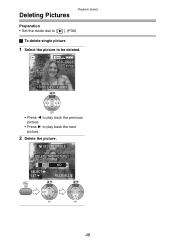
Playback (basic) Deleting Pictures Preparation • Set the mode dial to [ ]. (P30) ª To delete single picture 1 Select the picture to be deleted. 2304 100_0001 1/19 10:00 DEC. 1.2003 WB REVIEW SET • Press 2 to play back the previous picture. • Press 1 to play back the next picture. 2 Delete the picture. YES SELECT SET NO MULTI/ALL WB WB REVIEW SET REVIEW SET 48 DELETE SINGLE DELETE THIS PICTURE?
Playback (basic) Deleting Pictures Preparation • Set the mode dial to [ ]. (P30) ª To delete single picture 1 Select the picture to be deleted. 2304 100_0001 1/19 10:00 DEC. 1.2003 WB REVIEW SET • Press 2 to play back the previous picture. • Press 1 to play back the next picture. 2 Delete the picture. YES SELECT SET NO MULTI/ALL WB WB REVIEW SET REVIEW SET 48 DELETE SINGLE DELETE THIS PICTURE?