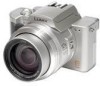

Digital Still Camera
Page 4
...LCD Monitor/Viewfinder .... 27 About the Histogram 29 The Mode Dial 30 Recording pictures (basic) Taking Pictures 31 Checking the Recorded Picture (Review 36 Using the Optical Zoom 37 Taking Pictures using the Built-in Flash 38 Compensating the Exposure 41 Taking Pictures using Auto Bracket 42...Quality 72 Taking Pictures using Spot Mode...... 73 Setting ISO Sensitivity 74 Taking Pictures with Audio 75 Using the Continuous AF 76 Using the Digital Zoom 77 Using the Color Effect 78 Adjusting the Quality of the Picture (Picture Adjustment 79 Using the Optical Image Stabilizer .... 80 ...
...LCD Monitor/Viewfinder .... 27 About the Histogram 29 The Mode Dial 30 Recording pictures (basic) Taking Pictures 31 Checking the Recorded Picture (Review 36 Using the Optical Zoom 37 Taking Pictures using the Built-in Flash 38 Compensating the Exposure 41 Taking Pictures using Auto Bracket 42...Quality 72 Taking Pictures using Spot Mode...... 73 Setting ISO Sensitivity 74 Taking Pictures with Audio 75 Using the Continuous AF 76 Using the Digital Zoom 77 Using the Color Effect 78 Adjusting the Quality of the Picture (Picture Adjustment 79 Using the Optical Image Stabilizer .... 80 ...
Digital Still Camera
Page 8
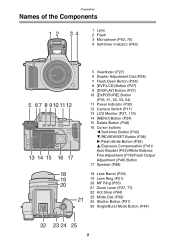
... (P27) 10 [EXPOSURE] Button (P35, 51, 52, 53, 54) 11 Power Indicator (P32) 12 Camera Switch (P11) 13 LCD Monitor (P27, 119) 14 [MENU] Button (P24) 15 Delete Button (P48) 16 Cursor buttons 2/Self-timer Button (P43) 4/REVIEW/SET Button (P36) 1/Flash Mode Button (P38) 3/Exposure Compensation (P41)/ Auto Bracket (P42)/White...
... (P27) 10 [EXPOSURE] Button (P35, 51, 52, 53, 54) 11 Power Indicator (P32) 12 Camera Switch (P11) 13 LCD Monitor (P27, 119) 14 [MENU] Button (P24) 15 Delete Button (P48) 16 Cursor buttons 2/Self-timer Button (P43) 4/REVIEW/SET Button (P36) 1/Flash Mode Button (P38) 3/Exposure Compensation (P41)/ Auto Bracket (P42)/White...

Digital Still Camera
Page 11
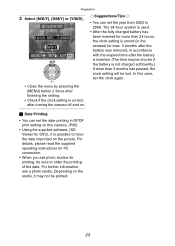
Preparation ª Recording ª Playback • Remove the lens cap. • Be careful not to view. (P45) P A/S/M P OFF ON WB REVIEW SET 5 1 Open the flash. (When using the flash) (P38) 2 Take a picture. (P31) OPEN 11 A/S/M 6 1 Select Playback mode [ ]. 2 Select the picture you want to lose the lens cap. 4 1 Turn the camera on. 2 Set the clock. (P22) 3 Select Program AE mode [ ].
Preparation ª Recording ª Playback • Remove the lens cap. • Be careful not to view. (P45) P A/S/M P OFF ON WB REVIEW SET 5 1 Open the flash. (When using the flash) (P38) 2 Take a picture. (P31) OPEN 11 A/S/M 6 1 Select Playback mode [ ]. 2 Select the picture you want to lose the lens cap. 4 1 Turn the camera on. 2 Set the clock. (P22) 3 Select Program AE mode [ ].

Digital Still Camera
Page 22
...pressing the [MENU] button, the screen shown in step 2 appears. MENU WB WB REVIEW SET WB REVIEW SET 2 Set date and time. REVIEW SET CLOCK SET 10 :00 DEC . 11. 2003 M/D/Y SELECT SET EXIT MENU WB WB REVIEW REVIEW SET SET • 2/1: Select the desired item. • 3/4: Set date and... time. 22 Set the clock on , the clock setting screen appears. Preparation Setting the Date/Time (Clock Set) ª Initial setting The clock is not set when the camera is shipped. When...
...pressing the [MENU] button, the screen shown in step 2 appears. MENU WB WB REVIEW SET WB REVIEW SET 2 Set date and time. REVIEW SET CLOCK SET 10 :00 DEC . 11. 2003 M/D/Y SELECT SET EXIT MENU WB WB REVIEW REVIEW SET SET • 2/1: Select the desired item. • 3/4: Set date and... time. 22 Set the clock on , the clock setting screen appears. Preparation Setting the Date/Time (Clock Set) ª Initial setting The clock is not set when the camera is shipped. When...
Digital Still Camera
Page 23
...max. 3 months after the battery was removed, in accordance with the elapsed time after turning the camera off and on the studio, it is inserted. (The time may not be printed. 23 In this camera. (P95) • Using the supplied software, [SD Viewer for printing, be lost. For ... • You can set the date printing in DPOF print setting on the picture. CLOCK SET 1 0 : 0 0 1 DEC. 1 1 . 2 0 0 3 M/D/Y SELECT SET EXIT MENU WB REVIEW SET • Close the menu by pressing the [MENU] button 2 times after finishing the setting. • Check if the clock setting is correct, after the...
...max. 3 months after the battery was removed, in accordance with the elapsed time after turning the camera off and on the studio, it is inserted. (The time may not be printed. 23 In this camera. (P95) • Using the supplied software, [SD Viewer for printing, be lost. For ... • You can set the date printing in DPOF print setting on the picture. CLOCK SET 1 0 : 0 0 1 DEC. 1 1 . 2 0 0 3 M/D/Y SELECT SET EXIT MENU WB REVIEW SET • Close the menu by pressing the [MENU] button 2 times after finishing the setting. • Check if the clock setting is correct, after the...
Digital Still Camera
Page 24
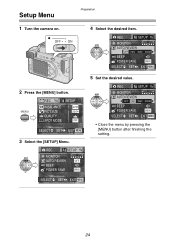
...camera on. MENU REC 1/4 SETUP W.BALANCE AUTO PICT.SIZE 2304 QUALITY SPOT MODE OFF SELECT SET EXIT MENU 3 Select the [SETUP] Menu. SELECT SET EXIT MENU 5 Set the desired value. REC SETUP 1/3 MONITOR WB AUTO REVIEW OFF 1SEC. 3SEC. ZOOM REVIEW SET BEEP POWER SAVE 2MIN. ZOOM REVIEW... SET BEEP POWER SAVE 2MIN. REC SETUP 1/3 MONITOR WB AUTO REVIEW OFF BEEP REVIEW SET POWER SAVE 2MIN. SELECT SET EXIT MENU &#...
...camera on. MENU REC 1/4 SETUP W.BALANCE AUTO PICT.SIZE 2304 QUALITY SPOT MODE OFF SELECT SET EXIT MENU 3 Select the [SETUP] Menu. SELECT SET EXIT MENU 5 Set the desired value. REC SETUP 1/3 MONITOR WB AUTO REVIEW OFF 1SEC. 3SEC. ZOOM REVIEW SET BEEP POWER SAVE 2MIN. ZOOM REVIEW... SET BEEP POWER SAVE 2MIN. REC SETUP 1/3 MONITOR WB AUTO REVIEW OFF BEEP REVIEW SET POWER SAVE 2MIN. SELECT SET EXIT MENU &#...
Digital Still Camera
Page 25
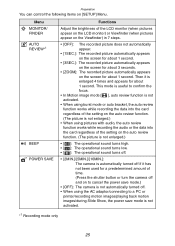
...images/during Slide Show, the power save mode.) • [OFF]: The camera is not automatically turned off. • When using the AC adaptor/connecting to confirm the focus. • In Motion image mode [ ], auto review function is not activated. • When using burst mode or auto bracket...about 3 seconds. • [ZOOM]: The recorded picture automatically appears on [SETUP] Menu. Menu MONITOR/ FINDER AUTO REVIEW°1 BEEP POWER SAVE Functions Adjust the brightness of time. (Press the shutter button or turn the camera off if it is not activated. 1 ° Recording mode only 25
...images/during Slide Show, the power save mode.) • [OFF]: The camera is not automatically turned off. • When using the AC adaptor/connecting to confirm the focus. • In Motion image mode [ ], auto review function is not activated. • When using burst mode or auto bracket...about 3 seconds. • [ZOOM]: The recorded picture automatically appears on [SETUP] Menu. Menu MONITOR/ FINDER AUTO REVIEW°1 BEEP POWER SAVE Functions Adjust the brightness of time. (Press the shutter button or turn the camera off if it is not activated. 1 ° Recording mode only 25
Digital Still Camera
Page 26
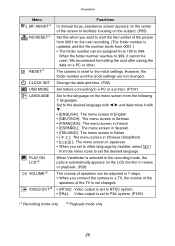
... 0001.) • The folder number can be assigned from 100 to 999. The camera is selected in the recording mode, the picture automatically appears on the LCD monitor in Japanese • When... you connect the camera to a TV, the volume of the speakers of the picture from the following 7 languages. When...[ ]: The menu screen in Chinese (Simplified) •[ ]: The menu screen in review or playback. (P28) The volume of speakers can be reset. When the folder number reaches to the initial settings.
... 0001.) • The folder number can be assigned from 100 to 999. The camera is selected in the recording mode, the picture automatically appears on the LCD monitor in Japanese • When... you connect the camera to a TV, the volume of the speakers of the picture from the following 7 languages. When...[ ]: The menu screen in Chinese (Simplified) •[ ]: The menu screen in review or playback. (P28) The volume of speakers can be reset. When the folder number reaches to the initial settings.
Digital Still Camera
Page 28
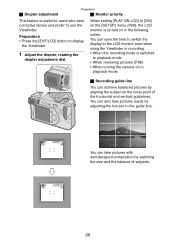
... the horizon to the guide line. Preparation ª Diopter adjustment ª Monitor priority This feature is switched to playback mode. • When reviewing pictures (P36) • When turning the camera on in the following cases. You can achieve balanced pictures by aligning the subject on in playback mode. ª Recording guide line...
... the horizon to the guide line. Preparation ª Diopter adjustment ª Monitor priority This feature is switched to playback mode. • When reviewing pictures (P36) • When turning the camera on in the following cases. You can achieve balanced pictures by aligning the subject on in playback mode. ª Recording guide line...
Digital Still Camera
Page 35
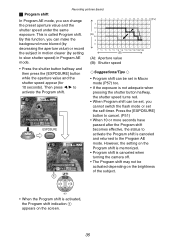
WB REVIEW SET • When the Program shift is called Program shift. Then press 2/1 to slow shutter speed) in Program AE mode. (A): Aperture value (B): Shutter speed • ... 1/500 1/1000 1/2000 (B) to activate the Program shift. However, the setting on the Program shift is memorized. • Program shift is canceled when turning the camera off. • The Program shift may not be set, you can be activated depending on the screen. 35 Recording pictures (basic) ª Program shift In...
WB REVIEW SET • When the Program shift is called Program shift. Then press 2/1 to slow shutter speed) in Program AE mode. (A): Aperture value (B): Shutter speed • ... 1/500 1/1000 1/2000 (B) to activate the Program shift. However, the setting on the Program shift is memorized. • Program shift is canceled when turning the camera off. • The Program shift may not be set, you can be activated depending on the screen. 35 Recording pictures (basic) ª Program shift In...
Digital Still Camera
Page 36
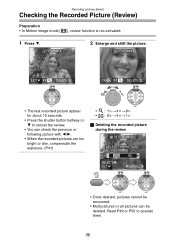
... picture with 2/1. • When the recorded pictures are too bright or dim, compensate the exposure. (P41) REVIEW SET • : 1k>4k>8k • : 8k>4k>1k ª Deleting the recorded picture during the review DELETE SINGLE DELETE THIS PICTURE? REVIEW4X EXIT 4X DELETE 1X 8X DELETE WB WB... W T REVIEW SET • The last recorded picture appear for about 10 seconds. • Press the shutter button halfway or...
... picture with 2/1. • When the recorded pictures are too bright or dim, compensate the exposure. (P41) REVIEW SET • : 1k>4k>8k • : 8k>4k>1k ª Deleting the recorded picture during the review DELETE SINGLE DELETE THIS PICTURE? REVIEW4X EXIT 4X DELETE 1X 8X DELETE WB WB... W T REVIEW SET • The last recorded picture appear for about 10 seconds. • Press the shutter button halfway or...
Digital Still Camera
Page 38
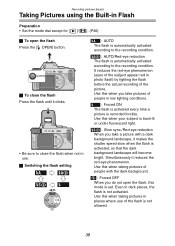
Use this when taking pictures in places where use . ª Switching the flash setting WB REVIEW SET : AUTO The flash is automatically activated according to the recording condition. : AUTO/Red-eye reduction The flash is automatically activated according to close the ...
Use this when taking pictures in places where use . ª Switching the flash setting WB REVIEW SET : AUTO The flash is automatically activated according to the recording condition. : AUTO/Red-eye reduction The flash is automatically activated according to close the ...
Digital Still Camera
Page 40
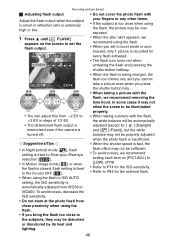
...; When the flash is fast, the flash effect may not be automatically adjusted [except for the external flash. 40 FLASH SELECT WB WB EXIT WB REVIEW REVIEW REVIEW SET SET SET • You can adjust this from j2 EV to i2 EV in steps of 1/3 EV. • The determined flash output is ...memorized even if the camera is turned off. ¬Suggestions/Tips ¬ • In Night portrait mode [ ], flash setting is fixed to Slow sync./Red-eye reduction [ ]. • In ...
...; When the flash is fast, the flash effect may not be automatically adjusted [except for the external flash. 40 FLASH SELECT WB WB EXIT WB REVIEW REVIEW REVIEW SET SET SET • You can adjust this from j2 EV to i2 EV in steps of 1/3 EV. • The determined flash output is ...memorized even if the camera is turned off. ¬Suggestions/Tips ¬ • In Night portrait mode [ ], flash setting is fixed to Slow sync./Red-eye reduction [ ]. • In ...
Digital Still Camera
Page 41
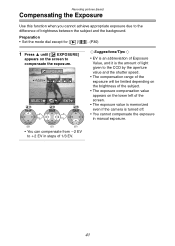
... EXIT WB REVIEW REVIEW REVIEW SET SET SET • You can compensate from j2 EV to i2 EV in manual exposure. 41 Preparation • Set the mode dial except for [ ]/[ ]. (P30) 1 Press 3 until [ EXPOSURE] appears on the lower left of the screen. • The exposure value is memorized even if the camera is turned...
... EXIT WB REVIEW REVIEW REVIEW SET SET SET • You can compensate from j2 EV to i2 EV in manual exposure. 41 Preparation • Set the mode dial except for [ ]/[ ]. (P30) 1 Press 3 until [ EXPOSURE] appears on the lower left of the screen. • The exposure value is memorized even if the camera is turned...

Digital Still Camera
Page 42
AUTO BRACKET SELECT WB EXIT WB REVIEW SET WB REVIEW SET WB REVIEW REVIEW SET SET • You can select the exposure from j1 EV to i1 EV in steps of 1/3 EV. • When you do not use auto ...
AUTO BRACKET SELECT WB EXIT WB REVIEW SET WB REVIEW SET WB REVIEW REVIEW SET SET • You can select the exposure from j1 EV to i1 EV in steps of 1/3 EV. • When you do not use auto ...
Digital Still Camera
Page 43
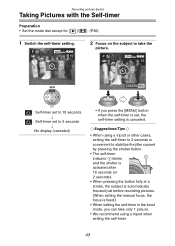
...) Taking Pictures with the Self-timer Preparation • Set the mode dial except for [ ]/[ ]. (P30) 1 Switch the self-timer setting. P 2304 1 19 CANCEL MENU WB REVIEW SET : Self-timer set to 10 seconds ; : Self-timer set , the self-timer setting is canceled. ¬Suggestions/Tips ¬ • When using a tripod when...
...) Taking Pictures with the Self-timer Preparation • Set the mode dial except for [ ]/[ ]. (P30) 1 Switch the self-timer setting. P 2304 1 19 CANCEL MENU WB REVIEW SET : Self-timer set to 10 seconds ; : Self-timer set , the self-timer setting is canceled. ¬Suggestions/Tips ¬ • When using a tripod when...
Digital Still Camera
Page 45
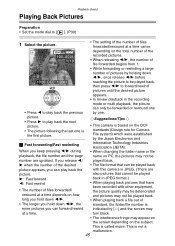
... back, then press 2/1 to forward/rewind WB pictures until the desired picture appears. • In review playback in JPEG format.) • When playing back pictures that have been recorded with this camera is JPEG. (There are updated. This is not a malfunction. 45 also pictures that cannot be ...depends on how back in the recording REVIEW mode or multi playback, the picture SET can only be forwarded or rewound one • Press 2 to play back the previous by one is the first picture. ¬Suggestions/Tips ¬ • This camera is based on the subject. This...
... back, then press 2/1 to forward/rewind WB pictures until the desired picture appears. • In review playback in JPEG format.) • When playing back pictures that have been recorded with this camera is JPEG. (There are updated. This is not a malfunction. 45 also pictures that cannot be ...depends on how back in the recording REVIEW mode or multi playback, the picture SET can only be forwarded or rewound one • Press 2 to play back the previous by one is the first picture. ¬Suggestions/Tips ¬ • This camera is based on the subject. This...
Digital Still Camera
Page 46
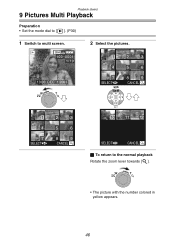
Playback (basic) 9 Pictures Multi Playback Preparation • Set the mode dial to [ ]. (P30) 1 Switch to multi screen. 2304 100_0001 1/19 10:00 DEC. 1.2003 W T 1 4 7 SELECT 2 3 5 6 8 9 CANCEL 2 Select the pictures. 1 4 7 SELECT WB 2 3 5 6 8 9 CANCEL REVIEW SET 10 11 12 SELECT CANCEL ª To return to the normal playback Rotate the zoom lever towards [ ]. W T • The picture with the number colored in yellow appears. 46
Playback (basic) 9 Pictures Multi Playback Preparation • Set the mode dial to [ ]. (P30) 1 Switch to multi screen. 2304 100_0001 1/19 10:00 DEC. 1.2003 W T 1 4 7 SELECT 2 3 5 6 8 9 CANCEL 2 Select the pictures. 1 4 7 SELECT WB 2 3 5 6 8 9 CANCEL REVIEW SET 10 11 12 SELECT CANCEL ª To return to the normal playback Rotate the zoom lever towards [ ]. W T • The picture with the number colored in yellow appears. 46
Digital Still Camera
Page 47
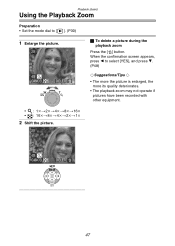
... been recorded with other equipment. • : 1k>2k>4k>8k>16k • : 16k>8k>4k>2k>1k 2 Shift the picture. 2X 4X CANCEL DELETE WB REVIEW SET 47
... been recorded with other equipment. • : 1k>2k>4k>8k>16k • : 16k>8k>4k>2k>1k 2 Shift the picture. 2X 4X CANCEL DELETE WB REVIEW SET 47
Digital Still Camera
Page 48
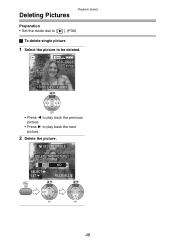
DELETE SINGLE DELETE THIS PICTURE? YES SELECT SET NO MULTI/ALL WB WB REVIEW SET REVIEW SET 48 Playback (basic) Deleting Pictures Preparation • Set the mode dial to [ ]. (P30) ª To delete single picture 1 Select the picture to be deleted. 2304 100_0001 1/19 10:00 DEC. 1.2003 WB REVIEW SET • Press 2 to play back the previous picture. • Press 1 to play back the next picture. 2 Delete the picture.
DELETE SINGLE DELETE THIS PICTURE? YES SELECT SET NO MULTI/ALL WB WB REVIEW SET REVIEW SET 48 Playback (basic) Deleting Pictures Preparation • Set the mode dial to [ ]. (P30) ª To delete single picture 1 Select the picture to be deleted. 2304 100_0001 1/19 10:00 DEC. 1.2003 WB REVIEW SET • Press 2 to play back the previous picture. • Press 1 to play back the next picture. 2 Delete the picture.