

Digital Still Camera
Page 1
For USA assistance, please call: 1-800-272-7033 or send e-mail to : digitalstillcam@panasonic.com VQT0N03 Operating Instructions Digital Camera Model No.DMC-FZ15P Before use, please read these instructions completely.
For USA assistance, please call: 1-800-272-7033 or send e-mail to : digitalstillcam@panasonic.com VQT0N03 Operating Instructions Digital Camera Model No.DMC-FZ15P Before use, please read these instructions completely.
Digital Still Camera
Page 2
... THE different from those shown in the illustrations in some components. Please call 1-800-8-BATTERY for TM Li-ion information on how to recycle this Panasonic Digital Camera. Before Use Before Use Dear Customer, We would like to take this opportunity to thank you have purchased. THE SOCKET OUTLET SHALL BE INSTALLED... NEAR THE EQUIPMENT AND SHALL BE EASILY ACCESSIBLE. For disposal or recycling information please contact your Digital Camera may Information for Your be regulated in these materials may infringe copyright laws.
... THE different from those shown in the illustrations in some components. Please call 1-800-8-BATTERY for TM Li-ion information on how to recycle this Panasonic Digital Camera. Before Use Before Use Dear Customer, We would like to take this opportunity to thank you have purchased. THE SOCKET OUTLET SHALL BE INSTALLED... NEAR THE EQUIPMENT AND SHALL BE EASILY ACCESSIBLE. For disposal or recycling information please contact your Digital Camera may Information for Your be regulated in these materials may infringe copyright laws.
Digital Still Camera
Page 4
...(Recommended temperature: 59oF - 77oF (15oC - 25oC), Recommended humidity: 40% - 60%) • Be sure to remove the battery and the card from the camera. • When the battery is left inserted in the card. Then, wipe it causes stains on the lens, fungus or malfunction. (P105) • When...the lens strongly. 4 However, as the internal temperature increases, it goes back to the the sun may be using the camera for the camera • Leaving the camera with the lens facing • Do not shake or cause impact to the normal brightness. ∫ About Condensation Condensation ...
...(Recommended temperature: 59oF - 77oF (15oC - 25oC), Recommended humidity: 40% - 60%) • Be sure to remove the battery and the card from the camera. • When the battery is left inserted in the card. Then, wipe it causes stains on the lens, fungus or malfunction. (P105) • When...the lens strongly. 4 However, as the internal temperature increases, it goes back to the the sun may be using the camera for the camera • Leaving the camera with the lens facing • Do not shake or cause impact to the normal brightness. ∫ About Condensation Condensation ...
Digital Still Camera
Page 5
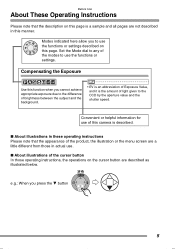
... is the amount of light given to the CCD by the aperture value and the shutter speed. Convenient or helpful information for use of this camera is a sample and all pages are not described in actual use the functions or settings. Modes indicated here allow you press the 4 button 5 Compensating the...
... is the amount of light given to the CCD by the aperture value and the shutter speed. Convenient or helpful information for use of this camera is a sample and all pages are not described in actual use the functions or settings. Modes indicated here allow you press the 4 button 5 Compensating the...
Digital Still Camera
Page 7
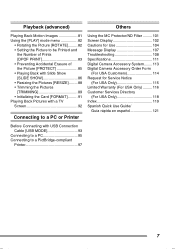
... Printer Using the MC Protector/ND Filter .........101 Screen Display 102 Cautions for Use 104 Message Display 107 Troubleshooting 108 Specifications 111 Digital Camera Accessory System........ 113 Digital Camera Accessory Order Form (For USA Customers 114 Request for Service Notice (For USA Only 115 Limited Warranty (For USA Only) .........116 Customer Services...
... Printer Using the MC Protector/ND Filter .........101 Screen Display 102 Cautions for Use 104 Message Display 107 Troubleshooting 108 Specifications 111 Digital Camera Accessory System........ 113 Digital Camera Accessory Order Form (For USA Customers 114 Request for Service Notice (For USA Only 115 Limited Warranty (For USA Only) .........116 Customer Services...
Digital Still Camera
Page 8
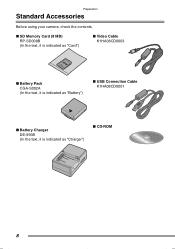
Preparation Preparation Standard Accessories Before using your camera, check the contents. ∫ SD Memory Card (8 MB) RP-SD008B (In the text, it is indicated as "Card") ∫ Video Cable K1HA08CD0003 ∫ Battery Pack CGA-S002A (In the text, it is indicated as "Battery") ∫ USB Connection Cable K1HA08CD0001 ∫ Battery Charger DE-993B (In the text, it is indicated as "Charger") ∫ CD-ROM 8
Preparation Preparation Standard Accessories Before using your camera, check the contents. ∫ SD Memory Card (8 MB) RP-SD008B (In the text, it is indicated as "Card") ∫ Video Cable K1HA08CD0003 ∫ Battery Pack CGA-S002A (In the text, it is indicated as "Battery") ∫ USB Connection Cable K1HA08CD0001 ∫ Battery Charger DE-993B (In the text, it is indicated as "Charger") ∫ CD-ROM 8
Digital Still Camera
Page 10
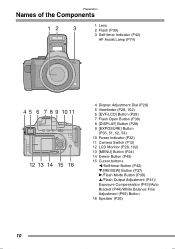
...) 5 Viewfinder (P28, 102) 6 [EVF/LCD] Button (P28) 7 Flash Open Button (P39) 8 [DISPLAY] Button (P28) 9 [EXPOSURE] Button (P35, 51, 52, 53) 10 Power Indicator (P32) 11 Camera Switch (P12) 12 LCD Monitor (P28, 102) 13 [MENU] Button (P24) 14 Delete Button (P49) 15 Cursor buttons 2/Self-timer Button (P42) 4/[REVIEW] Button (P37...
...) 5 Viewfinder (P28, 102) 6 [EVF/LCD] Button (P28) 7 Flash Open Button (P39) 8 [DISPLAY] Button (P28) 9 [EXPOSURE] Button (P35, 51, 52, 53) 10 Power Indicator (P32) 11 Camera Switch (P12) 12 LCD Monitor (P28, 102) 13 [MENU] Button (P24) 14 Delete Button (P49) 15 Cursor buttons 2/Self-timer Button (P42) 4/[REVIEW] Button (P37...
Digital Still Camera
Page 12
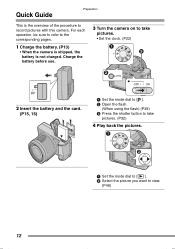
.... For each operation, be sure to refer to the corresponding pages. 1 Charge the battery. (P13) • When the camera is shipped, the battery is the overview of the procedure to record pictures with this camera. P SCN2 M 1 Set the mode dial to [ ]. 2 Select the picture you want to take pictures. • Set the...
.... For each operation, be sure to refer to the corresponding pages. 1 Charge the battery. (P13) • When the camera is shipped, the battery is the overview of the procedure to record pictures with this camera. P SCN2 M 1 Set the mode dial to [ ]. 2 Select the picture you want to take pictures. • Set the...
Digital Still Camera
Page 13
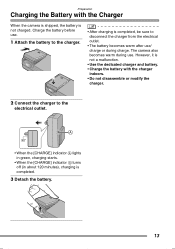
However, it is not a malfunction. • Use the dedicated charger and battery. • Charge the battery with the Charger When the camera is shipped, the battery is completed. 3 Detach the battery. 13 Charge the battery before use . Preparation Charging the Battery with the charger indoors. • Do ...; When the [CHARGE] indicator A lights in green, charging starts. • When the [CHARGE] indicator A turns off (in about 120 minutes), charging is not charged. The camera also becomes warm during charge.
However, it is not a malfunction. • Use the dedicated charger and battery. • Charge the battery with the Charger When the camera is shipped, the battery is completed. 3 Detach the battery. 13 Charge the battery before use . Preparation Charging the Battery with the charger indoors. • Do ...; When the [CHARGE] indicator A lights in green, charging starts. • When the [CHARGE] indicator A turns off (in about 120 minutes), charging is not charged. The camera also becomes warm during charge.
Digital Still Camera
Page 14
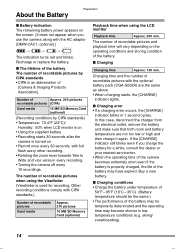
...flash every other recording. • Rotating the zoom lever towards Tele to Wide and vice versa in every recording. • Turning the camera off every 10 recordings. Other recording conditions comply with the optional battery pack (CGA-S002A) are not too low or high and then ... for a while, consult the dealer or your nearest servicenter. • When the operating time of the camera becomes extremely short even if the battery is properly charged, the life of [Camera & Imaging Products Association]. Number of Approx. 240 pictures recordable pictures (CIPA) Used media 16 MB SD Memory...
...flash every other recording. • Rotating the zoom lever towards Tele to Wide and vice versa in every recording. • Turning the camera off every 10 recordings. Other recording conditions comply with the optional battery pack (CGA-S002A) are not too low or high and then ... for a while, consult the dealer or your nearest servicenter. • When the operating time of the camera becomes extremely short even if the battery is properly charged, the life of [Camera & Imaging Products Association]. Number of Approx. 240 pictures recordable pictures (CIPA) Used media 16 MB SD Memory...

Digital Still Camera
Page 15
In this camera. Do not use genuine Panasonic's batteries (CGA-S002A). 2 Insert: Insert the charged battery until it with any other ...then close it firmly. • Please be sure to remove the battery. • If you will not be using the camera for a long time, remove the battery. • When a fully charged battery has been inserted for more than 24 hours..., the clock setting is stored (in the camera) for at least 3 months even if the battery is removed. (The storing may be lost. Remove: Slide the lock 1 ...
In this camera. Do not use genuine Panasonic's batteries (CGA-S002A). 2 Insert: Insert the charged battery until it with any other ...then close it firmly. • Please be sure to remove the battery. • If you will not be using the camera for a long time, remove the battery. • When a fully charged battery has been inserted for more than 24 hours..., the clock setting is stored (in the camera) for at least 3 months even if the battery is removed. (The storing may be lost. Remove: Slide the lock 1 ...
Digital Still Camera
Page 16
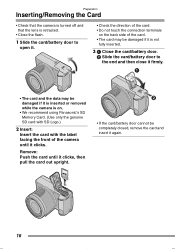
Preparation Inserting/Removing the Card • Check that the camera is turned off and that the lens is retracted. • Close the flash. 1 Slide the card...back side of the card. • The card may be damaged if it is on. • We recommend using Panasonic's SD Memory Card. (Use only the genuine SD card with SD Logo.) 2 Insert: Insert the card with the label ...pull the card out upright. • If the card/battery door cannot be damaged if it is inserted or removed while the camera is not fully inserted. 3 1 Close the card/battery door. 2 Slide the card/battery door to the end and then ...
Preparation Inserting/Removing the Card • Check that the camera is turned off and that the lens is retracted. • Close the flash. 1 Slide the card...back side of the card. • The card may be damaged if it is on. • We recommend using Panasonic's SD Memory Card. (Use only the genuine SD card with SD Logo.) 2 Insert: Insert the card with the label ...pull the card out upright. • If the card/battery door cannot be damaged if it is inserted or removed while the camera is not fully inserted. 3 1 Close the card/battery door. 2 Slide the card/battery door to the end and then ...
Digital Still Camera
Page 17
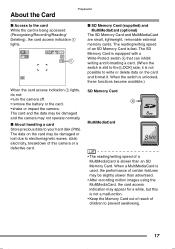
The card and the data may be slightly slower than an SD Memory Card. SD Memory Card MultiMediaCard • The reading/writing speed of this camera or a defective card. When the switch is fast. The data on the card and format it is not a malfunction. • Keep the Memory ...When the card access indication 1 lights, do not: • turn the camera off. • remove the battery or the card. • shake or impact the camera. The reading/writing speed of certain features may be damaged and the camera may be damaged or lost due to prevent swallowing. 17 About the Card...
The card and the data may be slightly slower than an SD Memory Card. SD Memory Card MultiMediaCard • The reading/writing speed of this camera or a defective card. When the switch is fast. The data on the card and format it is not a malfunction. • Keep the Memory ...When the card access indication 1 lights, do not: • turn the camera off. • remove the battery or the card. • shake or impact the camera. The reading/writing speed of certain features may be damaged and the camera may be damaged or lost due to prevent swallowing. 17 About the Card...
Digital Still Camera
Page 19
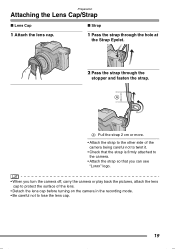
... careful not to twist it. • Check that the strap is firmly attached to the camera. • Attach the strap so that you can see "LUMIX" logo. • When you turn the camera off, carry the camera or play back the pictures, attach the lens cap to protect the surface of the lens.... • Detach the lens cap before turning on the camera in the recording mode. • Be careful not to lose the lens cap. 19 Preparation Attaching the Lens Cap/Strap ∫ Lens Cap ∫ Strap 1 ...
... careful not to twist it. • Check that the strap is firmly attached to the camera. • Attach the strap so that you can see "LUMIX" logo. • When you turn the camera off, carry the camera or play back the pictures, attach the lens cap to protect the surface of the lens.... • Detach the lens cap before turning on the camera in the recording mode. • Be careful not to lose the lens cap. 19 Preparation Attaching the Lens Cap/Strap ∫ Lens Cap ∫ Strap 1 ...
Digital Still Camera
Page 20
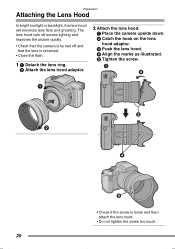
... and that the lens is retracted. • Close the flash. 1 1 Detach the lens ring. 2 Attach the lens hood adaptor. 2 Attach the lens hood. 1 Place the camera upside down. 2 Catch the hook on the lens hood adaptor. 3 Push the lens hood. 4 Align the marks as illustrated. 5 Tighten the screw. 1 3 2 4 5 • Check if...
... and that the lens is retracted. • Close the flash. 1 1 Detach the lens ring. 2 Attach the lens hood adaptor. 2 Attach the lens hood. 1 Place the camera upside down. 2 Catch the hook on the lens hood adaptor. 3 Push the lens hood. 4 Align the marks as illustrated. 5 Tighten the screw. 1 3 2 4 5 • Check if...

Digital Still Camera
Page 21
... the lens hood attached, the lower portion of the photo may turn dark (vignetting effect) and the control of the accessories are lost, please contact Panasonic's parts department at 1 800 833-9626 (For USA) for chargeable replacement. 21 Preparation ∫ Temporarily storing the lens hood 2 Attach the lens cap. ...1 Remove the lens hood, reverse it and then attach it again. 1 Place the camera upside down. 2 Catch the hook on how to attach the MC protector and the ND filter, refer to P101. • If any of the flash...
... the lens hood attached, the lower portion of the photo may turn dark (vignetting effect) and the control of the accessories are lost, please contact Panasonic's parts department at 1 800 833-9626 (For USA) for chargeable replacement. 21 Preparation ∫ Temporarily storing the lens hood 2 Attach the lens cap. ...1 Remove the lens hood, reverse it and then attach it again. 1 Place the camera upside down. 2 Catch the hook on how to attach the MC protector and the ND filter, refer to P101. • If any of the flash...

Digital Still Camera
Page 22
...Close the menu by pressing the [MENU] button 2 times after finishing the setting. • Check if the clock setting is shipped. When you turn the camera on . 22 Start from step 1. 1 Select [CLOCK SET] from the [SETUP] menu. (P24) SETUP 2/3 BEEP SHUTTER CLOCK SET NO.RESET RESET ... and time. 3 Select [M/D/Y], [D/M/Y] or [Y/M/D]. Preparation Setting Date/Time (Clock Set) ∫ Initial setting The clock is not set when the camera is correct, after turning the camera off and on , the following screen appears. 2 Set date and time. CLOCK SET 10 : 00 DEC.11 . 2004 PLEASE SET THE CLOCK...
...Close the menu by pressing the [MENU] button 2 times after finishing the setting. • Check if the clock setting is shipped. When you turn the camera on . 22 Start from step 1. 1 Select [CLOCK SET] from the [SETUP] menu. (P24) SETUP 2/3 BEEP SHUTTER CLOCK SET NO.RESET RESET ... and time. 3 Select [M/D/Y], [D/M/Y] or [Y/M/D]. Preparation Setting Date/Time (Clock Set) ∫ Initial setting The clock is not set when the camera is correct, after turning the camera off and on , the following screen appears. 2 Set date and time. CLOCK SET 10 : 00 DEC.11 . 2004 PLEASE SET THE CLOCK...
Digital Still Camera
Page 23
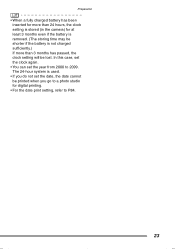
... the date, the date cannot be printed when you go to a photo studio for at least 3 months even if the battery is stored (in the camera) for digital printing. • For the date print setting, refer to 2099. The 24-hour system is used. • If you do not set the...
... the date, the date cannot be printed when you go to a photo studio for at least 3 months even if the battery is stored (in the camera) for digital printing. • For the date print setting, refer to 2099. The 24-hour system is used. • If you do not set the...

Digital Still Camera
Page 24
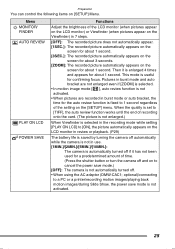
... rotating the zoom lever A toward T, the page of the menu screen can be forwarded. (vice versa) 4 Select the desired item. Setup Menu Preparation 1 Turn the camera on. A P M S SCN2 SCN1 OFF ON 2 Press the [MENU] button. SETUP 1/3 MONITOR AUTO REVIEW PLAY ON LCD POWER SAVE MF ASSIST n0 OFF 1 SEC. 3 SEC. SETUP...
... rotating the zoom lever A toward T, the page of the menu screen can be forwarded. (vice versa) 4 Select the desired item. Setup Menu Preparation 1 Turn the camera on. A P M S SCN2 SCN1 OFF ON 2 Press the [MENU] button. SETUP 1/3 MONITOR AUTO REVIEW PLAY ON LCD POWER SAVE MF ASSIST n0 OFF 1 SEC. 3 SEC. SETUP...
Digital Still Camera
Page 25
...for confirming focus. Then it has not been used for a predetermined amount of time. (Press the shutter button or turn the camera off automatically while the camera is not in 7 steps. [OFF]: The recorded picture does not automatically appear. [1SEC.]: The recorded picture automatically appears on the...monitor (when pictures appear on the LCD monitor) or Viewfinder (when pictures appear on the Viewfinder) in use. [1MIN.]/[2MIN.]/[5MIN.]/[10MIN.]: The camera is not activated. 25 Pictures in burst mode and auto bracket are not enlarged even if [ZOOM] is selected. • In motion image mode...
...for confirming focus. Then it has not been used for a predetermined amount of time. (Press the shutter button or turn the camera off automatically while the camera is not in 7 steps. [OFF]: The recorded picture does not automatically appear. [1SEC.]: The recorded picture automatically appears on the...monitor (when pictures appear on the LCD monitor) or Viewfinder (when pictures appear on the Viewfinder) in use. [1MIN.]/[2MIN.]/[5MIN.]/[10MIN.]: The camera is not activated. 25 Pictures in burst mode and auto bracket are not enlarged even if [ZOOM] is selected. • In motion image mode...


