

Digital Still Camera -english/ Spanish
Page 1
Operating Instructions Digital Camera/Lens Kit Model No. For USA assistance, please call: 1-800-272-7033 or send e-mail to : digitalstillcam@panasonic.com For Canadian assistance, please call: 1-800-561-5505 or visit us at www.panasonic.ca PP VQT0W82 DMC-L1K Before connecting, operating or adjusting this product, please read the instructions completely.
Operating Instructions Digital Camera/Lens Kit Model No. For USA assistance, please call: 1-800-272-7033 or send e-mail to : digitalstillcam@panasonic.com For Canadian assistance, please call: 1-800-561-5505 or visit us at www.panasonic.ca PP VQT0W82 DMC-L1K Before connecting, operating or adjusting this product, please read the instructions completely.
Digital Still Camera -english/ Spanish
Page 2
.... • Please note that is recyclable powers the product you for future reference. Please call 1-800-8-BATTERY for purposes other than your Digital Camera may look somewhat different from those shown in the illustrations in these Operating Instructions. • Four ThirdsTM is a trademark. • SDHC... in the United States and/or other published or broadcast material for TM Li-ion information on how to recycle this Panasonic Digital Camera. THERE ARE NO USER SERVICEABLE PARTS INSIDE. THE SOCKET OUTLET SHALL BE INSTALLED NEAR THE EQUIPMENT AND SHALL BE EASILY ACCESSIBLE...
.... • Please note that is recyclable powers the product you for future reference. Please call 1-800-8-BATTERY for purposes other than your Digital Camera may look somewhat different from those shown in the illustrations in these Operating Instructions. • Four ThirdsTM is a trademark. • SDHC... in the United States and/or other published or broadcast material for TM Li-ion information on how to recycle this Panasonic Digital Camera. THERE ARE NO USER SERVICEABLE PARTS INSIDE. THE SOCKET OUTLET SHALL BE INSTALLED NEAR THE EQUIPMENT AND SHALL BE EASILY ACCESSIBLE...
Digital Still Camera -english/ Spanish
Page 4
... day or on the LCD monitor will be damaged. • Sand or dust may form on the shutter curtains as they are very thin. The camera may stop operating normally, pictures may not be recorded or the lens may be slightly darker than 99.99% effective pixels with a mere 0.01% of... be recorded on pictures on the screen. Make sure that sand or dust does not get into the lens or the terminals when using the camera on a beach etc. • Make sure that water does not get scratched, bent or damaged. If rain water or other Countries outside the European Union...
... day or on the LCD monitor will be damaged. • Sand or dust may form on the shutter curtains as they are very thin. The camera may stop operating normally, pictures may not be recorded or the lens may be slightly darker than 99.99% effective pixels with a mere 0.01% of... be recorded on pictures on the screen. Make sure that sand or dust does not get into the lens or the terminals when using the camera on a beach etc. • Make sure that water does not get scratched, bent or damaged. If rain water or other Countries outside the European Union...
Digital Still Camera -english/ Spanish
Page 5
... naturally when the temperature of time • Store the battery in a plastic bag until the temperature of the camera is dirt (water, oil, and fingerprints, etc.) on the camera. - Lightly wipe the surface of the lens with a soft, dry cloth before and after it has completely discharged...parts before taking pictures. • Do not place the lens mount facing downwards. If condensation occurs, turn the camera off . The fog will discharge even if the camera is taken from an air conditioner etc. blows directly on the surface of condensation since it causes lens stains,...
... naturally when the temperature of time • Store the battery in a plastic bag until the temperature of the camera is dirt (water, oil, and fingerprints, etc.) on the camera. - Lightly wipe the surface of the lens with a soft, dry cloth before and after it has completely discharged...parts before taking pictures. • Do not place the lens mount facing downwards. If condensation occurs, turn the camera off . The fog will discharge even if the camera is taken from an air conditioner etc. blows directly on the surface of condensation since it causes lens stains,...
Digital Still Camera -english/ Spanish
Page 6
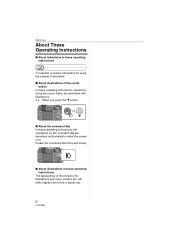
... differ slightly from those in actual use. 6 VQT0W82 Rotate the command dial firmly and slowly. ∫ About illustrations in these operating instructions, operations using the camera is described. ∫ About illustrations of the cursor button In these operating instructions The appearance of the product, the illustrations and menu screens etc. Before...
... differ slightly from those in actual use. 6 VQT0W82 Rotate the command dial firmly and slowly. ∫ About illustrations in these operating instructions, operations using the camera is described. ∫ About illustrations of the cursor button In these operating instructions The appearance of the product, the illustrations and menu screens etc. Before...
Digital Still Camera -english/ Spanish
Page 7
.../Removing the Card (Optional 21 About the Card 22 Attaching the Lens Hood 23 Attaching the Strap 24 Attaching the Eyepiece Cap 25 Turning the Camera On 25 Setting Date/Time (Clock Set 26 About the Setup Menu 27 Basic Before Taking Pictures With the Viewfinder 31 • Tips for...to Live View 50 • Tips for taking good pictures with Live View 51 • Changing the Information Displayed 51 • Recording a picture with the camera held high above your head (High angle mode 53 • Auto focus when taking pictures with Live View 54 • Manual focus when taking pictures...
.../Removing the Card (Optional 21 About the Card 22 Attaching the Lens Hood 23 Attaching the Strap 24 Attaching the Eyepiece Cap 25 Turning the Camera On 25 Setting Date/Time (Clock Set 26 About the Setup Menu 27 Basic Before Taking Pictures With the Viewfinder 31 • Tips for...to Live View 50 • Tips for taking good pictures with Live View 51 • Changing the Information Displayed 51 • Recording a picture with the camera held high above your head (High angle mode 53 • Auto focus when taking pictures with Live View 54 • Manual focus when taking pictures...
Digital Still Camera -english/ Spanish
Page 9
... • Location candidates for World Time settings 110 Cautions for Use 111 Message Display 114 Troubleshooting 115 Number of recordable pictures 120 Specifications 122 Digital Camera Accessory System ....... 125 Digital Camera Accessory Order Form (For USA Customers 126 Request for Service Notice (For USA Only 127 Limited Warranty (For USA Only) ......... 128 Customer Services...
... • Location candidates for World Time settings 110 Cautions for Use 111 Message Display 114 Troubleshooting 115 Number of recordable pictures 120 Specifications 122 Digital Camera Accessory System ....... 125 Digital Camera Accessory Order Form (For USA Customers 126 Request for Service Notice (For USA Only 127 Limited Warranty (For USA Only) ......... 128 Customer Services...
Digital Still Camera -english/ Spanish
Page 10
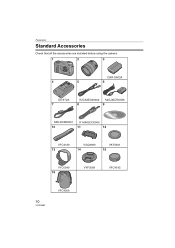
Preparation Preparation Standard Accessories Check that all the accessories are included before using the camera. 1 2 3 CGR-S603A 4 5 6 DE-972A 7 K2CA2EA00002 K2GJ2DZ00028 8 9 K2KJ2CB00001 K1HA05CD0004 10 11 12 VFC4189 13 VGQ8990 14 VKF4091 15 VYC0949 16 VYF3089 VFC4185 10 VQT0W82 VFC4206
Preparation Preparation Standard Accessories Check that all the accessories are included before using the camera. 1 2 3 CGR-S603A 4 5 6 DE-972A 7 K2CA2EA00002 K2GJ2DZ00028 8 9 K2KJ2CB00001 K1HA05CD0004 10 11 12 VFC4189 13 VGQ8990 14 VKF4091 15 VYC0949 16 VYF3089 VFC4185 10 VQT0W82 VFC4206
Digital Still Camera -english/ Spanish
Page 11
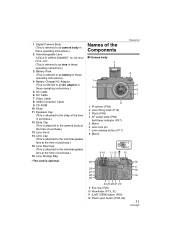
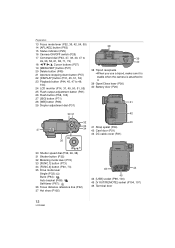
1 Digital Camera Body (This is referred to as camera body in these operating instructions.) 2 Interchangeable Lens "LEICA D VARIO-ELMARIT 14- 50 mm/ ...is attached to the strap at the time of purchase.) 12 Body Cap (This is attached to the camera body at the time of purchase.) 13 Lens Hood 14 Lens Cap (This is attached to the ...interchangeable lens at the time of purchase.) 15 Lens Rear Cap (This is attached to the interchangeable lens at the time of the Components ∫ Camera body 3 Preparation 4 1 5 2 6 7 8 1 IR sensor (P69) 2 Lens fitting mark (P16) 3 Flash (P58) 4 AF assist lamp ...
1 Digital Camera Body (This is referred to as camera body in these operating instructions.) 2 Interchangeable Lens "LEICA D VARIO-ELMARIT 14- 50 mm/ ...is attached to the strap at the time of purchase.) 12 Body Cap (This is attached to the camera body at the time of purchase.) 13 Lens Hood 14 Lens Cap (This is attached to the ...interchangeable lens at the time of purchase.) 15 Lens Rear Cap (This is attached to the interchangeable lens at the time of the Components ∫ Camera body 3 Preparation 4 1 5 2 6 7 8 1 IR sensor (P69) 2 Lens fitting mark (P16) 3 Flash (P58) 4 AF assist lamp ...
Digital Still Camera -english/ Spanish
Page 12
Preparation 13 Focus mode lever (P32, 35, 42, 54, 55) 14 [AFL/AEL] button (P63) 15 Status indicator (P25) 16 Camera ON/OFF switch (P25) 17 Command dial (P33, 37, 38, 40, 47 to 49, 56, 58, 61, 68, 71, 73) 18 2/4/1/3 Cursor buttons (P27) 19 [...) 29 Diopter adjustment dial (P31) 38 CLOSE OPEN 39 40 38 Tripod receptacle • When you use a tripod, make sure it is stable when the camera is attached to it. 39 Open/Close lever (P20) 40 Battery door (P20) 41 30 31 42 32 43 37 33 34 41 Strap eyelet...
Preparation 13 Focus mode lever (P32, 35, 42, 54, 55) 14 [AFL/AEL] button (P63) 15 Status indicator (P25) 16 Camera ON/OFF switch (P25) 17 Command dial (P33, 37, 38, 40, 47 to 49, 56, 58, 61, 68, 71, 73) 18 2/4/1/3 Cursor buttons (P27) 19 [...) 29 Diopter adjustment dial (P31) 38 CLOSE OPEN 39 40 38 Tripod receptacle • When you use a tripod, make sure it is stable when the camera is attached to it. 39 Open/Close lever (P20) 40 Battery door (P20) 41 30 31 42 32 43 37 33 34 41 Strap eyelet...
Digital Still Camera -english/ Spanish
Page 14
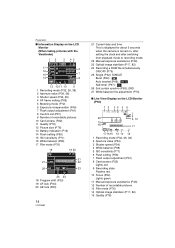
... shift (P33) 19 AF lock (P63) 20 AE lock (P63) 14 VQT0W82 21 Current date and time This is displayed for about 5 seconds when the camera is turned on, after setting the clock and after switching from playback mode to recording mode. 22 Manual exposure assistance (P39) 23 Optical image stabilizer...
... shift (P33) 19 AF lock (P63) 20 AE lock (P63) 14 VQT0W82 21 Current date and time This is displayed for about 5 seconds when the camera is turned on, after setting the clock and after switching from playback mode to recording mode. 22 Manual exposure assistance (P39) 23 Optical image stabilizer...

Digital Still Camera -english/ Spanish
Page 16
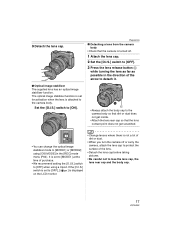
...Refer to use a lens with the lens you attach a lens. • Do not try to the camera body 1 Turn the lens rear cap A and the body cap B in the direction of digital cameras. ∫ Using a lens from another manufacturer • Some lenses from other than a dedicated interchangeable lens..., auto focus cannot be able to detach them. If you use [FUNC.1]. • Depending on the camera body and the lens and then rotate ...
...Refer to use a lens with the lens you attach a lens. • Do not try to the camera body 1 Turn the lens rear cap A and the body cap B in the direction of digital cameras. ∫ Using a lens from another manufacturer • Some lenses from other than a dedicated interchangeable lens..., auto focus cannot be able to detach them. If you use [FUNC.1]. • Depending on the camera body and the lens and then rotate ...
Digital Still Camera -english/ Spanish
Page 17
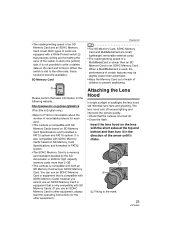
... image stabilizer function is set to [OFF], [ ] is displayed on the LCD monitor. • Change lenses where there is turned off or carry the camera, attach the lens cap to protect the surface of the arrow to [OFF]. 3 Press the lens release button D while turning the lens as far as... lens cap, the lens rear cap and the body cap. 17 VQT0W82 If the [O.I .S.] switch to detach it. Preparation ∫ Detaching a lens from the camera body • Check that the lens contact point does not get scratched. 3 Detach the lens cap. ∫ Optical image stabilizer The supplied lens has an...
... image stabilizer function is set to [OFF], [ ] is displayed on the LCD monitor. • Change lenses where there is turned off or carry the camera, attach the lens cap to protect the surface of the arrow to [OFF]. 3 Press the lens release button D while turning the lens as far as... lens cap, the lens rear cap and the body cap. 17 VQT0W82 If the [O.I .S.] switch to detach it. Preparation ∫ Detaching a lens from the camera body • Check that the lens contact point does not get scratched. 3 Detach the lens cap. ∫ Optical image stabilizer The supplied lens has an...
Digital Still Camera -english/ Spanish
Page 18
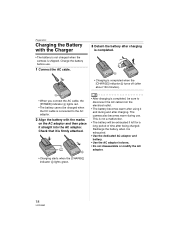
... • After charging is completed, be sure to the AC adaptor. 2 Align the battery with the Charger • The battery is not charged when the camera is completed when the [CHARGE] indicator B turns off (after about 130 minutes). A • When you connect the AC cable, the [POWER] indicator ... indicator B lights green. 18 VQT0W82 This is not a malfunction. • The battery will be charged when the DC cable is completed. The camera also becomes warm during use . 1 Connect the AC cable. 3 Detach the battery after charging is connected to disconnect the AC cable from the...
... • After charging is completed, be sure to the AC adaptor. 2 Align the battery with the Charger • The battery is not charged when the camera is completed when the [CHARGE] indicator B turns off (after about 130 minutes). A • When you connect the AC cable, the [POWER] indicator ... indicator B lights green. 18 VQT0W82 This is not a malfunction. • The battery will be charged when the DC cable is completed. The camera also becomes warm during use . 1 Connect the AC cable. 3 Detach the battery after charging is connected to disconnect the AC cable from the...
Digital Still Camera -english/ Spanish
Page 19
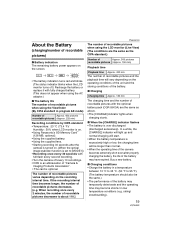
... 2 minutes, the number of recordable pictures decreases to [MODE1]) • Recording once every 30 seconds with full flash every second recording. • Turn the camera off .) Recharge the battery or replace it with fully charged battery. (This does not appear when using the AC adaptor.) ∫ The battery life The...battery indication turns red and blinks. (The status indicator blinks when the LCD monitor turns off every 10 recordings. • CIPA is an abbreviation of "Camera & Imaging Products Association". ¢The card is on. • Using Panasonic's SD Memory Card¢ (128 MB;
... 2 minutes, the number of recordable pictures decreases to [MODE1]) • Recording once every 30 seconds with full flash every second recording. • Turn the camera off .) Recharge the battery or replace it with fully charged battery. (This does not appear when using the AC adaptor.) ∫ The battery life The...battery indication turns red and blinks. (The status indicator blinks when the LCD monitor turns off every 10 recordings. • CIPA is an abbreviation of "Camera & Imaging Products Association". ¢The card is on. • Using Panasonic's SD Memory Card¢ (128 MB;
Digital Still Camera -english/ Spanish
Page 20
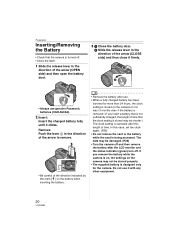
...the lever A in the direction of the arrow (CLOSE side) and then close it firmly. 1 2 CLOSE OPEN CLOSE OPEN • Always use genuine Panasonic batteries (CGR-S603A). 2 Insert: Insert the charged battery fully until it with any other equipment. 20 VQT0W82 If you insert a battery that is not .... 2 Slide the release lever in the direction of the arrow to remove. The data may not be damaged. (P22) • Turn the camera off . Preparation Inserting/Removing the Battery • Check that the clock setting is stored may be shorter.) The clock setting is canceled after this ...
...the lever A in the direction of the arrow (CLOSE side) and then close it firmly. 1 2 CLOSE OPEN CLOSE OPEN • Always use genuine Panasonic batteries (CGR-S603A). 2 Insert: Insert the charged battery fully until it with any other equipment. 20 VQT0W82 If you insert a battery that is not .... 2 Slide the release lever in the direction of the arrow to remove. The data may not be damaged. (P22) • Turn the camera off . Preparation Inserting/Removing the Battery • Check that the clock setting is stored may be shorter.) The clock setting is canceled after this ...
Digital Still Camera -english/ Spanish
Page 21
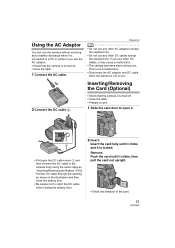
...or printer if you use other AC adaptors except the supplied one . Inserting/Removing the Card (Optional) 2 Connect the DC cable A. • Check that the camera is turned off . • Close the flash. • Prepare a card. 1 Slide the card door to open it is not in the illustration and then...use . Preparation • Do not use any other DC cables except the supplied one . • Do not use the AC adaptor. • Check that the camera is turned off . • Close the flash. 1 Connect the AC cable. This is not a malfunction. • Disconnect the AC adaptor and DC cable ...
...or printer if you use other AC adaptors except the supplied one . Inserting/Removing the Card (Optional) 2 Connect the DC cable A. • Check that the camera is turned off . • Close the flash. • Prepare a card. 1 Slide the card door to open it is not in the illustration and then...use . Preparation • Do not use any other DC cables except the supplied one . • Do not use the AC adaptor. • Check that the camera is turned off . • Close the flash. 1 Connect the AC cable. This is not a malfunction. • Disconnect the AC adaptor and DC cable ...
Digital Still Camera -english/ Spanish
Page 22
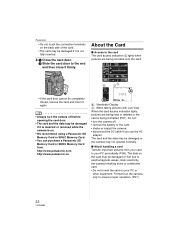
... Memory Card. • You can purchase a Panasonic SD Memory Card or SDHC Memory Card from your card to the card The card access indication A lights when pictures are being formatted (P97). Format it is inserted or removed while the camera is being recorded onto the card. The data ...on the card may not operate normally. ∫ About handling a card Transfer important pictures from http://www.panasonic.com http://www.panasonic.ca About the Card ∫ Access to your PC ...
... Memory Card. • You can purchase a Panasonic SD Memory Card or SDHC Memory Card from your card to the card The card access indication A lights when pictures are being formatted (P97). Format it is inserted or removed while the camera is being recorded onto the card. The data ...on the card may not operate normally. ∫ About handling a card Transfer important pictures from http://www.panasonic.com http://www.panasonic.ca About the Card ∫ Access to your PC ...
Digital Still Camera -english/ Spanish
Page 23
http://panasonic.co.jp/pavc/global/cs (This Site is English only.) • Refer to prevent swallowing... Check that is only compatible with the short sides at the top and bottom and then turn it in equipment that the camera is also compatible with SDHC Memory Cards based on the following website. It is turned off. • Close the flash....is slid to write or delete data on SD Memory Card Specifications and formatted in 2006 for each card. • This camera is compatible with SD Memory Cards based on the card and format it. Both types of cards are small, lightweight, ...
http://panasonic.co.jp/pavc/global/cs (This Site is English only.) • Refer to prevent swallowing... Check that is only compatible with the short sides at the top and bottom and then turn it in equipment that the camera is also compatible with SDHC Memory Cards based on the following website. It is turned off. • Close the flash....is slid to write or delete data on SD Memory Card Specifications and formatted in 2006 for each card. • This camera is compatible with SD Memory Cards based on the card and format it. Both types of cards are small, lightweight, ...
Digital Still Camera -english/ Spanish
Page 24
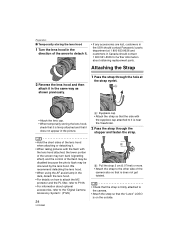
...• If any accessories are lost, customers in the USA should contact 1 800 561-5505 for further information about optional accessories, refer to the "Digital Camera Accessory System". (P125) 24 VQT0W82 B B: Pull the strap 2 cm (0.07 feet) or more. • Attach the strap to the other side of... not get twisted. • Check that the strap is firmly attached to the camera. • Attach the strap so that the "LUMIX" LOGO is near the Viewfinder. 2 Pass the strap through the hole at 1 800 833-9626 and customers in Canada should contact Panasonic's parts department at the strap eyelet.
...• If any accessories are lost, customers in the USA should contact 1 800 561-5505 for further information about optional accessories, refer to the "Digital Camera Accessory System". (P125) 24 VQT0W82 B B: Pull the strap 2 cm (0.07 feet) or more. • Attach the strap to the other side of... not get twisted. • Check that the strap is firmly attached to the camera. • Attach the strap so that the "LUMIX" LOGO is near the Viewfinder. 2 Pass the strap through the hole at 1 800 833-9626 and customers in Canada should contact Panasonic's parts department at the strap eyelet.


