

Basic Owners Manual CA
Page 1
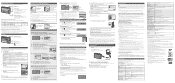
... known adverse health effects. Normal Picture Mode The subjects are recorded using the automatic function (Intelligent Auto Mode) We recommend this manual for taking pictures ∫ [Picture Size] A picture taken with RSS-210 of your local authorities or dealer and ask for... This operation is set . Settings [š] ([Face Detection]) [ ] ([9-Area]) [Ø] ([1-Area]) Description of recording. http://panasonic.jp/support/dsc/oi/index.html?model= DMC-SZ8&dest=PC • Click the desired language. ¢ You will not be focused. If any metal items (such as picture...
... known adverse health effects. Normal Picture Mode The subjects are recorded using the automatic function (Intelligent Auto Mode) We recommend this manual for taking pictures ∫ [Picture Size] A picture taken with RSS-210 of your local authorities or dealer and ask for... This operation is set . Settings [š] ([Face Detection]) [ ] ([9-Area]) [Ø] ([1-Area]) Description of recording. http://panasonic.jp/support/dsc/oi/index.html?model= DMC-SZ8&dest=PC • Click the desired language. ¢ You will not be focused. If any metal items (such as picture...
Basic Owners Manual CA
Page 2
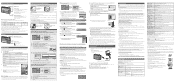
...], and enter the computer name of strong light. It cannot be displayed on the camera screen. Please refer to "Owner's Manual for advanced features (PDF format)" for "Panasonic Image App" or "LUMIX", and install the app. • Use the latest version. • Some smartphones/tablets may be differences in ...Set ∫ Close the menu Press [ ] repeatedly until it may not appear or it switches to WPS mode. http://panasonic.jp/support/global/cs/dsc/ ¢ In this manual, the app is referred to as you like and menus that it is not compatible. Please set on your smartphone Please...
...], and enter the computer name of strong light. It cannot be displayed on the camera screen. Please refer to "Owner's Manual for advanced features (PDF format)" for "Panasonic Image App" or "LUMIX", and install the app. • Use the latest version. • Some smartphones/tablets may be differences in ...Set ∫ Close the menu Press [ ] repeatedly until it may not appear or it switches to WPS mode. http://panasonic.jp/support/global/cs/dsc/ ¢ In this manual, the app is referred to as you like and menus that it is not compatible. Please set on your smartphone Please...

Basic Owners Manual US
Page 1
...original zoom magnification while minimizing the deterioration of the FCC Rules. [ENGLISH] Basic Owner's Manual Digital Camera Model No. http://panasonic.jp/support/dsc/oi/index.html?model= DMC-SZ8&dest=P • Click the desired language. ¢ You will be extended. This...device, pursuant to select [Intelligent Auto], and then press [MENU/SET]. If this Owner's Manual. Declaration of Conformity Trade Name: Model No.: Responsible Party: Support Contact: Panasonic DMC-SZ8 Panasonic Corporation of recordable pictures will need Adobe Reader to 60%RH] • Do not store ...
...original zoom magnification while minimizing the deterioration of the FCC Rules. [ENGLISH] Basic Owner's Manual Digital Camera Model No. http://panasonic.jp/support/dsc/oi/index.html?model= DMC-SZ8&dest=P • Click the desired language. ¢ You will be extended. This...device, pursuant to select [Intelligent Auto], and then press [MENU/SET]. If this Owner's Manual. Declaration of Conformity Trade Name: Model No.: Responsible Party: Support Contact: Panasonic DMC-SZ8 Panasonic Corporation of recordable pictures will need Adobe Reader to 60%RH] • Do not store ...
Basic Owners Manual US
Page 2
...to as "Image App". For example, you want to connect to the operating instructions of alphanumeric characters. http://panasonic.jp/support/global/cs/dsc/ ¢ In this manual are using the USB connection cable (supplied) 1 Connect the computer and camera with a smartphone Playing back pictures... in the camera Saving images stored in the camera Install the dedicated smartphone/tablet app "Panasonic Image App"¢ on the ...
...to as "Image App". For example, you want to connect to the operating instructions of alphanumeric characters. http://panasonic.jp/support/global/cs/dsc/ ¢ In this manual are using the USB connection cable (supplied) 1 Connect the computer and camera with a smartphone Playing back pictures... in the camera Saving images stored in the camera Install the dedicated smartphone/tablet app "Panasonic Image App"¢ on the ...

Advanced Owners Manual
Page 1
Owner's Manual for future use. DMC-SZ8 Please read these instructions carefully before using this product, and save this manual for advanced features Digital Camera Model No. customers only) VQT5G73 F0114YD0 Register online at www.panasonic.com/register (U.S.
Owner's Manual for future use. DMC-SZ8 Please read these instructions carefully before using this product, and save this manual for advanced features Digital Camera Model No. customers only) VQT5G73 F0114YD0 Register online at www.panasonic.com/register (U.S.
Advanced Owners Manual
Page 7
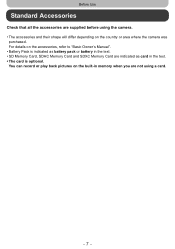
For details on the country or area where the camera was purchased. Before Use Standard Accessories Check that all the accessories are indicated as card in the text. • The card is optional. You can record or play back pictures on the built-in memory when you are not using the camera. • The accessories and their shape will differ depending on the accessories, refer to "Basic Owner's Manual". • Battery Pack is indicated as battery pack or battery in the text. • SD Memory Card, SDHC Memory Card and SDXC Memory Card are supplied before using a card. - 7 -
For details on the country or area where the camera was purchased. Before Use Standard Accessories Check that all the accessories are indicated as card in the text. • The card is optional. You can record or play back pictures on the built-in memory when you are not using the camera. • The accessories and their shape will differ depending on the accessories, refer to "Basic Owner's Manual". • Battery Pack is indicated as battery pack or battery in the text. • SD Memory Card, SDHC Memory Card and SDXC Memory Card are supplied before using a card. - 7 -
Advanced Owners Manual
Page 8
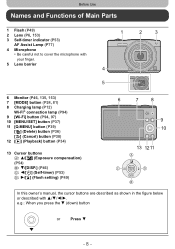
...) button (P34) 13 Cursor buttons A: 3/[È] (Exposure compensation) (P54) B: 4/[DISP.] (P46) C: 2/[ë] (Self-timer) (P53) D: 1/[‰] (Flash setting) (P49) 2 3 7 8 9 10 13 1211 In this owner's manual, the cursor buttons are described as shown in the figure below or described with 3/4/2/1.
...) button (P34) 13 Cursor buttons A: 3/[È] (Exposure compensation) (P54) B: 4/[DISP.] (P46) C: 2/[ë] (Self-timer) (P53) D: 1/[‰] (Flash setting) (P49) 2 3 7 8 9 10 13 1211 In this owner's manual, the cursor buttons are described as shown in the figure below or described with 3/4/2/1.
Advanced Owners Manual
Page 28
Basic Changing the settings Following menus can be set. [Rec] Menu [Picture Size]¢/[Burst]¢ Item [Motion Picture] [Rec Quality] [Setup] [Online Manual]/[Clock Set]/[World Time]/[Airplane Mode]/[Beep]/ [Language] • Menu items other than those listed above are not displayed, but you can set , [Red-Eye ...
Basic Changing the settings Following menus can be set. [Rec] Menu [Picture Size]¢/[Burst]¢ Item [Motion Picture] [Rec Quality] [Setup] [Online Manual]/[Clock Set]/[World Time]/[Airplane Mode]/[Beep]/ [Language] • Menu items other than those listed above are not displayed, but you can set , [Red-Eye ...
Advanced Owners Manual
Page 40
...the pictures you cannot find the travel destination in your home area and travel destinations and record them . • In Intelligent Auto Mode, only [Online Manual], [Clock Set], [World Time], [Airplane Mode], [Beep], [Language] can be set after setting up [Home]. [World Time] " [Destination]: ...- After selecting [Destination] or [Home], press 2/1 to select an area, and press [MENU/SET] to P21 for details. You can be set. [Online Manual] [URL display]/[USB connection]/[QR Code display] U [Clock Set] Setting Date/Time. • Refer to set. • Set [Home] first thing after ...
...the pictures you cannot find the travel destination in your home area and travel destinations and record them . • In Intelligent Auto Mode, only [Online Manual], [Clock Set], [World Time], [Airplane Mode], [Beep], [Language] can be set after setting up [Home]. [World Time] " [Destination]: ...- After selecting [Destination] or [Home], press 2/1 to select an area, and press [MENU/SET] to P21 for details. You can be set. [Online Manual] [URL display]/[USB connection]/[QR Code display] U [Clock Set] Setting Date/Time. • Refer to set. • Set [Home] first thing after ...
Advanced Owners Manual
Page 71
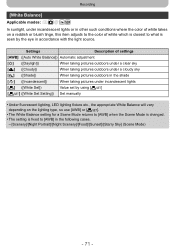
Recording [White Balance] Applicable modes: In sunlight, under incandescent lights [Ò] ([White Set]) Value set by using [Ó] [Ó] ([White Set Setting]) Set manually • Under fluorescent lighting, LED lighting fixture etc., the appropriate White Balance will vary depending on a reddish or bluish tinge, this item adjusts to the ...
Recording [White Balance] Applicable modes: In sunlight, under incandescent lights [Ò] ([White Set]) Value set by using [Ó] [Ó] ([White Set Setting]) Set manually • Under fluorescent lighting, LED lighting fixture etc., the appropriate White Balance will vary depending on a reddish or bluish tinge, this item adjusts to the ...
Advanced Owners Manual
Page 72
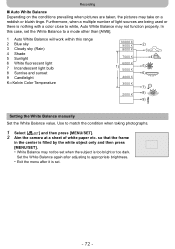
... range 2 Blue sky 3 Cloudy sky (Rain) 4 Shade 5 Sunlight 6 White fluorescent light 7 Incandescent light bulb 8 Sunrise and sunset 9 Candlelight KlKelvin Color Temperature Setting the White Balance manually Set the White Balance value. so that the frame in the center is filled by the white object only and then press [MENU/SET]. •...
... range 2 Blue sky 3 Cloudy sky (Rain) 4 Shade 5 Sunlight 6 White fluorescent light 7 Incandescent light bulb 8 Sunrise and sunset 9 Candlelight KlKelvin Color Temperature Setting the White Balance manually Set the White Balance value. so that the frame in the center is filled by the white object only and then press [MENU/SET]. •...
Advanced Owners Manual
Page 104
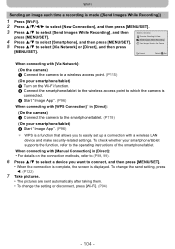
When connecting with [Manual Connection] in [Direct]: • For details on the Wi-Fi function. 3 Connect the smartphone/tablet to the wireless access point to which the camera is ...
When connecting with [Manual Connection] in [Direct]: • For details on the Wi-Fi function. 3 Connect the smartphone/tablet to the wireless access point to which the camera is ...
Advanced Owners Manual
Page 105
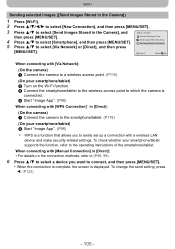
To change the send setting, press 2. (P122) - 105 - When connecting with [Manual Connection] in [Direct]: • For details on the Wi-Fi function. 3 Connect the smartphone/tablet to the wireless access point to which the camera is ...
To change the send setting, press 2. (P122) - 105 - When connecting with [Manual Connection] in [Direct]: • For details on the Wi-Fi function. 3 Connect the smartphone/tablet to the wireless access point to which the camera is ...
Advanced Owners Manual
Page 108
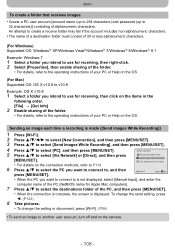
... on the OS. (For Mac) Supported OS: OS X v10.5 to v10.9 Example: OS X v10.8 1 Select a folder you want to connect to is not displayed, select [Manual Input], and enter the computer name of the PC (NetBIOS name for Apple Mac computers). 7 Press 3/4 to select the destinations folder of the PC, and...
... on the OS. (For Mac) Supported OS: OS X v10.5 to v10.9 Example: OS X v10.8 1 Select a folder you want to connect to is not displayed, select [Manual Input], and enter the computer name of the PC (NetBIOS name for Apple Mac computers). 7 Press 3/4 to select the destinations folder of the PC, and...
Advanced Owners Manual
Page 109
... the PC you want to connect to, and then press [MENU/SET]. • When the PC you want to connect to is not displayed, select [Manual Input], and enter the computer name of the PC (NetBIOS name for Apple Mac computers). 7 Press 3/4 to select the destinations folder of the PC, and...
... the PC you want to connect to, and then press [MENU/SET]. • When the PC you want to connect to is not displayed, select [Manual Input], and enter the computer name of the PC (NetBIOS name for Apple Mac computers). 7 Press 3/4 to select the destinations folder of the PC, and...

Advanced Owners Manual
Page 115
... method Use button on the camera screen into the wireless access point. 3 Press [MENU/SET]. • Refer to the wireless access point instruction manual for details. To check if the wireless access point you want to search for and connect to a wireless access point. • Refer to P116...wireless access point. Press the wireless access point WPS e.g.: button until it switches to WPS Mode. • Refer to the wireless access point instruction manual for details. [WPS (PIN code)] [From List] Save PIN code type wireless access point that is compatible with Wi-Fi Protected Setup with a...
... method Use button on the camera screen into the wireless access point. 3 Press [MENU/SET]. • Refer to the wireless access point instruction manual for details. To check if the wireless access point you want to search for and connect to a wireless access point. • Refer to P116...wireless access point. Press the wireless access point WPS e.g.: button until it switches to WPS Mode. • Refer to the wireless access point instruction manual for details. [WPS (PIN code)] [From List] Save PIN code type wireless access point that is compatible with Wi-Fi Protected Setup with a...
Advanced Owners Manual
Page 116
...points. • Confirm encryption key of the selected wireless access point if the network authentication is encrypted. • When connecting by [Manual Input], confirm SSID, encryption type, encryption key of the wireless access point you are using. 1 Press 3/4 to select the wireless ..." section on P117. 3 Press 3/4 to select the network authentication type, and press [MENU/SET]. • For information on network authentication, see the manual of the wireless access point. 4 Press 3/4 to "Message Display" (P137) and "Troubleshooting" (P140) for a wireless access point again. • ...
...points. • Confirm encryption key of the selected wireless access point if the network authentication is encrypted. • When connecting by [Manual Input], confirm SSID, encryption type, encryption key of the wireless access point you are using. 1 Press 3/4 to select the wireless ..." section on P117. 3 Press 3/4 to select the network authentication type, and press [MENU/SET]. • For information on network authentication, see the manual of the wireless access point. 4 Press 3/4 to "Message Display" (P137) and "Troubleshooting" (P140) for a wireless access point again. • ...
Advanced Owners Manual
Page 118
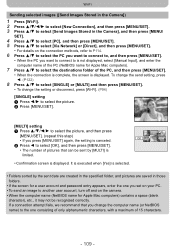
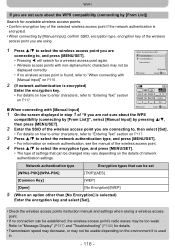
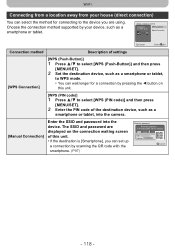
...wait longer for a connection by your device, such as a smartphone or tablet. Select connection method Connect to the WPS device WPS Connection Manual Connection Cancel Select Set Connection method Description of settings [WPS Connection] [WPS (Push-Button)] 1 Press 3/4 to select [WPS (Push-...Button)] and then press [MENU/SET]. 2 Set the destination device, such as a smartphone or tablet, into the camera. [Manual Connection] Enter the SSID and password into the device. Choose the connection method supported by pressing the 2 button on the connection waiting screen of...
...wait longer for a connection by your device, such as a smartphone or tablet. Select connection method Connect to the WPS device WPS Connection Manual Connection Cancel Select Set Connection method Description of settings [WPS Connection] [WPS (Push-Button)] 1 Press 3/4 to select [WPS (Push-...Button)] and then press [MENU/SET]. 2 Set the destination device, such as a smartphone or tablet, into the camera. [Manual Connection] Enter the SSID and password into the device. Choose the connection method supported by pressing the 2 button on the connection waiting screen of...