

DMCFH7 User Guide
Page 1
Owner's Manual for advanced features Digital Camera Model No. VQT3P97 DMC-FH7 Before connecting, operating or adjusting this product, please read the instructions completely.
Owner's Manual for advanced features Digital Camera Model No. VQT3P97 DMC-FH7 Before connecting, operating or adjusting this product, please read the instructions completely.

DMCFH7 User Guide
Page 2
Contents Before Use Care of the camera 4 Standard Accessories 5 Names of the Components 6 How to Use the Touch Panel 8 Preparation Charging the Battery 9 • Charging 9 • Approximate operating time and number of .../Time (Clock Set 18 • Changing the Clock Setting 19 Tips for taking good pictures 20 • Fit the strap and hold the camera carefully 20 • Preventing jitter (camera shake) .......20 Basic Selecting the [Rec] Mode 21 Taking pictures using the automatic function (Intelligent Auto Mode 22 • Changing the settings...
Contents Before Use Care of the camera 4 Standard Accessories 5 Names of the Components 6 How to Use the Touch Panel 8 Preparation Charging the Battery 9 • Charging 9 • Approximate operating time and number of .../Time (Clock Set 18 • Changing the Clock Setting 19 Tips for taking good pictures 20 • Fit the strap and hold the camera carefully 20 • Preventing jitter (camera shake) .......20 Basic Selecting the [Rec] Mode 21 Taking pictures using the automatic function (Intelligent Auto Mode 22 • Changing the settings...
DMCFH7 User Guide
Page 4
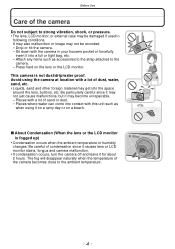
... when the ambient temperature or humidity changes. Places where water can come into contact with the camera in following conditions. The fog will disappear naturally when the temperature of sand or dust. ...into a full or tight bag, etc. - Attach any items such as when using the camera at location with a lot of the camera becomes close to the ambient temperature. - 4 - Avoid using it on a rainy day ...the lens or the LCD monitor is not dust/drip/water proof. Before Use Before Use Care of the camera Do not subject to strong vibration, shock, or pressure. • The lens, LCD monitor, or ...
... when the ambient temperature or humidity changes. Places where water can come into contact with the camera in following conditions. The fog will disappear naturally when the temperature of sand or dust. ...into a full or tight bag, etc. - Attach any items such as when using the camera at location with a lot of the camera becomes close to the ambient temperature. - 4 - Avoid using it on a rainy day ...the lens or the LCD monitor is not dust/drip/water proof. Before Use Before Use Care of the camera Do not subject to strong vibration, shock, or pressure. • The lens, LCD monitor, or ...
DMCFH7 User Guide
Page 5
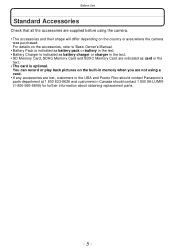
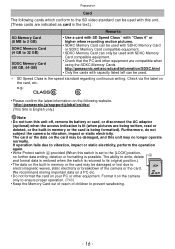
You can record or play back pictures on the country or area where the camera was purchased. Before Use Standard Accessories Check that all the accessories are supplied before using the camera. • The accessories and their shape will differ depending on the built-in memory when you are not using a card. •... in the text. • SD Memory Card, SDHC Memory Card and SDXC Memory Card are lost, customers in the USA and Puerto Rico should contact Panasonic's parts department at 1 800 833-9626 and customers in the text. • The card is optional.
You can record or play back pictures on the country or area where the camera was purchased. Before Use Standard Accessories Check that all the accessories are supplied before using the camera. • The accessories and their shape will differ depending on the built-in memory when you are not using a card. •... in the text. • SD Memory Card, SDHC Memory Card and SDXC Memory Card are lost, customers in the USA and Puerto Rico should contact Panasonic's parts department at 1 800 833-9626 and customers in the text. • The card is optional.
DMCFH7 User Guide
Page 6
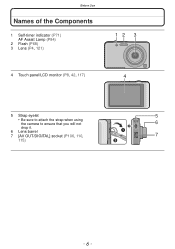
Before Use Names of the Components 1 Self-timer indicator (P71) AF Assist Lamp (P84) 2 Flash (P68) 3 Lens (P4, 121) 12 3 4 Touch panel/LCD monitor (P8, 42, 117) 4 5 Strap eyelet 5 • Be sure to attach the strap when using the camera to ensure that you will not 6 drop it. 6 Lens barrel 7 [AV OUT/DIGITAL] socket (P106, 110, 7 115) - 6 -
Before Use Names of the Components 1 Self-timer indicator (P71) AF Assist Lamp (P84) 2 Flash (P68) 3 Lens (P4, 121) 12 3 4 Touch panel/LCD monitor (P8, 42, 117) 4 5 Strap eyelet 5 • Be sure to attach the strap when using the camera to ensure that you will not 6 drop it. 6 Lens barrel 7 [AV OUT/DIGITAL] socket (P106, 110, 7 115) - 6 -

DMCFH7 User Guide
Page 7
For connection details, refer to P14. 16 Release lever (P13) 12 14 89 10 11 13 15 16 - 7 - 8 Camera ON/OFF switch (P18) 9 Zoom lever (P45) 10 Microphone 11 Shutter button (P22, 25, 30) Before Use 12 Tripod receptacle 13 Card/Battery door (P13, 14) 14 Speaker (P37) • Do not cover the speaker with your fingers. 15 DC coupler cover (P14) • When using an AC adaptor, ensure that the Panasonic DC coupler (optional) and AC adaptor (optional) are used.
For connection details, refer to P14. 16 Release lever (P13) 12 14 89 10 11 13 15 16 - 7 - 8 Camera ON/OFF switch (P18) 9 Zoom lever (P45) 10 Microphone 11 Shutter button (P22, 25, 30) Before Use 12 Tripod receptacle 13 Card/Battery door (P13, 14) 14 Speaker (P37) • Do not cover the speaker with your fingers. 15 DC coupler cover (P14) • When using an AC adaptor, ensure that the Panasonic DC coupler (optional) and AC adaptor (optional) are used.
DMCFH7 User Guide
Page 9
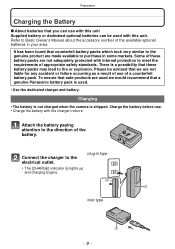
... battery paying attention to meet the requirements of appropriate safety standards. Some of a counterfeit battery pack. Charging • The battery is not charged when the camera is used we are not liable for any accident or failure occurring as a result of use of these battery packs may lead to purchase in... the accessory number of the battery. Preparation Preparation Charging the Battery ∫ About batteries that you can be advised that we would recommend that a genuine Panasonic battery pack is shipped.
... battery paying attention to meet the requirements of appropriate safety standards. Some of a counterfeit battery pack. Charging • The battery is not charged when the camera is used we are not liable for any accident or failure occurring as a result of use of these battery packs may lead to purchase in... the accessory number of the battery. Preparation Preparation Charging the Battery ∫ About batteries that you can be advised that we would recommend that a genuine Panasonic battery pack is shipped.
DMCFH7 User Guide
Page 10
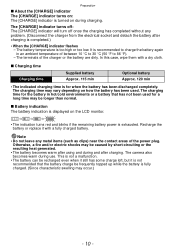
... the battery has been used for a long time may be longer than normal. ∫ Battery indication The battery indication is displayed on during use. The camera also becomes warm during charging. Preparation ∫ About the [CHARGE] indicator The [CHARGE] indicator turns on: The [CHARGE] indicator is turned on the LCD monitor...
... the battery has been used for a long time may be longer than normal. ∫ Battery indication The battery indication is displayed on during use. The camera also becomes warm during charging. Preparation ∫ About the [CHARGE] indicator The [CHARGE] indicator turns on: The [CHARGE] indicator is turned on the LCD monitor...
DMCFH7 User Guide
Page 11
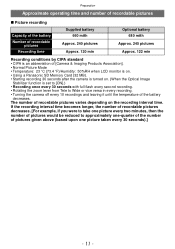
... picture every two minutes, then the number of pictures would be reduced to Wide or vice versa in every recording. • Turning the camera off every 10 recordings and leaving it until the temperature of the battery decreases. If the recording interval time becomes longer, the number of .... 120 min Optional battery 680 mAh Approx. 245 pictures Approx. 122 min Recording conditions by CIPA standard • CIPA is an abbreviation of [Camera & Imaging Products Association]. • Normal Picture Mode • Temperature: 23 oC (73.4 oF)/Humidity: 50%RH when LCD monitor is on. •...
... picture every two minutes, then the number of pictures would be reduced to Wide or vice versa in every recording. • Turning the camera off every 10 recordings and leaving it until the temperature of the battery decreases. If the recording interval time becomes longer, the number of .... 120 min Optional battery 680 mAh Approx. 245 pictures Approx. 122 min Recording conditions by CIPA standard • CIPA is an abbreviation of [Camera & Imaging Products Association]. • Normal Picture Mode • Temperature: 23 oC (73.4 oF)/Humidity: 50%RH when LCD monitor is on. •...

DMCFH7 User Guide
Page 12
... the environment and the operating conditions. In low-temperature environments, such as flash and zoom are used repeatedly. • When the operating time of the camera becomes extremely short even after properly charging the battery, the life of the battery may have expired.
... the environment and the operating conditions. In low-temperature environments, such as flash and zoom are used repeatedly. • When the operating time of the camera becomes extremely short even after properly charging the battery, the life of the battery may have expired.
DMCFH7 User Guide
Page 13
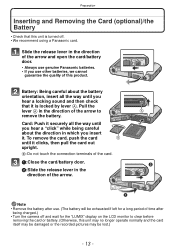
Card: Push it securely all the way until you hear a "click" while being charged.) • Turn the camera off . • We recommend using a Panasonic card. Note • Remove the battery after being careful about the battery orientation, insert all the way until it clicks, then pull the card out ...upright. Pull the lever A in the direction of the arrow and open the card/battery door. • Always use genuine Panasonic batteries. • If you insert it. To remove the card, push the card until you hear a locking sound and then check that this unit is...
Card: Push it securely all the way until you hear a "click" while being charged.) • Turn the camera off . • We recommend using a Panasonic card. Note • Remove the battery after being careful about the battery orientation, insert all the way until it clicks, then pull the card out ...upright. Pull the lever A in the direction of the arrow and open the card/battery door. • Always use genuine Panasonic batteries. • If you insert it. To remove the card, push the card until you hear a locking sound and then check that this unit is...
DMCFH7 User Guide
Page 14
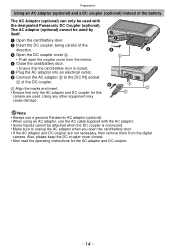
... adaptor (optional). • When using an AC adaptor, use the AC cable supplied with the designated Panasonic DC Coupler (optional). Also, please keep the DC coupler cover closed . 5 Plug the AC adaptor into an electrical outlet. 6 Connect the AC adaptor B to unplug... the AC adaptor when you open the coupler cover from the digital camera. Using any other equipment may cause damage. The AC adaptor (optional) cannot be used . Preparation Using an AC adaptor (optional) and a DC coupler (optional) ...
... adaptor (optional). • When using an AC adaptor, use the AC cable supplied with the designated Panasonic DC Coupler (optional). Also, please keep the DC coupler cover closed . 5 Plug the AC adaptor into an electrical outlet. 6 Connect the AC adaptor B to unplug... the AC adaptor when you open the coupler cover from the digital camera. Using any other equipment may cause damage. The AC adaptor (optional) cannot be used . Preparation Using an AC adaptor (optional) and a DC coupler (optional) ...
DMCFH7 User Guide
Page 16
...recommend storing important data on a PC etc. 2 • Do not format the card on the card, etc. Furthermore, do not subject the camera to electromagnetic waves, static electricity or breakdown of children to write, delete A and format data is restored when the switch is being written, read... on the following cards which conform to the SD video standard can be damaged or lost due to vibration, impact or static electricity. http://panasonic.net/avc/sdcard/information/SDXC.html • Only the cards with SDXC Memory Card compatible equipment. • Check that the PC and other...
...recommend storing important data on a PC etc. 2 • Do not format the card on the card, etc. Furthermore, do not subject the camera to electromagnetic waves, static electricity or breakdown of children to write, delete A and format data is restored when the switch is being written, read... on the following cards which conform to the SD video standard can be damaged or lost due to vibration, impact or static electricity. http://panasonic.net/avc/sdcard/information/SDXC.html • Only the cards with SDXC Memory Card compatible equipment. • Check that the PC and other...
DMCFH7 User Guide
Page 18
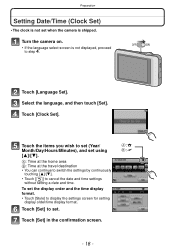
... [Set]. Preparation Setting Date/Time (Clock Set) • The clock is not set . Touch [Set] to set when the camera is not displayed, proceed to step 4. To set using [3]/[4]. Turn the camera on. • If the language select screen is shipped. Touch [Language Set]. Touch the items you wish to set (Year...
... [Set]. Preparation Setting Date/Time (Clock Set) • The clock is not set . Touch [Set] to set when the camera is not displayed, proceed to step 4. To set using [3]/[4]. Turn the camera on. • If the language select screen is shipped. Touch [Language Set]. Touch the items you wish to set (Year...

DMCFH7 User Guide
Page 19
... Stamp]. • If the clock is set, the correct date can be printed even if the date is not displayed on the screen of the camera. - 19 -
... Stamp]. • If the clock is set, the correct date can be printed even if the date is not displayed on the screen of the camera. - 19 -
DMCFH7 User Guide
Page 20
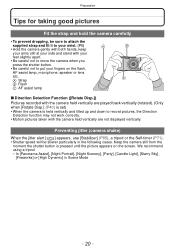
...P71). • Shutter speed will be sure to attach the supplied strap and fit it to put your side and stand with the camera held vertically and tilted up and down to record pictures, the Direction Detection function may not work correctly. • Motion pictures taken ...], [Night Scenery], [Party], [Candle Light], [Starry Sky], [Fireworks] or [High Dynamic] in the following cases. We recommend using a tripod. - Keep the camera still from the moment the shutter button is held vertically are played back vertically (rotated). (Only when [Rotate Disp.] (P40) is set) • When the...
...P71). • Shutter speed will be sure to attach the supplied strap and fit it to put your side and stand with the camera held vertically and tilted up and down to record pictures, the Direction Detection function may not work correctly. • Motion pictures taken ...], [Night Scenery], [Party], [Candle Light], [Starry Sky], [Fireworks] or [High Dynamic] in the following cases. We recommend using a tripod. - Keep the camera still from the moment the shutter button is held vertically are played back vertically (rotated). (Only when [Rotate Disp.] (P40) is set) • When the...
DMCFH7 User Guide
Page 21
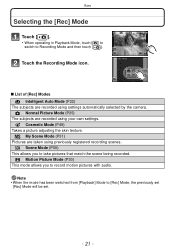
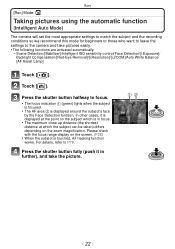
... [ ]. Touch the Recording Mode icon. ∫ List of [Rec] Modes ¦ Intelligent Auto Mode (P22) The subjects are recorded using settings automatically selected by the camera. !
... [ ]. Touch the Recording Mode icon. ∫ List of [Rec] Modes ¦ Intelligent Auto Mode (P22) The subjects are recorded using settings automatically selected by the camera. !
DMCFH7 User Guide
Page 22
... to match the subject and the recording conditions so we recommend this mode for beginners or those who want to leave the settings to the camera and take the picture. 12 - 22 - In other cases, it in focus. • The maximum close-up distance (the shortest distance at the point on...
... to match the subject and the recording conditions so we recommend this mode for beginners or those who want to leave the settings to the camera and take the picture. 12 - 22 - In other cases, it in focus. • The maximum close-up distance (the shortest distance at the point on...
DMCFH7 User Guide
Page 24
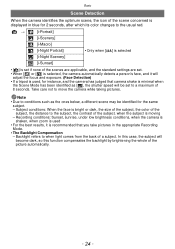
...8226; For the best results, it will adjust the focus and exposure. (Face Detection) • If a tripod is used, for instance, and the camera has judged that you take pictures in the appropriate Recording Mode. • The Backlight Compensation - Take care not to conditions such as [ ], the shutter ... subject, the contrast of a subject. In this case, the subject will be identified for the same subject. - Basic Scene Detection When the camera identifies the optimum scene, the icon of the scene concerned is displayed in blue for 2 seconds, after which its color changes to the usual ...
...8226; For the best results, it will adjust the focus and exposure. (Face Detection) • If a tripod is used, for instance, and the camera has judged that you take pictures in the appropriate Recording Mode. • The Backlight Compensation - Take care not to conditions such as [ ], the shutter ... subject, the contrast of a subject. In this case, the subject will be identified for the same subject. - Basic Scene Detection When the camera identifies the optimum scene, the icon of the scene concerned is displayed in blue for 2 seconds, after which its color changes to the usual ...
DMCFH7 User Guide
Page 25
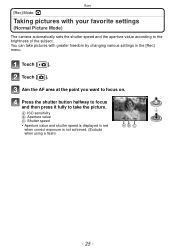
Touch [ ]. Press the shutter button halfway to focus and then press it fully to take pictures with your favorite settings (Normal Picture Mode) The camera automatically sets the shutter speed and the aperture value according to focus on. Basic [Rec] Mode: · Taking pictures with greater freedom by changing various ...
Touch [ ]. Press the shutter button halfway to focus and then press it fully to take pictures with your favorite settings (Normal Picture Mode) The camera automatically sets the shutter speed and the aperture value according to focus on. Basic [Rec] Mode: · Taking pictures with greater freedom by changing various ...


