

Digital Still Camera
Page 1
Operating Instructions Digital Camera Model No.DMC-FZ20PP Before use, please read these instructions completely. For USA assistance, please call: 1-800-272-7033 or send e-mail to : digitalstillcam@panasonic.com For Canadian assistance, please call: 1-800-561-5505 or visit us at www.panasonic.ca VQT0M38
Operating Instructions Digital Camera Model No.DMC-FZ20PP Before use, please read these instructions completely. For USA assistance, please call: 1-800-272-7033 or send e-mail to : digitalstillcam@panasonic.com For Canadian assistance, please call: 1-800-561-5505 or visit us at www.panasonic.ca VQT0M38
Digital Still Camera
Page 2
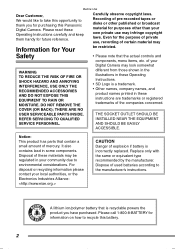
...Safety • Please note that is recyclable powers the product you for TM Li-ion information on how to recycle this Panasonic Digital Camera. Notice: This product has parts that contain a small amount of used batteries according to the manufacturer's instructions. Please call... replaced. REFER SERVICING TO QUALIFIED SERVICE PERSONNEL. Disposal of the companies concerned. For disposal or recycling information please contact your Digital Camera may be restricted. Dispose of mercury. Before Use Before Use Dear Customer, We would like to take this opportunity to ...
...Safety • Please note that is recyclable powers the product you for TM Li-ion information on how to recycle this Panasonic Digital Camera. Notice: This product has parts that contain a small amount of used batteries according to the manufacturer's instructions. Please call... replaced. REFER SERVICING TO QUALIFIED SERVICE PERSONNEL. Disposal of the companies concerned. For disposal or recycling information please contact your Digital Camera may be restricted. Dispose of mercury. Before Use Before Use Dear Customer, We would like to take this opportunity to ...
Digital Still Camera
Page 4
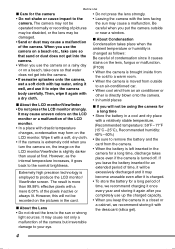
...after you leave the battery inserted for an extended period of time, it will not be the sun may cause not only a malfunction of the camera but irreversible damage to your eye. 4 If you always lit. Viewfinder screen. recorded on the LCD monitor/Viewfinder is slightly darker than 99.99... may cause uneven colors on a beach, take care so that water does not get into the camera. • When you keep the camera in the camera for a long time, discharge takes place even if the camera is turned off. It may cause a malfunction. However, as follows: Be careful of condensation since ...
...after you leave the battery inserted for an extended period of time, it will not be the sun may cause not only a malfunction of the camera but irreversible damage to your eye. 4 If you always lit. Viewfinder screen. recorded on the LCD monitor/Viewfinder is slightly darker than 99.99... may cause uneven colors on a beach, take care so that water does not get into the camera. • When you keep the camera in the camera for a long time, discharge takes place even if the camera is turned off. It may cause a malfunction. However, as follows: Be careful of condensation since ...
Digital Still Camera
Page 5
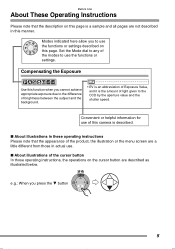
... the background. • EV is an abbreviation of Exposure Value, and it is a sample and all pages are not described in actual use of this camera is described. ∫ About illustrations in these operating instructions Please note that the description on this page is the amount of light given to the...
... the background. • EV is an abbreviation of Exposure Value, and it is a sample and all pages are not described in actual use of this camera is described. ∫ About illustrations in these operating instructions Please note that the description on this page is the amount of light given to the...
Digital Still Camera
Page 7
... MC Protector/ND Filter .........104 Using the Remote Shutter 105 Screen Display 106 Cautions for Use 108 Message Display 111 Troubleshooting 112 Specifications 115 Digital Camera Accessory System........ 117 Digital Camera Accessory Order Form (For USA Customers 118 Request for Service Notice (For USA Only 119 Limited Warranty (For USA Only) .........120 Customer Services...
... MC Protector/ND Filter .........104 Using the Remote Shutter 105 Screen Display 106 Cautions for Use 108 Message Display 111 Troubleshooting 112 Specifications 115 Digital Camera Accessory System........ 117 Digital Camera Accessory Order Form (For USA Customers 118 Request for Service Notice (For USA Only 119 Limited Warranty (For USA Only) .........120 Customer Services...
Digital Still Camera
Page 8
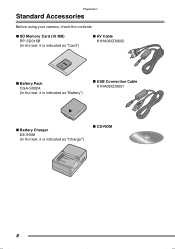
Preparation Preparation Standard Accessories Before using your camera, check the contents. ∫ SD Memory Card (16 MB) RP-SD016B (In the text, it is indicated as "Card") ∫ AV Cable K1HA08CD0002 ∫ Battery Pack CGA-S002A (In the text, it is indicated as "Battery") ∫ USB Connection Cable K1HA08CD0001 ∫ Battery Charger DE-993B (In the text, it is indicated as "Charger") ∫ CD-ROM 8
Preparation Preparation Standard Accessories Before using your camera, check the contents. ∫ SD Memory Card (16 MB) RP-SD016B (In the text, it is indicated as "Card") ∫ AV Cable K1HA08CD0002 ∫ Battery Pack CGA-S002A (In the text, it is indicated as "Battery") ∫ USB Connection Cable K1HA08CD0001 ∫ Battery Charger DE-993B (In the text, it is indicated as "Charger") ∫ CD-ROM 8
Digital Still Camera
Page 10
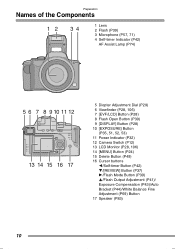
... (P28, 106) 7 [EVF/LCD] Button (P28) 8 Flash Open Button (P39) 9 [DISPLAY] Button (P28) 10 [EXPOSURE] Button (P35, 51, 52, 53) 11 Power Indicator (P32) 12 Camera Switch (P12) 13 LCD Monitor (P28, 106) 14 [MENU] Button (P24) 15 Delete Button (P49) 16 Cursor buttons 2/Self-timer Button (P42) 4/[REVIEW] Button (P37...
... (P28, 106) 7 [EVF/LCD] Button (P28) 8 Flash Open Button (P39) 9 [DISPLAY] Button (P28) 10 [EXPOSURE] Button (P35, 51, 52, 53) 11 Power Indicator (P32) 12 Camera Switch (P12) 13 LCD Monitor (P28, 106) 14 [MENU] Button (P24) 15 Delete Button (P49) 16 Cursor buttons 2/Self-timer Button (P42) 4/[REVIEW] Button (P37...
Digital Still Camera
Page 12
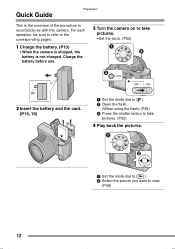
...SCN2 M 1 Set the mode dial to [ ]. 2 Select the picture you want to the corresponding pages. 1 Charge the battery. (P13) • When the camera is shipped, the battery is the overview of the procedure to take pictures. • Set the clock. (P22) A P M OPEN OFF ON 2 Insert the ... 2 Open the flash. (When using the flash) (P39) 3 Press the shutter button to record pictures with this camera. For each operation, be sure to refer to view. (P46) 12 S 3 Turn the camera on to take pictures. (P32) 4 Play back the pictures. SCN1 SCN2 SCN1 Quick Guide Preparation This is not charged...
...SCN2 M 1 Set the mode dial to [ ]. 2 Select the picture you want to the corresponding pages. 1 Charge the battery. (P13) • When the camera is shipped, the battery is the overview of the procedure to take pictures. • Set the clock. (P22) A P M OPEN OFF ON 2 Insert the ... 2 Open the flash. (When using the flash) (P39) 3 Press the shutter button to record pictures with this camera. For each operation, be sure to refer to view. (P46) 12 S 3 Turn the camera on to take pictures. (P32) 4 Play back the pictures. SCN1 SCN2 SCN1 Quick Guide Preparation This is not charged...
Digital Still Camera
Page 13
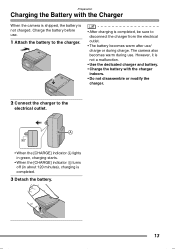
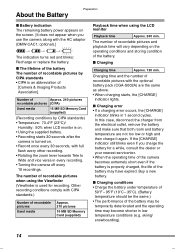
... not a malfunction. • Use the dedicated charger and battery. • Charge the battery with the Charger When the camera is shipped, the battery is not charged. Charge the battery before use . The camera also becomes warm during charge. Preparation Charging the Battery with the charger indoors. • Do not disassemble or modify...
... not a malfunction. • Use the dedicated charger and battery. • Charge the battery with the Charger When the camera is shipped, the battery is not charged. Charge the battery before use . The camera also becomes warm during charge. Preparation Charging the Battery with the charger indoors. • Do not disassemble or modify...
Digital Still Camera
Page 14
... - 35oC). (Battery temperature should be temporarily deteriorated and the operating time may have expired. If the [CHARGE] indicator still blinks even if you use the camera along with the AC adaptor (DMW-CAC1; Charging time and the number of recordable pictures Used media Approx. 270 pictures ...the Viewfinder (Viewfinder is used for a while, consult the dealer or your nearest servicenter. • When the operating time of the camera becomes extremely short even if the battery is properly charged, the life of Approx. 240 pictures recordable pictures (CIPA) Used media 16 MB...
... - 35oC). (Battery temperature should be temporarily deteriorated and the operating time may have expired. If the [CHARGE] indicator still blinks even if you use the camera along with the AC adaptor (DMW-CAC1; Charging time and the number of recordable pictures Used media Approx. 270 pictures ...the Viewfinder (Viewfinder is used for a while, consult the dealer or your nearest servicenter. • When the operating time of the camera becomes extremely short even if the battery is properly charged, the life of Approx. 240 pictures recordable pictures (CIPA) Used media 16 MB...
Digital Still Camera
Page 15
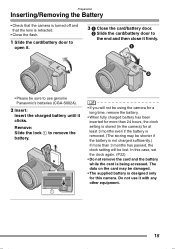
...to use it with any other equipment. 15 Do not use genuine Panasonic's batteries (CGA-S002A). 2 Insert: Insert the charged battery until it firmly. • Please be sure to remove the battery. • If you will not be using the camera for a long time, remove the battery. • When fully charged... battery has been inserted for more than 24 hours, the clock setting is stored (in the camera) for this case, set the clock again. (P22) • Do not remove the card and the battery while the card is not charged sufficiently.)...
...to use it with any other equipment. 15 Do not use genuine Panasonic's batteries (CGA-S002A). 2 Insert: Insert the charged battery until it firmly. • Please be sure to remove the battery. • If you will not be using the camera for a long time, remove the battery. • When fully charged... battery has been inserted for more than 24 hours, the clock setting is stored (in the camera) for this case, set the clock again. (P22) • Do not remove the card and the battery while the card is not charged sufficiently.)...
Digital Still Camera
Page 16
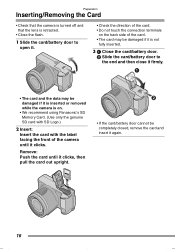
Preparation Inserting/Removing the Card • Check that the camera is turned off and that the lens is not fully inserted. 3 1 Close the card/battery...the card out upright. • If the card/battery door cannot be damaged if it is inserted or removed while the camera is on the back side of the card. • The card may be damaged if it is retracted. • ...; Check the direction of the card. • Do not touch the connection terminals on . • We recommend using Panasonic's SD Memory Card. (Use only the genuine SD card with SD Logo.) 2 Insert: Insert the card with the label facing...
Preparation Inserting/Removing the Card • Check that the camera is turned off and that the lens is not fully inserted. 3 1 Close the card/battery...the card out upright. • If the card/battery door cannot be damaged if it is inserted or removed while the camera is on the back side of the card. • The card may be damaged if it is retracted. • ...; Check the direction of the card. • Do not touch the connection terminals on . • We recommend using Panasonic's SD Memory Card. (Use only the genuine SD card with SD Logo.) 2 Insert: Insert the card with the label facing...
Digital Still Camera
Page 17
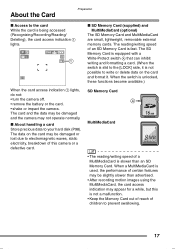
...The data on the card and format it is not possible to write or delete data on the card may appear for a while, but this camera or a defective card. About the Card Preparation ∫ Access to your hard disk (P98). SD Memory Card MultiMediaCard • The reading/...Card. When the switch is slower than advertised. • After recording motion images using the MultiMediaCard, the card access indication may be damaged and the camera may not operate normally. ∫ About handling a card Store precious data to the card While the card is not a malfunction. • Keep...
...The data on the card and format it is not possible to write or delete data on the card may appear for a while, but this camera or a defective card. About the Card Preparation ∫ Access to your hard disk (P98). SD Memory Card MultiMediaCard • The reading/...Card. When the switch is slower than advertised. • After recording motion images using the MultiMediaCard, the card access indication may be damaged and the camera may not operate normally. ∫ About handling a card Store precious data to the card While the card is not a malfunction. • Keep...
Digital Still Camera
Page 19
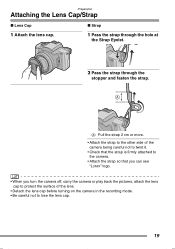
... careful not to twist it. • Check that the strap is firmly attached to the camera. • Attach the strap so that you can see "LUMIX" logo. • When you turn the camera off, carry the camera or play back the pictures, attach the lens cap to protect the surface of the lens.... • Detach the lens cap before turning on the camera in the recording mode. • Be careful not to lose the lens cap. 19 Preparation Attaching the Lens Cap/Strap ∫ Lens Cap ∫ Strap 1 ...
... careful not to twist it. • Check that the strap is firmly attached to the camera. • Attach the strap so that you can see "LUMIX" logo. • When you turn the camera off, carry the camera or play back the pictures, attach the lens cap to protect the surface of the lens.... • Detach the lens cap before turning on the camera in the recording mode. • Be careful not to lose the lens cap. 19 Preparation Attaching the Lens Cap/Strap ∫ Lens Cap ∫ Strap 1 ...
Digital Still Camera
Page 20
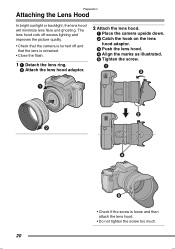
... and that the lens is retracted. • Close the flash. 1 1 Detach the lens ring. 2 Attach the lens hood adaptor. 2 Attach the lens hood. 1 Place the camera upside down. 2 Catch the hook on the lens hood adaptor. 3 Push the lens hood. 4 Align the marks as illustrated. 5 Tighten the screw. 1 3 2 4 5 • Check if...
... and that the lens is retracted. • Close the flash. 1 1 Detach the lens ring. 2 Attach the lens hood adaptor. 2 Attach the lens hood. 1 Place the camera upside down. 2 Catch the hook on the lens hood adaptor. 3 Push the lens hood. 4 Align the marks as illustrated. 5 Tighten the screw. 1 3 2 4 5 • Check if...
Digital Still Camera
Page 21
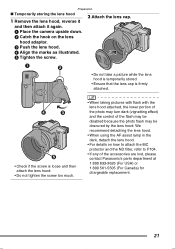
Preparation ∫ Temporarily storing the lens hood 2 Attach the lens cap. 1 Remove the lens hood, reverse it and then attach it again. 1 Place the camera upside down. 2 Catch the hook on how to attach the MC protector and the ND filter, refer to P104. • If any of the flash ... the lens hood attached, the lower portion of the photo may turn dark (vignetting effect) and the control of the accessories are lost, please contact Panasonic's parts department at 1 800 833-9626 (For USA) or 1 800 561-5505 (For Canada) for chargeable replacement. 21
Preparation ∫ Temporarily storing the lens hood 2 Attach the lens cap. 1 Remove the lens hood, reverse it and then attach it again. 1 Place the camera upside down. 2 Catch the hook on how to attach the MC protector and the ND filter, refer to P104. • If any of the flash ... the lens hood attached, the lower portion of the photo may turn dark (vignetting effect) and the control of the accessories are lost, please contact Panasonic's parts department at 1 800 833-9626 (For USA) or 1 800 561-5505 (For Canada) for chargeable replacement. 21
Digital Still Camera
Page 22
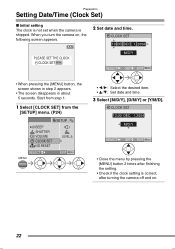
...M/D/Y SELECT SET EXIT MENU • Close the menu by pressing the [MENU] button 2 times after turning the camera off and on , the following screen appears. 2 Set date and time. When you turn the camera on . 22 Start from step 1. 1 Select [CLOCK SET] from the [SETUP] menu. (P24) BEEP ... 3/4: Set date and time. 3 Select [M/D/Y], [D/M/Y] or [Y/M/D]. Preparation Setting Date/Time (Clock Set) ∫ Initial setting The clock is not set when the camera is correct, after finishing the setting. • Check if the clock setting is shipped. CLOCK SET 10 : 00 DEC.11 . 2004 PLEASE SET THE CLOCK...
...M/D/Y SELECT SET EXIT MENU • Close the menu by pressing the [MENU] button 2 times after turning the camera off and on , the following screen appears. 2 Set date and time. When you turn the camera on . 22 Start from step 1. 1 Select [CLOCK SET] from the [SETUP] menu. (P24) BEEP ... 3/4: Set date and time. 3 Select [M/D/Y], [D/M/Y] or [Y/M/D]. Preparation Setting Date/Time (Clock Set) ∫ Initial setting The clock is not set when the camera is correct, after finishing the setting. • Check if the clock setting is shipped. CLOCK SET 10 : 00 DEC.11 . 2004 PLEASE SET THE CLOCK...
Digital Still Camera
Page 23
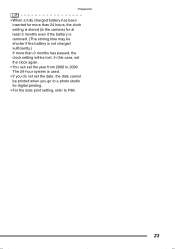
... more than 24 hours, the clock setting is stored (in the camera) for at least 3 months even if the battery is removed. (The storing time may be shorter if the battery is used. • If you go to a photo studio for digital printing. • For the date print setting, refer to 2099...
... more than 24 hours, the clock setting is stored (in the camera) for at least 3 months even if the battery is removed. (The storing time may be shorter if the battery is used. • If you go to a photo studio for digital printing. • For the date print setting, refer to 2099...
Digital Still Camera
Page 24
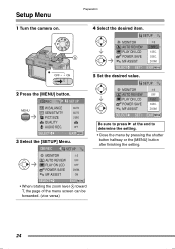
... 5 Set the desired value. REC SETUP 1/4 MONITOR AUTO REVIEW PLAY ON LCD POWER SAVE MF ASSIST n0 OFF OFF 2 MIN. Setup Menu Preparation 1 Turn the camera on.
... 5 Set the desired value. REC SETUP 1/4 MONITOR AUTO REVIEW PLAY ON LCD POWER SAVE MF ASSIST n0 OFF OFF 2 MIN. Setup Menu Preparation 1 Turn the camera on.
Digital Still Camera
Page 25
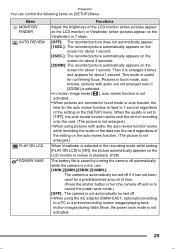
...second. optional)/connecting to a PC or a printer/recording motion images/playing back motion images/during Slide Show, the power save mode.) [OFF]: The camera is not automatically turned off. • When using pictures with audio are not enlarged even if [ZOOM] is selected. • In motion image ...(when pictures appear on the LCD monitor) or Viewfinder (when pictures appear on the Viewfinder) in use. [1MIN.]/[2MIN.]/[5MIN.]/[10MIN.]: The camera is automatically turned off if it is enlarged 4 times and appears for confirming focus. This mode is useful for about 3 seconds. [ZOOM...
...second. optional)/connecting to a PC or a printer/recording motion images/playing back motion images/during Slide Show, the power save mode.) [OFF]: The camera is not automatically turned off. • When using pictures with audio are not enlarged even if [ZOOM] is selected. • In motion image ...(when pictures appear on the LCD monitor) or Viewfinder (when pictures appear on the Viewfinder) in use. [1MIN.]/[2MIN.]/[5MIN.]/[10MIN.]: The camera is automatically turned off if it is enlarged 4 times and appears for confirming focus. This mode is useful for about 3 seconds. [ZOOM...


