
DMCFZ40 User Guide
Page 1
DMC-FZ40 Before connecting, operating or adjusting this product, please read the instructions completely. VQT2Y96 Operating Instructions for advanced features Digital Camera Model No.
DMC-FZ40 Before connecting, operating or adjusting this product, please read the instructions completely. VQT2Y96 Operating Instructions for advanced features Digital Camera Model No.
DMCFZ40 User Guide
Page 2
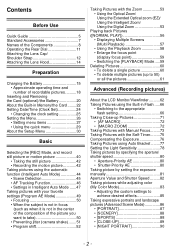
...center of the composition of the picture you want to take 50 • Preventing jitter (camera shake) .......51 • Program shift 52 Taking Pictures with the Zoom 53 • ...the Optical Zoom/ Using the Extended Optical zoom (EZ)/ Using the Intelligent Zoom/ Using the Digital Zoom 53 Playing back Pictures ([NORMAL PLAY 56 • Displaying Multiple Screens (Multi Playback 57... picture 60 • To delete multiple pictures (up to 50) or all the pictures 61 Advanced (Recording pictures) About the LCD Monitor/Viewfinder ..........62 Taking Pictures using the Built-in Flash .....66...
...center of the composition of the picture you want to take 50 • Preventing jitter (camera shake) .......51 • Program shift 52 Taking Pictures with the Zoom 53 • ...the Optical Zoom/ Using the Extended Optical zoom (EZ)/ Using the Intelligent Zoom/ Using the Digital Zoom 53 Playing back Pictures ([NORMAL PLAY 56 • Displaying Multiple Screens (Multi Playback 57... picture 60 • To delete multiple pictures (up to 50) or all the pictures 61 Advanced (Recording pictures) About the LCD Monitor/Viewfinder ..........62 Taking Pictures using the Built-in Flash .....66...
DMCFZ40 User Guide
Page 5
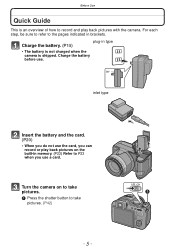
Turn the camera on to take pictures. (P42) - 5 - Before Use Before Use Quick Guide This is shipped. For each step, be sure to refer to the pages indicated ... Insert the battery and the card. (P20) • When you can record or play back pictures with the camera. Charge the battery. (P15) plug-in type • The battery is not charged when the camera is an overview of how to take pictures. 1 Press the shutter button to record and play...
Turn the camera on to take pictures. (P42) - 5 - Before Use Before Use Quick Guide This is shipped. For each step, be sure to refer to the pages indicated ... Insert the battery and the card. (P20) • When you can record or play back pictures with the camera. Charge the battery. (P15) plug-in type • The battery is not charged when the camera is an overview of how to take pictures. 1 Press the shutter button to record and play...
DMCFZ40 User Guide
Page 7
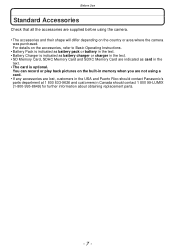
... indicated as battery charger or charger in the text. • SD Memory Card, SDHC Memory Card and SDXC Memory Card are supplied before using the camera. • The accessories and their shape will differ depending on the built-in memory when you are not using a card. • If any accessories are... lost, customers in the USA and Puerto Rico should contact Panasonic's parts department at 1 800 833-9626 and customers in the text. • The card is optional. You can record or play back pictures on the...
... indicated as battery charger or charger in the text. • SD Memory Card, SDHC Memory Card and SDXC Memory Card are supplied before using the camera. • The accessories and their shape will differ depending on the built-in memory when you are not using a card. • If any accessories are... lost, customers in the USA and Puerto Rico should contact Panasonic's parts department at 1 800 833-9626 and customers in the text. • The card is optional. You can record or play back pictures on the...
DMCFZ40 User Guide
Page 9
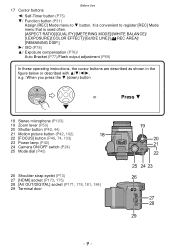
... Zoom lever (P53) 20 Shutter button (P42, 44) 21 Motion picture button (P42, 102) 22 [FOCUS] button (P46, 74, 133) 23 Power lamp (P40) 24 Camera ON/OFF switch (P24) 25 Mode dial (P40) CUST M 26 Shoulder strap eyelet (P13) 27 [HDMI] socket (P173, 175) 28 [AV OUT.../DIGITAL] socket (P171, 178, 181, 184) 29 Terminal door AV OUT/DIGITAL - 9 - Before Use 17 Cursor buttons 2/ Self-Timer button (P75) 4/ Function button (P31) Assign [REC] Mode menu to register [REC] Mode...
... Zoom lever (P53) 20 Shutter button (P42, 44) 21 Motion picture button (P42, 102) 22 [FOCUS] button (P46, 74, 133) 23 Power lamp (P40) 24 Camera ON/OFF switch (P24) 25 Mode dial (P40) CUST M 26 Shoulder strap eyelet (P13) 27 [HDMI] socket (P173, 175) 28 [AV OUT.../DIGITAL] socket (P171, 178, 181, 184) 29 Terminal door AV OUT/DIGITAL - 9 - Before Use 17 Cursor buttons 2/ Self-Timer button (P75) 4/ Function button (P31) Assign [REC] Mode menu to register [REC] Mode...
DMCFZ40 User Guide
Page 10
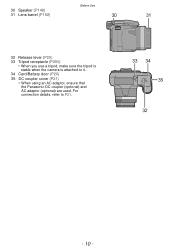
30 Speaker (P148) 31 Lens barrel (P192) Before Use 32 Release lever (P20) 33 Tripod receptacle (P200) • When you use a tripod, make sure the tripod is stable when the camera is attached to P21. - 10 - For connection details, refer to it. 34 Card/Battery door (P20) 35 DC coupler cover (P21) • When using an AC adaptor, ensure that the Panasonic DC coupler (optional) and AC adaptor (optional) are used.
30 Speaker (P148) 31 Lens barrel (P192) Before Use 32 Release lever (P20) 33 Tripod receptacle (P200) • When you use a tripod, make sure the tripod is stable when the camera is attached to P21. - 10 - For connection details, refer to it. 34 Card/Battery door (P20) 35 DC coupler cover (P21) • When using an AC adaptor, ensure that the Panasonic DC coupler (optional) and AC adaptor (optional) are used.
DMCFZ40 User Guide
Page 12
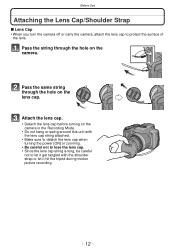
Pass the string through the hole on the lens cap. Pass the same string through the hole on the camera in the Recording Mode. • Do not hang or swing around this unit with the lens cap string attached. • Make sure to detach the ... the lens. Attach the lens cap. • Detach the lens cap before turning on the camera. Before Use Attaching the Lens Cap/Shoulder Strap ∫ Lens Cap • When you turn the camera off or carry the camera, attach the lens cap to let it get tangled with the shoulder strap or let...
Pass the string through the hole on the lens cap. Pass the same string through the hole on the camera in the Recording Mode. • Do not hang or swing around this unit with the lens cap string attached. • Make sure to detach the ... the lens. Attach the lens cap. • Detach the lens cap before turning on the camera. Before Use Attaching the Lens Cap/Shoulder Strap ∫ Lens Cap • When you turn the camera off or carry the camera, attach the lens cap to let it get tangled with the shoulder strap or let...
DMCFZ40 User Guide
Page 13
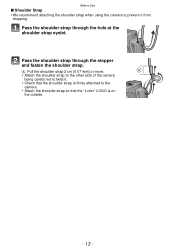
Pass the shoulder strap through the stopper and fasten the shoulder strap. Pass the shoulder strap through the hole at the shoulder strap eyelet. A Pull the shoulder strap 2 cm (0.07 feet) or more. • Attach the shoulder strap to the other side of the camera being careful not to twist it. • Check that the "LUMIX" LOGO is on the outside. - 13 - Before Use ∫ Shoulder Strap • We recommend attaching the shoulder strap when using the camera to the camera. • Attach the shoulder strap so that the shoulder strap is firmly attached to prevent it from dropping.
Pass the shoulder strap through the stopper and fasten the shoulder strap. Pass the shoulder strap through the hole at the shoulder strap eyelet. A Pull the shoulder strap 2 cm (0.07 feet) or more. • Attach the shoulder strap to the other side of the camera being careful not to twist it. • Check that the "LUMIX" LOGO is on the outside. - 13 - Before Use ∫ Shoulder Strap • We recommend attaching the shoulder strap when using the camera to the camera. • Attach the shoulder strap so that the shoulder strap is firmly attached to prevent it from dropping.
DMCFZ40 User Guide
Page 14
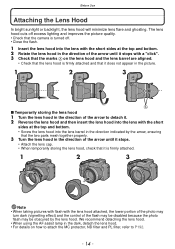
The lens hood cuts off excess lighting and improves the picture quality. • Check that the camera is turned off. • Close the flash. 1 Insert the lens hood into the lens with the short sides at the top and bottom. 2 Rotate the ...
The lens hood cuts off excess lighting and improves the picture quality. • Check that the camera is turned off. • Close the flash. 1 Insert the lens hood into the lens with the short sides at the top and bottom. 2 Rotate the ...
DMCFZ40 User Guide
Page 15
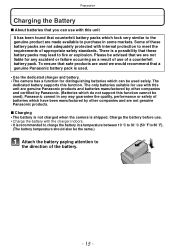
... battery supports this unit It has been found that counterfeit battery packs which have been manufactured by other companies and certified by Panasonic. (Batteries which do not support this function cannot be the same.) Attach the battery paying attention to the direction of batteries... - 15 - To ensure that safe products are used we are not genuine Panasonic products. ∫ Charging • The battery is not charged when the camera is used. • Use the dedicated charger and battery. • The camera has a function for use . • Charge the battery with the charger...
... battery supports this unit It has been found that counterfeit battery packs which have been manufactured by other companies and certified by Panasonic. (Batteries which do not support this function cannot be the same.) Attach the battery paying attention to the direction of batteries... - 15 - To ensure that safe products are used we are not genuine Panasonic products. ∫ Charging • The battery is not charged when the camera is used. • Use the dedicated charger and battery. • The camera has a function for use . • Charge the battery with the charger...
DMCFZ40 User Guide
Page 17
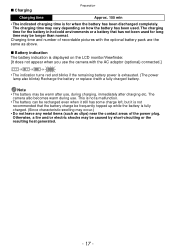
...plug. Otherwise, a fire and/or electric shocks may vary depending on the LCD monitor/Viewfinder. [It does not appear when you use the camera with a fully charged battery. The charging time for the battery in hot/cold environments or a battery that the battery charge be caused by ...short-circuiting or the resulting heat generated. - 17 - The camera also becomes warm during charging, immediately after use, during use. The charging time may be frequently topped up while the battery is fully charged. ...
...plug. Otherwise, a fire and/or electric shocks may vary depending on the LCD monitor/Viewfinder. [It does not appear when you use the camera with a fully charged battery. The charging time for the battery in hot/cold environments or a battery that the battery charge be caused by ...short-circuiting or the resulting heat generated. - 17 - The camera also becomes warm during charging, immediately after use, during use. The charging time may be frequently topped up while the battery is fully charged. ...
DMCFZ40 User Guide
Page 18
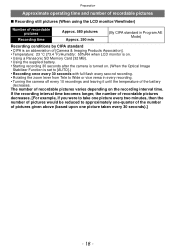
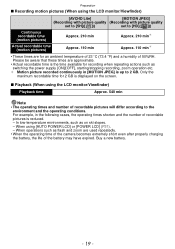
... AE Mode) Recording conditions by CIPA standard • CIPA is an abbreviation of [Camera & Imaging Products Association]. • Temperature: 23 oC (73.4 oF)/Humidity: 50%RH when LCD monitor is on. • Using a Panasonic SD Memory Card (32 MB). • Using the supplied battery. • Starting... recording 30 seconds after the camera is turned on the recording interval time. If the recording interval time becomes longer, the number ...
... AE Mode) Recording conditions by CIPA standard • CIPA is an abbreviation of [Camera & Imaging Products Association]. • Temperature: 23 oC (73.4 oF)/Humidity: 50%RH when LCD monitor is on. • Using a Panasonic SD Memory Card (32 MB). • Using the supplied battery. • Starting... recording 30 seconds after the camera is turned on the recording interval time. If the recording interval time becomes longer, the number ...
DMCFZ40 User Guide
Page 19
...; Actual recordable time (motion pictures) Approx. 110 min Approx. 110 min¢ • These times are used repeatedly. • When the operating time of the camera becomes extremely short even after properly charging the battery, the life of the battery may have expired.
...; Actual recordable time (motion pictures) Approx. 110 min Approx. 110 min¢ • These times are used repeatedly. • When the operating time of the camera becomes extremely short even after properly charging the battery, the life of the battery may have expired.

DMCFZ40 User Guide
Page 21
... is retracted. • Connect the AC cable to the AC adaptor and the camera. Also, please keep the DC coupler cover closed. • Also read the operating instructions for the camera. Note • Always use a genuine Panasonic AC adaptor (optional). • When using an AC adaptor, use the AC ...recommend you use a battery with the AC adaptor. • If the AC adaptor and DC coupler are not necessary, then remove them from the digital camera. Preparation Note • Remove the battery after use. • Do not remove the battery while the power is on as shown in the illustration...
... is retracted. • Connect the AC cable to the AC adaptor and the camera. Also, please keep the DC coupler cover closed. • Also read the operating instructions for the camera. Note • Always use a genuine Panasonic AC adaptor (optional). • When using an AC adaptor, use the AC ...recommend you use a battery with the AC adaptor. • If the AC adaptor and DC coupler are not necessary, then remove them from the digital camera. Preparation Note • Remove the battery after use. • Do not remove the battery while the power is on as shown in the illustration...
DMCFZ40 User Guide
Page 23
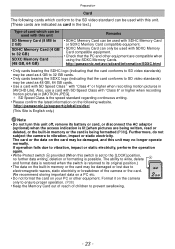
...this switch is set to electromagnetic waves, static electricity or breakdown of the camera or the card. We recommend storing important data on a PC etc. • Do not format the card on... the camera only to ensure proper operation. (P38) • Keep the Memory Card out of reach of ...162; SD Speed Class is possible. Format it on your PC or other equipment are being formatted (P38)]. http://panasonic.net/avc/sdcard/information/SDXC.html • Only cards bearing the SDHC logo (indicating that the PC and other...
...this switch is set to electromagnetic waves, static electricity or breakdown of the camera or the card. We recommend storing important data on a PC etc. • Do not format the card on... the camera only to ensure proper operation. (P38) • Keep the Memory Card out of reach of ...162; SD Speed Class is possible. Format it on your PC or other equipment are being formatted (P38)]. http://panasonic.net/avc/sdcard/information/SDXC.html • Only cards bearing the SDHC logo (indicating that the PC and other...
DMCFZ40 User Guide
Page 24
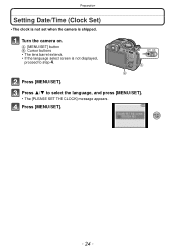
A [MENU/SET] button B Cursor buttons • The lens barrel extends. • If the language select screen is shipped. Press [MENU/SET]. - 24 - Press [MENU/SET]. Turn the camera on. Preparation Setting Date/Time (Clock Set) • The clock is not set when the camera is not displayed, proceed to select the language, and press [MENU/SET]. • The [PLEASE SET THE CLOCK] message appears. Press 3/4 to step 4.
A [MENU/SET] button B Cursor buttons • The lens barrel extends. • If the language select screen is shipped. Press [MENU/SET]. - 24 - Press [MENU/SET]. Turn the camera on. Preparation Setting Date/Time (Clock Set) • The clock is not set when the camera is not displayed, proceed to select the language, and press [MENU/SET]. • The [PLEASE SET THE CLOCK] message appears. Press 3/4 to step 4.
DMCFZ40 User Guide
Page 25
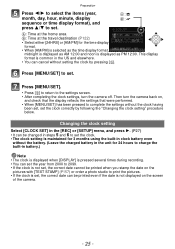
Press [MENU/SET] to set , the correct date can be printed even if the date is not displayed on the screen of the camera. - 25 - Changing the clock setting Select [CLOCK SET] in the [REC] or [SETUP] menu, and press 1. (P27) ...set . Press [MENU/SET]. • Press [,] to return to the settings screen. • After completing the clock settings, turn the camera back on the pictures with [TEXT STAMP] (P157) or order a photo studio to print the pictures. • If the clock is ... the charged battery in clock battery even without the clock having been set, set . Then turn the camera off.
Press [MENU/SET] to set , the correct date can be printed even if the date is not displayed on the screen of the camera. - 25 - Changing the clock setting Select [CLOCK SET] in the [REC] or [SETUP] menu, and press 1. (P27) ...set . Press [MENU/SET]. • Press [,] to return to the settings screen. • After completing the clock settings, turn the camera back on the pictures with [TEXT STAMP] (P157) or order a photo studio to print the pictures. • If the clock is ... the charged battery in clock battery even without the clock having been set, set . Then turn the camera off.
DMCFZ40 User Guide
Page 26
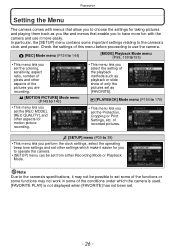
... [MOTION PICTURE] Mode menu (P145 to 146) • This menu lets you set the [REC MODE], [REC QUALITY], and other settings which the camera is used. [FAVORITE PLAY] is not displayed when [FAVORITE] has not been set from either Recording Mode or Playback Mode. In particular, the [SETUP] ...menu contains some of the functions or some functions may not be set . - 26 - Preparation Setting the Menu The camera comes with the camera and use the camera. ! [REC] Mode menu (P124 to 144) [MODE] Playback Mode menu (P59, 150 to153) • This menu lets you set ...
... [MOTION PICTURE] Mode menu (P145 to 146) • This menu lets you set the [REC MODE], [REC QUALITY], and other settings which the camera is used. [FAVORITE PLAY] is not displayed when [FAVORITE] has not been set from either Recording Mode or Playback Mode. In particular, the [SETUP] ...menu contains some of the functions or some functions may not be set . - 26 - Preparation Setting the Menu The camera comes with the camera and use the camera. ! [REC] Mode menu (P124 to 144) [MODE] Playback Mode menu (P59, 150 to153) • This menu lets you set ...
DMCFZ40 User Guide
Page 27
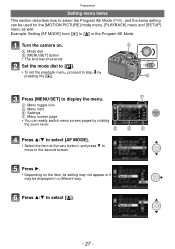
... 1. • Depending on . C Menu toggle icon D Menu item E Settings F Menu screen page • You can be displayed in the Program AE Mode CUST M Turn the camera on the item, its setting may not appear or it may be used for the [MOTION PICTURE] mode menu, [PLAYBACK] menu and [SETUP] menu as...
... 1. • Depending on . C Menu toggle icon D Menu item E Settings F Menu screen page • You can be displayed in the Program AE Mode CUST M Turn the camera on the item, its setting may not appear or it may be used for the [MOTION PICTURE] mode menu, [PLAYBACK] menu and [SETUP] menu as...
DMCFZ40 User Guide
Page 30
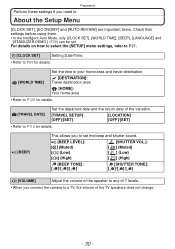
...) [SHUTTER VOL.]: [ ] (Muted) [ ] (Low) [ ] (High) [BEEP TONE]: [ 1 ]/[ 2 ]/[ 3 ] [SHUTTER TONE]: [ 1 ]/[ 2 ]/[ 3 ] u [VOLUME] Adjust the volume of the speaker to any of 7 levels. • When you connect the camera to a TV, the volume of the vacation. [TRAVEL SETUP] [OFF]/[SET] [LOCATION] [OFF]/[SET] • Refer to P119 for details. About the Setup Menu [CLOCK...
...) [SHUTTER VOL.]: [ ] (Muted) [ ] (Low) [ ] (High) [BEEP TONE]: [ 1 ]/[ 2 ]/[ 3 ] [SHUTTER TONE]: [ 1 ]/[ 2 ]/[ 3 ] u [VOLUME] Adjust the volume of the speaker to any of 7 levels. • When you connect the camera to a TV, the volume of the vacation. [TRAVEL SETUP] [OFF]/[SET] [LOCATION] [OFF]/[SET] • Refer to P119 for details. About the Setup Menu [CLOCK...


