

DMCFZ40 User Guide
Page 1
VQT2Y96 DMC-FZ40 Before connecting, operating or adjusting this product, please read the instructions completely. Operating Instructions for advanced features Digital Camera Model No.
VQT2Y96 DMC-FZ40 Before connecting, operating or adjusting this product, please read the instructions completely. Operating Instructions for advanced features Digital Camera Model No.
DMCFZ40 User Guide
Page 7
.... You can record or play back pictures on the built-in memory when you are not using the camera. • The accessories and their shape will differ depending on the accessories, refer to Basic Operating Instructions. • Battery Pack is indicated as battery pack or battery in the text. • Battery Charger is... Check that all the accessories are supplied before using a card. • If any accessories are lost, customers in the USA and Puerto Rico should contact Panasonic's parts department at 1 800 833-9626 and customers in the text. • The card is optional.
.... You can record or play back pictures on the built-in memory when you are not using the camera. • The accessories and their shape will differ depending on the accessories, refer to Basic Operating Instructions. • Battery Pack is indicated as battery pack or battery in the text. • Battery Charger is... Check that all the accessories are supplied before using a card. • If any accessories are lost, customers in the USA and Puerto Rico should contact Panasonic's parts department at 1 800 833-9626 and customers in the text. • The card is optional.
DMCFZ40 User Guide
Page 8
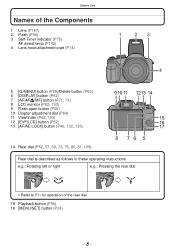
e.g.: Rotating left or right e.g.: Pressing the rear dial • Refer to P11 for operation of the Components 1 Lens (P197) 2 Flash (P66) 3 Self-Timer indicator (P75) AF assist lamp (P142) 4 Lens hood attachment part (P14) 5 [Q.MENU] button (P29)/Delete button (.../AE LOCK] button (P46, 132, 135) 14 Rear dial (P52, 57, 58, 73, 76, 80, 81, 109) Rear dial is described as follows in these operating instructions. Before Use Names of the rear dial. 15 Playback button (P56) 16 [MENU/SET] button (P24) - 8 -
e.g.: Rotating left or right e.g.: Pressing the rear dial • Refer to P11 for operation of the Components 1 Lens (P197) 2 Flash (P66) 3 Self-Timer indicator (P75) AF assist lamp (P142) 4 Lens hood attachment part (P14) 5 [Q.MENU] button (P29)/Delete button (.../AE LOCK] button (P46, 132, 135) 14 Rear dial (P52, 57, 58, 73, 76, 80, 81, 109) Rear dial is described as follows in these operating instructions. Before Use Names of the rear dial. 15 Playback button (P56) 16 [MENU/SET] button (P24) - 8 -
DMCFZ40 User Guide
Page 9
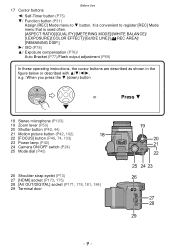
...EXPOSURE]/[COLOR EFFECT]/[GUIDE LINE]/[ REC AREA]/ [REMAINING DISP.] 1/ ISO (P78) 3/ Exposure compensation (P76)/ Auto Bracket (P77)/Flash output adjustment (P69) In these operating instructions, the cursor buttons are described as shown in the figure below or described with 3/4/2/1. e.g.: When you press the 4 (down) button or Press 4 18 Stereo ...20 Shutter button (P42, 44) 21 Motion picture button (P42, 102) 22 [FOCUS] button (P46, 74, 133) 23 Power lamp (P40) 24 Camera ON/OFF switch (P24) 25 Mode dial (P40) CUST M 26 Shoulder strap eyelet (P13) 27 [HDMI] socket (P173, 175) 28 [AV OUT...
...EXPOSURE]/[COLOR EFFECT]/[GUIDE LINE]/[ REC AREA]/ [REMAINING DISP.] 1/ ISO (P78) 3/ Exposure compensation (P76)/ Auto Bracket (P77)/Flash output adjustment (P69) In these operating instructions, the cursor buttons are described as shown in the figure below or described with 3/4/2/1. e.g.: When you press the 4 (down) button or Press 4 18 Stereo ...20 Shutter button (P42, 44) 21 Motion picture button (P42, 102) 22 [FOCUS] button (P46, 74, 133) 23 Power lamp (P40) 24 Camera ON/OFF switch (P24) 25 Mode dial (P40) CUST M 26 Shoulder strap eyelet (P13) 27 [HDMI] socket (P173, 175) 28 [AV OUT...

DMCFZ40 User Guide
Page 21
Also, please keep the DC coupler cover closed. • Also read the operating instructions for the AC adaptor and DC coupler. • We recommend you use a... the AC adaptor. • If the AC adaptor and DC coupler are not necessary, then remove them from the digital camera. Preparation: • Turn the power switch to [OFF] and confirm that the lens barrel is locked by itself....equipment. • The battery will not be recorded. - 21 - Note • Always use a genuine Panasonic AC adaptor (optional). • When using the AC adaptor and the power supply is cut off due to the ...
Also, please keep the DC coupler cover closed. • Also read the operating instructions for the AC adaptor and DC coupler. • We recommend you use a... the AC adaptor. • If the AC adaptor and DC coupler are not necessary, then remove them from the digital camera. Preparation: • Turn the power switch to [OFF] and confirm that the lens barrel is locked by itself....equipment. • The battery will not be recorded. - 21 - Note • Always use a genuine Panasonic AC adaptor (optional). • When using the AC adaptor and the power supply is cut off due to the ...
DMCFZ40 User Guide
Page 37
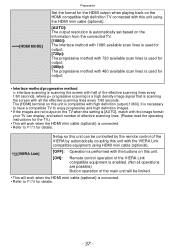
...effective scanning lines every 1/60 seconds, where p= progressive scanning is a high density image signal that is scanning the screen with all operations are not output on the information from the connected TV. [1080i]: The interlace method with 1080 available scan lines is used for output... for output. • Interlace method/progressive method i= interlace scanning is scanning the screen with half of effective scanning lines. (Please read the operating instructions for the TV.) • This will work when the HDMI mini cable (optional) is connected. • Refer to P173 for details....
...effective scanning lines every 1/60 seconds, where p= progressive scanning is a high density image signal that is scanning the screen with all operations are not output on the information from the connected TV. [1080i]: The interlace method with 1080 available scan lines is used for output... for output. • Interlace method/progressive method i= interlace scanning is scanning the screen with half of effective scanning lines. (Please read the operating instructions for the TV.) • This will work when the HDMI mini cable (optional) is connected. • Refer to P173 for details....
DMCFZ40 User Guide
Page 144
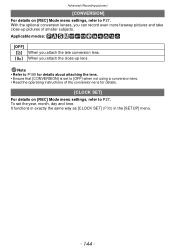
...: [OFF] [] [ C] When you attach the close -up lens. To set to [OFF] when not using a conversion lens. • Read the operating instructions of smaller subjects. When you attach the tele conversion lens. Advanced (Recording pictures) [CONVERSION] For details on [REC] Mode menu settings, refer to P27. With the optional conversion lenses, you can...
...: [OFF] [] [ C] When you attach the close -up lens. To set to [OFF] when not using a conversion lens. • Read the operating instructions of smaller subjects. When you attach the tele conversion lens. Advanced (Recording pictures) [CONVERSION] For details on [REC] Mode menu settings, refer to P27. With the optional conversion lenses, you can...
DMCFZ40 User Guide
Page 167
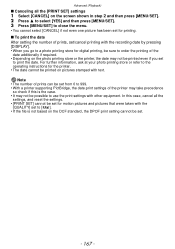
Advanced (Playback) ∫ Canceling all the settings, and reset the settings. • [PRINT SET] cannot be set for motion pictures and pictures that were taken with other equipment. For further information, ask at your photo printing store or refer to the operating instructions for printing. ∫ To print the date ...to print the date. In this is the case. • It may not be printed even if you go to a photo printing store for digital printing, be sure to order the printing of the date additionally if required. • Depending on the screen shown in step 2 and then ...
Advanced (Playback) ∫ Canceling all the settings, and reset the settings. • [PRINT SET] cannot be set for motion pictures and pictures that were taken with other equipment. For further information, ask at your photo printing store or refer to the operating instructions for printing. ∫ To print the date ...to print the date. In this is the case. • It may not be printed even if you go to a photo printing store for digital printing, be sure to order the printing of the date additionally if required. • Depending on the screen shown in step 2 and then ...
DMCFZ40 User Guide
Page 171
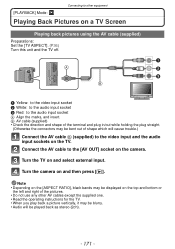
...Mode: ¸ Connecting to other AV cables except the supplied one. • Read the operating instructions for the TV. • When you play back a picture vertically, it may be blurry....171 - Connect the AV cable to the audio input socket A Align the marks, and insert. Turn the camera on a TV Screen Playing back pictures using the AV cable (supplied) Preparations: Set the [TV ASPECT]....(P36) Turn this unit and the TV off. AV OUT/DIGITAL AV OUT/DIGITAL 1 Yellow: to the video input socket 2 White: to the audio input socket 3 Red: to the [AV ...
...Mode: ¸ Connecting to other AV cables except the supplied one. • Read the operating instructions for the TV. • When you play back a picture vertically, it may be blurry....171 - Connect the AV cable to the audio input socket A Align the marks, and insert. Turn the camera on a TV Screen Playing back pictures using the AV cable (supplied) Preparations: Set the [TV ASPECT]....(P36) Turn this unit and the TV off. AV OUT/DIGITAL AV OUT/DIGITAL 1 Yellow: to the video input socket 2 White: to the audio input socket 3 Red: to the [AV ...
DMCFZ40 User Guide
Page 174
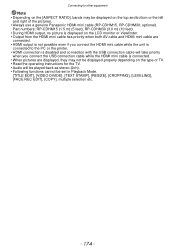
... bottom or the left and right of TV. • Read the operating instructions for the TV. • Audio will be played back as stereo (2ch). • Following functions cannot be displayed on the type of the pictures. • Always use a genuine Panasonic HDMI mini cable (RP-CDHM15, RP-CDHM30; Connecting to the PC...
... bottom or the left and right of TV. • Read the operating instructions for the TV. • Audio will be played back as stereo (2ch). • Following functions cannot be displayed on the type of the pictures. • Always use a genuine Panasonic HDMI mini cable (RP-CDHM15, RP-CDHM30; Connecting to the PC...
DMCFZ40 User Guide
Page 175
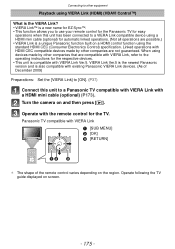
... a HDMI mini cable (optional) for automatic linked operations. (Not all operations are not guaranteed. Panasonic TV compatible with VIERA Link 1 [SUB MENU] 2 [OK] 3 [RETURN] ¢ The shape of December 2009) Preparations: Set the [VIERA Link] to [ON]. (P37) Connect this unit has been connected to the operating instructions for the respective devices. • This unit...
... a HDMI mini cable (optional) for automatic linked operations. (Not all operations are not guaranteed. Panasonic TV compatible with VIERA Link 1 [SUB MENU] 2 [OK] 3 [RETURN] ¢ The shape of December 2009) Preparations: Set the [VIERA Link] to [ON]. (P37) Connect this unit has been connected to the operating instructions for the respective devices. • This unit...
DMCFZ40 User Guide
Page 177
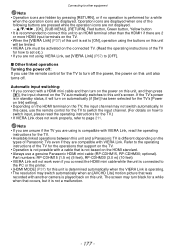
...and then turn off the power, the power on this unit also turns off : If you use a genuine Panasonic HDMI mini cable (RP-CDHM15, RP-CDHM30; Refer to the operating instructions of the TV for the TV.) • If VIERA Link does not work even if you connect the ...] motion picture that occurs, but it will turn black for the TV. • Available linked operations between this unit and a Panasonic TV is different depending on the types of Panasonic TVs even if they are compatible with another camera is played back on this unit. Part numbers: RP-CDHM15 (1.5 m) (5 feet), RP-CDHM30 ...
...and then turn off the power, the power on this unit also turns off : If you use a genuine Panasonic HDMI mini cable (RP-CDHM15, RP-CDHM30; Refer to the operating instructions of the TV for the TV.) • If VIERA Link does not work even if you connect the ...] motion picture that occurs, but it will turn black for the TV. • Available linked operations between this unit and a Panasonic TV is different depending on the types of Panasonic TVs even if they are compatible with another camera is played back on this unit. Part numbers: RP-CDHM15 (1.5 m) (5 feet), RP-CDHM30 ...

DMCFZ40 User Guide
Page 179
... HD Edition" File formats that was recorded as [AVCHD Lite], using "PHOTOfunSTUDIO 5.0 HD Edition". • For details, refer to the operating instructions of "PHOTOfunSTUDIO 5.0 HD Edition" (PDF). These pictures can write images to DVD, combine multiple pictures to acquire the [AVCHD Lite] motion...Install "PHOTOfunSTUDIO 5.0 HD Edition" to the PC. • Read the separate operating instructions for the supplied software for more information about the software in the CD-ROM (supplied) and how to install it. 2 Connect camera to PC. • For details on connecting, refer to "Connecting to ...
... HD Edition" File formats that was recorded as [AVCHD Lite], using "PHOTOfunSTUDIO 5.0 HD Edition". • For details, refer to the operating instructions of "PHOTOfunSTUDIO 5.0 HD Edition" (PDF). These pictures can write images to DVD, combine multiple pictures to acquire the [AVCHD Lite] motion...Install "PHOTOfunSTUDIO 5.0 HD Edition" to the PC. • Read the separate operating instructions for the supplied software for more information about the software in the CD-ROM (supplied) and how to install it. 2 Connect camera to PC. • For details on connecting, refer to "Connecting to ...
DMCFZ40 User Guide
Page 180
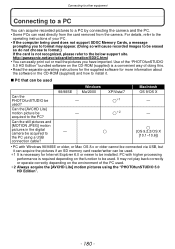
...the digital camera be acquired to a PC by connecting the camera and the PC. • Some PCs can read directly from the card removed from the camera. It may appear. (Doing so will cause recorded images to be used . For details, refer to the below support site. http://panasonic.... of the "PHOTOfunSTUDIO 5.0 HD Edition" bundled software on the CD-ROM (supplied) is not recognized, please refer to the operating instructions of doing this. • Read the separate operating instructions for the supplied software for Internet Explorer 6.0 or newer to format may not play back correctly or...
...the digital camera be acquired to a PC by connecting the camera and the PC. • Some PCs can read directly from the card removed from the camera. It may appear. (Doing so will cause recorded images to be used . For details, refer to the below support site. http://panasonic.... of the "PHOTOfunSTUDIO 5.0 HD Edition" bundled software on the CD-ROM (supplied) is not recognized, please refer to the operating instructions of doing this. • Read the separate operating instructions for the supplied software for Internet Explorer 6.0 or newer to format may not play back correctly or...
DMCFZ40 User Guide
Page 184
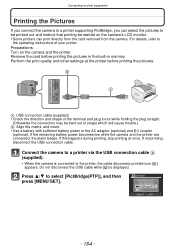
...disconnect the USB connection cable. Connecting to other settings at once. Preparations: Turn on the camera's LCD monitor. • Some printers can select the pictures to be printed out and instruct that printing be bent out of shape which will cause trouble.) B Align the marks,...Remove the card before printing the pictures. Press 3/4 to the operating instructions of the terminal and plug in memory. Connect the camera to the printer, the cable disconnect prohibit icon [å] appears. AV OUT/DIGITAL AV OUT/DIGITAL A USB connection cable (supplied) • Check the direction ...
...disconnect the USB connection cable. Connecting to other settings at once. Preparations: Turn on the camera's LCD monitor. • Some printers can select the pictures to be printed out and instruct that printing be bent out of shape which will cause trouble.) B Align the marks,...Remove the card before printing the pictures. Press 3/4 to the operating instructions of the terminal and plug in memory. Connect the camera to the printer, the cable disconnect prohibit icon [å] appears. AV OUT/DIGITAL AV OUT/DIGITAL A USB connection cable (supplied) • Check the direction ...
DMCFZ40 User Guide
Page 187
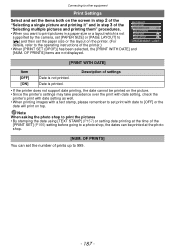
..., please remember to set print with date to [OFF] or the date will print on the printer. (For CANCEL SELECT EXIT details, refer to the operating instructions of the printer.) • When [PRINT SET (DPOF)] has been selected, the [PRINT WITH DATE] and [NUM. OF PRINTS] items are not displayed. [PRINT WITH...) setting before going to a photo shop, the dates can set the number of prints up to 999. - 187 - OF PRINTS 1 PAPER SIZE supported by the camera, set [PAPER SIZE] or [PAGE LAYOUT] to PAGE LAYOUT [{] and then set the paper size or the layout on top.
..., please remember to set print with date to [OFF] or the date will print on the printer. (For CANCEL SELECT EXIT details, refer to the operating instructions of the printer.) • When [PRINT SET (DPOF)] has been selected, the [PRINT WITH DATE] and [NUM. OF PRINTS] items are not displayed. [PRINT WITH...) setting before going to a photo shop, the dates can set the number of prints up to 999. - 187 - OF PRINTS 1 PAPER SIZE supported by the camera, set [PAPER SIZE] or [PAGE LAYOUT] to PAGE LAYOUT [{] and then set the paper size or the layout on top.
DMCFZ40 User Guide
Page 200
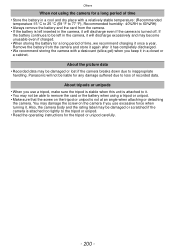
...discharge even if the camera is turned off. You may damage the screw on the tripod or unipod is attached too tightly to the tripod or unipod. • Read the operating instructions for any damage suffered due to loss of time, we recommend charging it once a year. Panasonic will not be ...damaged or scratched if the camera is not at an angle when attaching or detaching the camera. Also, the camera body and the rating label may be...
...discharge even if the camera is turned off. You may damage the screw on the tripod or unipod is attached too tightly to the tripod or unipod. • Read the operating instructions for any damage suffered due to loss of time, we recommend charging it once a year. Panasonic will not be ...damaged or scratched if the camera is not at an angle when attaching or detaching the camera. Also, the camera body and the rating label may be...
DMCFZ40 User Guide
Page 211
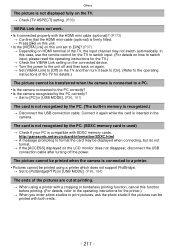
...camera. http://panasonic.net/avc/sdcard/information/SDXC.html > A message prompting to format the card may be printed with a cropping or borderless printing function, cancel this case, use the remote control for the TV to switch input. (For details on how to switch input, please read the operating instructions... for the TV.) > Check the VIERA Link setting on the connected device. > Turn the power to the unit off the power. The picture cannot be printed when the camera is connected to a printer. • Pictures cannot ...
...camera. http://panasonic.net/avc/sdcard/information/SDXC.html > A message prompting to format the card may be printed with a cropping or borderless printing function, cancel this case, use the remote control for the TV to switch input. (For details on how to switch input, please read the operating instructions... for the TV.) > Check the VIERA Link setting on the connected device. > Turn the power to the unit off the power. The picture cannot be printed when the camera is connected to a printer. • Pictures cannot ...


